Evaporative emission control system pressure sensor
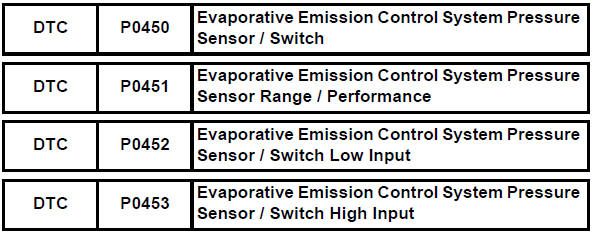
Dtc summary
Hint:
The canister pressure sensor is built into the canister pump module.
DescriptionThe description can be found in the evap (evaporative emission) system (see page es-335).
Monitor description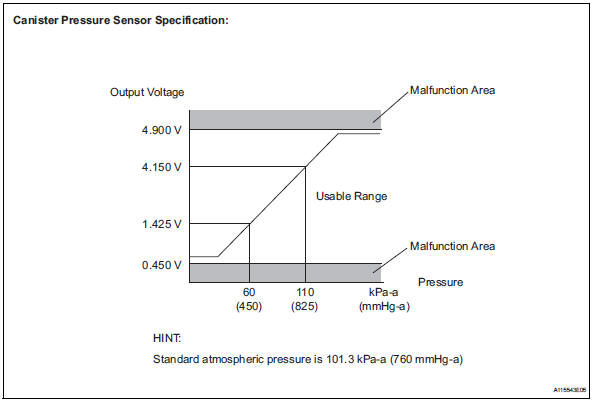
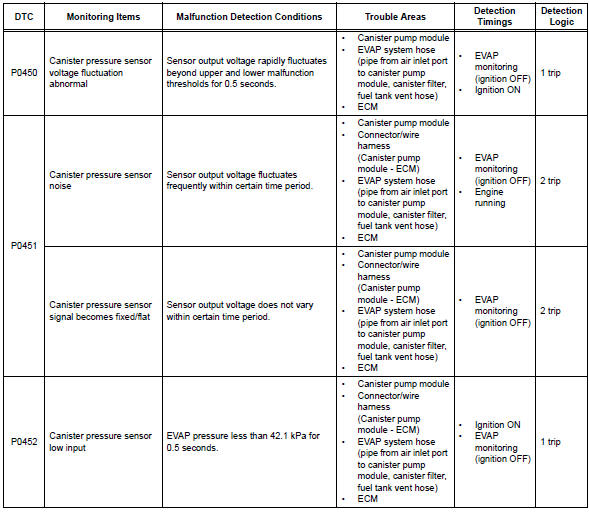
- Dtc p0450: canister pressure sensor abnormal fluctuation
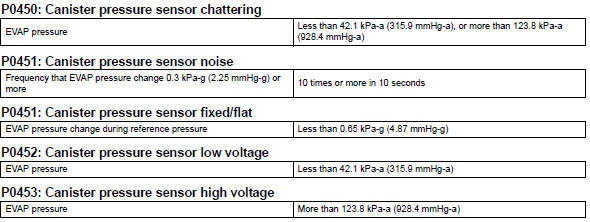
If the canister pressure sensor output [pressure] rapidly fluctuates between less than 42.1 Kpa-a (315.9 Mmhg-a) and more than 123.8 Kpa-a (928.4 Mmhg-a), the ecm interprets this as an open or short circuit malfunction in the canister pressure sensor or its circuit, and stops the evap (evaporative emission) system monitor. The ecm then illuminates the mil and sets the dtc (1 trip detection logic).
- Dtc p0451: canister pressure sensor noise or fixed/flat
If the canister pressure sensor voltage output fluctuates rapidly for 10 seconds, the ecm stops the evap system monitor. The ecm interprets this as noise from the canister pressure sensor, and stops the evap system monitor. The ecm then illuminates the mil and sets the dtc.
Alternatively, if the sensor voltage output does not change for 10 seconds, the ecm interprets this as the sensor being fixed/flat, and stops the monitor. The ecm then illuminates the mil and sets the dtc.
(Both the malfunctions are detected by 2 trip detection logic).
- Dtc p0452: canister pressure sensor voltage low
If the canister pressure sensor output [pressure] is below 42.1 Kpa-a (315.9 Mmhg-a), the ecm interprets this as an open or short circuit malfunction in the canister pressure sensor or its circuit, and stops the evap system monitor. The ecm then illuminates the mil and sets the dtc (1 trip detection logic).
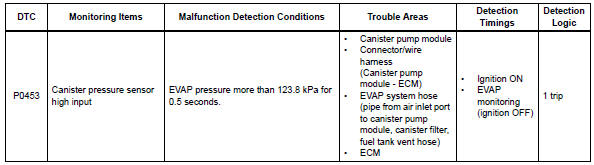
- Dtc p0453: canister pressure sensor voltage high
If the canister pressure sensor output [pressure] is 123.8 Kpa-a (928.4 Mmhg-a) or more, the ecm interprets this as an open or short circuit malfunction in the canister pressure sensor or its circuit, and stops the evap system monitor. The ecm then illuminates the mil and sets the dtc (1 trip detection logic).
Monitor strategy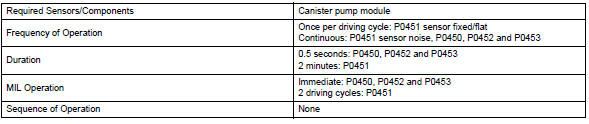
Typical enabling conditions
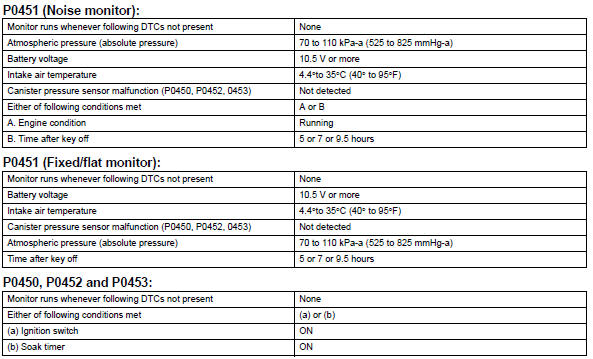
Typical malfunction thresholds
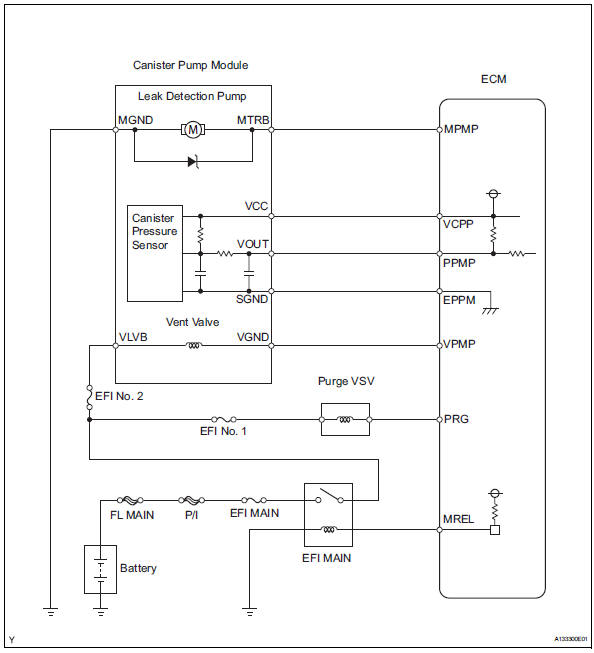
Wiring diagram
Inspection procedure Notice:
- When a vehicle is brought into the workshop, leave it as it is. Do not change the vehicle condition. For example, do not tighten the fuel cap.
- Do not disassemble the canister pump module.
- The intelligent tester is required to conduct the following diagnostic troubleshooting procedure.
- Confirm dtc and evap pressure
- Connect the intelligent tester to the dlc3.
- Turn the ignition switch on (do not start the engine).
- Turn the tester on.
- Select the following menu items: diagnosis / enhanced obd ii / dtc info / current codes.
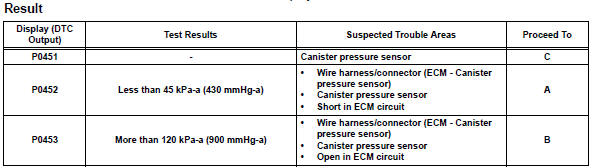
- Read dtcs.
- Select the following menu items: diagnosis / enhanced obd ii / data list / evap / evap vapor press.
- Read the evap (evaporative emission) pressure displayed on the tester.


- Check harness and connector (canister pump module - ecm)
- Turn the ignition switch off.
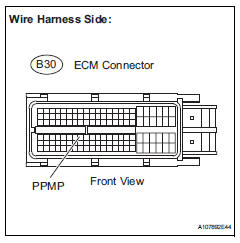
- Disconnect the b30 ecm connector.
- Measure the resistance between ppmp terminal of the ecm connector and the body ground.

- Reconnect the ecm connector.


- Check harness and connector (canister pump module - ecm)
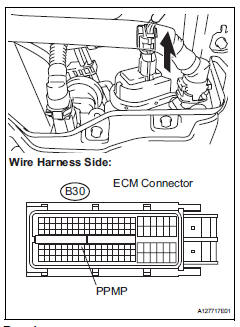
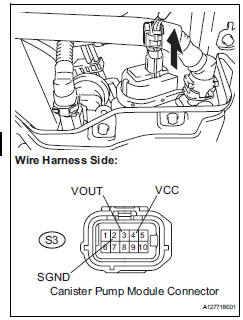
- Disconnect the s3 canister pump module connector.
- Disconnect the b30 ecm connector.
- Measure the resistance between ppmp terminal of the ecm connector and the body ground.

- Reconnect the canister pump module connector.
- Reconnect the ecm connector.

- Check harness and connector (canister pump module - ecm)
- Disconnect the s3 canister pump module connector.
- Turn the ignition switch on.
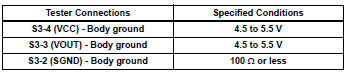
- Measure the voltage and resistance of the canister connector.

- Reconnect the canister pump module connector.

- Replace charcoal canister assembly
- Replace the canister assembly (see page ec-10).
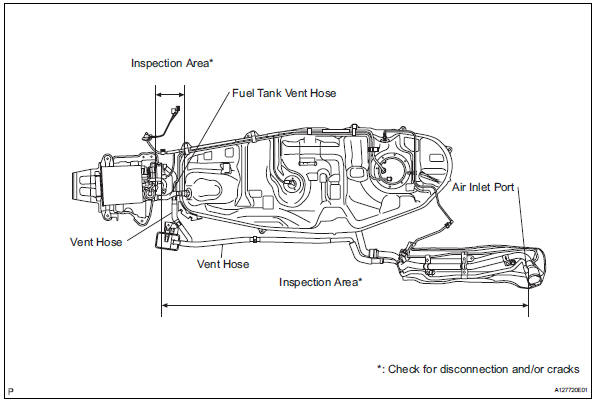
When replacing the canister, check the canister pump module interior and related pipes for water, fuel and other liquids. If liquids are present, check for disconnections and/or cracks in the following: 1) the pipe from the air inlet port to the canister pump module; 2) the canister filter; and 3) the fuel tank vent hose.
 Go to step 8
- Repair or replace harness or connector
If the exhaust tailpipe has been removed, go to the next step before reinstalling it.
 Go to step 8
- Replace ecm
- Replace the ecm (see page es-429).
 Go to step 8
- Check whether dtc output recurs (after repair)
- Connect the intelligent tester to the dlc3.
- Turn the ignition switch on and turn the tester on.
- Wait for at least 60 seconds.
- On the tester, select the following menu items: diagnosis / enhanced obd ii / dtc info / pending codes.
If no pending dtcs are displayed on the tester, the repair has been successfully completed.
Test yourself
A quick Toyota RAV4 quiz: every answer comes with an explanation and a link to the manual page.