2Az-fe engine mechanical
Fuel pump control circuit
In this manual: 2Az-fe engine mechanical
45steps
~270min
4/5difficulty
Done 0 of 45
Description
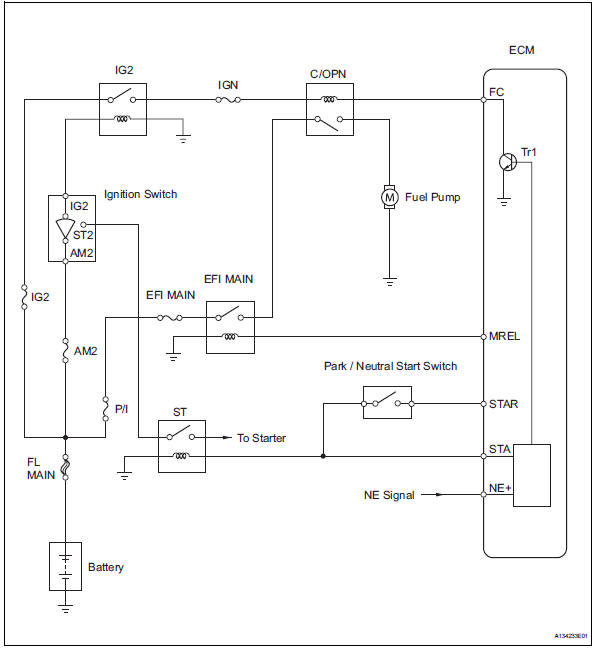
Wiring diagram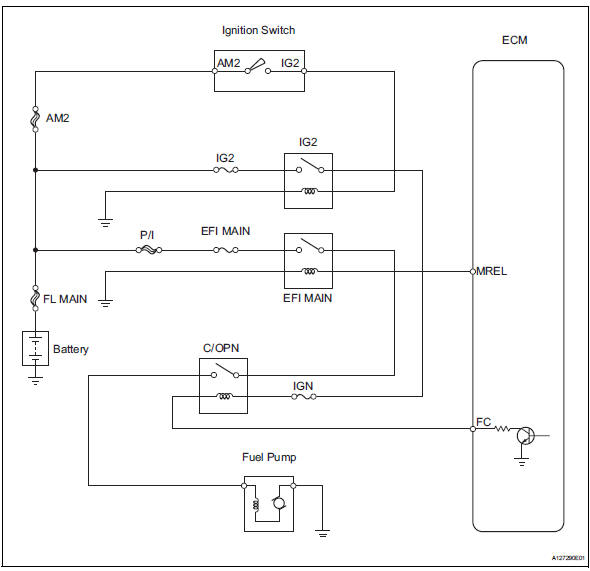
Inspection procedure

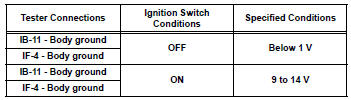



Standard resistance (check for short)
Hint:


Standard resistance (check for short)


Standard resistance (check for short)







When the engine is cranked, the starter relay drive signal output from the star terminal of the ecm is input into the sta terminal of the ecm, and ne signal generated by the crankshaft position sensor is also input into the ne+ terminal. Thus, the ecm interprets that the engine is cranked, and turns the transistor tr1 in the ecm internal circuit on. The current flows to the c/opn (circuit opening) relay by turning the tr1 on. Then, the fuel pump operates.
While the ne signal is input into the ecm, when the engine is running, the ecm turns the tr1 on continuously.
Wiring diagram
Inspection procedure
- Perform active test using intelligent tester (fuel pump/spd)
- Connect the intelligent tester to the dlc3.
- Turn the ignition switch on and turn the tester on.
- Select the following menu items: diagnosis / enhanced obd ii / active test / fuel pump / spd.
- Check whether the fuel pump operating sound occurs when performing the active test on the tester.
- Inspect instrument panel junction block assembly (c/opn relay input voltage)
- Measure the voltage between the terminal of the instrument panel junction block (j/b) and the body ground when the ignition switch is turned on and off.
- Check harness and connector (instrument panel j/b - integration relay, ig2 relay)
- Remove the integration relay and ig2 relay from the engine room no. 1 Relay block.
- Disconnect the instrument panel junction block connector.
- Check the resistance.
Standard resistance (check for short)
- Reinstall the integration relay and ig2 relay.
- Reconnect the instrument panel junction block connector.


- Inspect instrument panel junc.ssembly (c/opn relay)
- Remove the instrument panel junction block.
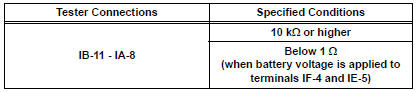
- Measure the c/opn relay resistance.
Hint:
Relay coil circuit between if-4 and ie-5 is not through ign fuse.
- Reinstall the instrument panel junction block.
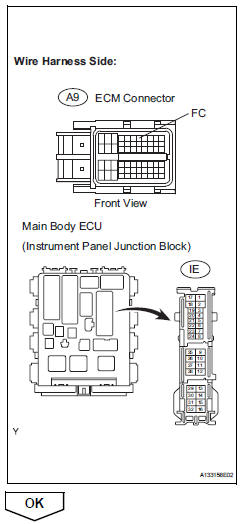
- Check harness and connector (instrument panel j/b - ecm)
- Disconnect the a9 ecm connector.
- Disconnect the ie connector from instrument panel junction block.
- Measure the resistance.
Standard resistance (check for short)
- Reconnect the instrument panel junction block and the ecm connectors.
- Check harness and connector (c/opn relay - fuel pump - body ground)
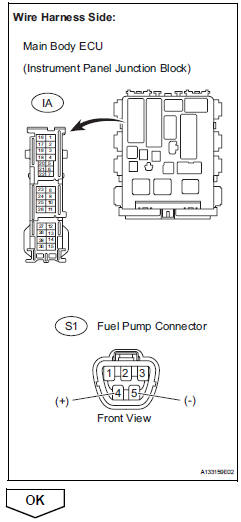
- Check the harness and the connectors between the instrument panel junction block assembly and the fuel pump.
- Disconnect the ia instrument panel junction block connector.
- Disconnect the s1 fuel pump connector.
- Measure the resistance.
Standard resistance (check for short)
- Check the harness and the connectors between the fuel pump and the body ground.
- Disconnect the s1 fuel pump connector.
- Measure the resistance.
- Reconnect the instrument panel junction block connector
- Reconnect the fuel pump connector.

- Inspect fuel pump
- Inspect fuel pump resistance.
- Measure the resistance between the terminals.
- Inspect fuel pump operation.
- Apply the battery voltage to both the terminals.
- These tests must be done quickly (within 10 seconds) to prevent the coil from burning out.
- Keep the fuel pump as far away from the battery as possible.
- Always turn the voltage on and off on the battery side, not the fuel pump side.
- Read value using intelligent tester (starter sig)
- Connect the intelligent tester to the dlc3.
- Turn the ignition switch on and turn the tester on.
- Select the following menu items: diagnosis / enhanced obd ii / data list / primary / starter sig.
- Check the result when the ignition switch is turned to on and start.
- Read value using intelligent tester (engine spd)
- Connect the intelligent tester to the dlc3.
- Turn the ignition switch on and turn the tester on.
- Select the following menu items: diagnosis / enhanced obd ii / data list / primary / engine spd.
- Read the values displayed on the tester while cranking.
Test yourself
A quick Toyota RAV4 quiz: every answer comes with an explanation and a link to the manual page.
Was this page helpful?