Sliding roof. Sliding sunroof
- Assembly overview – glass panel
- Assembly overview – sun blind
- Removing and installing frame with sun blind
- Dismantling and assembling frame with sun blind
- Removing and installing sun blind cables
- Removing and installing sun blind
- Removing and installing roof system control unit J1355
- Adapting roof system adjustment control unit J1355
- Manual operation
- Removing and installing sun blind drive unit VX455
- Removing and installing glass panel
- Minimum drying time for bonded glass panels
- Assembly overview - water drain hoses
- Cleaning water drain hoses
- Removing and installing water drain hoses
- Removing and installing water drain hose mounting
Assembly overview – glass panel
Assembly overview – glass panel
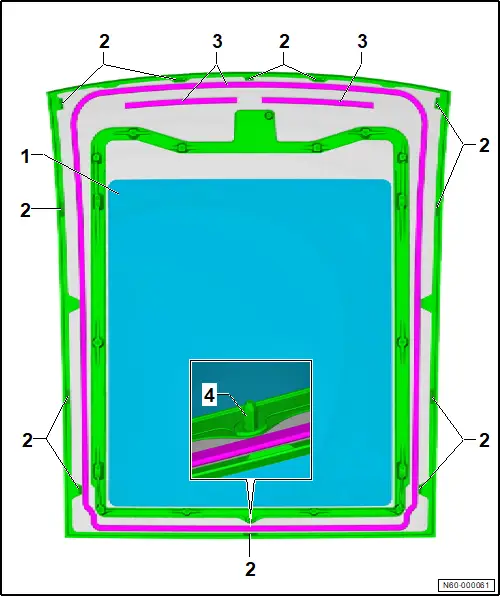
1 - Glass panel
❏ → Rep. gr.60; Removing and installing glass panel
2 - Spacer
❏ Part of glass panel
❏ Qty. 12
3 - Bonding surface
❏ Marked on glass panel
4 - Centring pin
❏ Part of glass panel
Assembly overview – sun blind
Assembly overview – sun blind
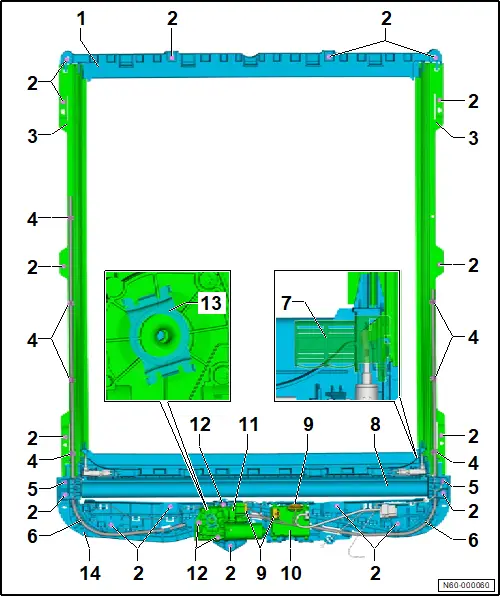
1 - Rear frame section
❏ → Rep. gr.60; Dismantling and assembling frame with sun blind
2 - Bolt
❏ Qty. 15
❏ Renew after removing
❏ 5,5 N·m
3 - Side frame section
❏ Left and right
❏ → Rep. gr.60; Dismantling and assembling frame with sun blind
4 - Clip
❏ For sun blind cable
❏ Qty. 7
5 - Bolt
❏ Qty. 2
❏ Renew after removing
❏ 5,5 N·m
6 - Sun blind cable
❏ → Rep. gr.60; Removing and installing sunroof roller blind cables
7 - Slide
❏ Left and right
8 - Sun blind
❏ → Rep. gr.60; Removing and installing sun blind
9 - Electrical connector
10 - Roof system control unit -J1355-
❏ → Rep. gr.60; Removing and installing roof system control unit J1355
❏ → Rep. gr.60; Adapting roof system adjustment control unit J1355
11 - Sun blind drive unit -VX455-
❏ With Hall sender 1 for sun blind motor -G1193-
❏ With Hall sender 2 for sun blind motor -G1194-
❏ With sun blind motor -V758-
❏ → Rep. gr.60; Removing and installing sun blind drive unit VX455
12 - Bolt
❏ Qty. 3
❏ 4 N·m
13 - Spring plate
❏ Renew together with sun blind drive unit -VX455-
14 - Front frame section
❏ → Rep. gr.60; Dismantling and assembling frame with sun blind
Removing and installing frame with sun blind
Removing and installing frame with sun blind
Removing
– Remove moulded headliner → General body repairs, interior; Rep. gr.70; Roof trims; Removing and installing moulded headliner.
– Disconnect electrical connector.
Important
● The aid of an additional person is required for the subsequent work steps.
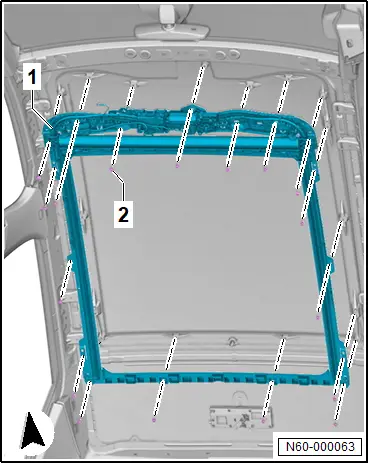
– Unscrew bolts -2-, and remove frame with sun blind -1- from vehicle.
Installing
Install in reverse order of removal, observing the following:
Important
● Side sections of the frame must be aligned parallel relative to one another.
Tightening torques
♦ → Rep. gr.60; Assembly overview – sun blind
Dismantling and assembling frame with sun blind
Dismantling and assembling frame with sun blind
 NOTICE
Risk of damage to the frame when dismantling.
– Handle the frame with caution, and do not bend it.
Dismantling
Remove front section of frame
– Remove frame with sun blind → Rep. gr.60; Removing and installing frame with sun blind.
– Remove sunroof roller blind motor [V260] → Rep. gr.60; Removing and installing sunroof roller blind motor [V260].
– Release sunroof roller blind cables → Rep. gr.60; Removing and installing sun blind.
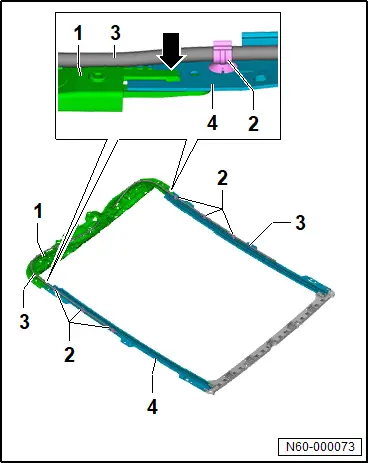
– Pull cables -3- out of clips -2-.
– Release locking devices -arrows-, and detach front section of frame -1- from side sections of frame -4-.
Remove rear section of frame
– Release frame with sun blind in rear area → Rep. gr.60; Removing and installing frame with sun blind.
– Release locking devices -arrows-, and detach rear section of frame -2- from side sections of frame -1-.
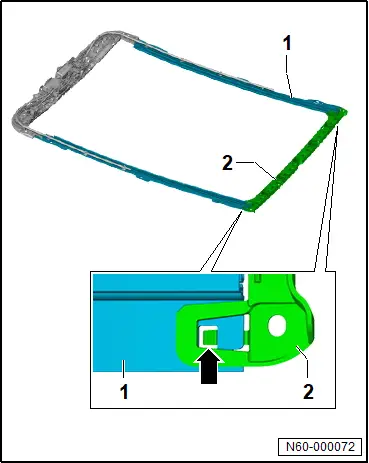
Assembling
Assembly is carried out in reverse sequence; note the following:
Important
● Side sections of the frame must be aligned parallel relative to one another.
Tightening torques
♦ → Rep. gr.60; Assembly overview – sun blind
Removing and installing sun blind cables
Removing and installing sun blind cables
Removing
– Mark location of cables before removal to ease reinstallation.
– Remove sun blind → Rep. gr.60; Removing and installing sun blind.
– Pull cables -1- in direction of -arrows- out of side sections of frame -2-.
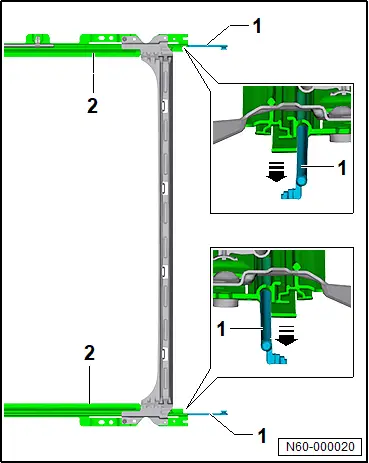
Installing
Install in reverse order of removal.
Removing and installing sun blind
Removing and installing sun blind
Removing
– Open sun blind completely.
If the electrical system fails to operate, the sun blind can also be opened manually → Rep. gr.60; Manual operation.
– Remove moulded headliner → General body repairs, interior; Rep. gr.70; Roof trims; Removing and installing moulded headliner.
– Remove sun blind drive unit -VX455- → Rep. gr.60; Removing and installing sun blind drive unit VX455.
– Push cross strut -1- of sun blind -4- on left and right evenly by hand in direction of -arrow A- as far as foremost position.
– Unscrew bolts -2- on left and right.
– Release locking devices at holders -3-.
– Pull sun blind -4- together with holders in direction of -arrow A- out of side sections of frame -6- until connecting points between sun blind -1- and cables -5- become visible.
– Detach cables -5- from slides on cross strut -1- in direction of -arrow B-.
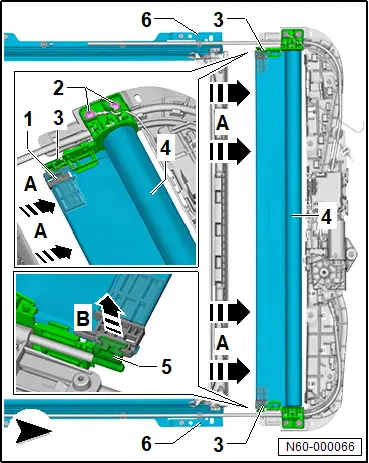
Installing
Install in reverse order of removal, observing the following:
– Adapt → Rep. gr.60; roof system control unit J1355.
Tightening torques
♦ → Rep. gr.60; Assembly overview – sun blind
Removing and installing roof system control unit J1355
Removing and installing roof system control unit J1355
Roof system control unit -J1355- is referred to hereafter as control unit.
Removing
– Lower the moulded headliner, and place it on head restraints → General body repairs, interior; Rep. gr.70; Roof trims; Removing and installing moulded headliner.
If the control unit is renewed, perform the test plan for renewal of the control unit:
– Carry out function “Renew control unit” using → Vehicle diagnostic tester → Rep. gr.00; Access to diagnoses.
Continued
– Disconnect electrical connectors -3-.
– Push tab -2- in direction of -arrow A-.
– Swing control unit -1- downwards, and pull it in direction of -arrow B- out of retainers -4-.
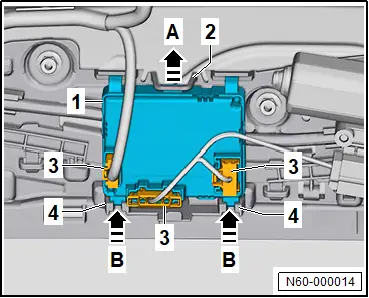
Installing
Install in reverse order of removal, observing the following:
– Conclude function “Renew control unit” using → Vehicle diagnostic tester → Rep. gr.00; Access to diagnoses.
Adapting roof system adjustment control unit J1355
Adapting roof system adjustment control unit J1355
Important
● Ignition is switched on.
– Press and hold “Close” button until adaption process is concluded (approx. 20 seconds).
The sun blind is completely closed.
Adaption can only be carried out using → Vehicle diagnostic tester.
– Carry out function “Control unit, basic setting” using → Vehicle diagnostic tester → Rep. gr.00; Access to diagnoses.
Manual operation
Manual operation
Sun blind drive unit -VX455- is referred to hereafter as motor.
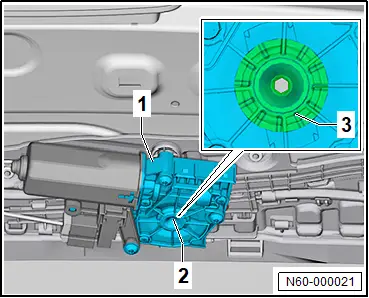
If the electrical system fails to operate, the sun blind can be manually operated with the aid of a commercially available hexagon key on the motor.
When doing so, considerable force must be exerted as the motor is not disengaged from the gearing.
– Lower the moulded headliner, and place it on head restraints → General body repairs, interior; Rep. gr.70; Roof trims; Removing and installing moulded headliner.
– Guide commercially available hexagon key into connector -3- of motor -1-.
– Turn bolt -2- to move sun blind.
Removing and installing sun blind drive unit VX455
Removing and installing sun blind drive unit VX455
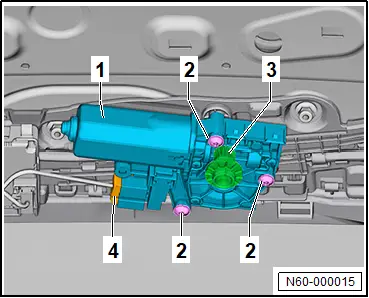
Sun blind drive unit -VX455- is referred to hereafter as motor.
Removing
– Lower the moulded headliner, and place it on head restraints → General body repairs, interior; Rep. gr.70; Roof trims; Removing and installing moulded headliner.
– Disconnect electrical connector -4-.
– Unscrew bolts -2- and pull off motor -1-.
– Disconnect electrical connector -3- for motor -1-.
Installing
Install in reverse order of removal, observing the following:
New motor
– Install new spring plate.
All vehicles (continued)
– Perform parallel alignment of sun blind before motor is installed.
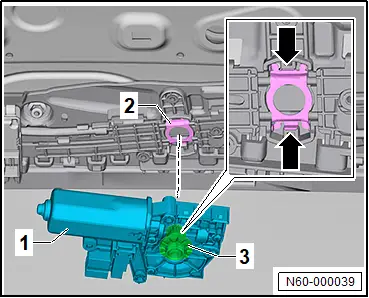
– Fit electrical connector -3- for motor -1-.
Important
● Make sure that spring plate -2- is securely seated -arrows-.
– Check spring plate -2-.
New motor
– Adapt → Rep. gr.60; roof system control unit J1355.
All vehicles (continued)
Tightening torques
♦ → Rep. gr.60; Assembly overview – sun blind
Removing and installing glass panel
Removing and installing glass panel
Special tools and workshop equipment required
♦ Cutting cord -VAS 861 001/1A-
♦ Hot air blower -V.A.G 1416-
♦ Setting gauge -3371-
♦ Suction lifter -V.A.G 1344-
♦ Windscreen removal set -VAS 861 001A-
♦ commercially available plastic wedge
 CAUTION
Risk of injury to hands and eyes due to glass splinters.
Danger of cutting yourself.
– Put on safety goggles.
– Put on protective gloves.
 NOTICE
Risk of damage to surfaces of components.
– Mask off surrounding components in the visible area with commercially available adhesive tape.
Removal is described using window removal kit -VAS 861 001A-.
Removing
– Remove frame with sun blind → Rep. gr.60; Removing and installing frame with sun blind.
Renewing glass panel
– Remove sunroof roller blind → Rep. gr.60; Removing and installing sun blind.
– Remove roof system control unit -J1355- → Rep. gr.60; Removing and installing roof system control unit J1355.
– Remove sun blind drive unit -VX455- → Rep. gr.60; Removing and installing sun blind drive unit VX455.
All vehicles (continued)
– Insert cutting cord -VAS 861 001/1A- -2- in awl -4- from windscreen removal set -VAS 861 001A-.
– Mask off exit area of awl -4- at body flange with adhesive tape.
– Pierce adhesive bead with awl -4- from inside to outside and pull through cutting cord -2- towards outside.
– Lay cutting cord -2- all around beneath glass panel -1-.
– To insert cutting cord -2- between glass panel -1- and windscreen, push windscreen seal down using commercially available plastic wedge, and make use of threading aid.
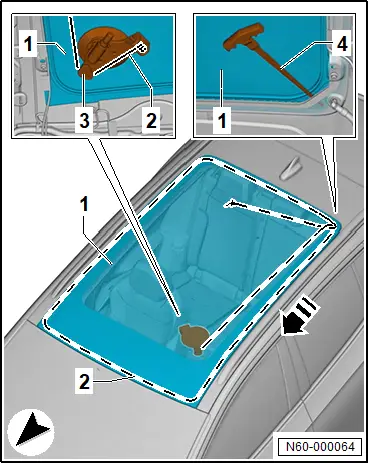
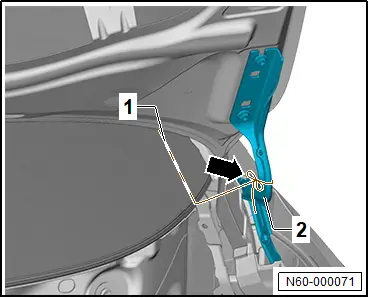
– Protect contact surface of cutting cord -1- on hinge -2- using commercially available adhesive tape.
– Secure outer end of cutting cord -1- on left hinge -2- -arrow-.
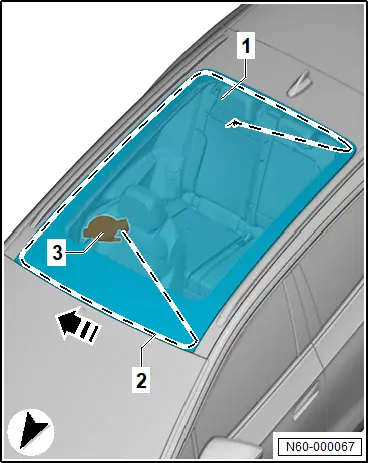
– Secure cutting out device -3- from window removal kit to inside of glass panel -1- at front left.
– Insert cutting cord -2- into cutting out device -3- from window removal kit.
– Tension cutting cord -2- with cutting out device -3- from window removal kit.
– Cut free side area of glass panel -1- in direction of -arrow- using cutting cord -2-.
– Secure cutting out device -3- from window removal kit to inside of glass panel -1- at front right.
Note
There are two adhesive beads in the front area between the glass panel -1- and roof cross member. Greater force is necessary when cutting through in these areas.
– Heat up glass panel -1- in area of adhesive beads to 40 °C using hot air blower -V.A.G 1416-.
– Cut free front area of glass panel -1- in direction of -arrow- using cutting cord -2-.
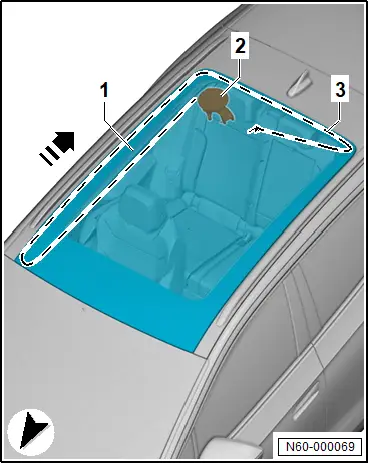
– Secure cutting out device -2- from window removal kit to inside of glass panel -1- at rear right.
– Cut free side area of glass panel in direction of -arrow- using cutting cord -3-.
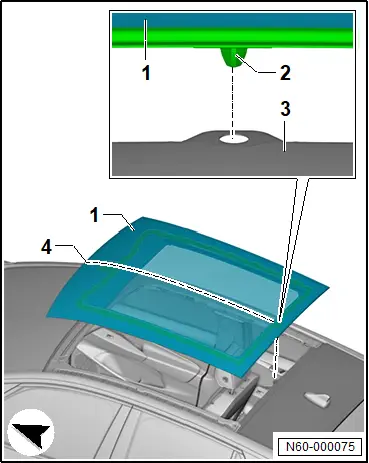
Note
Glass panel -1- can also be reused without centring pin -2-.
– Cut through adhesive bead around centring pin -2-.
– Secure cutting out device -2- from window removal kit to inside of glass panel -1- at rear right.
– Cut free rear area of glass panel in direction of -arrow- using cutting cord -3-.
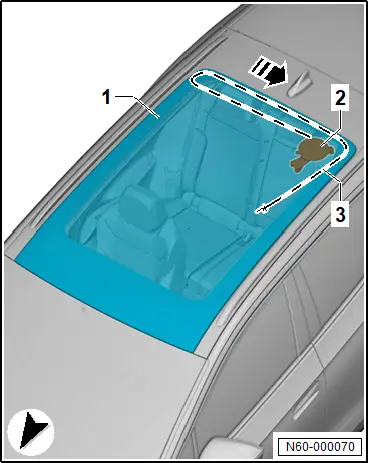
Important
● The aid of an additional person is required for the subsequent work steps.
– Lift glass panel out of vehicle using two suction lifters -V.A.G 1344-.
Installing
Undamaged glass panel
– → General information - body; Rep. gr.52; Use of adhesives; Preparing undamaged windows for installation.
All vehicles (continued)
New glass panel
Note
Bonding surface is marked on glass panel.
– Clean bonding surface, allow to flash-off and apply primer → General information - body; Rep. gr.52; Use of adhesives; Preparing new windows for installation.
All vehicles (continued)
– → General information - body; Rep. gr.52; Use of adhesives; Preparing body flange for installation.
– Observe → General information - body; Rep. gr.52; Use of adhesives; Installation instructions for bonded windows.
– Observe → Rep. gr.60; Minimum drying time for bonded glass panels.
Glass panel -1- can also be installed without spacers -3-.
Dimensions for cross-section of adhesive bead:
♦ Dimension -a-: 8 ± 2 mm
♦ Dimension -b-: 13.5 ± 1.5 mm
– Apply window adhesive to bonding surfaces -2- marked accordingly on glass panel -1-.
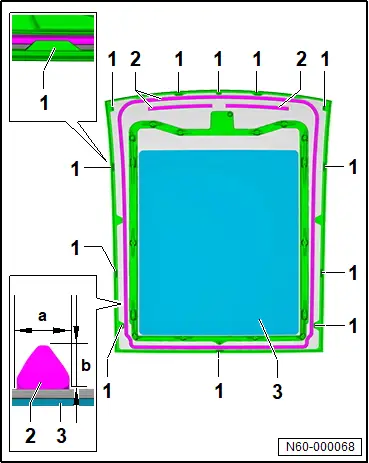
– Insert glass panel -1- into roof aperture -3- using suction lifter -V.A.G 1344-.
Important
● Insert glass panel -1- within 10 minutes, since adhesive properties of window adhesive will be impaired otherwise.
– Align glass panel -1- centrally -2- in roof aperture -3- via centring pin -4-.
If there is no centring pin -2-, align glass panel -1- centrally in roof aperture -3- as shown in illustration -4-.
– Push down glass panel -1- onto spacers.
– Verify gaps using setting gauge -3371-. Observe → Rep. gr.00; Gaps - roof when doing this.
Continue installation in reverse order of removal.
Minimum drying time for bonded glass panels
Minimum drying time for bonded glass panels
The minimum drying time is the time from bonding in until the vehicle is ready to be used.
The vehicle is safe to use only after the minimum drying time has elapsed.
Minimum drying time after installation of the glass panel is 24 hours.
Important
The following requirements during the minimum drying time must be complied with:
● Vehicle must be standing on level surface.
● No work must be performed on vehicle.
● Room temperature must be between 20 °C and 30 °C.
● Relative humidity must be between 30 % and 80 %.
Assembly overview - water drain hoses
Assembly overview - water drain hoses
Overview shown for left side of vehicle as an example
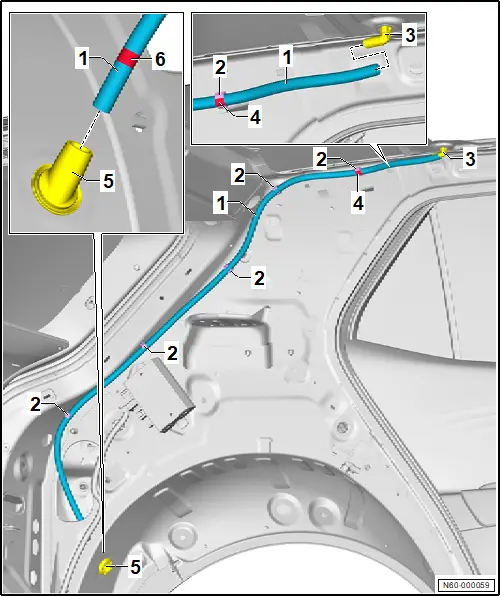
1 - Water drain hose
❏ → Rep. gr.60; Removing and installing water drain hoses
❏ → Rep. gr.60; Cleaning water drain hoses
2 - Clip
❏ Qty. 5
3 - Water drain hose mounting
❏ → Rep. gr.60; Removing and installing water drain hose mounting
4 - Marking
❏ For clip after mounting
5 - Hose retainer
6 - Marking
❏ For hose retainer
Cleaning water drain hoses
Cleaning water drain hoses
Special tools and workshop equipment required
♦ Cleaning and insertion aid -VAS 6620-
The cleaning procedure is described for the left side of vehicle as an example.
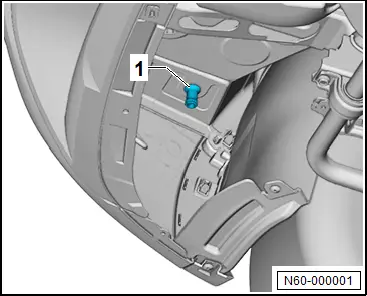
– Remove rear wheel housing liner → Rep. gr.66; Removing and installing rear wheel housing liner.
– Insert cleaning and insertion aid -VAS 6620- from below into plug -1-, and clean water drain hose.
Removing and installing water drain hoses
Removing and installing water drain hoses
Removal and installation are described for the left side of vehicle as an example.
Removing
– Release and secure moulded headliner → General body repairs, interior; Rep. gr.70; Roof trims; Removing and installing moulded headliner.
– Remove luggage compartment side trim → General body repairs, interior; Rep. gr.70; Luggage compartment trims; Removing and installing luggage compartment side trim.
– Remove C-pillar trim → General body repairs, interior; Rep. gr.70; Trims, interior; Removing and installing C-pillar trim.
– Detach water drain hose -1- from clips.
– Pull water drain hose -1- in direction of -arrow- out of mounting -2-.
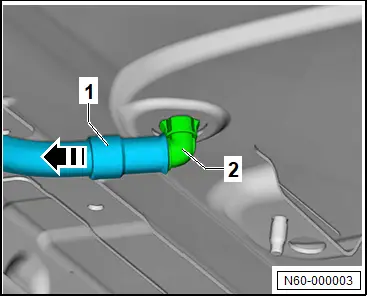
– Pull water drain hose -1- out of hose retainer.
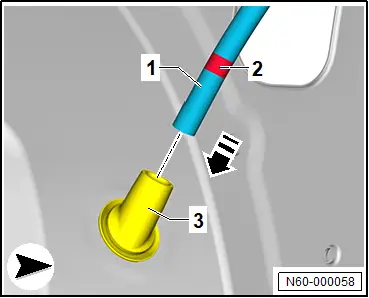
Installing
Install in reverse order of removal, observing the following:
– Push water drain hose to stop onto mounting.
– Push water drain hose -1- onto hose retainer -5- as far as marking -6-.
– Position water drain hose -3- at clip -1- with marking -2- being centred, and insert it in direction of -arrow-.
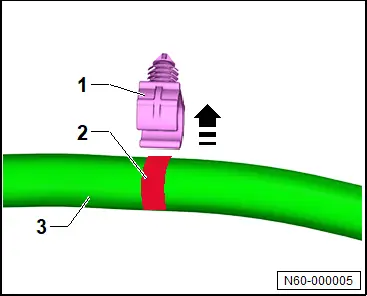
Removing and installing water drain hose mounting
Removing and installing water drain hose mounting
Removal and installation are described for the left side of vehicle as an example.
Removing
– Remove glass panel → Rep. gr.60; Removing and installing glass panel.
– Press locking devices -arrows-, and detach water drain hose mounting -1-.
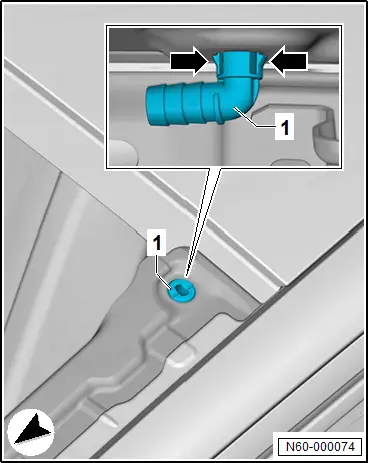
Installing
Install in reverse order of removal, observing the following:
Important
● Contact surfaces must be clean.
● Locking devices must engage audibly.
Important
● Carry out leakage test following installation of water drain hose mounting.