Rear suspension, drive shaft. Subframe
- Fixing subframe in position
- Assembly overview – subframe mountings
- Assembly overview – subframe
- Preparing scissor-type assembly platform
- Taking up weight of subframe using scissor-type assembly platform
- Renewing gearbox/transmission unit mounting
- Renewing motor mountings
- Renewing front subframe mountings
- Renewing rear subframe mountings
Fixing subframe in position
Fixing subframe in position
Special tools and workshop equipment required
♦ locating pin -T10463-
♦ magnetic rod and mirror -VAS 241 005-
 NOTICE
If the subframe is removed, the axle settings may change.
This can influence the driving behaviour of the vehicle.
– Secure the subframe in its exact position relative to the body using 4 threaded pins.
– → Rep. gr.42; Securing vehicle to support arms of lifting platform
– → Rep. gr.42; Prepare scissor-type assembly platform.
– → Rep. gr.42; Taking up weight of subframe using scissor-type assembly platform
– On both sides of vehicle, replace front bolts -2- on subframe -1- one after other with locating pins -T10463-.
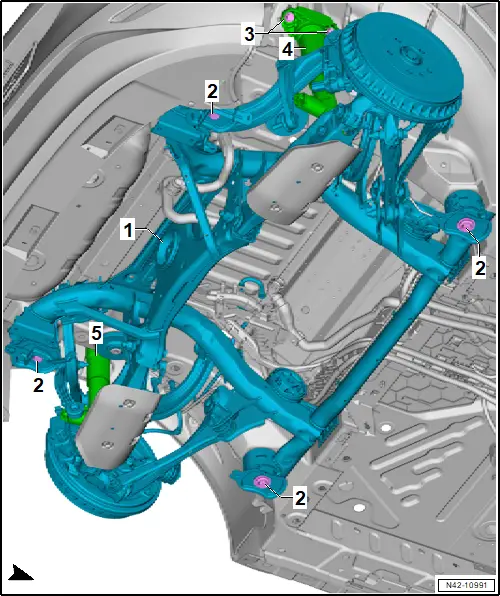
– Screw locating pin -T10463- into hole in subframe mounting -1-.
– Tighten locating pin -A- to 20 N·m using suitable tool -B-.
Vehicles with intermediate plate on front mountings on subframe
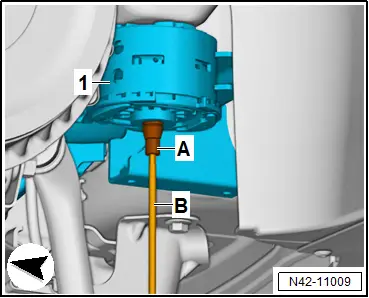
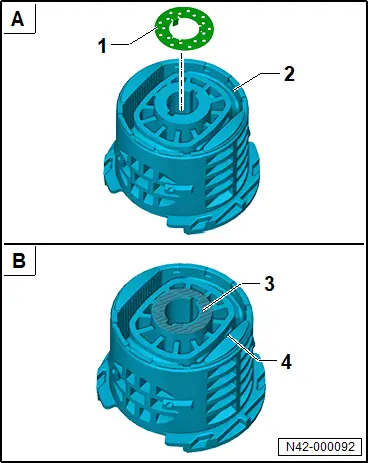
– Using commercially available lamp, magnetic rod and mirror -VAS 241 005-, check if intermediate plate -1- is fitted.
Important
● On vehicles with intermediate plates on front mountings on subframe -2-, fixing subframe in place is not possible.
All vehicles (continued)
Installing
Install in reverse order of removal, observing the following:
Vehicles with intermediate plates on front mountings on subframe
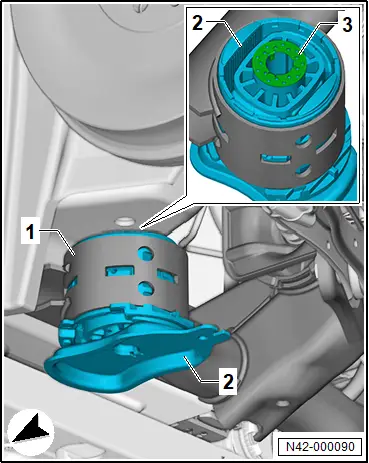
– Unscrew locating pin on one side.
– Renew intermediate plate -3-.
Important
● Intermediate plates -3- must be fitted on both sides of vehicle.
– Insert intermediate plate -3- with locking lugs into front subframe mounting -2-.
– Repeat procedure on opposite side of vehicle.
– Carry out wheel alignment → Rep. gr.44; Wheel alignment.
All vehicles (continued)
– Always unscrew one locating pin at a time, replace it with a new bolt, and only then proceed with the next one.
Tightening torques
♦ → Running gear, axles, steering; Rep. gr.42; Subframe; Assembly overview – subframe
Assembly overview – subframe mountings
Assembly overview – subframe mountings
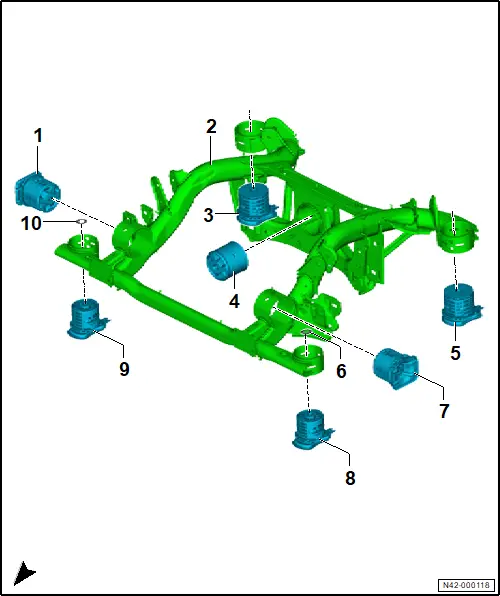
1 - Right motor mounting
❏ → Rep. gr.42; Renewing motor mountings
2 - Subframe
❏ → Rep. gr.42; Assembly overview – subframe
❏ → Rep. gr.42; Fixing subframe in position
❏ → Rep. gr.42; Taking up weight of subframe using scissor-type assembly platform
❏ → Rep. gr.42; Removing and installing rear axle
3 - Subframe mounting, rear right
❏ → Rep. gr.42; Renewing rear subframe mountings
4 - Gearbox mounting
❏ → Rep. gr.42; Renewing gearbox mounting
5 - Subframe mounting, rear left
❏ → Rep. gr.42; Renewing rear subframe mountings
6 - Intermediate plate
❏ Depending on equipment/version
❏ Renew after removing
7 - Left engine mounting
❏ → Rep. gr.42; Renewing motor mountings
8 - Subframe mountings, front left
❏ Renew on both sides.
❏ → Rep. gr.42; Renewing front subframe mountings
9 - Subframe mounting, front right
❏ Renew on both sides.
❏ → Rep. gr.42; Renewing front subframe mountings
10 - Intermediate plate
❏ Depending on equipment/version
❏ Renew after removing
Assembly overview – subframe
Assembly overview – subframe
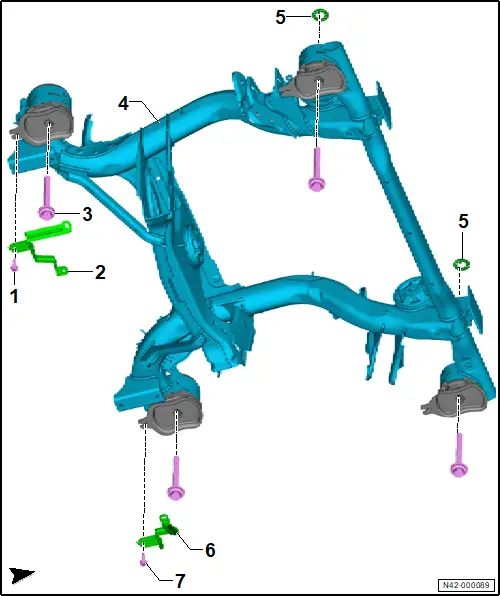
1 - Bolt
❏ M 6 x 25
❏ 8 N·m
2 - Bracket
3 - Bolt
❏ Qty. 4
❏ Renew after removing
❏ M14 × 1.5 × 125
❏ 130 N·m +180°
4 - Subframe
❏ → Rep. gr.42; Assembly overview – subframe mountings
❏ → Rep. gr.42; Fixing subframe in position
❏ → Rep. gr.42; Taking up weight of subframe using scissor-type assembly platform
❏ → Rep. gr.42; Removing and installing rear axle
5 - Intermediate plate
❏ Depending on equipment/version
❏ Renew on both sides.
❏ Qty. 2
6 - Bracket
7 - Bolt
❏ M 6 x 25
❏ 8 N·m
Preparing scissor-type assembly platform
Preparing scissor-type assembly platform
Special tools and workshop equipment required
♦ Basic set for Phaeton -VAS 6131/1-
♦ Plate -VAS 6131/10-1-
♦ Scissor-type assembly platform -VAS 6131B-
♦ Support -VAS 6131/1-4-
♦ Support set for Audi -VAS 6131/10-
♦ Support set for Audi -VAS 6131/10-5-
♦ Support set for natural gas tank -VAS 6131/15-
♦ Support taper -VAS 6131/10-2-
♦ Universal support -VAS 6131/13-2-
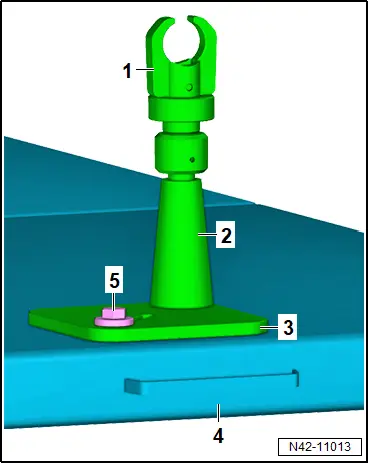
Prepare supports 1:
– Assemble supports as shown using the following tools:
1 - Support -VAS 6131/1-4-
2 - Plate for support -VAS 6131/1-4-
3 - Scissor-type assembly platform -VAS 6131B-
4 - M 10 × 25 bolt Basic set for Phaeton -VAS 6131/1-
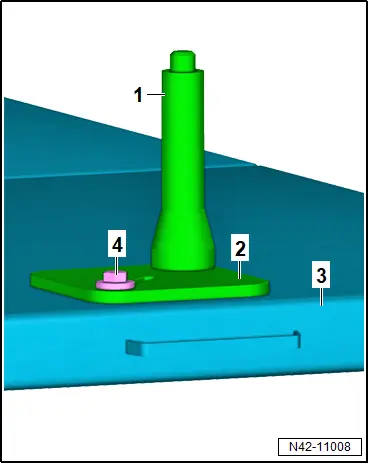
Prepare support 2:
– Assemble support as shown using the following tools:
1 - Universal support -VAS 6131/13-2-
2 - Support set for Audi -VAS 6131/10-5-
3 - Support taper -VAS 6131/10-2-
4 - Plate -VAS 6131/10-1-
5 - Scissor-type assembly platform -VAS 6131B-
6 - M 10 × 25 bolt Support set for Audi -VAS 6131/10-
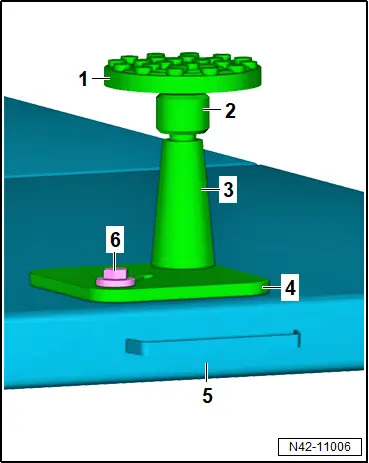
Prepare supports 3:
– Assemble supports as shown using the following tools:
1 - Support set for natural gas tank -VAS 6131/15-
2 - Support taper -VAS 6131/10-2-
3 - Plate -VAS 6131/10-1-
4 - Scissor-type assembly platform -VAS 6131B-
5 - M 10 × 25 bolt Support set for Audi -VAS 6131/10-
– Screw bolts for supports by hand into scissor-type assembly platform -VAS 6131B--4-. Position scissor-type assembly platform -VAS 6131B--4- horizontally.
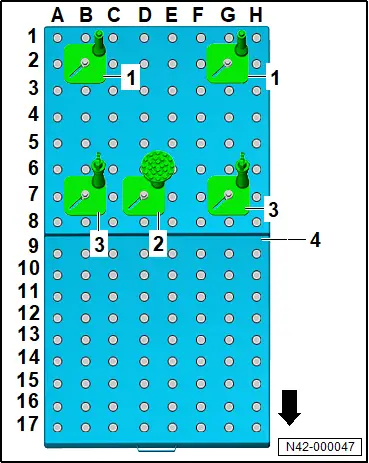 Coordinates Support B 2 1 G 2 1 G 7 3 D7 2 B 7 3
Note
The supports can also be mounted at other coordinates. Distance between the individual supports must be exactly as specified.
– Note spirit level on scissor-type assembly platform -VAS 6131B--4-.
Taking up weight of subframe using scissor-type assembly platform
Taking up weight of subframe using scissor-type assembly platform
Special tools and workshop equipment required
♦ scissor-type assembly platform -VAS 6131B-
♦ support set for natural gas fuel tank -VAS 6131/15-
Removing
– → Rep. gr.42; Prepare scissor-type assembly platform.
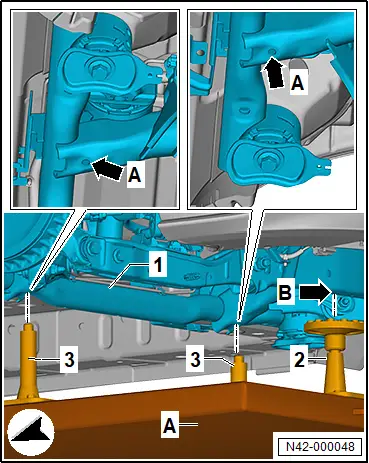
– Position scissor-type assembly platform -VAS 6131B- -A- longitudinally under vehicle, align it, and raise it.
– Position support -2- at cross piece -arrow B- at rear of subframe -1-.
– Align height of support -2-, then tighten support.
– Align height of supports -3-.
– Raise scissor-type assembly platform -VAS 6131B- -A- further.
– Align supports -3- with holes -arrows A- at front of subframe -1-.
– Tighten bolted connection of supports -3- on scissor-type assembly platform -VAS 6131B- -A- to 40 N·m.
– Raise scissor-type assembly platform -VAS 6131B- -A- further, and support subframe -1-.
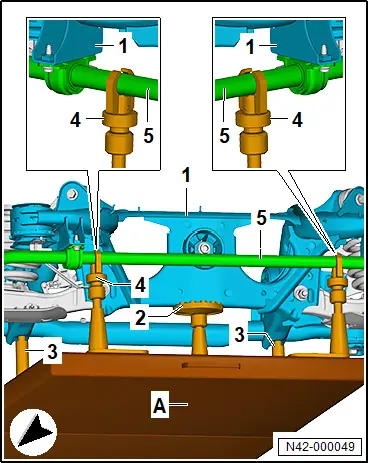
– Secure support set for natural gas fuel tank -VAS 6131/15- -4- to anti-roll bar -5-.
– Close clamps from support set for natural gas tank -VAS 6131/15- -4- using knurled nut.
– Tighten bolted connection of support set for natural gas tank -VAS 6131/15- -4- on scissor-type assembly platform -VAS 6131B- -A- to 40 N·m.
Renewing gearbox/transmission unit mounting
Renewing gearbox/transmission unit mounting
Special tools and workshop equipment required
♦ Hydraulic cylinder -VAS 6178-
♦ Nut -T10205/8-2-
♦ Thrust piece -T10205/13-
♦ Thrust piece -T10620/14-
♦ assembly tool -T10620-
♦ foot pump -VAS 6179-
♦ spindle -T10620/17-
♦ spindle -T10620/4-
♦ thrust piece -T10620/15-
♦ thrust piece -T10620/16-
Removal and installation are described for the left side of vehicle as an example.
Important
● Aid of an additional person is required for subsequent work steps.
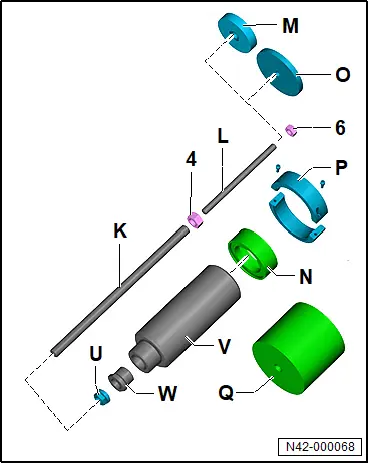
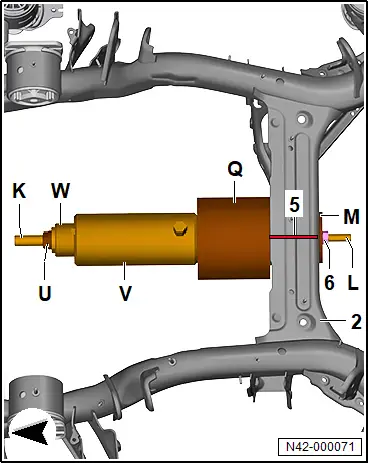
Required tools and auxiliary equipment from assembly tool -T10620-:
K - Spindle -T10620/17-
L - Spindle -T10620/4-
M - Thrust piece -T10620/14-
N - Thrust piece -T10620/12-
O - Thrust piece -T10620/15-
P - Thrust piece -T10620/13-
Q - Thrust piece -T10620/16-
U - Nut -T10205/8-2-
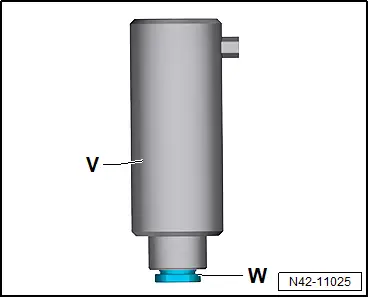
V - Hydraulic cylinder -VAS 6178-
W - Thrust piece -T10205/13-
6 - Nut for spindle -T10620/4-
Removing
– Remove rear axle → Rep. gr.42; Removing and installing rear axle.
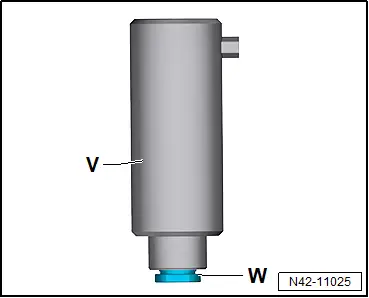
– Grease threads of thrust piece -T10205/13- -W-.
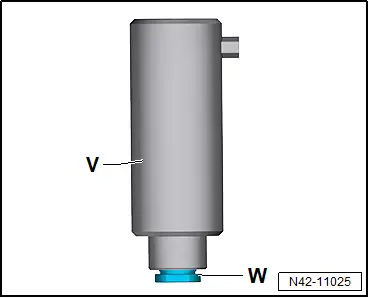
– Screw thrust piece -T10205/13- -W- into hydraulic cylinder -VAS 6178- -V-.
– Screw in thrust piece -T10205/13- -W- completely.
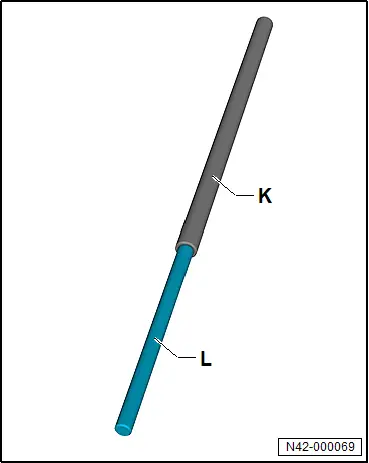
– Screw spindle -T10620/4- -L- into spindle -T10620/17- -K-.
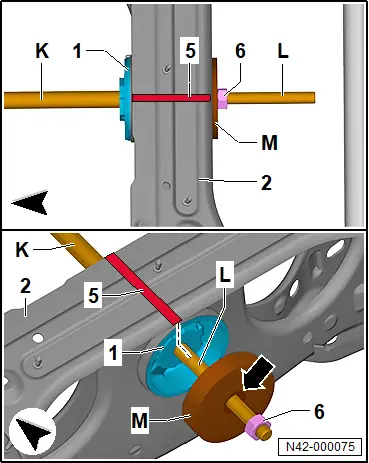
– Draw a line -5- to mark installation position of gearbox mounting -1- relative to subframe -2-.
– Push thrust piece -T10620/14- -M- onto spindle -T10620/4- -L-.
– Recess on thrust piece -T10620/14- -M- will later point towards nut for spindle -T10620/4- -6-.
– Push spindle -T10620/4- -L- together with spindle -T10620/17- -K- into gearbox mounting -1-.
– Screw nut for spindle -T10620/4- -6- onto spindle -T10620/4- -L-.
– Align thrust piece -T10620/14- -M-. Nut for spindle -T10620/4- -6- must be seated in recess of thrust piece -T10620/14- -M-.
– Push thrust piece -T10620/16- -Q- onto spindle -T10620/17- -K-.
– Open side of thrust piece -T10620/16- -Q- must point towards subframe -2-.
– Push hydraulic cylinder -VAS 6178- -V- onto spindle -T10620/17- -K-.
– Side with hydraulic connection must point towards subframe -2-.
– Screw nut -T10205/8-2- -U- onto spindle -T10620/17- -K-.
– Align thrust pieces. Collar of support for gearbox mounting on subframe -2- must be seated in thrust piece -T10620/16- -Q-.
– Thrust piece -T10620/14- -M- must be seated on outer edge of gearbox mounting.
– Tighten nuts -U- and -6-.
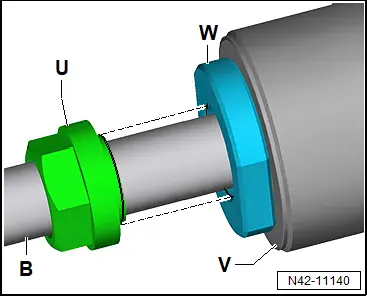
– Nut -T10205/8-2- -U- must be screwed flush on thrust piece -T10205/13- -W-.
– Guide of nut -T10205/8-2- -U- must be seated in thrust piece -T10205/13- -W-.
– Align tools again, and tighten nut -T10205/8-2- -U-.
– Connect foot pump -VAS 6179- to hydraulic cylinder -VAS 6178- -V-.
– Actuate foot pump -VAS 6179-. Press out gearbox mounting with hydraulic cylinder -VAS 6178-.
Installing
Install in reverse order of removal, observing the following:
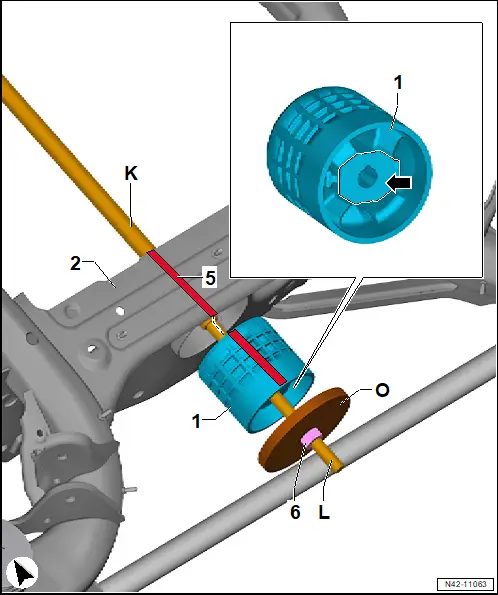
– Transfer previously made marking -5- to new gearbox mounting -1-.
– Push gearbox mounting -1- onto spindle -T10620/4- -L-.
– Area -arrow- shown on gearbox mounting -1- must point towards anti-roll bar.
– Push thrust piece -T10620/15- -O- onto spindle -T10620/4- -L-.
– Screw nut for spindle -T10620/4- -6- onto spindle -T10620/4- -L-.
– Insert spindle -T10620/4- -L- together with spindle -T10620/17- -K- and gearbox mounting into subframe -2-.
– Position gearbox mounting -1- in relation to subframe -2- according to line -5-, and align it.
– Push thrust piece -T10620/12- -N- onto spindle -T10620/17- -K-.
– Side with deeper recess must point towards subframe -2-.
– Push hydraulic cylinder -VAS 6178- -V- onto spindle -T10620/17- -K-.
– Side with hydraulic connection must point towards subframe -2-.
– Fit hydraulic cylinder -VAS 6178- -V- to thrust piece -T10620/12- -N-.
– Screw nut -T10205/8-2- -U- onto spindle -T10620/17- -K-.
– Screw on nut for spindle -T10620/4- -6- up to thrust piece -T10620/15- -O-.
– Fit thrust piece -T10620/12- -N- to hydraulic cylinder -VAS 6178- -V-.
– Position gearbox mounting -1- in relation to subframe -2- according to line -5-, and align it.
– Tighten nut -6- and nut -T10205/8-2- -U- while aligning thrust pieces properly.
– Make sure that tools are correctly positioned relative to each other.
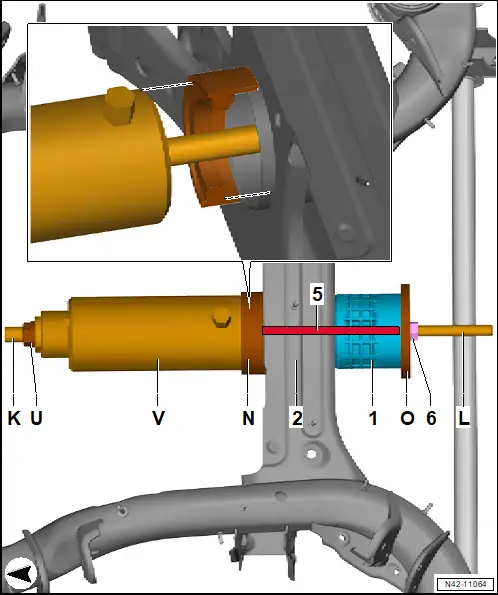
– Position thrust piece -T10620/13- -P- at gearbox mounting -1-.
– Shorter gap -a- must point towards subframe -2-.
– Assemble both halves of thrust piece -T10620/13- -P- using the two bolts.
– Align thrust pieces and gearbox mounting -1- with subframe -2-.
– Tighten both halves of thrust piece -T10620/13- -P- using the two bolts.
– Tighten nut -6-.
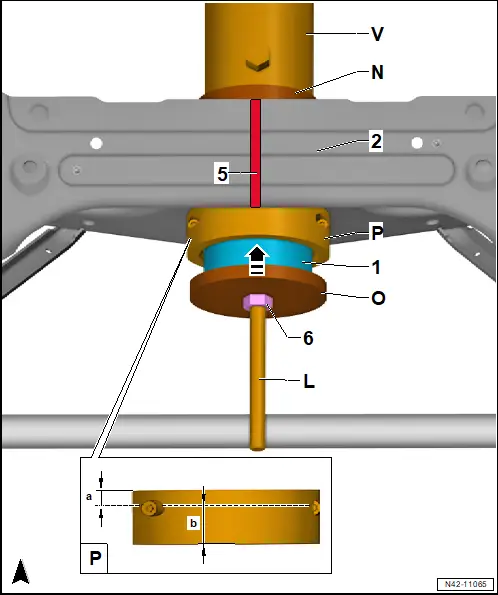
– Nut -T10205/8-2- -U- must be screwed in flush on thrust piece -T10205/13- -W-.
– Guide of nut -T10205/8-2- -U- must be seated in thrust piece -T10205/13- -W-.
– Align tools again, and tighten nut -T10205/8-2- -U-.
– Connect foot pump -VAS 6179- to hydraulic cylinder -VAS 6178- -V-.
– Actuate foot pump -VAS 6179-. Draw in gearbox mounting -1- with hydraulic cylinder -VAS 6178- -V-.
– Draw in gearbox mounting -1- until collar is almost in contact with thrust piece -T10620/13- -P-.
– Remove thrust piece -T10620/13- -P-.
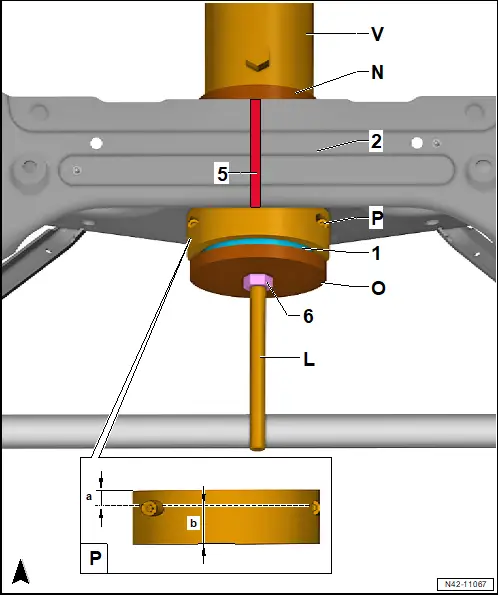
– Completely draw in gearbox mounting -1-. Gearbox mounting -1- must make flush contact with subframe -2-.
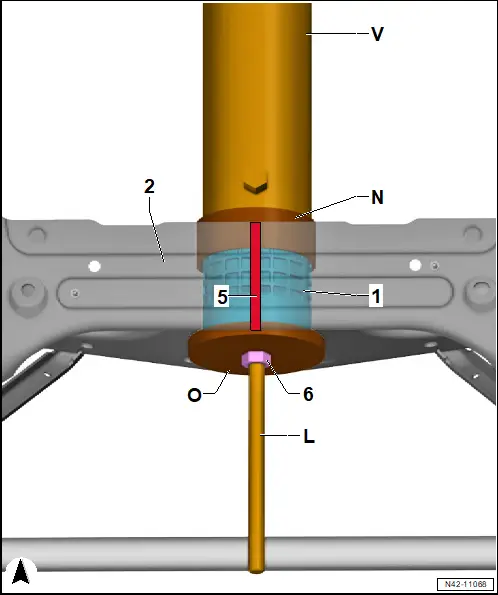
Tightening torques
♦ → Rep. gr.42; Assembly overview – subframe
♦ → Rep. gr.42; Assembly overview – subframe mountings
Renewing motor mountings
Renewing motor mountings
Special tools and workshop equipment required
♦ foot pump -VAS 6179-
♦ hydraulic cylinder -VAS 6178-
Removal and installation are described for the left side of vehicle as an example.
Removing
– Remove rear axle → Rep. gr.42; Removing and installing rear axle.
– Grease threads of thrust piece -T10205/13- -W-.
– Screw thrust piece -T10205/13- -W- into hydraulic cylinder -VAS 6178- -V-.
– Screw in thrust piece -T10205/13- -W- completely.
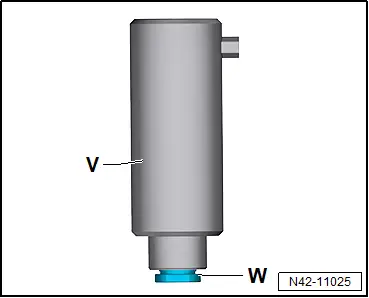
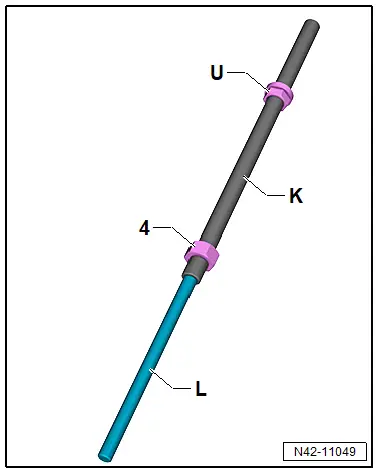
– Screw nut -T10205/8-2- -U- onto spindle -T10620/17- -K-.
– Screw nut for spindle -T10620/17- -4- onto spindle -T10620/17- -K-.
– Screw spindle -T10620/4- -L- into spindle -T10620/17- -K-.
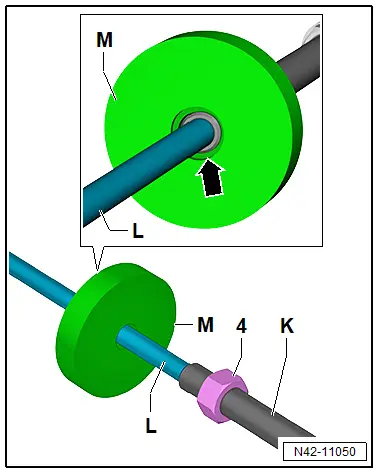
– Push thrust piece -T10620/14- -M- onto spindle -T10620/4- -L-.
Important
● Recess -arrow- must point towards motor mounting.
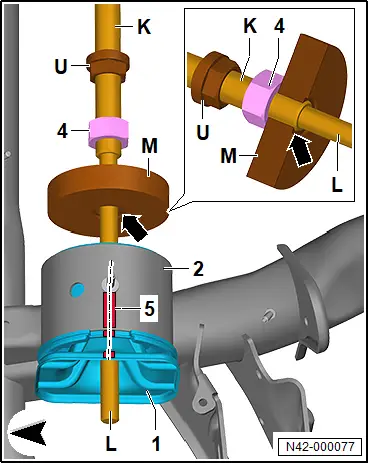
– Mark installation position of motor mounting -1- relative to subframe -2-.
– Mark installation position with a line -5-.
– Push spindle -T10620/4- -L- into motor mounting -1-.
Important
● Recess -arrow- must point towards motor mounting -1-.
– Screw nut -T10205/8-2--U- onto spindle -T10620/17- -K-.
– Thrust piece -T10620/14- -M- must be seated on spindle -T10620/17- -K-.
– Screw nut -T10205/8-2- -U- in position on spindle -T10620/17- -K-.
Important
● Spindle -T10620/17- -K- must not project over recess -arrow- in direction of motor mounting later on.
– Hold spindle -T10620/17- -K- and spindle -T10620/4- -L- at an angle.
Important
● Aid of an additional person is required for subsequent work steps.
– Push hydraulic cylinder -VAS 6178- -V- onto spindle -T10620/17- -K-.
Important
● Piston of hydraulic cylinder -VAS 6178- -V- must point towards nut -T10205/8-2- -U- and motor mounting -1-.
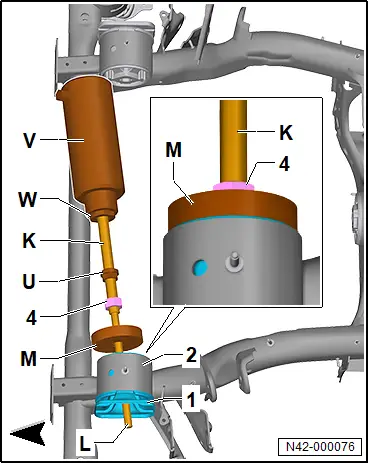
– Fit thrust piece -T10620/12- -N- to hydraulic cylinder -VAS 6178- -V-.
Important
● Flat recess must point towards hydraulic cylinder -VAS 6178- -V-.
● Deeper recess must be seated at subframe -2-.
● Make sure that there is distance -a- between thrust piece -T10620/12- -N- and line connection -arrow- on hydraulic cylinder -VAS 6178- -V-.
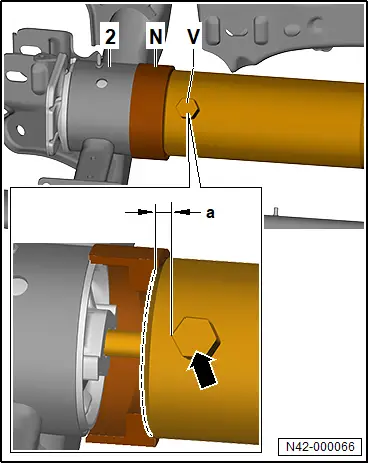
– Swivel spindle -T10620/17- -K-, spindle -T10620/4- -L- and hydraulic cylinder -VAS 6178- -V- inwards.
– Position thrust piece -T10620/12- -N- on subframe -2-.
– Position thrust piece -T10620/14- -M- on motor mounting -1-.
– Screw on nut -4- up to thrust piece -T10620/14- -M-.
Important
● Thrust piece -T10620/14- -M- must be seated on spindle -T10620/17- -K-.
● Spindle -T10620/17- -K- must not project over recess in thrust piece -T10620/14- -M- in direction of motor mounting.
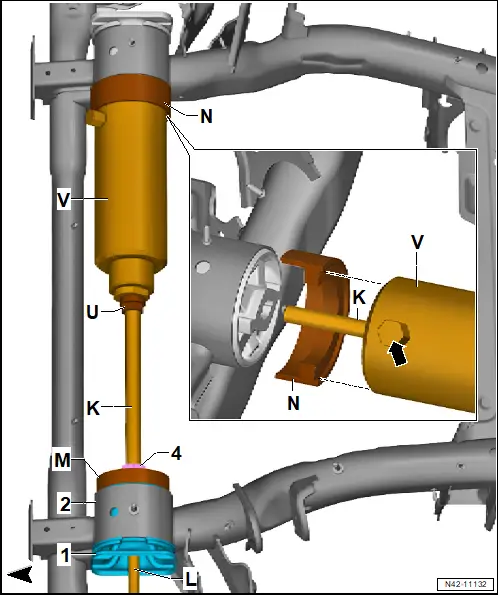
– Screw on nut -T10205/8-2- -U- up to hydraulic cylinder -VAS 6178- -V-.
– Align both thrust pieces, and make sure they are seated correctly.
– Tighten nut -U- and nut -4-.
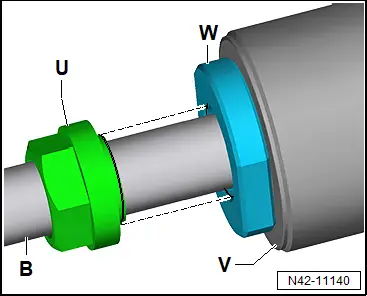
– Screw nut -T10205/8-2- -U- onto thrust piece -T10205/13- -W- until it is flush.
Important
● Guide of nut -T10205/8-2- -U- must be seated in thrust piece -T10205/13- -W-.
– Align tools again, and tighten nut -T10205/8-2- -U-.
– Connect foot pump -VAS 6179- to hydraulic cylinder -VAS 6178- -V-.
 CAUTION
Risk of injuries from tools falling down.
– When pressing out, make sure that a second person holds the tool to prevent it from falling down.
– Actuate foot pump -VAS 6179-. Press out motor mounting with hydraulic cylinder -VAS 6178- outwards.
Installing
Install in reverse order of removal, observing the following:
– Transfer previously made marking -5- to new motor mounting -1-.
– Position motor mounting -1- in relation to subframe -2- according to line -5-, and align it.
– Push thrust piece -T10620/15- -O- onto spindle -T10620/4- -L-.
– Screw nut -6- onto spindle -T10620/4- -L-.
– Position thrust piece -T10620/13- -P- on motor mounting -1- making sure that shorter gap -a- points towards subframe -2-.
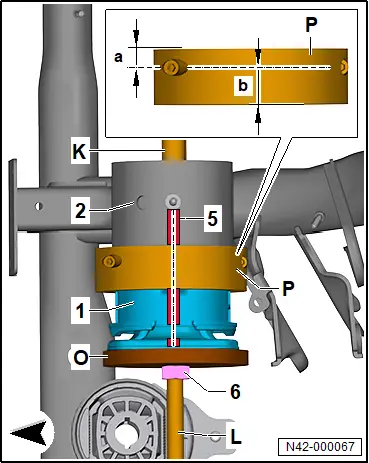
– Assemble both halves of thrust piece -T10620/13- -P- using the two bolts.
– Push thrust piece -T10620/12- -N- onto spindle -T10620/17- -K-.
– Position thrust piece -T10620/12- -N- on subframe -2-.
Important
● Side with 2 recesses must point towards subframe -2-.
– Push hydraulic cylinder -VAS 6178- -V- onto spindle -T10620/17- -K-.
– Fit hydraulic cylinder -VAS 6178- -V- to thrust piece -T10620/12- -N-.
– Screw nut -T10205/8-2- -U- onto spindle -T10620/17- -K-.
– Screw nut for spindle -T10620/4- -6- onto thrust piece -T10620/15- -O-.
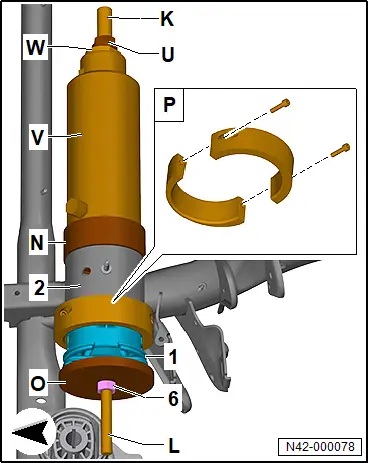
– Position recess on thrust piece -T10620/12- -N- with larger diameter on subframe -2-, and align it.
– Align hydraulic cylinder -VAS 6178- -V- relative to thrust piece -T10620/12- -N-.
Important
● Guide of nut -T10205/8-2- -U- must be seated in thrust piece -T10205/13- -W-.
– Align tools again, and tighten nut -T10205/8-2- -U-.
– Tighten both halves of thrust piece -T10620/13- -P- using the two bolts.
– Connect foot pump -VAS 6179- to hydraulic cylinder -VAS 6178-.
– Actuate foot pump -VAS 6179-. Draw in motor mounting -1- inwards with hydraulic cylinder -VAS 6178- -V-.
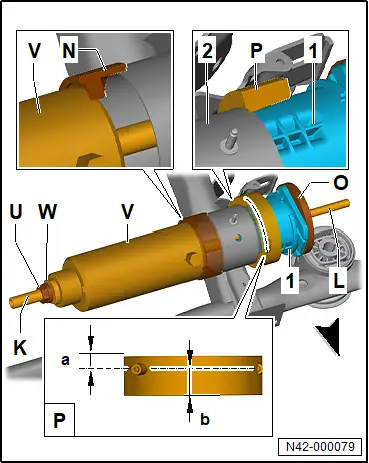
– Draw in motor mounting -1- until collar is almost in contact with thrust piece -T10620/13- -P-.
Important
● End of motor mounting -1- should then be in area of hole -arrow-.
– Remove thrust piece -T10620/13- -P-.
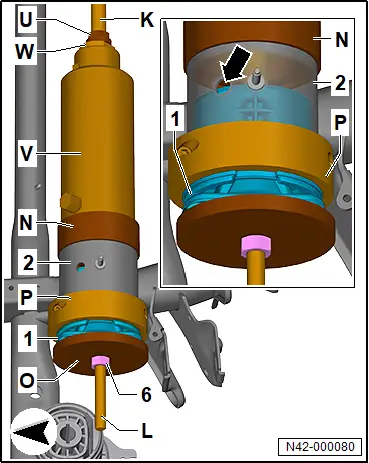
– Completely draw in motor mounting -1- until motor mounting -3- rests against subframe -2- -arrow-.
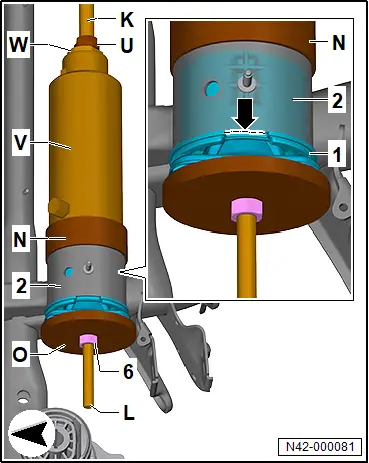
Tightening torques
♦ → Rep. gr.42; Assembly overview – subframe
Renewing front subframe mountings
Renewing front subframe mountings
Special tools and workshop equipment required
♦ Assembly tool -T10620-
♦ foot pump -VAS 6179-
♦ hydraulic press -VAS 6178-
♦ nut -T10205/8-2-
♦ thrust piece -T10205/13-
Removal and installation are described for left side of vehicle as an example.
Removing
– Lower front section of rear axle → Rep. gr.42; Lowering rear axle.
– Grease threads of thrust piece -T10205/13- -W-.
– Screw thrust piece -W- into hydraulic press -VAS 6178- -V-.
– Screw in thrust piece -W- completely.
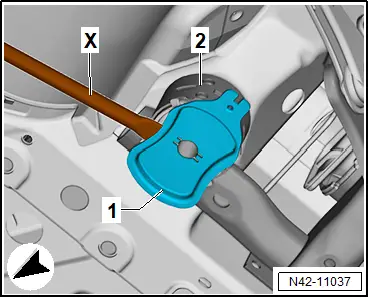
– Use assembly lever -X- to lever cover -1- off mounting -2-.
– Fit thrust piece -T10620/6- -G- onto front subframe mounting -1- with collar side facing down.
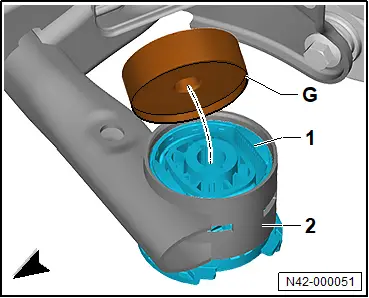
– Screw spindle -T10620/11- -B- into thrust piece -G-.
– Make sure that thrust piece -G- is seated correctly on front subframe mounting -1-.
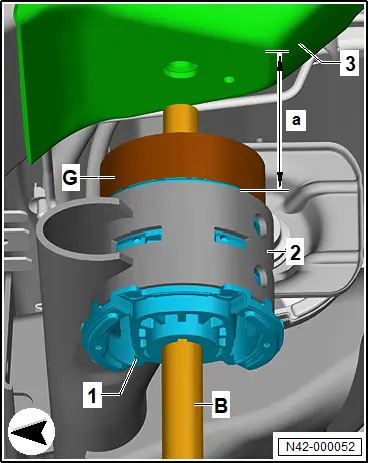
– Fit thrust piece -T10620/1- -H- on thrust piece -T10620/5- -D-.
– Make sure that tools are correctly engaged with each other.
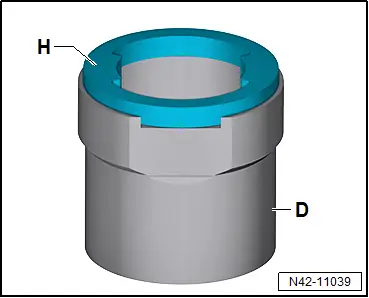
– Push thrust piece -D- with thrust piece -H- onto spindle -B-.
– Inner edges of thrust piece -H- must be positioned on subframe -2- between recesses in front subframe mounting -1-.
– Hold thrust piece -D- in position.
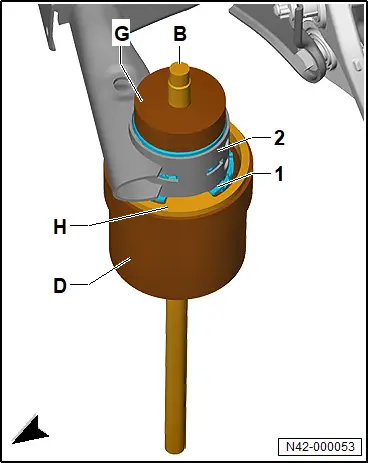
Due to the heavy weight of the tool and the difficult handling, a second person is required for the following work steps.
– Push hydraulic press -V- onto spindle -B-.
– Screw nut -T10205/8-2- -U- onto spindle -B-.
– Screw nut -U- onto thrust piece -T10205/13- -W-.
– Align tools, making sure that they are seated correctly.
– Pretension tools and front subframe mounting via nut -U-.
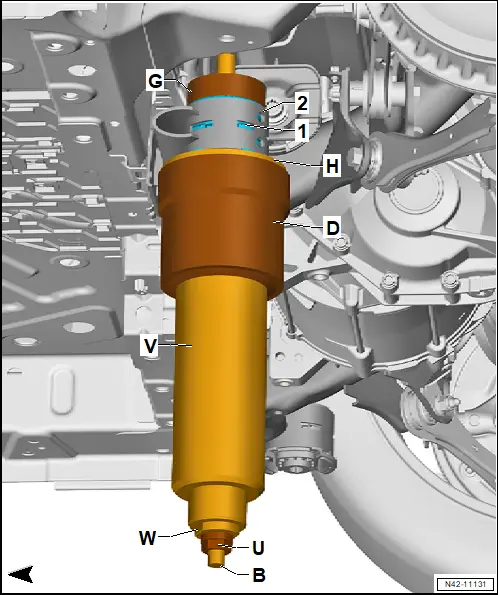
Continued
– Screw nut -U- onto thrust piece -W- until it is flush.
Important
● Guide of nut -U- must be seated in thrust piece -W-.
– Align tools again, and tighten nut -U-.
– Connect foot pump -VAS 6179- to hydraulic press -V-.
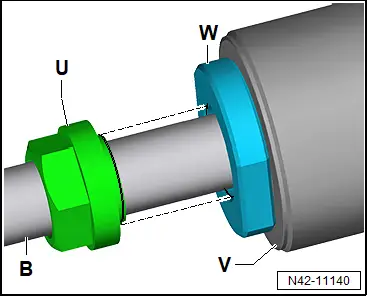
 CAUTION
Risk of injuries from tools falling down.
– When pressing out, make sure that a second person holds the tool to prevent it from falling down.
– Operate foot pump. Press out front subframe mounting with hydraulic cylinder by 50 mm.
– Release pressure on hydraulic cylinder via foot pump.
– Lower tools.
– Lower thrust piece -D- with thrust piece -H-.
– Mark installation position by drawing a line -arrow- on front subframe mounting -1- and on subframe -2-.
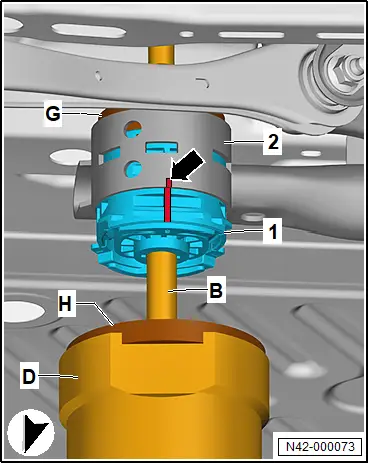
– Apply tools anew.
– Align tools, and make sure that they are seated correctly.
– Completely press out front subframe mounting.
Installing
Install in reverse order of removal, observing the following:
– Transfer previously made installation position marking from old front subframe mounting onto new mounting.
– Fit thrust piece -T10620/7- -I- with collar side on subframe -2-.
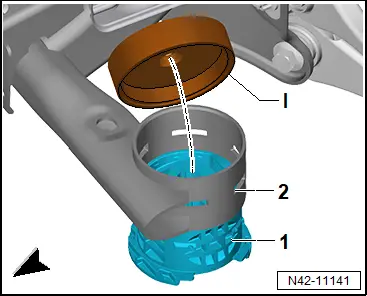
– Make sure that thrust piece -I- is seated correctly at edge of subframe -2-.
– Screw spindle -B- into thrust piece -I-.
– Fit front subframe mounting -1- onto subframe -2-.
Important
● Long side of shoulder runs parallel to direction of travel.
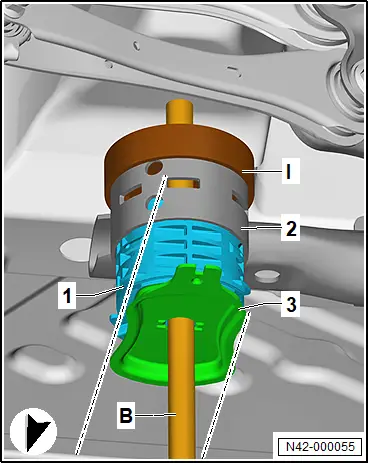
Due to the heavy weight of the tool and the difficult handling, a second person is required for the following work steps.
– Push thrust piece -T10620/10- -F- in direction of -arrow- onto spindle -B-.
– Position thrust piece -F- on cover -3-.
– Push hydraulic press -V- onto spindle -B-.
– Screw nut -U- onto spindle -B-, and tighten it by hand.
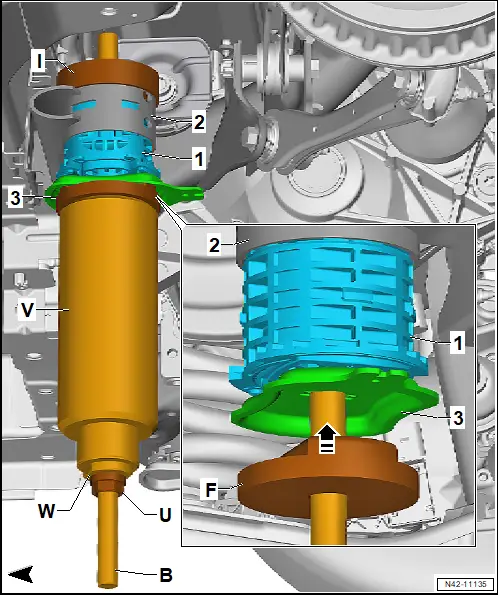
Continued
– Align tools, making sure that they are seated correctly.
Important
● Long side -arrows- of cover -3- must run parallel to direction of travel.
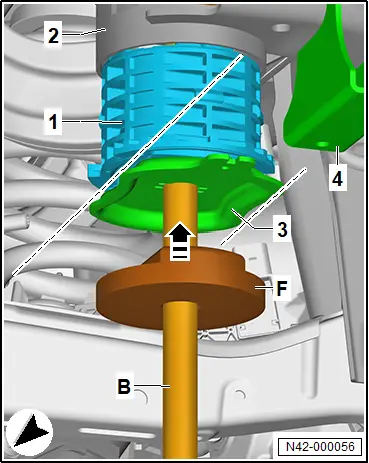
Due to the heavy weight of the tool and the difficult handling, a second person is required for the following work steps.
– Check position of front subframe mounting -1-, and align it.
– Pretension tools and front subframe mounting -1- via nut -U-.
– Align tools again, and tighten nut -U-.
– Guide of nut -U- must be seated in thrust piece -W-.
– Operate foot pump. Press in front subframe mounting -1- with hydraulic cylinder -V- until collar makes contact with subframe -2- without gaps.
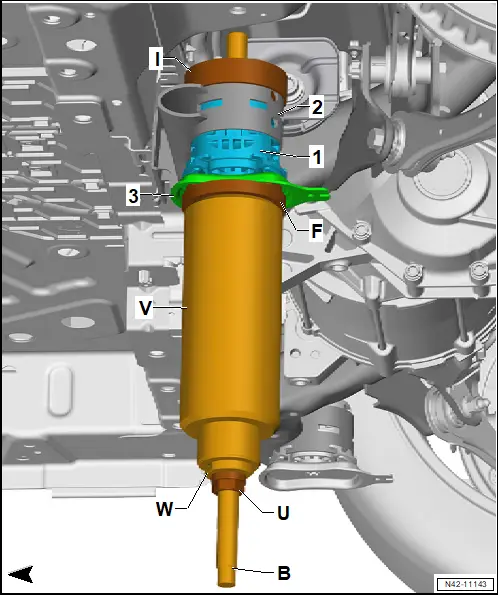
Continued
Tightening torques
♦ → Rep. gr.42; Assembly overview – subframe
Renewing rear subframe mountings
Renewing rear subframe mountings
Special tools and workshop equipment required
♦ spindle -T10620/11-
Removal and installation are described for the left side of vehicle as an example.
Removing
– Lower rear section of rear axle → Rep. gr.42; Lowering rear axle.
– Grease threads of thrust piece -T10205/13- -W-.
– Screw thrust piece -T10205/13- -W- into hydraulic cylinder -VAS 6178- -V-.
– Screw in thrust piece -T10205/13- -W- completely.
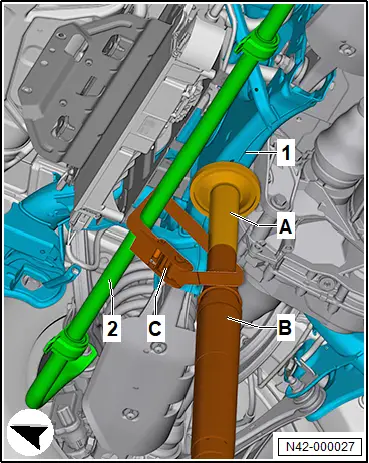
– Secure anti-roll bar -2- on engine and gearbox jack -VAS 6931- -B-.
– Using assembly lever -X-, lever cover -1- off subframe -2-.
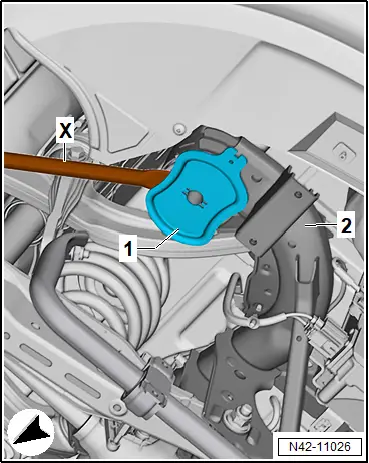
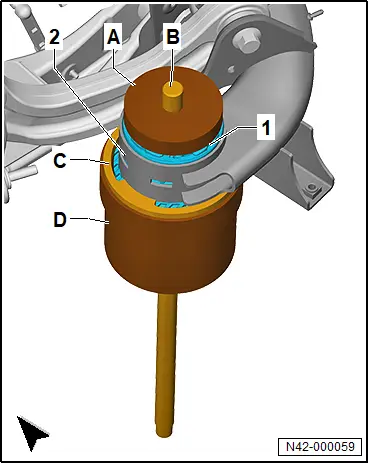
– Fit thrust piece -T10620/8- -A- onto rear subframe mounting -1-.
– Screw spindle -T10620/11- -B- into thrust piece -T10620/8- -A-.
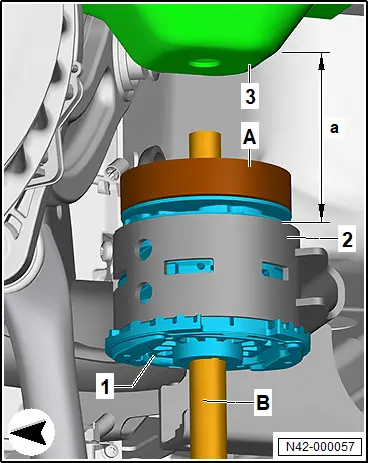
– Fit thrust piece -T10620/2- -C- on thrust piece -T10620/5- -D-.
– Guide of thrust piece -T10620/2- -C- must engage in hole -arrow-.
Important
● Straight edges must lie against each other.
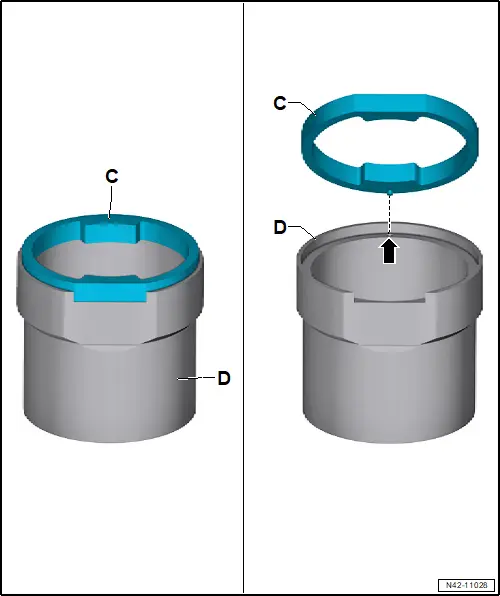
– Push thrust piece -T10620/5- -D- together with thrust piece -T10620/2- -C- onto spindle -T10620/11- -B-.
– Straight edges -arrow- of thrust piece -T10620/5- -D- and thrust piece -T10620/2- -C- must point towards anti-roll bar -3- on subframe -2-.
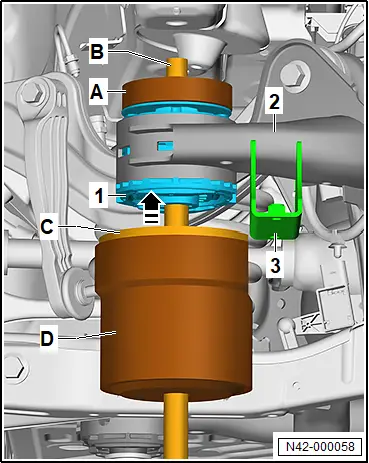
– Position inner edges of thrust piece -T10620/2- -C- between recesses in mounting -1- on subframe -2-.
Important
● Inner edges of thrust piece -T10620/2- -C- must contact subframe -2-.
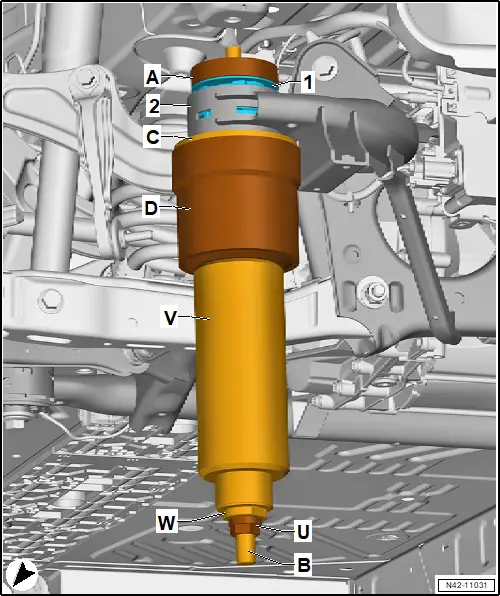
Due to the heavy weight of the tool and the difficult handling, a second person is required for the following work steps.
– Push hydraulic cylinder -VAS 6178- -V- onto spindle -T10620/11- -B-.
– Screw nut -T10205/8-2- -U- onto spindle -T10620/11- -B- hand-tight.
– Pretension tools and rear subframe mounting -1- via nut -T10205/8-2- -U-.
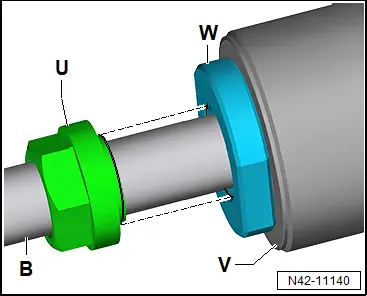
Continued
– Screw nut -T10205/8-2- -U- onto thrust piece -T10205/13- -W- until it is flush.
Important
● Guide of nut -T10205/8-2- -U- must be seated in thrust piece -T10205/13- -W-.
– Align tools again, and tighten nut -T10205/8-2- -U-.
– Connect foot pump -VAS 6179- to hydraulic cylinder -VAS 6178- -V-.
 CAUTION
Risk of injuries from tools falling down.
– When pressing out, make sure that a second person holds the tool to prevent it from falling down.
– Operate foot pump -VAS 6179-, and press out rear subframe mounting with hydraulic cylinder -VAS 6178-.
Installing
Install in reverse order of removal, observing the following:
– Position thrust piece -T10620/9- -E- with collar side on subframe -2-.
– Fit rear subframe mounting -1- to subframe -2-.
– Screw spindle -T10620/11- -B- into thrust piece -T10620/9- -E-.
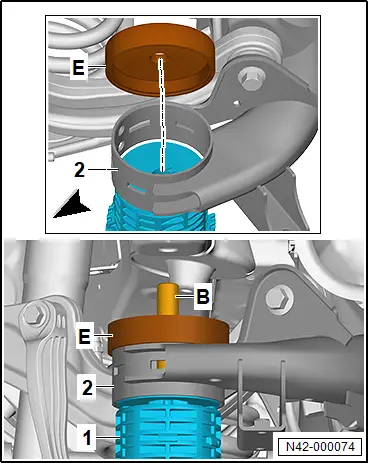
– Align rear subframe mounting -1- relative to subframe -2- as indicated by lines.
Important
● Make sure that mounting for anti-roll bar -4- and edges -arrow- of rear subframe mounting -1- are aligned parallel to each other.
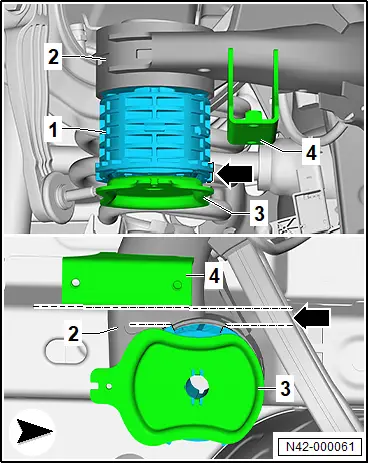
– Make sure that thrust piece -T10620/9- -E- is seated correctly at edge of subframe -2-.
– Push thrust piece -T10620/10- -F- onto spindle -T10620/11- -B-.
– Fit thrust piece -T10620/10- -F- to cover -3-.
Important
● Long side of cover -3- must run parallel with direction of travel.
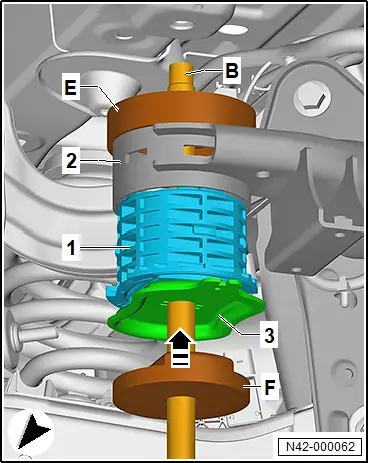
Due to the heavy weight of the tool and the difficult handling, a second person is required for the following work steps.
– Push hydraulic cylinder -VAS 6178- -V- onto spindle -T10620/11- -B-.
– Screw nut -T10205/8-2- -U- onto spindle -T10620/11- -B- hand-tight.
– Pretension tools and rear subframe mounting -1- via nut -T10205/8-2- -U-.
– Align tools again, and tighten nut -T10205/8-2- -U-.
Important
● Guide of nut -T10205/8-2- -U- must be seated in thrust piece -T10205/13- -W-.
– Actuate foot pump -VAS 6179-. Press in rear subframe mounting -1- with hydraulic cylinder -VAS 6178- -V- until collar makes contact with subframe -2- “without gaps”.
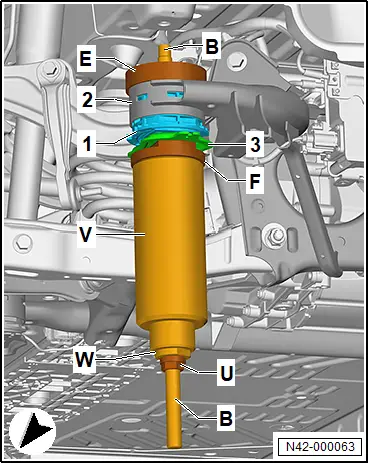
Continued
Tightening torques
♦ → Rep. gr.42; Assembly overview – subframe