Driver assist systems. Senders, sensors, control units
- Removing and installing front parking aid senders [G252]/[G253]/[G254]/[G255]
- Removing and installing parking aid control unit [J446]
- Removing and installing left/right overhead view camera R244/R245
- Removing and installing front overhead view camera [R243]
- Removing and installing lane change assist warning lamp in exterior mirror
- Removing and installing lane change assist control unit [J769]/[J770]
- Removing and installing adaptive cruise control unit [J428]
- Removing and installing rear park assist steering senders [G716]/[G717]
- Removing and installing front park assist steering senders [G568]/[G569]
- Removing and installing rear parking aid senders [G203]/[G204]/[G205]/[G206]
Removing and installing front parking aid senders [G252]/[G253]/[G254]/[G255]
Removing and installing front parking aid senders [G252]/[G253]/[G254]/[G255]
The front right parking aid sender -G252-, front centre right parking aid sender -G253-, front centre left parking aid sender -G254- and front left parking aid sender -G255- will henceforth be referred to as “sender”.
Removing
Outer rear senders:
– Detach front wheel housing liner → General body repairs, exterior; Rep. gr.66; Wheel housing liner; Removing and installing front wheel housing liner.
– Press locking devices in direction of -arrow- while simultaneously pressing sender -1- inwards from outside.
– Disconnect electrical connector -2-, and pull it in a straight line off sender -1-.
– Remove sender -1-.
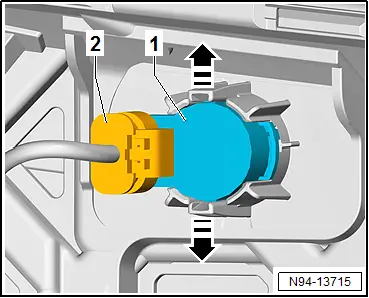
All vehicles (continued)
Inner rear senders:
– Remove bumper cover → General body repairs, exterior; Rep. gr.63; Front bumper; Removing and installing bumper cover.
– Press locking devices in direction of -arrow- while simultaneously pressing sender -1- inwards from outside.
– Disconnect electrical connector -2-, and pull it in a straight line off sender -1-.
– Remove sender -1-.
All vehicles (continued)
Installing
Install in reverse order of removal, observing the following:
 NOTICE
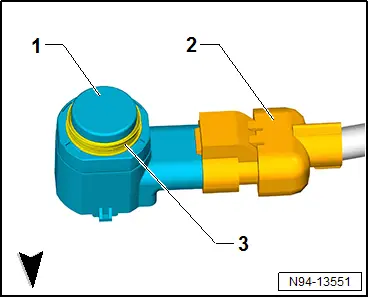
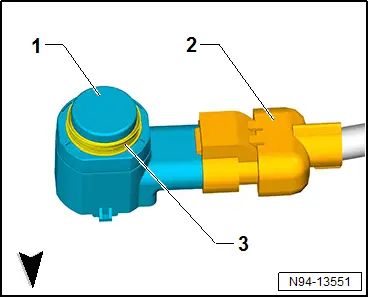
Malfunctions due to the use of an unsuitable or damaged decoupling ring -3-.
– Do not turn decoupling ring -3- on the sender head.
– Renew decoupling ring -3- if unsuitable or damaged.
– Check decoupling ring -3- on sender -1- for damage.
– Push electrical connector -2- in straight line on sender -1- and engage it.
– When inserting sender -1- in sender retainer, make sure that the decoupling ring -3- is seated correctly on the sender head.
– Insert sender -1- in a straight line into sender retainer.
Important
● Locking devices of sender retainer must engage when installing sender -1-.
Removing and installing parking aid control unit [J446]
Removing and installing parking aid control unit [J446]
Removing
– Remove right luggage compartment side trim → General body repairs, interior; Rep. gr.70; Luggage compartment trims; Removing and installing luggage compartment side trim.
– Release locking devices -A-, and swing out parking aid control unit -J446- -1- in direction of -arrow B-.
– Disconnect electrical connectors.
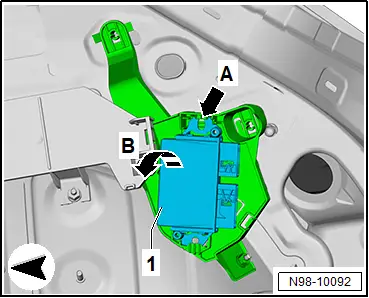
Installing
Install in reverse order of removal.
Removing and installing left/right overhead view camera R244/R245
Removing and installing left/right overhead view camera R244/R245
Left overhead view camera -R244- and right overhead view camera -R245- are called camera in this document.
Removal and installation are described for left vehicle side as an example.
Removing
– Remove upper mirror cover → General body repairs, exterior; Rep. gr.66; Exterior mirrors; Removing and installing upper mirror cover.
– Unscrew bolts -2-.
– Remove bracket -1- with camera -3-.
– Separate electrical connector and remove camera -3- from bracket -1-.
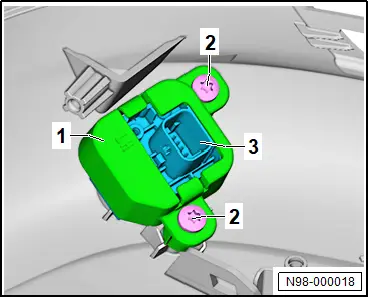
Installing
Install in the reverse order of removal, observing the following:
– → Rep. gr.98; Calibrate overhead view camera.
Tightening torques
♦ → General body repairs, exterior; Rep. gr.66; Exterior mirror; Assembly overview - exterior mirror
Removing and installing front overhead view camera [R243]
Removing and installing front overhead view camera [R243]
Removing
Front overhead view camera -R243- is referred to hereafter as camera.
– Remove bumper cover → General body repairs, exterior; Rep. gr.63; Front bumper; Removing and installing bumper cover.
– Disconnect connector -1-.

– Push locking devices in direction of -arrow- and remove bracket -1-.
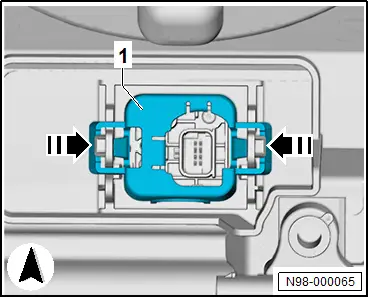
– Pull out camera -1-.
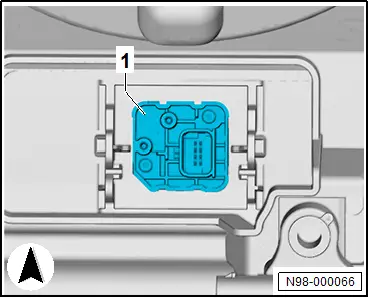
Installing
Install in reverse order of removal, observing the following:
Important
● Make sure that camera is correctly seated.
– → Rep. gr.98; Calibrate overhead view camera.
Removing and installing lane change assist warning lamp in exterior mirror
Removing and installing lane change assist warning lamp in exterior mirror
Removal and installation are described for the left vehicle side as an example.
Removing
– Remove upper mirror cover → General body repairs, exterior; Rep. gr.66; Exterior mirrors; Removing and installing upper mirror cover.
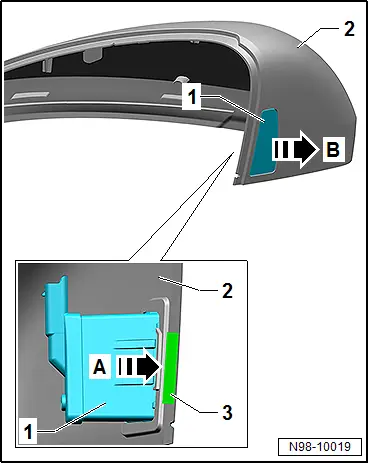
– Push area -3- in direction of -arrow A-, and hold it in that position.
– Press warning lamp -1- in direction of -arrow B- out of mirror cover -2-.
Installing
Install in reverse order of removal.
Removing and installing lane change assist control unit [J769]/[J770]
Removing and installing lane change assist control unit [J769]/[J770]
The lane change assist control unit -J769- and lane change assist control unit 2 -J770- will henceforth be referred to as “control unit”.
Removal and installation are described for the left vehicle side as an example.
Removing
– Remove bumper cover → General body repairs, exterior; Rep. gr.63; Rear bumper; Removing and installing bumper cover.
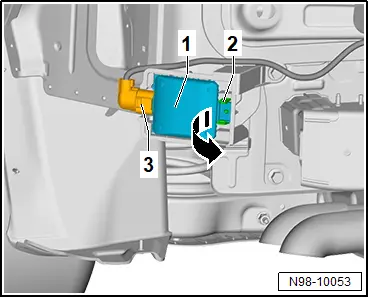
– Disconnect electrical connector -3-.
– Release locking device -2-.
– Swing control unit -1- in direction of -arrow-, and remove it.
– To remove bracket of control unit -1-, unscrew nut, and remove bracket.
Installing
Install in reverse order of removal, observing the following:
Tightening torques
ComponentSpecified torqueNut on bracket3.5 N·m
Removing and installing adaptive cruise control unit [J428]
Removing and installing adaptive cruise control unit [J428]
Removing
Adaptive cruise control unit -J428- is called control unit in this document.
If the control unit is renewed, perform the test plan for the renewal of the control unit:
– Carry out function “Adaptive cruise control unit” using → Vehicle diagnostic tester → Rep. gr.00; Access to diagnoses.
Continued
– Remove bumper cover → General body repairs, exterior; Rep. gr.63; Front bumper; Removing and installing bumper cover.
– Disconnect electrical connector.
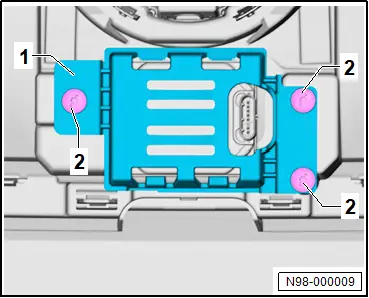
– Unscrew bolts -2-.
– Remove bracket -1- with control unit.
Installing
Install in reverse order of removal, observing the following:
If the control unit has been renewed, conclude the test plan for the renewal of the control unit:
– Conclude function “Adaptive cruise control unit” using → Vehicle diagnostic tester → Rep. gr.00; Access to diagnoses.
Continued
– → Rep. gr.98; Adjusting/calibrating adaptive cruise control unit
Tightening torques
ComponentSpecified torqueBolt on bumper cover8 Nm
Removing and installing rear park assist steering senders [G716]/[G717]
Removing and installing rear park assist steering senders [G716]/[G717]
The rear left park assist steering sender -G716- and rear right park assist steering sender -G717- will henceforth be referred to as “sender”.
Removing
– Detach rear wheel housing liner → General body repairs, exterior; Rep. gr.66; Wheel housing liner; Removing and installing rear wheel housing liner.
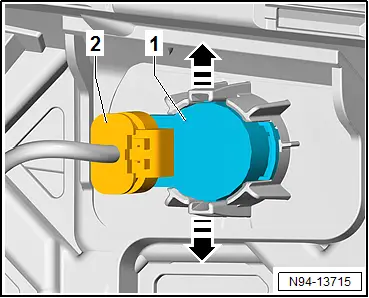
– Press locking devices in direction of -arrow- while simultaneously pressing sender -1- inwards from outside.
– Disconnect electrical connector -2-, and pull it in a straight line off sender -1-.
– Remove sender -1-.
Installing
Install in reverse order of removal, observing the following:
 NOTICE
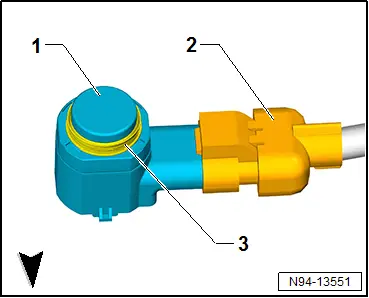
Malfunctions due to the use of an unsuitable or damaged decoupling ring -3-.
– Do not turn decoupling ring -3- on the sender head.
– Renew decoupling ring -3- if unsuitable or damaged.
– Check decoupling ring -3- on sender -1- for damage.
– Push electrical connector -2- in straight line on sender -1- and engage.
– When inserting sender -1- in sender retainer, make sure that the decoupling ring -3- is seated correctly on the sender head.
– Insert sender -1- in a straight line into sender retainer.
Important
● Locking devices of sender retainer must engage when installing sender -1-.
Removing and installing front park assist steering senders [G568]/[G569]
Removing and installing front park assist steering senders [G568]/[G569]
The front left sender for park assist steering on left side of vehicle -G568- and front right sender for park assist steering on right side of vehicle -G569- will henceforth be referred to as “sender”.
Removing
– Detach front wheel housing liner → General body repairs, exterior; Rep. gr.66; Wheel housing liner; Removing and installing front wheel housing liner.
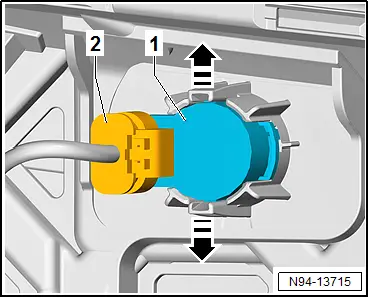
– Press locking devices in direction of -arrow- while simultaneously pressing sender -1- inwards from outside.
– Disconnect electrical connector -2-, and pull it in a straight line off sender -1-.
– Remove sender -1-.
Installing
Install in reverse order of removal, observing the following:
 NOTICE
Malfunctions due to the use of an unsuitable or damaged decoupling ring -3-.
– Do not turn decoupling ring -3- on the sender head.
– Renew decoupling ring -3- if unsuitable or damaged.
– Check decoupling ring -3- on sender -1- for damage.
– Push electrical connector -2- in straight line on sender -1- and engage.
– When inserting sender -1- in sender retainer, make sure that the decoupling ring -3- is seated correctly on the sender head.
– Insert sender -1- in a straight line into sender retainer.
Important
● Locking devices of sender retainer must engage when installing sender -1-.
Removing and installing rear parking aid senders [G203]/[G204]/[G205]/[G206]
Removing and installing rear parking aid senders [G203]/[G204]/[G205]/[G206]
The rear left parking aid sender -G203-, rear centre left parking aid sender -G204-, rear centre right parking aid sender -G205- and rear right parking aid sender -G206- will henceforth be referred to as “sender”.
Removing
Outer senders:
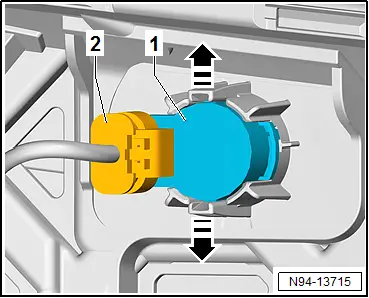
– Press locking devices in direction of -arrow- while simultaneously pressing sender -1- inwards from outside.
– Disconnect electrical connector -2-, and pull it in a straight line off sender -1-.
– Remove sender -1-.
All vehicles (continued)
Inner senders:
– Unscrew bolts -2-.
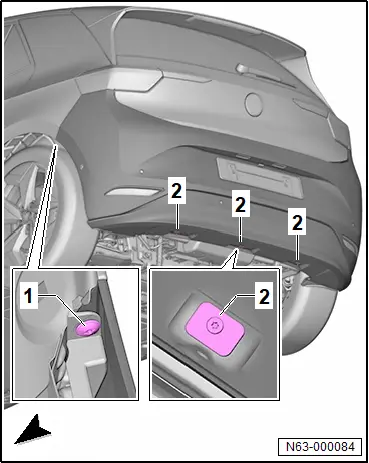
– Press locking devices in direction of -arrow- while simultaneously pressing sender -1- inwards from outside.
– Disconnect electrical connector -2-, and pull it in a straight line off sender -1-.
– Remove sender -1-.
All vehicles (continued)
Installing
Install in the reverse order of removal, observing the following:
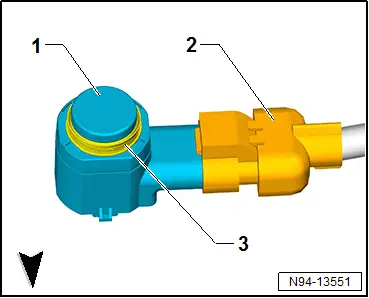
 NOTICE
Malfunctions due to the use of an unsuitable or damaged decoupling ring -3-.
– Do not turn decoupling ring -3- on the sender head.
– Renew decoupling ring -3- if unsuitable or damaged.
– Check decoupling ring -3- on sender -1- for damage.
– Push electrical connector -2- in straight line on sender -1- and engage it.
– When inserting sender -1- in sender retainer, make sure that the decoupling ring -3- is seated correctly on the sender head.
– Insert sender -1- in a straight line into sender retainer.
Important
● Locking devices of sender retainer must engage when installing sender -1-.
Tightening torques
♦ → General body repairs, exterior; Rep. gr.63; Rear bumper; Assembly overview – bumper cover