Electric drive EIP220, EIA200, EIA210. Engine assy,cylinder block,crankcase
- Assembly overview – front motor, left-hand drive vehicles
- Installing front motor, right-hand drive vehicles
- Installing rear motor
- Securing motor to engine and gearbox support, rear motor
- Removing rear motor
- Assembly overview - rear motor
- Installing front motor, left-hand drive vehicles
- Securing motor to engine and gearbox support, front motor
- Removing front motor, right-hand drive vehicles
- Removing front motor, left-hand drive vehicles
- Assembly overview – front motor, right-hand drive vehicles
- Removing and installing gearbox mountings
Assembly overview – front motor, left-hand drive vehicles
Assembly overview – front motor, left-hand drive vehicles

1 - Three-phase current drive 2 -VX97-
❏ With electric drive motor 2 -V717-
❏ With drive motor 2 temperature sender -G1146-
❏ With drive motor 2 rotor position sender 1 -G1147-
❏ With power and control electronics 2 for electric drive -JX4-
❏ → Rep. gr.93; Removing and installing power and control electronics for electric drive
❏ → Rep. gr.10; Removing front motor
❏ → Rep. gr.10; Installing front motor
2 - Bolt for gearbox mounting
❏ Renew after removing
❏ 70 N·m +90°
3 - Bolt for gearbox support
❏ Qty. 3
❏ Renew after removing
❏ 50 N·m +90°
4 - Gearbox support
5 - Gearbox breather line
6 - Bolt for gearbox mounting
❏ Qty. 2
❏ Renew after removing
❏ 50 N·m +90°
7 - Gearbox mounting
❏ → Rep. gr.10; Removing and installing gearbox mounting
8 - High-voltage connector for power and control electronics 2 for electric drive -JX4-
9 - High-voltage cable duct
10 - Bolt for cable guide
❏ Qty. 3
❏ 8 N·m
11 - Bolt for potential equalisation line
❏ 8 N·m
12 - Electrical connector for power and control electronics 2 for electric drive -JX4-
13 - Potential equalisation line
14 - Engine support
15 - Front motor mounting
❏ → Running gear, axles, steering; Rep. gr.40; Subframe; Renewing front motor mounting
16 - Bolt for motor mounting
❏ Renew after removing
❏ 130 N·m +180°
17 - Bolt for motor support
❏ Qty. 3
❏ Renew after removing
❏ 50 N·m +90°
18 - Bolt for motor support
❏ Qty. 3
❏ Renew after removing
❏ 50 N·m +90°
19 - Bolt for motor mounting
❏ Renew after removing
❏ 130 N·m +180°
20 - Front motor mounting
❏ → Running gear, axles, steering; Rep. gr.40; Subframe; Renewing front motor mounting
21 - Engine support
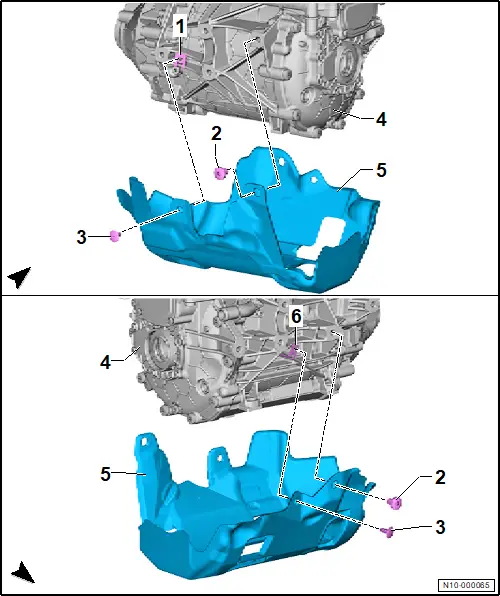
Assembly overview – noise insulation, motor
1 - Retaining clip
2 - Clip/bolt
- Depending on equipment/version
- Bolt with washer
- Qty. 2
- 5 N·m
3 - Clip
- Qty. 2
4 - Three-phase current drive 2 -VX97-
5 - Noise insulation
- Depending on equipment/version
6 - Retaining clip

Installing front motor, right-hand drive vehicles
Installing front motor, right-hand drive vehicles
Special tools and workshop equipment required
♦ lifting tackle -VAS 501 021-
♦ workshop hoist -VAS 6100-
Three- phase current drive 2 -VX97- with power and control electronics 2 for electric drive -JX4- will henceforth be referred to as “motor”.
Installing
– Insert bracket -A- into holes -arrows B-.
– Screw bolt -1- to stop into hole -arrow C-.
– Secure shackle -2- in centre hole.
– Attach workshop hoist -VAS 6100- to shackle -2-.

– Use workshop hoist to position motor -1- on subframe in such a way that a distance of -a- = 20 mm remains between motor support and gearbox mounting.
– Align motor support and gearbox mounting with each other.
– Screw in bolts -2- and -3- until bolt heads make contact with gearbox mounting.
– Detach lifting tackle -VAS 501 021- -arrow-.
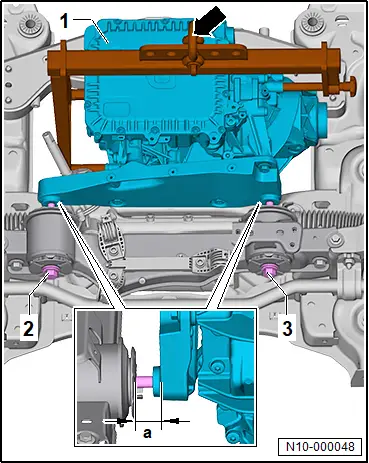
– Raise motor -1- 10 mm in direction of -arrow B- using assembly lever -A-, and pull it against gearbox mounting in direction of -arrow C-.
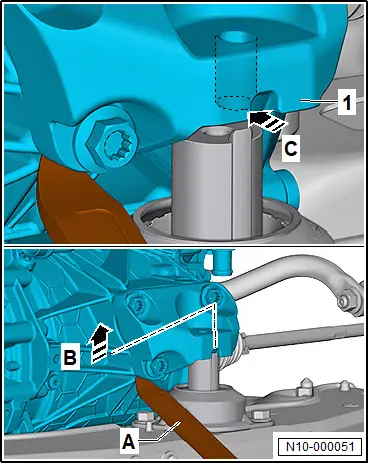
– Screw in bolts -1- and -2- entirely, and tighten them.

– Tighten bolt -1- for motor mounting -2-.

Further installation is carried out in reverse order of removal, observing the following:
– Install subframe together with motor → Running gear, axles, steering; Rep. gr.40; Subframe; Removing and installing subframe with motor.
Tightening torques
♦ → Rep. gr.10; Assembly overview – front motor
Installing rear motor
Installing rear motor
Special tools and workshop equipment required
♦ bit XZN 16 -T10198-
♦ engine and gearbox jack -VAS 6931-
♦ gearbox support -3282-
Three-phase current drive -VX54- with power and control electronics for electric drive -JX1- is referred to hereafter as motor.
Installing
Important
● Motor and gearbox are secured to gearbox support -3282- and engine and gearbox jack -VAS 6931- → Rep. gr.10; Removing rear motor.
– Raise motor with gearbox -1- up to 150 mm before installation position.

– Fit electrical connector -1- above gearbox, and close locking bracket in direction of -arrow A-.
– Tighten bolts -2- and -3-.

– Fit coolant hose -1- above gearbox, and close locking element -2-. Ensure proper engagement by pulling.
– Attach breather line -3-.
– Close clips -arrow A- and -arrow B-.

– Raise motor with gearbox -1- until bolts for motor and gearbox mountings can be started.
– Tighten bolts for engine and gearbox mounting using bit XZN 16 -T10198-.
– Mount bracket -1- for potential equalisation line on gearbox and tighten nut -arrow-.

– Install left and right drive shafts → Running gear, axles, steering; Rep. gr.42; Drive shaft; Removing and installing drive shaft.
If the power and control electronics for electric drive -JX1- has been renewed:
– Carry out function “power and control electronics for electric drive [JX1], commissioning” → Rep. gr.00; Access to diagnoses.
Note
At the end of the diagnosis, the function “Calibrate electric drive motor” is carried out automatically.
Continued
If the three-phase current drive -VX54- was renewed:
– Carry out function “Calibrate electric drive motor” → Rep. gr.93; Calibrating electric drive motor [VX54].
Continued
Further installation is carried out in reverse order of removal, observing the following:
 WARNING
High voltage can cause fatal injury.
Danger of severe or fatal injuries from electric shock or electric arcs.
– Have a high-voltage technician (HVT) or a high-voltage expert (HVE) re-energise the high-voltage system.
– → Rep. gr.93; Re-energise high-voltage system.
Tightening torques
♦ → Rep. gr.10; Assembly overview - motor
♦ → Rep. gr.93; Assembly overview – electric drive motor, rear motor
♦ → Rep. gr.93; Assembly overview - charging unit for high-voltage battery
♦ → Running gear, axles, steering; Rep. gr.42; Drive shaft; Assembly overview – drive shaft
♦ → General body repairs, exterior; Rep. gr.66; Underbody cladding; Assembly overview – underbody cladding
Securing motor to engine and gearbox support, rear motor
Securing motor to engine and gearbox support, rear motor
Special tools and workshop equipment required
♦ Motor bracket -VAS 6095A/1-21-
♦ engine and gearbox support -VAS 6095A-
♦ lifting tackle -VAS 501 019-
♦ retaining plate -VW309A-
♦ workshop hoist -VAS 6100-
 CAUTION
Risk of injury from moving parts.
Body parts could suffer contusions.
– Never reach or step into the hazard zone.
Assembling lifting tackle -VAS 501 019- -A-
– Fit bow -VAS 501 019/1- -1- and bow -VAS 501 019/2- -2- to lifting tackle. Screw in bolts -5-.
– Secure shackle -4- in hole shown in illustration.

– Align bows -1- and -2- with markings -arrows-.
– Tighten bolts -5-.

Securing motor on engine and gearbox support
– Insert bows -1- and -2- of lifting tackle -A- into holes -arrows B-.
– Screw bolt -3- by hand to stop into hole -arrow C-.
– Attach workshop hoist -VAS 6100- to shackle -4-, and raise motor.

– Mount motor bracket -VAS 6095A/1-21- -A- on retaining plate -VW309A- -B- and tighten bolts.
– Position motor bracket -A- on motor -1-, and tighten bolts.

– Secure motor -1- with motor bracket -A- and support plate -B- to engine and gearbox support -VAS 6095A- -C-.

Tightening torques
BoltsSpecified torqueBracket -VAS 501 019/1- and bracket -VAS 501 019/2- to lifting tackle -VAS 501 019-25 NmMotor bracket -VAS 6095A/1-21- to retaining plate -VW309A-80 NmMotor bracket -VAS 6095A/1-21- to motor20 Nm
Removing rear motor
Removing rear motor
Special tools and workshop equipment required
♦ Hook -3282/049-
♦ Pin -3282/34-
♦ Pin -3282/45-
♦ bit XZN 16 -T10198-
♦ engine and gearbox jack -VAS 6931-
♦ engine bung set -VAS 6122-
♦ gearbox support -3282-
Three-phase current drive -VX54- with power and control electronics for electric drive -JX1- is referred to hereafter as motor.
Removing
 DANGER
High voltage can cause fatal injury.
Danger of severe or fatal injuries from electric shock or electric arcs.
– Have a high-voltage technician (HVT) or a high-voltage expert (HVE) de-energise the high-voltage system.
– → Rep. gr.93; De-energise high-voltage system.
– Remove rear centre underbody cladding -1- → General body repairs, exterior; Rep. gr.66; Underbody cladding; Removing and installing rear centre underbody cladding.
– Remove rear underbody cladding -2- → General body repairs, exterior; Rep. gr.66; Underbody cladding; Removing and installing rear underbody cladding.
– Remove stone deflector for spring control arm -4- → Running gear, axles, steering; Rep. gr.42; Suspension link, track rod; Removing and installing stone deflector for spring control arm.

– Remove left and right drive shaft → Running gear, axles, steering; Rep. gr.42; Drive shaft; Removing and installing drive shaft.
– Remove rear left and right wheel housing liner → General body repairs, exterior; Rep. gr.66; Wheel housing liner; Removing and installing rear wheel housing liner.
– → Rep. gr.19; Drain coolant.
Note
For the bolt of the gearbox mounting to be renewed it is necessary to remove the charger.
– Remove charging unit 1 for high-voltage battery -AX4- → Rep. gr.93; Removing and installing charging unit 1 for high-voltage battery [AX4].
– Open hose clip -arrow-, and pull off coolant hose -1-.
– Disconnect electrical connector -2-.

– Unscrew nut -arrow-, and remove bracket -1- for potential equalisation line.
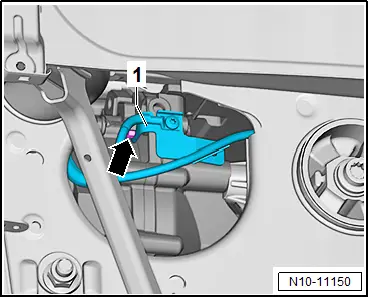
– Unclip coolant hose -1- as shown -arrow-.

– Unclip gearbox breather line -1- in rear left wheel housing -arrows-.
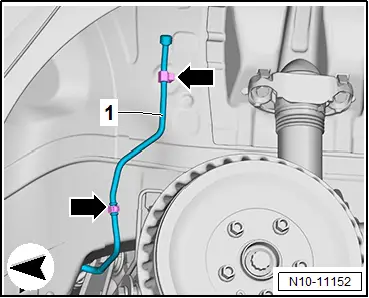
– On gearbox side, unscrew bolts -arrows- for high-voltage cable duct -1-.
– Place gearbox support -3282- -D- on engine and gearbox jack -VAS 6931- -E-.
– Position engine and gearbox jack -E- centrally under motor and gearbox -2-.
– Screw in adapters into supports as follows:
A - Pin -3282/34-
B - Pin -3282/45- with screwed on nut -1-
C - Hook -3282/049-
– Align mountings -A- and -B- to mounting points in motor and gearbox.
– Position mounting -C- under power and control electronics for electric drive -JX1-.
– Raise motor with gearbox to relieve load on motor mountings.

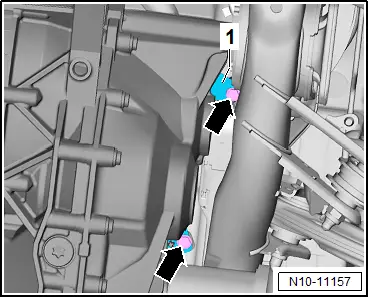
– Use bit XZN 16 -T10198- to unscrew bolts -1- for left and right motor mountings through opening -arrow- in longitudinal member.

– Unscrew gearbox mounting bolt -arrow-.

– Lower motor with gearbox approx. 150 mm.

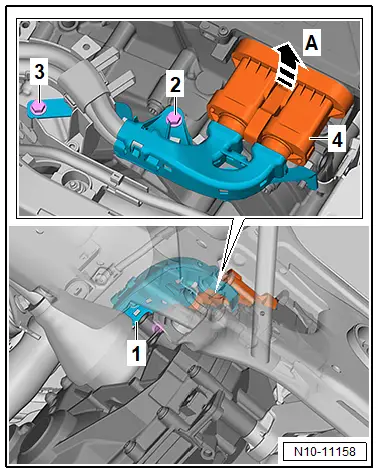
– Detach high-voltage cable -1- from power and control electronics for electric drive -JX1-. To do this, unscrew bolts -2- and -3- above the gearbox.
– Open locking bracket -A- on high-voltage connector -4-, and pull off high-voltage connector → Rep. gr.93; Disconnecting high-voltage connectors.
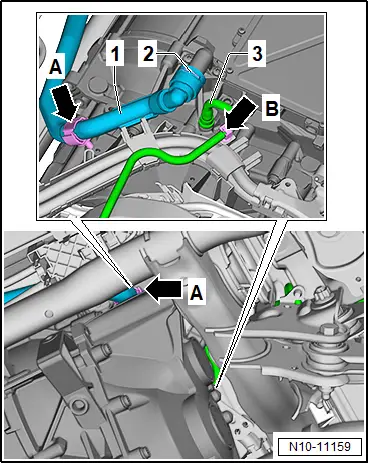
– Unclip coolant hose -1- above gearbox -arrow A-.
– Lift catch -2- and pull off coolant hose.
– Unclip gearbox breather line -3- -arrow B-, and pull it off gearbox.
 NOTICE
Risk of damage to lines and hoses when lowering the motor/gearbox assembly.
– Make sure that all connections between the motor/gearbox and the vehicle body have been disconnected.
– When lowering, carefully guide motor/gearbox assembly out of motor compartment.
– Lower motor with gearbox.
– Seal any open connections on motor and gearbox with plugs from engine bung set -VAS 6122-.
Assembly overview - rear motor
Assembly overview - rear motor

1 - Electrical connector
❏ High voltage
2 - Wiring guide
3 - Bolt
❏ Qty. 6
❏ 8 N·m
4 - O-ring
5 - Retaining clip
6 - Coolant hose
7 - Clip
8 - Clamp
9 - Bolt
❏ Qty. 2
❏ Renew after removing
❏ 8 N·m +90°
10 - O-ring
❏ Renew after removing
11 - Union
12 - Three-phase current drive - VX54-
❏ With power and control electronics for electric drive - JX1-
❏ → Rep. gr.93; Removing and installing power and control electronics for electric drive
❏ → Rep. gr.10; Removing rear motor
❏ → Rep. gr.10; Installing rear motor
13 - Coolant pipe
❏ To remove, remove high-voltage battery → Rep. gr.93; High-voltage battery unit
14 - O-ring
15 - Bleeder valve
❏ Special lubricant for sealing seat → Electronic parts catalogue (ETKA)
❏ Renew after removing
16 - Bolt
❏ Qty. 2
❏ Renew after removing
❏ 130 N·m +180°
17 - Bolt
❏ Qty. 3
❏ Renew after removing
❏ 70 N·m +180°
18 - Engine support
19 - Bolt
❏ Renew after removing
❏ 130 N·m +180°
20 - Temperature sensor - G18-
❏ → Rep. gr.19; Removing and installing temperature sensor [G18]
21 - O-ring
❏ Renew after removing
22 - Coolant hose
23 - Retainer
❏ Contact point for potential equalisation line
❏ Secured to centre hex stud
❏ Centre hex stud: 8 N·m +45°
24 - Nut
❏ 8 N·m
25 - O-ring
26 - Breather line
27 - Bolt
❏ 8 N·m
28 - Electrical connector
Installing front motor, left-hand drive vehicles
Installing front motor, left-hand drive vehicles
Special tools and workshop equipment required
♦ lifting tackle -VAS 501 021-
♦ workshop hoist -VAS 6100-
Three- phase current drive 2 -VX97- with power and control electronics 2 for electric drive -JX4- will henceforth be referred to as “motor”.
Installing
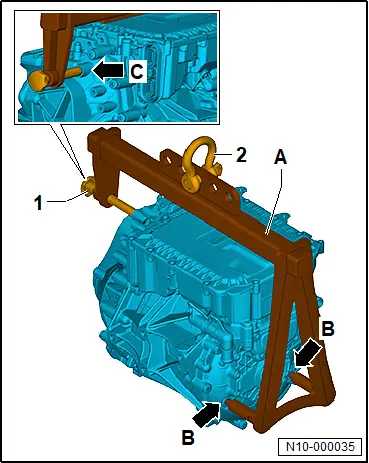
– Insert bracket -A- into holes -arrows B-.
– Screw bolt -1- to stop into hole -arrow C-.
– Secure shackle -2- in centre hole.
– Attach workshop hoist -VAS 6100- to shackle -2-.
– Use workshop hoist to position motor -1- on subframe.
– Align motor support with gearbox mounting, and screw in bolts -3- and -4- until stop.
– Tighten bolt -2-.
– Tighten bolts -3- and -4-.
– Detach lifting tackle -VAS 501 021- -arrow-.

Further installation is carried out in reverse order of removal, observing the following:
– Install subframe together with motor → Running gear, axles, steering; Rep. gr.40; Subframe; Removing and installing subframe with motor.
Tightening torques
♦ → Rep. gr.10; Assembly overview – front motor
Securing motor to engine and gearbox support, front motor
Securing motor to engine and gearbox support, front motor
Special tools and workshop equipment required
♦ Motor bracket -VAS 6095A/1-22-
♦ engine and gearbox jack -VAS 6095A-
♦ lifting tackle -VAS 501 021-
♦ retaining plate -VW309A-
♦ workshop hoist -VAS 6100-
The three-phase current drive 2 -VX97- along with the power and control electronics 2 for electric drive -JX4- will henceforth be referred to as “motor”.
– Insert bracket of lifting tackle -VAS 501 021--A- into holes -arrows B-.
– Screw bolt -1- to stop into hole -arrow C- by hand.
– Secure shackle -2- in centre hole.
– Attach workshop hoist -VAS 6100- to shackle -2-, and raise motor.

– Unscrew and remove bolts -arrows- and remove motor support -1-.
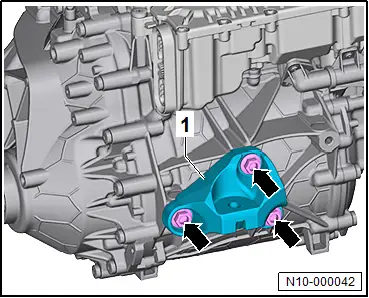
– Mount motor bracket -VAS 6095A/1-22- -A- on motor -1- and tighten bolts -arrows-.
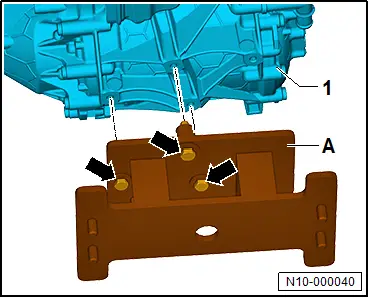
– Insert retaining plate -VW309A- -B- into engine and gearbox jack -VAS 6095A- -C-.
– Mount motor bracket -VAS 6095A/1-22- -A- on retaining plate -VW309A- -B- and tighten bolts -arrows-.
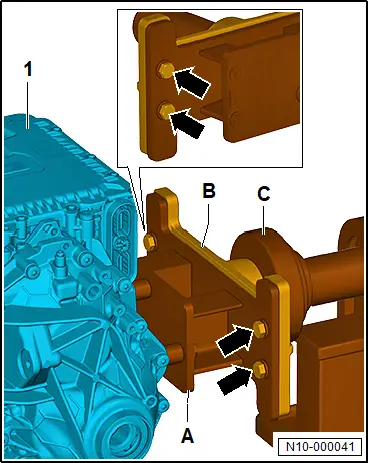
Tightening torques
BoltsSpecified torqueMotor bracket -VAS 6095A/1-22- to motor20 NmMotor bracket -VAS 6095A/1-22- to retaining plate -VW309A-80 Nm
Removing front motor, right-hand drive vehicles
Removing front motor, right-hand drive vehicles
Special tools and workshop equipment required
♦ engine bung set -VAS 6122-
♦ lifting tackle -VAS 501 021-
♦ workshop hoist -VAS 6100-
Three- phase current drive 2 -VX97- with power and control electronics 2 for electric drive -JX4- will henceforth be referred to as “motor”.
Removing
Important
● Once the drive shafts have been removed, the drive shaft flange must be sealed with a suitable plug from engine bung set -VAS 6122-.
● Make sure that no gear oil leaks out.
– Remove subframe together with motor → Running gear, axles, steering; Rep. gr.40; Subframe; Removing and installing subframe with motor.
– Loosen bolts -1- and -2-, and unscrew them by 20 mm -a-.
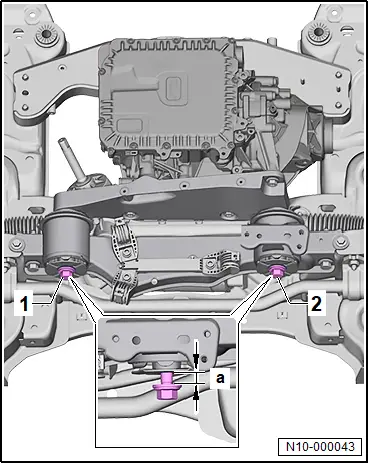
– Unscrew bolt -1- for motor mounting -2-.

– Raise motor -1- 10 mm in direction of -arrow B- using assembly lever -A-, and pull it towards rear in direction of -arrow C-.

– Insert bracket -A- of lifting tackle -VAS 501 021- into holes -arrows B-.
– Screw bolt -1- to stop into hole -arrow C-.
– Secure shackle -2- in centre hole.

– Attach workshop hoist -VAS 6100- to shackle -arrow-.
– Use workshop hoist to take up weight of motor -1-.
– Unscrew bolts -2- and -3-.
– Use workshop hoist to raise motor -1-.

♦ For further repairs, → Rep. gr.10; Secure motor to engine and gearbox support, front motor.
Removing front motor, left-hand drive vehicles
Removing front motor, left-hand drive vehicles
Special tools and workshop equipment required
♦ engine bung set -VAS 6122-
♦ lifting tackle -VAS 501 021-
♦ workshop hoist -VAS 6100-
Three-phase current drive 2 -VX97- with power and control electronics 2 for electric drive -JX4- will henceforth be referred to as “motor”.
Removing
Important
● Once the drive shafts have been removed, the drive shaft flange must be sealed with a suitable plug from engine bung set -VAS 6122-.
● Make sure that no gear oil leaks out.
– Remove subframe together with motor → Running gear, axles, steering; Rep. gr.40; Subframe; Removing and installing subframe with motor.
– Insert bracket -A- of lifting tackle -VAS 501 021- into holes -arrows B-.
– Screw bolt -1- to stop into hole -arrow C-.
– Secure shackle -2- in centre hole.
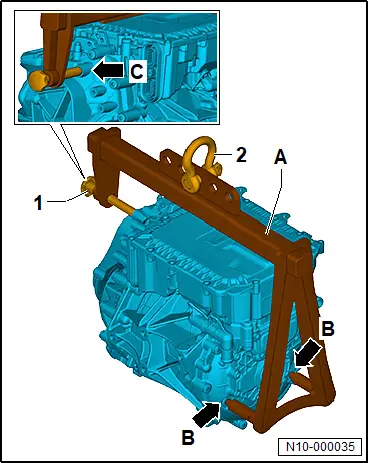
– Attach workshop hoist -VAS 6100- to shackle -arrow-.
– Use workshop hoist to take up weight of motor -1-.
– Unscrew bolts -2-, -3- and -4-.
– Use workshop hoist to raise motor -1-.

♦ For further repairs, → Rep. gr.10; Secure motor to engine and gearbox support, front motor.
Assembly overview – front motor, right-hand drive vehicles
Assembly overview – front motor, right-hand drive vehicles

1 - Three-phase current drive 2 -VX97-
❏ With electric drive motor 2 -V717-
❏ With drive motor 2 temperature sender -G1146-
❏ With drive motor 2 rotor position sender 1 -G1147-
❏ With power and control electronics 2 for electric drive -JX4-
❏ → Rep. gr.93; Removing and installing power and control electronics for electric drive
❏ → Rep. gr.10; Removing front motor
❏ → Rep. gr.10; Installing front motor
2 - Bolt for gearbox mounting
❏ Renew after removing
❏ 70 N·m +90°
3 - Bolt for gearbox support
❏ Qty. 3
❏ Renew after removing
❏ 50 N·m +90°
4 - Gearbox support
5 - Gearbox breather line
6 - Bolt for gearbox mounting
❏ Qty. 2
❏ Renew after removing
❏ 50 N·m +90°
7 - Gearbox mounting
❏ → Rep. gr.10; Removing and installing gearbox mounting
8 - High-voltage connector for power and control electronics 2 for electric drive -JX4-
9 - High-voltage cable duct
10 - Bolt for cable guide
❏ Qty. 3
❏ 8 N·m
11 - Bolt for potential equalisation line
❏ 8 N·m
12 - Electrical connector for power and control electronics 2 for electric drive -JX4-
13 - Potential equalisation line
14 - Cover plate
15 - Bolt
❏ Qty. 3
❏ 8 N·m
16 - Bolt for motor support
❏ Qty. 2
❏ Renew after removing
❏ 50 N·m +90°
17 - Front motor mounting
❏ → Running gear, axles, steering; Rep. gr.40; Subframe; Renewing front motor mounting
18 - Bolt for front motor mounting
❏ Renew after removing
❏ 130 N·m +180°
19 - Bolt for motor support
❏ Qty. 2
❏ Renew after removing
❏ 50 N·m +90°
20 - Bolt for front motor mounting
❏ Renew after removing
❏ 130 N·m +180°
21 - Front motor mounting
❏ → Running gear, axles, steering; Rep. gr.40; Subframe; Renewing front motor mounting
22 - Engine support
Assembly overview – noise insulation, motor
1 - Retaining clip
2 - Clip/bolt
- Depending on equipment/version
- Bolt with washer
- Qty. 2
- 5 N·m
3 - Clip
- Qty. 2
4 - Three-phase current drive 2 -VX97-
5 - Noise insulation
- Depending on equipment/version
6 - Retaining clip
Removing and installing gearbox mountings
Removing and installing gearbox mountings
Removing
– → Rep. gr.10; Remove motor (front).
– Remove bolts -arrows- and detach gearbox mounting -1-.

Installing
Installation is carried out in reverse order; note the following:
Tightening torques
♦ → Rep. gr.10; Exploded view - motor (front)