Rear suspension, drive shaft. Rear axle

In this manual: Rear suspension, drive shaft. Rear axle
Technical data. Panel gaps - front — 1Body front. Lock carrier — 1Body front. Wings — 1Body front. Bulkhead — 1Bonnet, flaps, cab, central locking. Bonnet — 1Bonnet, flaps, cab, central locking. Rear lid — 1Bonnet, flaps, cab, central locking. Charging flap unit — 1Front door, central locking. Door — 1Front door, central locking. Door components — 1Front door, central locking. Central locking — 1Rear door,sliding door,wing doors,central locking. Door — 1Rear door,sliding door,wing doors,central locking. Door components — 1Sliding roof. Sliding sunroof — 1Bumper. Bumper, front — 1Bumper. Bumper, rear — 1Glazing & window mechanism. Repair notes — 1Glazing & window mechanism. Windscreen — 1Glazing & window mechanism. Rear windscreen — 1Glazing & window mechanism. Side windows — 1Glazing & window mechanism. Door windows — 1Exterior equipment. Spoiler — 1Exterior equipment. Mouldings, trims, extensions — 1Exterior equipment. Underbody cladding — 1Exterior equipment. Roof moulding and roof railing — 1Exterior equipment. Exterior mirror — 1Exterior equipment. Wheel housing liner — 1Exterior equipment. Lettering and emblems — 1Exterior equipment. Bicycle carrier — 1Exterior equipment. Trim film and protective film — 1Interior equipment. Compartments & covers — 1Interior equipment. Equipment — 1Interior equipment. Centre console — 1Interior equipment. Front centre armrest — 1Interior equipment. Interior mirror — 1Passenger protection. Seat belts — 1Passenger protection. Child seat anchors — 1Passenger protection. Airbag system — 1Passenger protection. Airbag control unit — 1Passenger protection. Front airbag, driver side — 1Passenger protection. Front passenger airbag — 1Passenger protection. Side airbags — 1Passenger protection. Curtain airbags — 1Passenger protection. Airbag crash sensors — 1Passenger protection. Seat occupied recognition — 1Trim, noise insulation. Front door trims — 1Trim, noise insulation. Rear door trims — 1Trim, noise insulation. Dash panel — 1Trim, noise insulation. Central tube for dash panel — 1Trim, noise insulation. Interior trims — 1Trim, noise insulation. Roof trims — 1Trim, noise insulation. Luggage compartment trims — 1Seat frames. Overview of seat variants — 1Seat frames. Front seats — 1Seat frames. Rear seats — 1Seat padding, covers. Front seat covers and padding — 1Seat padding, covers. Rear seat covers and padding — 1Vehicle-specific paintwork information. Explanation of symbols — 1Vehicle-specific paintwork information. Paintwork structure — 1Vehicle-specific paintwork information. Areas exposed to stone chipping — 1Vehicle-specific paintwork information. Masked sectors — 1Vehicle-specific paintwork information. Seam sealing — 1Vehicle-specific paintwork information. Underseal — 1Vehicle-specific paintwork information. Cavity sealing — 1Vehicle-specific paintwork information. Contrasting colours — 1Vehicle-specific paintwork information. Paintwork repair — 1Technical data. Acoustic considerations during vehicle development — 1Technical data. General procedure for identifying noises — 1Technical data. Volkswagen equipment for localising noises — 1Technical data. Borescope VAS 6748A — 1Technical data. Causes — 1Technical data. Locating water ingress — 1Technical data. Attachments — 1Technical data. Vehicle identification data — 1Technical data. Safety information — 1Technical data. Body parts and materials — 1Technical data. Alignment jig — 1Body front. Longitudinal member cross panel — 1Body front. Longitudinal member — 1Body front. Front wheel housing — 1Body centre, roof, frame. Roof — 1Body centre, roof, frame. A-pillar — 1Body centre, roof, frame. B-pillar — 1Body centre, roof, frame. Side member — 1Body, rear. Rear cross member — 1Body, rear. Rear cross panel — 1Body, rear. Luggage compartment floor — 1Body, rear. Rear longitudinal member — 1Body, rear. Side panel — 1Body, rear. Rear wheel housing — 1General information, Body. Basic information on body repairs — 1General information, Body. Explanation of symbols — 1General information, Body. Overview of materials used — 1General information, Body. Joining and separating techniques — 1General information, Body. Surface repair — 1General information, Body. Corrosion protection — 1General information, Body. Noise insulation — 1General information, Body. Plastic repair — 1General information, Body. Welding plastic attachments — 1General information, Body. General notes – windows — 1General information, Body. Glass repair — 1General information, Body. Use of adhesives — 1General information, Body. Self-adhesive components — 1General information, Body. Noises — 1General information, Body. Preparing for disposal — 1General information, Body. Leaks — 1General information, paint. Safety information — 1General information, paint. General information — 1Genuine products. Filler — 1Genuine products. Priming metal — 1Genuine products. Priming plastic materials — 1Genuine products. Surfacer — 1Genuine products. 2-pack top coats — 1Repair painting work. Paint finish – decorative strips and films — 1Repair painting work. Tips and tricks — 1Air conditioner. Overview of fitting locations — 1Air conditioner. Refrigerant circuit — 1Air conditioner. Valve unit of heat pump — 1Air conditioner. Air conditioner compressor — 1Air conditioner. Control motors — 1Air conditioner. Front heater and air conditioning unit — 1Air conditioner. Air duct — 1Air conditioner. Coolant circuit — 1Air conditioner. Other controlling and regulating components — 1Air conditioner. Air quality improvement system — 11-speed gearbox 0MH, rear, EQ310. Technical data — 11-speed gearbox 0MH, rear, EQ310. Gearbox mechanics,operation, construction,diff — 11-speed gearbox 0MH, rear, EQ310. Final drive, differential, differential lock — 1General information. High voltage — 1Electric drive EIP220, EIA200, EIA210. Technical data — 1Electric drive EIP220, EIA200, EIA210. Engine assy,cylinder block,crankcase — 1Electric drive EIP220, EIA200, EIA210. Engine cooling — 1Electric drive. High-voltage components, charging unit and voltage converter — 1Electric drive. Warning stickers — 1Electric drive. High-voltage battery unit, edge of upper part of battery housing without wax — 1Electric drive. High-voltage battery unit, edge of upper part of battery housing with wax — 1Electric drive. Power and control electronics for electric drive — 1Electric drive. Electric drive motor — 1Electric drive. Motor control unit — 1Electric drive. De-energising high-voltage system — 1Electric drive. Re-energise high-voltage system — 1Electric drive. Potential equalisation lines — 1Electric drive. Charging socket, with charging cable — 1Electric drive. Charging socket, with separate charging cable — 1Electric drive. Charging unit for high-voltage battery — 1Electric drive. Charging unit for high-voltage battery, with integrated voltage converter — 1Electric drive. Vehicle noise & engine sound — 1Electric drive. Accelerator pedal — 1Electric drive. Voltage converter — 1Electric drive. High-voltage cables, all-wheel drive — 1Electric drive. High-voltage cables, rear-wheel drive — 1Front suspension, drive shafts. Front axle — 1Front suspension, drive shafts. Subframe — 1Front suspension, drive shafts. Suspension strut, upper suspension link — 1Front suspension, drive shafts. Lower suspension link, swivel joint — 1Front suspension, drive shafts. Wheel bearing — 1Front suspension, drive shafts. Anti-roll bar — 1Rear suspension, drive shaft. Rear axle — 1Rear suspension, drive shaft. Subframe — 1Rear suspension, drive shaft. Anti-roll bar — 1Rear suspension, drive shaft. Suspension link, track rod — 1Rear suspension, drive shaft. Suspension strut, shock absorber, spring — 1Rear suspension, drive shaft. Wheel bearing assembly, trailing arm — 1Rear suspension, drive shaft. Drive shaft — 1Self-levelling air spring system. Electronically controlled damping — 1Self-levelling air spring system. Vehicle level sender — 1Wheels, tyres. axle align. Wheel alignment — 1Wheels, tyres. axle align. Wheels, tyres — 1Steering. Steering wheel — 1Steering. Steering column — 1Steering. Steering rack — 1Brake system. Technical data — 1ABS, ADR, TCS, EDL, ESP. Overview of fitting locations — 1ABS, ADR, TCS, EDL, ESP. Control unit and hydraulic unit — 1ABS, ADR, TCS, EDL, ESP. Sensors — 1Brake, brake mechanics. Front brake — 1Brake, brake mechanics. Rear brake — 1Brake, brake mechanics. Parking brake — 1Brake, brake mechanics. Brake pedal — 1Brakes, hydraulics, regulator, servo. Brake servo and brake master cylinder — 1Brakes, hydraulics, regulator, servo. Hydraulic system — 1Wheels and Tyres Guide. Wheels, tyres. axle align — 1Wheels, tyres. axle align. Instructions on using the guide — 1Wheels, tyres. axle align. Legislative and technical conditions — 1Wheels, tyres. axle align. Wheel change — 1Wheels, tyres. axle align. Fitting tyre — 1Wheels, tyres. axle align. Wheel bolts — 1Wheels, tyres. axle align. Information on tyres — 1Wheels, tyres. axle align. Handling problems — 1Wheels, tyres. axle align. Evaluating tyres — 1Wheels, tyres. axle align. Tyre wear — 1Starter-current supply-CC. Battery — 1Instruments, GCI. Dash panel insert — 1Instruments, GCI. Horn — 1Windscreen wipewash system. Windscreen wiper system — 1Windscreen wipewash system. Windscreen washer system — 1Windscreen wipewash system. Rear window wiper system — 1Windscreen wipewash system. Rear window washer system — 1Lights, lamps, switches outside. LED headlight — 1Lights, lamps, switches outside. LED matrix headlight — 1Lights, lamps, switches outside. Tail lights — 1Lights, lamps, switches outside. Lights in exterior mirror — 1Lights, lamps, switches outside. Number plate light — 1Lights, lamps, switches outside. Entry and start authorisation system — 1Lights, lamps, switches outside. Steering column switch module — 1Lights, lamps, switches outside. Towing bracket — 1Lights, lamps, switches inside, anti-theft system. Lights — 1Lights, lamps, switches inside, anti-theft system. Controls — 1Lights, lamps, switches inside, anti-theft system. Anti-theft alarm system — 1Lights, lamps, switches inside, anti-theft system. Cigarette lighter, socket — 1Wiring. Relay carriers, fuse holders, electronics boxes — 1Wiring. Control units — 1Infotainment. Componentscontrol units — 1Infotainment. Multifunction steering wheel — 1Driver assist systems. Senders, sensors, control units — 1Driver assist systems. Adaptive cruise control — 1Driver assist systems. Reversing camera system — 1Driver assist systems. Front camera for driver assist systems — 1Driver assist systems. Overhead view camera — 1Electrical system. Starter-current supply-CC — 1Electrical system. Windscreen wipe and wash system — 1Wiring. Wires and lines — 1Wiring. Cleaning contact surfaces — 1
~9min read
  • Overview of fitting locations – rear axle
  • Removing and installing rear axle
  • Lowering rear axle, front section
  • Lowering rear axle, rear section
  • Securing vehicle to support arms of lifting platform

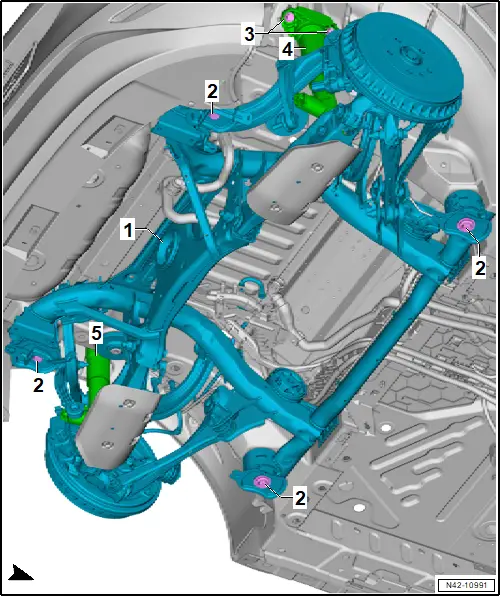
Overview of fitting locations – rear axle

Overview of fitting locations – rear axle
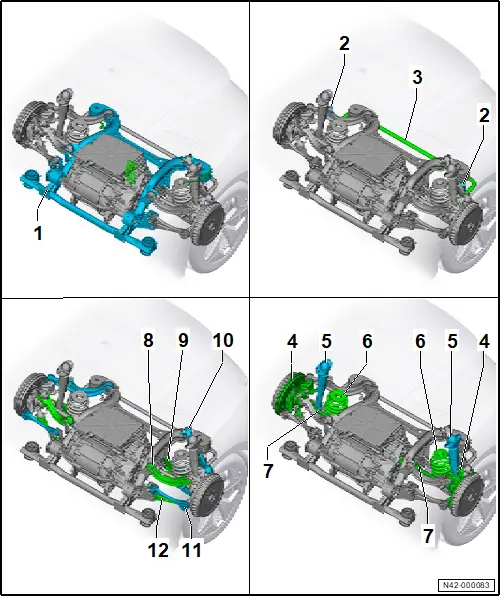
1 - Subframe

❏ → Rep. gr.42; Assembly overview – subframe

❏ → Rep. gr.42; Taking up weight of subframe using scissor-type assembly platform

❏ → Rep. gr.42; Removing and installing rear axle

2 - Coupling rod

❏ → Rep. gr.42; Assembly overview – anti-roll bar

❏ → Rep. gr.42; Removing and installing coupling rod

3 - Anti-roll bar

❏ → Rep. gr.42; Assembly overview – anti-roll bar

❏ → Rep. gr.42; Removing and installing anti-roll bar

4 - Wheel bearing housing

❏ → Rep. gr.42; Assembly overview – wheel bearing

❏ → Rep. gr.42; Removing and installing wheel bearing housing

5 - Shock absorbers

❏ → Rep. gr.42; Assembly overview – shock absorber

❏ → Rep. gr.42; Removing and installing shock absorber

6 - Spring

❏ → Rep. gr.42; Assembly overview – spring

❏ → Rep. gr.42; Removing and installing spring

7 - Drive shaft

❏ → Rep. gr.42; Assembly overview – drive shaft

❏ → Rep. gr.42; Removing and installing drive shaft

8 - Upper link (front)

❏ → Rep. gr.42; Assembly overview – suspension link

❏ → Rep. gr.42; Removing and installing upper front suspension link

9 - Spring control arm

❏ → Rep. gr.42; Assembly overview – spring control arm

❏ → Rep. gr.42; Removing and installing spring control arm

10 - Upper rear suspension link

❏ → Rep. gr.42; Assembly overview – suspension link

❏ → Rep. gr.42; Removing and installing upper rear suspension link

11 - Track rod

❏ → Rep. gr.42; Assembly overview – track rod

❏ → Rep. gr.42; Removing and installing track rod

12 - Lower suspension link

❏ → Rep. gr.42; Assembly overview – suspension link

❏ → Rep. gr.42; Removing and installing lower suspension link

Removing and installing rear axle

Removing and installing rear axle

Special tools and workshop equipment required

♦ scissor-type assembly platform -VAS 6131B-

♦ tensioning strap -T10038-

Removing

– Remove motor → Rep. gr.10; Removing and installing rear motor; Removing rear motor.

– Remove springs → Rep. gr.42; Removing and installing springs.

– Remove rear wheel housing liners → General body repairs, exterior; Rep. gr.66; Wheel housing liner; Removing and installing rear wheel housing liner.

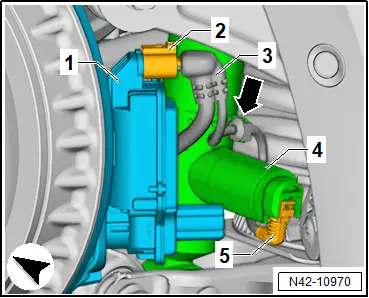
– Disconnect electrical connector -2- on left parking brake motor -V282- and on right parking brake motor -V283- -1-.
Vehicles with adaptive chassis control

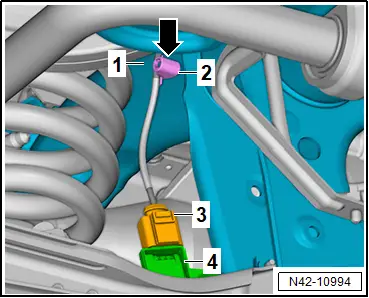
– Disconnect electrical connector -3- on rear left shock absorber damping adjustment valve -N338- and on rear right shock absorber damping adjustment valve -N339-.

– Pull electrical wire off retainer on shock absorber -2- on both sides of vehicle -arrow-.
All vehicles (continued)

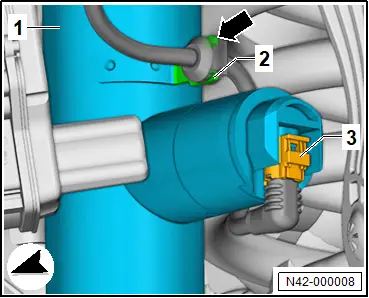
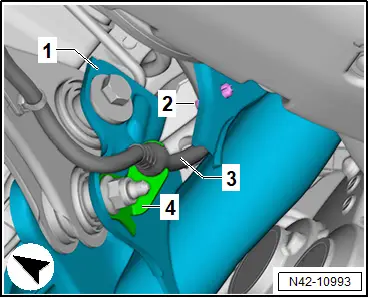
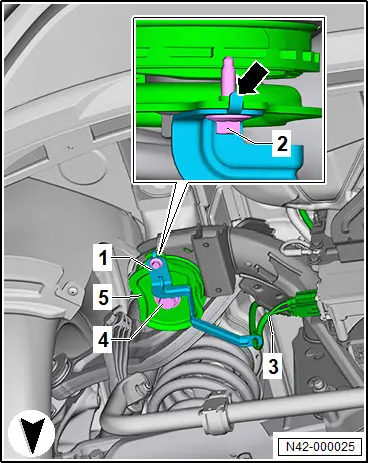
– Disconnect electrical wire -3- on rear left vehicle level sender -G76- -4-.

– Pull off electrical wire -2- on rear axle -1- -arrow-.
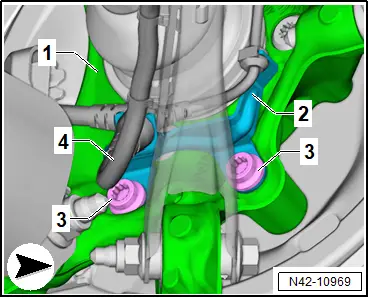
– Pull electrical wire -4- off retainer -2-.
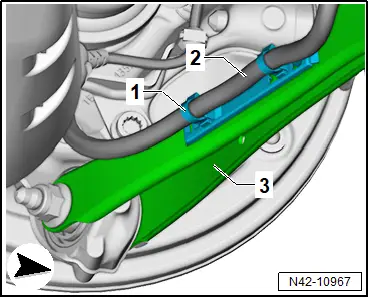
– Unclip retainer -1- for electrical wire -2- from lower suspension link -3-.

– To do this, press together locking lugs of retainer -1- at inside of lower suspension link -3-.
– Pull electrical wire -3- off retainer -4- on both sides of vehicle.

– Unclip electrical wire -3- from rear axle -1- on both sides of vehicle -2-.
– Disconnect electrical connector -2- on rear left speed sensor -G46- and on rear right speed sensor -G44- -3-.
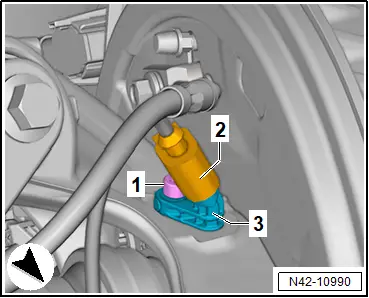
– Pull retaining clip -3- off brake hose -4- on both sides of vehicle.

– Unscrew brake line -1- on both sides of vehicle.

– Pull brake hose -4- out of retainer -2- on both sides of vehicle.
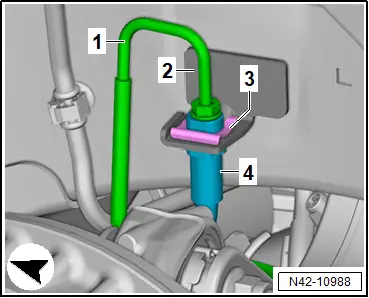
– Unclip electrical wire -3- from retainer -1- on right side of vehicle -arrows-.

– Unclip electrical wire -6- from retainer -4- on left side of vehicle -arrow-.
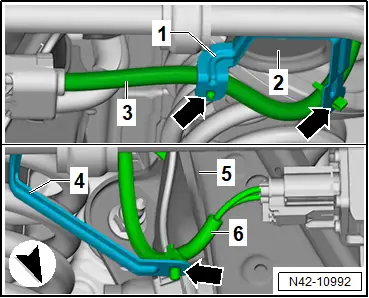
For greater clarity, the illustration shows the rear axle from above.

– Completely detach electrical wire -3- on rear axle -1-, and move it aside.

– Unclip brake lines -5- on rear axle -1- from retainers -arrows-.

– Pull cable guide -4- upwards off rear axle -1-.

– Secure electrical wire and brake lines to vehicle using suitable workshop materials.
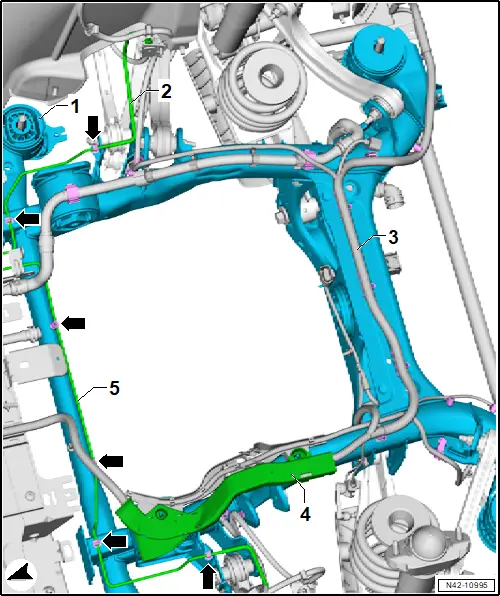
– → Rep. gr.42; Fix subframe in position.

– Unscrew bolts -3- for shock absorbers -4- and -5-.

– → Rep. gr.42; Take up weight of subframe using scissor-type assembly platform.

NOTICE

Risk of lines becoming damaged due to limited space.

– When lowering, ensure sufficient clearance to brake lines and electrical wiring.

– Lower subframe with attachments using scissor-type assembly platform -VAS 6131B-.

– Use a tensioning strap -T10038- to secure subframe to scissor-type assembly platform -VAS 6131B-.

– Lower subframe with attachments further using scissor-type assembly platform -VAS 6131B-.
Installing

Install in reverse order of removal, observing the following:

– Carry out required function/functions using → Vehicle diagnostic tester → Rep. gr.00; Access to diagnoses.

– → Rep. gr.44; When does wheel alignment have to be checked?

Tightening torques

♦ → Rep. gr.42; Assembly overview – subframe

♦ → Rep. gr.42; Assembly overview – shock absorber

Lowering rear axle, front section

Lowering rear axle, front section

Special tools and workshop equipment required

♦ engine and gearbox jack -VAS 6931-

♦ gearbox support -T10337-

– Remove rear underbody cladding → General body repairs, exterior; Rep. gr.66; Underbody cladding; Removing and installing rear underbody cladding.

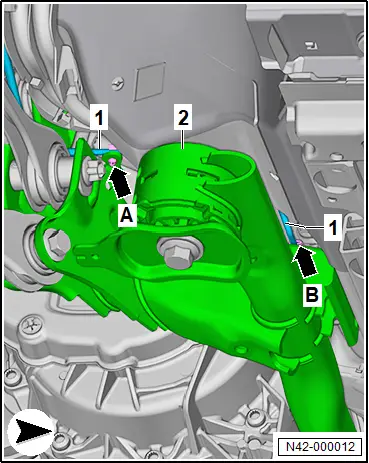
– Unclip brake line -1- on right side of subframe -2- -arrow A- and -arrow B-.
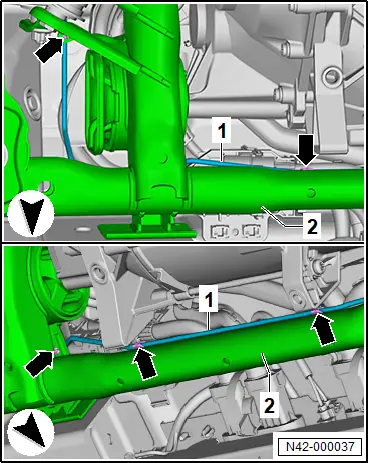
– Unclip brake line -1- on left side of subframe -2- -arrows-.
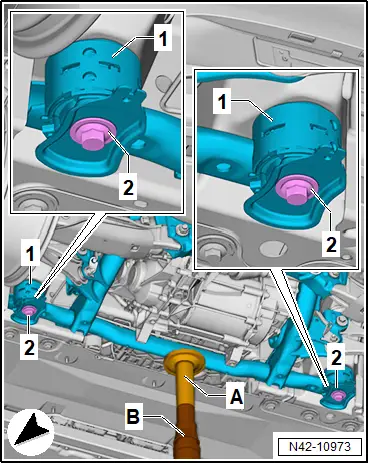
– Fit gearbox support -T10337- -A- onto engine and gearbox jack -VAS 6931- -B-.

– Position gearbox support -T10337- -A- on subframe -1-.

– Support subframe -1- with engine and gearbox jack -VAS 6931- -B-.

– Unscrew bolts -2- from subframe -1- on both sides of vehicle.

NOTICE

Risk of damage to electrical wires, hoses and connections!

– Do not lower subframe any further than specified.

– When lowering, make sure not to damage any components.

– Lower subframe -1- approx. 35 mm.
Installing

Install in reverse order of removal, observing the following:

Vehicles with intermediate plates on front mountings on subframe

– Check if intermediate plate -1- is fitted between body and mounting.

Important

● There may be no intermediate plates -1- fitted on front subframe mounting -4- (fluted surface -3-).
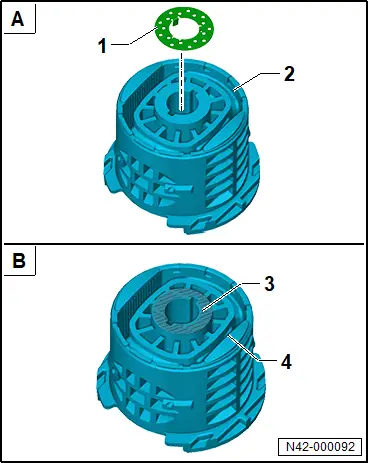
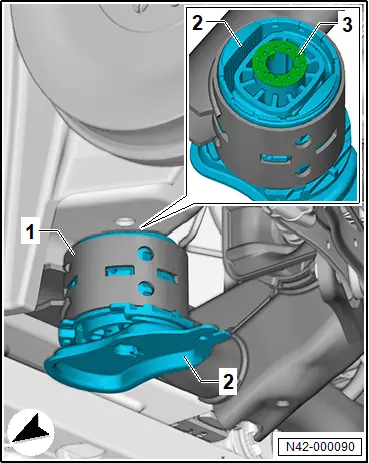
– Renew intermediate plate -3-.

Important

● Intermediate plates -3- must be fitted on both sides of vehicle.

– Insert intermediate plates -3- with locking lugs into front subframe mounting -2-.
All vehicles (continued)

Tightening torques

♦ → Rep. gr.42; Assembly overview – subframe

Lowering rear axle, rear section

Lowering rear axle, rear section

Special tools and workshop equipment required

♦ engine and gearbox jack -VAS 6931-

♦ gearbox support -T10337-

– Remove rear underbody cladding → General body repairs, exterior; Rep. gr.66; Underbody cladding; Removing and installing rear underbody cladding.

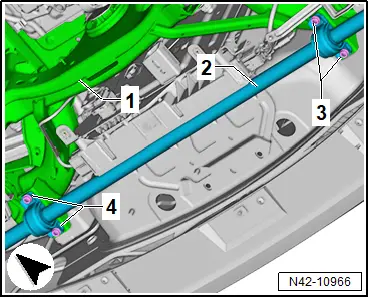
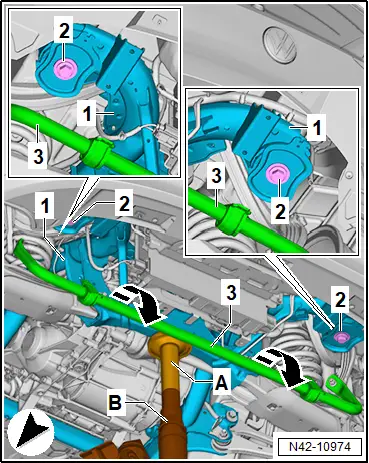
– Unscrew bolts -3- and -4- for anti-roll bar -2- on subframe -1-. Hold anti-roll bar when doing this.

– Detach anti-roll bar from subframe, and swing it downwards.
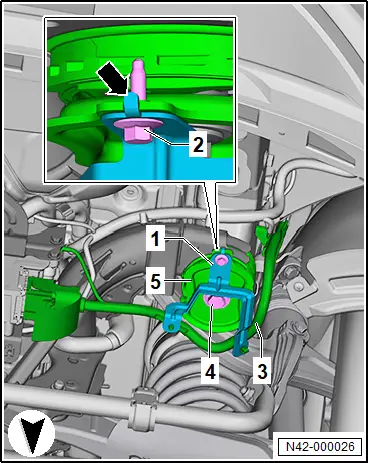
– Unscrew bolt -2- from subframe mounting on rear right -5-.

– Lay aside bracket -1- with electrical wire -3-.
– Unscrew bolt -2- from subframe mounting on rear left -5-.

– Lay aside bracket -1- with electrical wire -3-.
– Fit gearbox support -T10337- -A- onto engine and gearbox jack -VAS 6931- -B-.

– Position gearbox support -T10337- -A- on subframe -1-.

– Support subframe -1- with engine and gearbox jack -VAS 6931- -B-.

– Unscrew bolts -2-.

NOTICE

Risk of damage to electrical wires, hoses and connections!

– Do not lower subframe any further than specified.

– When lowering, make sure not to damage any components.

– Lower subframe -1- by 35 mm.
Installing

Install in reverse order of removal, observing the following:

Tightening torques

♦ → Rep. gr.42; Assembly overview - subframe

Securing vehicle to support arms of lifting platform

Securing vehicle to support arms of lifting platform

Special tools and workshop equipment required

♦ tensioning strap -T10523-

Removal and installation are described for the left side of vehicle as an example.

Securing for work on suspension links:

– Remove rear centre underbody cladding → General body repairs, exterior; Rep. gr.66; Underbody cladding; Removing and installing rear centre underbody cladding.

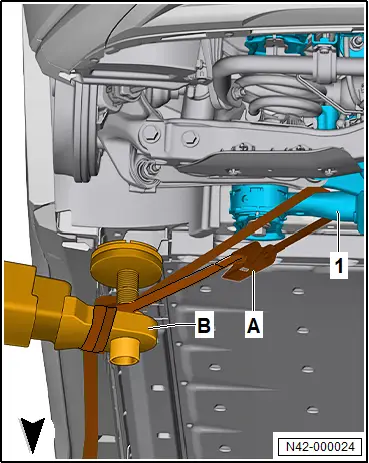
– Wrap tensioning strap -T10523- -A- support arms of lifting platform -B- on both sides of vehicle.

NOTICE

Risk of damage to lines.

– Make sure that no brake lines, electrical wires, hoses or connections are trapped or put under tension.

– Lay tensioning strap -T10523- -A- around rear axle -1-.

– Insert end of tensioning strap into ratchet of tensioning strap -T10523- -A-.

– Tension the tensioning strap -T10523- -A-.
All vehicles (continued)

Securing for work on rear axle and to remove rear axle:

– Join three tensioning straps -T10523- to each other.

NOTICE

Risk of damage to the vehicle if protective measures are insufficient.

– Cover paintwork and components using suitable workshop materials to protect them against damage.

– Make sure that no brake lines, electrical wires, hoses and connections are damaged when routing the tensioning straps.

– Position ratchets of tensioning strap so that they do not cause damage and can be actuated.

– Open rear doors on both sides of vehicle.

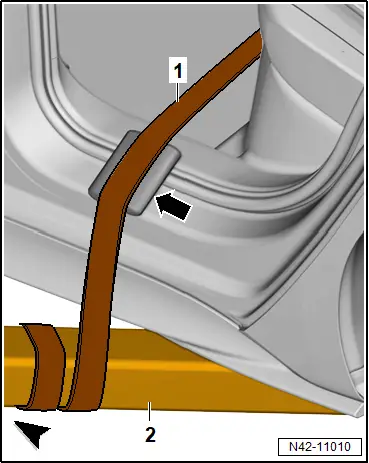
– Route tensioning strap -T10523- -1- through vehicle and around lifting platform.

– Wrap tensioning strap -T10523- -1- around support arms -2- of lifting platform on both sides of vehicle.

– Route tensioning strap -T10523- -1- beneath vehicle.

– Insert end of tensioning strap into ratchet of tensioning strap -T10523- -1-.

– Tension the tensioning strap -T10523- -1-.