Removal and Installation of Front Brake Disc / Caliper
* If the caliper is detached only to remove the brake disc, do not disconnect the brake hose. Otherwise, air must be bled from the system after installation. Hang the caliper on wire so that the hose is not twisted or stretched.
REMOVAL
1. Mark the position of the wheel relative to the hub with paint. This allows the balanced wheel to be installed in its original position. Loosen the wheel bolts with the vehicle on the ground. Raise and support the vehicle on stands and remove the wheel.
2. Lightly depress the brake pedal and hold it. To do this, place a wooden block between the pedal and the seat, moving the seat back and then forward. This prevents brake fluid from draining out of the reservoir and air from entering the system after the brake line is disconnected.
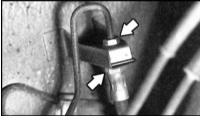
3. Disconnect the brake line at the connecting fitting. Otherwise the brake hose cannot be disconnected from the caliper. Refer to the accompanying illustration.
* Some fluid may leak out. Collect the fluid in a container designated for brake fluid storage.
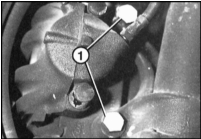
4. Remove the caliper mounting bolts (1) and remove the caliper from the brake disc.
5. Remove the retaining screw (4) using a 5 mm hex key.
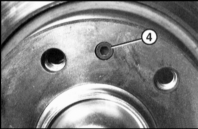
6. Remove the brake disc.
* Ventilated discs are balanced. Do not remove or move the balancing clips on the inner diameter of the brake disc.
Installation
To ensure even braking of both wheels, the brake discs must have the same surface roughness. Therefore, always replace or machine both discs.
At the service station, check the brake disc for runout. The maximum disc runout must not exceed the value given in the Specifications (for the installed disc).
INSTALLATION
1. Measure the brake disc thickness. Refer to the Brake Disc Thickness Measurement section.
2. If there is rust on the disc or wheel hub, remove it.
3. Clean new discs with thinner.
4. Install the brake disc on the front wheel hub and secure it with a hex key. First rotate the disc so that the bolt holes align.
5. Install the caliper with brake pads in place.
* If the brake hose is connected, make sure it is not twisted or stretched. Check that the brake hose moves freely when the steering wheel is turned fully.
6. Tighten the caliper with lightly lubricated bolts to 110 N·m.
7. Position the wheels straight. Secure the hose in the bracket and connect the brake line with the union nut. Make sure the brake hose is not twisted. Check that the hose moves freely when the steering wheel is turned fully.
8. Bleed air from the brake system. Refer to the Brake System Bleeding section.
9. Install and secure the front wheels. Do not lubricate the wheel bolts with oil. Install the wheels so that the marks made during removal line up. Lower the vehicle onto the wheels and tighten the wheel bolts in a crisscross pattern to 100 N·m.
10. Turn the steering wheel fully right and left and check that the brake hose moves freely without contacting adjacent components.
11.
* Press the brake pedal several times firmly until resistance is felt. This pushes the brake pads against the disc and seats them in their working position.
12. Check the brake fluid level in the reservoir. If necessary, top up to the MAX mark.
Caution, check the following:
a) Are the brake hoses secured?
b) Is the brake hose secured in the bracket?
c) Is the bleeder screw tightened?
d) Is there enough brake fluid in the reservoir?
e) With the engine running, check the system for leaks. To do this, press the brake pedal with a force of 200 - 300 N (20 - 30 kg) and hold it for 10 s. The pedal force must not decrease.
f) Check all connections for leaks.
* Brake fluid must be disposed of in a special manner.
Test yourself
A quick BMW 1 quiz: every answer comes with an explanation and a link to the manual page.