Parking Brake Adjustment
The parking brake is designed to be completely independent of the service brakes. Therefore, parking brake wear is minimal. Corrosion of the brake drum or contamination of the brake shoes reduces braking torque. If old shoes are being adjusted, the parking brake must be bedded in. To do this, from a speed of 40 km/h, gently apply the parking brake so that braking begins. Maintaining speed, apply the brake by one notch and drive approximately 400 m further. This removes traces of corrosion and eliminates accumulated wear products.
Parking brake adjustment is required when:
a) Parking brake shoes are replaced.
b) The brake drum is replaced.
c) Shoe position is adjusted.
d) Excessive application travel is required (more than 10 notches).
* The parking brake cable and all moving components must operate freely.
PROCEDURE
1. Loosen one wheel attaching bolt on each rear wheel.
2. Raise the vehicle and support it on stands.
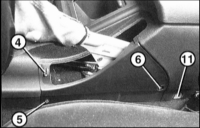
3. Remove the parking brake lever front cover by pulling it forward over the handle. Refer to the accompanying illustration.
* Service stations use special tool BMW-341030 to adjust parking brakes. The tool consists of two nested socket wrenches, sized for the different lock nut and adjusting nut dimensions. If this tool is not available, the lever cover and, if necessary, the center console must be removed.

4. Remove the parking brake lever cover. To do this, loosen bolt (4). Remove bolts (5) and (6) after removing the caps. Disconnect the cover. To do this, pull the cover rearward and upward toward the driver's seat, then remove it.
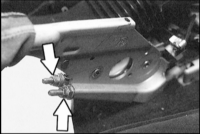
5. Loosen the two lock nuts and adjusting bolts (arrows in the accompanying illustration) of the parking brake cable. Fully release the cables.
6. Fully remove one attaching bolt on each wheel. Rotate the wheel so that the hole is in the lowest position. Shine a flashlight through the hole. The adjusting nut must be visible.
* It is not necessary to remove the wheel, as shown in the accompanying illustration.
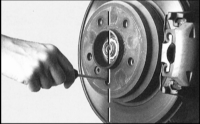
7. Using a screwdriver (2), turn the adjusting nut (1) to press the brake shoes against the drum until the wheel cannot be turned by hand. Then back off the adjusting nut by 8 notches. If the adjusting nut on the left side of the vehicle turns in the direction of the arrow (refer to the accompanying illustration), the brake shoes are in contact with the drum. On the right side of the vehicle, the nut turns in the opposite direction.

8. After adjustment, check that the wheels rotate freely. If they do not, back off the adjusting nut. The wheels must rotate freely.
9. Adjust the brake cables. To do this, apply the parking brake lever by 4 notches and tighten the adjusting nuts (arrows in the illustration) so that the left and right rear wheels can be rotated evenly by hand. Release the parking brake lever and check that the wheels rotate freely. Repeat the adjustment if necessary.
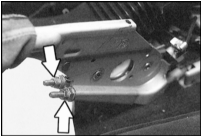
10. Fully release the brake lever.
11. Turn the ignition on. The parking brake warning lamp must not illuminate.
12. Apply the parking brake lever by 1 notch. The rear wheels must not be braked at this point. If they are, repeat the adjustment.
13. Apply the parking brake lever by 2 notches. The warning lamp must now illuminate. If it does not, bend the brake lever switch contact.
14. Turn the ignition off.
15. Tighten the lock nuts while holding the adjusting nuts.
16. Secure the side cover of the parking brake lever. Install the bolt caps.
17. Engage the front cover of the parking brake lever at the bottom and secure it at the top.
18. Lower the vehicle to the wheels.
19. Install the two rear wheel attaching bolts and tighten them to 100 N·m. Install the wheel caps.
Test yourself
A quick BMW 1 quiz: every answer comes with an explanation and a link to the manual page.