Discharging, adding oil, evacuating air, charging the A/C system with refrigerant
GENERAL INFORMATION.
The A/C system can be discharged, oil added, evacuated, and charged
with refrigerant using a special recovery/recharge station for servicing air conditioning systems, or with a set of hoses and a manifold
gauge set and 420 ml refrigerant storage containers. Adapters from the gauge set are used to connect the hoses of the recharge station or manifold gauge set. Straight and angled (90-degree) adapters are available. When performing work involving opening the A/C system, it is necessary to
wear safety goggles and wrap the fittings with a clean cloth. Work in a well-ventilated area and avoid inhaling refrigerant vapors. Liquid refrigerant in the eyes may cause injury. 1) Before removing or replacing any A/C system component, the system must first be fully discharged of refrigerant.
work in a well-ventilated area and avoid breathing refrigerant vapor. Liquid refrigerant in the eyes can cause injury. 1) Before removing or replacing any A/C system component, fully discharge the system of refrigerant.
2) When evacuating air and charging the system with refrigerant, use a manifold gauge set with valves and gauges.
3) The system may be discharged, evacuated, and charged with refrigerant only through the service port located on the low-pressure side.
4) When discharging and charging the A/C system, it is prohibited to connect high-pressure lines and other lines to the service port located on the high-pressure side.
Warning.
It is prohibited to disconnect the gauge hose from the adapter fitting while the line is connected to the A/C system. When disconnecting the line, unscrew the adapter from the service port.
It is prohibited to disconnect the charging hose from the gauge manifold while it is connected to the service port on the low-pressure side. This will fully discharge the system through the open valve.
service port and may cause personnel injury from leaking refrigerant.
Discharging the A/C system
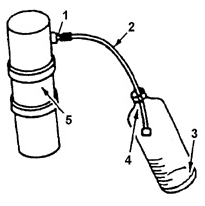
Discharging the A/C system without using a recovery/recharge station
1. Adapter fitting.
2. Gauge hose.
3. Oil.
4. Open container (for gas outlet) with refrigerant oil.
5. Receiver/drier.
Before replacing any A/C system component or part, the system must first be fully
discharged of refrigerant. Discharging is performed only through the service
port on the low-pressure side.
1) With the ignition off, remove the protective cap from the service port on the low-pressure side. The port is located on the receiver/drier body. Connect the recovery/recharge station or manifold gauge set to the port. The system can also be discharged using a gauge hose and a container with refrigerant oil, see figure. Discharging the A/C system without using a recovery/recharge station. One end of the hose
is placed in the container, and the other end is slowly connected to the service port on the
receiver/drier body. When the hose is connected, the shutoff valve of the port opens and discharging of the A/C system begins. If discharging does not occur, check
that the pin in the hose tip, which opens the valve, is functioning properly.
2) After fully discharging the low-pressure side, check for residual pressure on the high-pressure side (through the port of this side).
3) If residual pressure is present, discharge the high-pressure side in the same manner.
(Residual pressure indicates a restriction in the high-pressure line.
Locate and eliminate the fault before evacuating and charging the system.)
4) After the system is fully discharged (no gas escapes from the hose with the tip fully screwed on), measure and record the amount of refrigerant oil collected. If more than 15 ml of oil has been collected, add the same amount of fresh refrigerant oil grade
525 to the system. In addition, add an amount of oil equal to that remaining in the removed component.
Oil must be added before evacuating air and charging the system with refrigerant.
Adding oil
Refrigerant oil is added after discharging the A/C system and before evacuating it.
air. To do this, disconnect the suction line from the receiver outlet fitting, pour the required amount of fresh oil into the line or fitting, and
reconnect the line properly.
Refrigerant oil content in A/C system components.
The A/C system refrigerant oil capacity with the V-5 compressor is 240 ml. When the system operates on R-12 refrigerant, use oil grade 525. When operating on R-134a refrigerant, use PAG oil..
When replacing A/C system components, add the following amounts of oil to the system.
a) Compressor – if less than 30 ml of oil was drained, add 60 ml. If more than 30 ml was drained,.
add the same amount of oil. Procedures for correct oil draining from the compressor.
are described below..
b) Evaporator – add 90 ml of oil..
c) Condenser – add 30 ml of oil..
d) Receiver – pour 105 ml of oil into the new receiver..
e) Oil losses due to significant refrigerant leaks..
1) If a rapid pressure drop occurs in the A/C system, approximately 90 ml of oil is lost along with the refrigerant. Any malfunctions associated with rapid discharge of the
system are accompanied by similar oil losses. Minor leaks
of refrigerant do not result in oil loss..
2) When replacing any component associated with large refrigerant losses, add
90 ml of refrigerant oil to the system. When operating on R-12
refrigerant, use oil grade 525. When operating on R-134a refrigerant, use PAG oil..
Additionally, add oil to the system in an amount depending on the component being replaced,
see items a)-e) above..
3) Add oil directly into the component being installed. If this is difficult, add the oil to the receiver.
Evacuating air and charging the system.
If the A/C system was partially disassembled for repair and maintenance, or
refrigerant leakage occurred, air must be evacuated from the system before charging it. Air evacuation and refrigerant charging are interrelated,
therefore gauge lines must be flushed before starting work.
refrigerant. Air evacuation and system charging can be performed in two
methods:..
1) using a recovery/charging station;.
2) using a refrigerant container..
Warning.
Under no circumstances use alcohol to dry the A/C system. This
will lead to failure of system components..
Gauge calibration.
Before evacuating air, check the vacuum gauge and the serviceability of the vacuum
system. On the disconnected gauge, check the needle position: it should point to the center of zero. Lightly tap the gauge and make sure
the needle does not stick. If necessary, set the needle to zero..
1) Remove the gauge cover..
2) Holding the needle adjustment screw with your hand, carefully turn the needle to zero. Lightly tap the gauge and make sure the needle does not stick..
Install the cover in place.
Checking the vacuum system.
Before connecting the vacuum pump to the A/C system, check its
operability. To do this, connect a gauge to the vacuum pump and turn on the
pump. If the pump does not provide a vacuum of 711...737 mm Hg, check the system for leaks. If the system is leak-tight, the vacuum pump requires repair.
Refrigerant charging using a recovery/charging station.
1) Do not connect the high-pressure line to the A/C system..
2) The high-pressure valve of the charging station must always be closed..
3) Perform all air evacuation and refrigerant charging operations through the
service port of the receiver..
4) Following these instructions will help prevent accidental connection of the A/C high-pressure circuit to the charging station in case of an error in the valve opening sequence with the compressor running.
Refrigerant charging from a container.
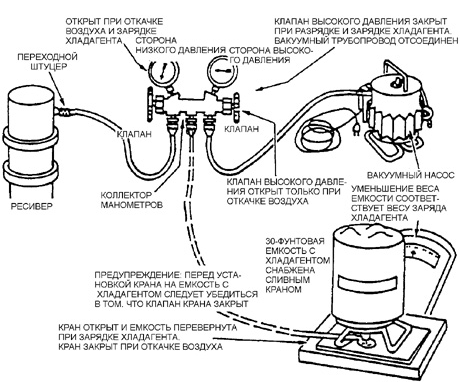
Charging the A/C system with refrigerant from a container
1) Connect the gauge manifold (tool J 23575-01) as follows.
Refer to the procedure below.
a. Connect the vacuum gauge to the receiver fitting..
b. Connect the center port of the manifold to the refrigerant container.
c. Connect the high-pressure gauge to the vacuum pump.
2) To evacuate air from the A/C system, slowly open the high and low pressure valves (see figure Charging the A/C system with refrigerant from a container) and turn on the vacuum pump.
Continue evacuating air until a vacuum of 711...737 mm Hg is reached on the
vacuum gauge. Note that throughout the air evacuation procedure, a vacuum value of 711...737 mm Hg is specified. This vacuum
corresponds to sea-level conditions. If necessary, apply a correction that reduces the nominal vacuum by 25 mm Hg for every 300 m of altitude above sea level.
For example, at an altitude of 1500 m above sea level the nominal
vacuum is 584...610 mm Hg. If the required nominal vacuum is not achieved, close the vacuum valve, turn off the vacuum pump and
check the connections and the pump for leaks..
3) When the required vacuum is reached in the A/C system, close the high
pressure valve and turn off the vacuum pump..
4) Check the system for leaks using the vacuum gauge. The vacuum must remain stable for 5 minutes. If the system is leak-tight, disconnect the vacuum
hose from the manifold and proceed to charge the A/C system with refrigerant..
5) If the vacuum is not held for 5 minutes, charge 420 ml of refrigerant into the A/C system and check it for leaks. Then discharge the system and repair the leaks. Repeat the air evacuation procedure.
refrigerant and check it for leaks. Then discharge the system and repair the leaks. Repeat the air evacuation procedure.
Charging the A/C system with refrigerant.
1) Start the engine and turn off the A/C system button..
2) Invert the container and place it on a scale. Open the container outlet valve. Drain 480 ml of refrigerant into the A/C system through the low-pressure circuit fitting..
3) After draining 480 ml of refrigerant, immediately turn on the compressor and the maximum blower airflow to fully charge the system
with refrigerant. The charging operation can be accelerated by using a high-capacity fan blowing across the condenser. If temperature is maintained
with refrigerant. The charging operation can be accelerated by using a high-capacity fan blowing across the condenser. If temperature is maintained
If the condenser is at a lower level compared with the receiver, charging will proceed
faster.
4) Close the drain valve of the receiver and run the engine for 30 s to purge refrigerant from the lines and gauge hoses.
5) With the engine running, disconnect the charging hose with adapter from the
receiver fitting. Disconnect quickly to avoid refrigerant loss from the system.
Warning.
Do not disconnect the gauge hose from the adapter if the line
is connected to the A/C system. First unscrew the adapter from the service
receiver fitting. Do not disconnect the charging hose while it is connected to the receiver. This will fully discharge the A/C system through the receiver fitting check valve and may cause personal injury from escaping refrigerant vapors.
6) Install the protective cap on the receiver fitting.
7) Switch off the engine.
8) Check the A/C system for leaks using an electronic leak detector.
9) Start the engine.
10) Check the operation of the A/C system.
Test yourself
A quick Daewoo Nexia quiz: every answer comes with an explanation and a link to the manual page.