Inspection of Transmission Control Solenoid Valves
INSPECTION
PROCEDURE
1. Inspect the three pairs of transmission control solenoid valves: Lock-up/Shift Control Solenoid Valve A, Shift Control Solenoid Valves B and C, and Clutch Pressure Control Solenoid Valves.
Lock-up/Shift Control Solenoid Valve A
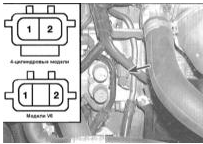
2. Disconnect the 2-pin electrical connector of the Lock-up/Shift Control Solenoid Valve A assembly and measure the resistance between each connector terminal (valve side) and ground. Compare the results with the Specifications. Replace the valve assembly if necessary.
3. Using a jumper wire, connect each connector terminal in turn to the battery positive terminal; a distinct click should be heard as each valve operates. If no click is heard, take the vehicle to a service station for full diagnosis of the ECM and solenoid valve circuits.
Shift Control Solenoid Valves B and C
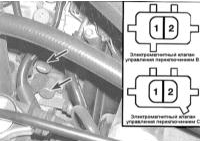
4. Disconnect the 2-pin electrical connectors of the shift control solenoid valves and measure the resistance between terminals 1 and 2 of each. Compare the results with the Specifications. Replace the defective valve assembly if necessary.
5. Using a jumper wire, connect terminal 2 of each valve in turn to the battery positive terminal, with terminal 1 grounded. A distinct click should be heard as each valve operates. If no click is heard, replace the defective valve.
Clutch Pressure Control Solenoid Valves
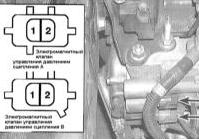
6. Disconnect the connectors of the clutch pressure control valves and measure the resistance between terminals 1 and 2 of each connector. Compare the results with the Specifications. Replace the defective valve if necessary.
7. Using a jumper wire, connect terminal 1 of each valve in turn to the battery positive terminal, with terminal 2 grounded. A distinct click should be heard as each valve operates. If no click is heard, replace the defective valve.
Test yourself
A quick Honda Accord quiz: every answer comes with an explanation and a link to the manual page.