Engine Control System/Fuel System
Fuel Pump Repair Procedures
In this manual: Engine Control System/Fuel System
21steps
~126min
4/5difficulty
Done 0 of 21
Removal
- Release the fuel line residual pressure. (Refer to Fuel System - "Release Fuel Line Residual Pressure")
- Fold down the rear seat cushion.
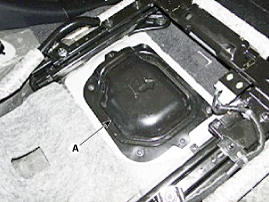
- Remove the fuel pump service cover (A) at both the highest (H) and lowest (L) float levels.
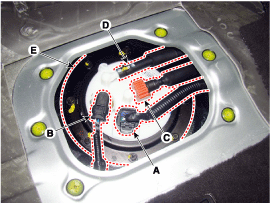
- Disconnect the fuel pump connector (A) and the fuel pressure connector (B).
- Disconnect the quick-connect fitting of the fuel feed pipe (C) and the suction hose (D).
- Remove the fuel pump plate cover (E) after loosening the mounting bolts, then remove the fuel pump.
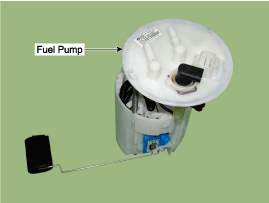
Installation
- To install, perform the removal procedure in reverse order. Fuel pump plate cover bolt: 2.0 ~ 2.9 N·m
When installing the fuel pump module, be careful not to twist the O-ring.
Inspection
[Fuel Sender]
- Turn the ignition switch OFF and disconnect the negative (-) battery cable.
- Remove the fuel pump assembly. (Refer to Fuel System - "Fuel Pump")
- Using an ohmmeter, measure the resistance between terminals 5 and 6 of the sensor connector (A) at each float level.
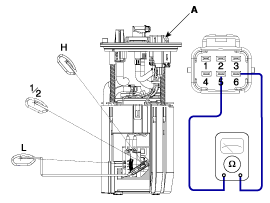
Pin No. Description 1 Fuel Pump Phase Control (U) 2 Fuel Pump Phase Control (V) 3 Fuel Pump Phase Control (W) 4 Ground 5 Fuel Level Sensor Signal 6 Fuel Level Sensor Ground - Make sure the resistance is within specification.
Position Resistance (Ω) Capacity (?) L 81,6 ~ 83,6 6 1/2 3 ~ 5 38 H 3 ~ 5 73

- [Main Fuel Level Sensor + Sub Fuel Level Sensor Resistance Sum]
Position Resistance (Ω) Capacity (?) L 198 ~ 202 6 1/2 107 ~ 111 38 H 6 ~ 10 73
- [Main Fuel Level Sensor + Sub Fuel Level Sensor Resistance Sum]
[Fuel Pump Three-Phase Coil Inspection]
- Turn the ignition switch OFF and disconnect the negative (-) battery cable.
- Remove the fuel pump assembly. (Refer to Fuel System - "Fuel Pump")
- Using an ohmmeter, measure the resistance between terminals U-V, V-W and W-U.
- Make sure the resistance is within specification.
Specification: 0.09 ~ 0.13 ?
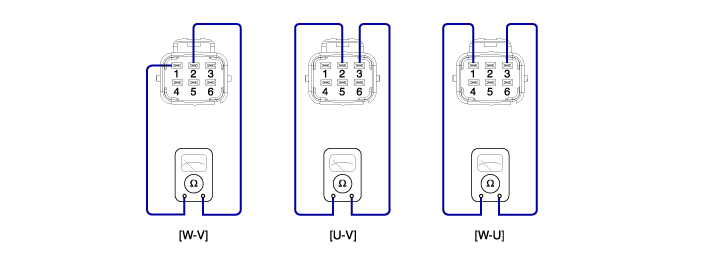
Pin No. Description 1 Fuel Pump Phase Control (U) 2 Fuel Pump Phase Control (V) 3 Fuel Pump Phase Control (W) 4 Ground 5 Fuel Level Sensor Signal 6 Fuel Level Sensor Ground
[Fuel Pump]
- Turn the ignition switch OFF and disconnect the negative (-) battery cable.
- Remove the fuel pump assembly. (Refer to Fuel System - "Fuel Pump")
- Connect the fuel pump connector and the fuel pressure sensor connector.
- Connect the negative (-) battery cable.
- Turn the ignition ON or start the engine with no load.
- Activate the fuel pump.
- If cranking or idling continues for a longer time, overheating may occur. Crank for a maximum of 3 seconds.
- Check that the fuel pump operates normally.
Test yourself
A quick Hyundai Genesis DH quiz: every answer comes with an explanation and a link to the manual page.
Was this page helpful?