Radio receiver (H260) (if equipped)
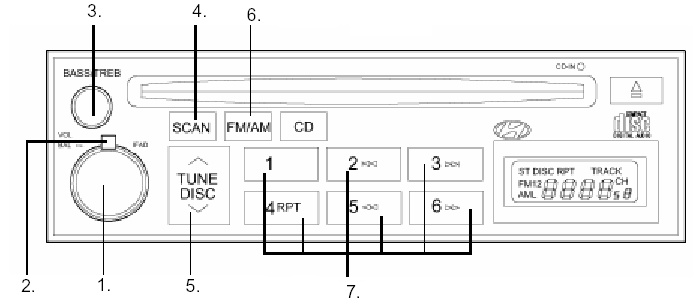
RADIO RECEIVER (H260) (if equipped)
1. ON/OFF power knob, VOLUME control, BALANCE control
2. FADER button
3. BASS/TREBLE push button
4. SCAN button
5. TUNE/SEEK button
6. Band selector button
7. Preset button
1. ON/OFF power knob. The radio operates when the ignition switch is in the "ACC" or "ON" position. Press this knob to turn on the radio. The liquid crystal display shows the radio frequency in radio mode, or the disc track number in CD or CD AUTO CHANGER mode. To turn off the power, press the knob again.
VOLUME control
To increase the volume, turn the knob clockwise. To decrease the volume, turn the knob counterclockwise.
BALANCE control
Pull the knob out and turn it clockwise to increase the volume of the right speaker. (The volume of the left speaker will decrease.)
When the knob is turned counterclockwise, the volume of the left speaker will increase. (The volume of the right speaker will decrease.)
2. FADE control (fader)
Turn counterclockwise to increase the volume of the front speaker. (The volume of the rear speaker will decrease.) If the knob is turned clockwise, the volume of the rear speaker will increase.
(The volume of the front speaker will decrease.)
3. BASS control button
Press the button so that it pops out, then turn it left or right until the desired bass tone is obtained.
TREB control button
Pull the button toward you.
Turn left or right until the desired treble tone is obtained.
4. SCAN button
When the SCAN button is pressed, the frequency will increase and the receiver will tune to the next receivable stations, one after another, for 5 seconds each. To stop scan, press this button again.
5. TUNE knob (manual tuning)
Press the side ( ) or (
 ) to increase or decrease the frequency. Press and hold either button for continuous seeking. Release the button when the desired station is received.
SEEK operation (automatic station selection)
Press the TUNE button for 0.5 seconds or longer. When released, the receiver automatically tunes to the next receivable station with an audible beep.
When pressing the side () for more than 0.5 seconds, the receiver automatically tunes to the next higher frequency when released. When pressing the side () for more than 0.5 seconds, the receiver automatically tunes to the next lower frequency when released.
6. BAND selection button
Press the button switches between the AM, FM1 and FM2 bands. The selected mode is shown on the liquid crystal display.
7. Station preset button
The electronic memory can store six (6) stations each for AM, FM and FM2.
HOW TO PRESET STATIONS
Six AM stations and twelve FM stations can be programmed into the radio memory.
Afterwards, simply press the band selection button and/or one of the six station preset buttons to instantly recall one of these stations.
To program stations, do the following:
• Press the band selection button to select the AM, FM or FM2 band.
• Using seek, scan or manual tuning, select the station you want to store.
• Determine the station preset button you want to use to access the station.
• Press the station preset button for more than two seconds. The display will show which preset button was pressed. After the station is stored, the frequency display will light. Then release the button and program the next desired station. A total of 18 stations can be programmed, with each button assigned 1 AM station and 2 FM stations.
• Once programming is complete, any stored station can be recalled by selecting the AM, FM or FM2 band and the corresponding button.
Test yourself
A quick Hyundai H1 quiz: every answer comes with an explanation and a link to the manual page.