Measure the resistance between terminals 1 and 2 of the OCV.
Make sure the resistance is within specification.
Specification: Refer to "Specifications"
Removal
[CVVT Oil Control Valve (Intake)]
Turn the ignition switch OFF and disconnect the negative (-) battery cable.
Remove the intake manifold. (Refer to Engine Mechanical System - "Intake Manifold")
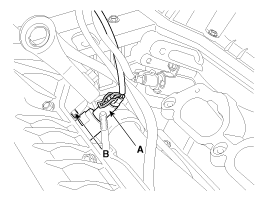
Disconnect the CVVT oil control valve connector (A).
Remove the installation bolt (B) and remove the valve from the engine. [Bank 1][Bank 2]
[CVVT Oil Control Valve (Bank 1/Intake)]
Turn the ignition switch OFF and disconnect the negative (-) battery cable.
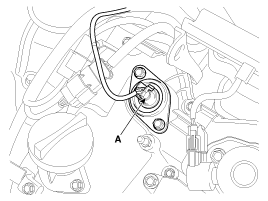
Disconnect the CVVT oil control valve connector (A).
Remove the coolant reservoir. (Refer to Engine Mechanical System - Coolant Reservoir)
Remove the cylinder head cover. (Refer to Engine Mechanical System - "Cylinder Head Cover")
Loosen the installation bolt (A) and remove the valve from the engine.
[CVVT Oil Control Valve (Bank 2/Exhaust)]
Turn the ignition switch OFF and disconnect the negative (-) battery cable.
Disconnect the CVVT oil control valve connector (A).
Remove the cylinder head cover. (Refer to Engine Mechanical System - "Cylinder Head Cover")
Loosen the installation bolt (A) and remove the valve from the engine.
Installation
Install the component with the specified torque.
Note that internal damage may occur if the component is dropped. If the component has been dropped, inspect it before installation.
Apply engine oil to the O-ring of the valve.
When installing, carefully distinguish the valve and harness connector colors on Bank 1 and Bank 2, otherwise the engine will operate abnormally (see the table below).
Items
Component Side
Harness Side
Bank 1 (Right)
Gray
Bank 2 (Left)
Black
Install in the reverse order of removal. CVVT oil control valve bolt: 9.8 ~ 11.8 N·m
?
Test yourself
A quick Kia Cadenza VG Owner's Manual quiz: every answer comes with an explanation and a link to the manual page.