Exterior equipment. Mouldings, trims, extensions

In this manual: Exterior equipment. Mouldings, trims, extensions
Technical data. Panel gaps - front — 1Body front. Lock carrier — 1Body front. Wings — 1Body front. Bulkhead — 1Bonnet, flaps, cab, central locking. Bonnet — 1Bonnet, flaps, cab, central locking. Rear lid — 1Bonnet, flaps, cab, central locking. Charging flap unit — 1Front door, central locking. Door — 1Front door, central locking. Door components — 1Front door, central locking. Central locking — 1Rear door,sliding door,wing doors,central locking. Door — 1Rear door,sliding door,wing doors,central locking. Door components — 1Sliding roof. Sliding sunroof — 1Bumper. Bumper, front — 1Bumper. Bumper, rear — 1Glazing & window mechanism. Repair notes — 1Glazing & window mechanism. Windscreen — 1Glazing & window mechanism. Rear windscreen — 1Glazing & window mechanism. Side windows — 1Glazing & window mechanism. Door windows — 1Exterior equipment. Spoiler — 1Exterior equipment. Mouldings, trims, extensions — 1Exterior equipment. Underbody cladding — 1Exterior equipment. Roof moulding and roof railing — 1Exterior equipment. Exterior mirror — 1Exterior equipment. Wheel housing liner — 1Exterior equipment. Lettering and emblems — 1Exterior equipment. Bicycle carrier — 1Exterior equipment. Trim film and protective film — 1Interior equipment. Compartments & covers — 1Interior equipment. Equipment — 1Interior equipment. Centre console — 1Interior equipment. Front centre armrest — 1Interior equipment. Interior mirror — 1Passenger protection. Seat belts — 1Passenger protection. Child seat anchors — 1Passenger protection. Airbag system — 1Passenger protection. Airbag control unit — 1Passenger protection. Front airbag, driver side — 1Passenger protection. Front passenger airbag — 1Passenger protection. Side airbags — 1Passenger protection. Curtain airbags — 1Passenger protection. Airbag crash sensors — 1Passenger protection. Seat occupied recognition — 1Trim, noise insulation. Front door trims — 1Trim, noise insulation. Rear door trims — 1Trim, noise insulation. Dash panel — 1Trim, noise insulation. Central tube for dash panel — 1Trim, noise insulation. Interior trims — 1Trim, noise insulation. Roof trims — 1Trim, noise insulation. Luggage compartment trims — 1Seat frames. Overview of seat variants — 1Seat frames. Front seats — 1Seat frames. Rear seats — 1Seat padding, covers. Front seat covers and padding — 1Seat padding, covers. Rear seat covers and padding — 1Vehicle-specific paintwork information. Explanation of symbols — 1Vehicle-specific paintwork information. Paintwork structure — 1Vehicle-specific paintwork information. Areas exposed to stone chipping — 1Vehicle-specific paintwork information. Masked sectors — 1Vehicle-specific paintwork information. Seam sealing — 1Vehicle-specific paintwork information. Underseal — 1Vehicle-specific paintwork information. Cavity sealing — 1Vehicle-specific paintwork information. Contrasting colours — 1Vehicle-specific paintwork information. Paintwork repair — 1Technical data. Acoustic considerations during vehicle development — 1Technical data. General procedure for identifying noises — 1Technical data. Volkswagen equipment for localising noises — 1Technical data. Borescope VAS 6748A — 1Technical data. Causes — 1Technical data. Locating water ingress — 1Technical data. Attachments — 1Technical data. Vehicle identification data — 1Technical data. Safety information — 1Technical data. Body parts and materials — 1Technical data. Alignment jig — 1Body front. Longitudinal member cross panel — 1Body front. Longitudinal member — 1Body front. Front wheel housing — 1Body centre, roof, frame. Roof — 1Body centre, roof, frame. A-pillar — 1Body centre, roof, frame. B-pillar — 1Body centre, roof, frame. Side member — 1Body, rear. Rear cross member — 1Body, rear. Rear cross panel — 1Body, rear. Luggage compartment floor — 1Body, rear. Rear longitudinal member — 1Body, rear. Side panel — 1Body, rear. Rear wheel housing — 1General information, Body. Basic information on body repairs — 1General information, Body. Explanation of symbols — 1General information, Body. Overview of materials used — 1General information, Body. Joining and separating techniques — 1General information, Body. Surface repair — 1General information, Body. Corrosion protection — 1General information, Body. Noise insulation — 1General information, Body. Plastic repair — 1General information, Body. Welding plastic attachments — 1General information, Body. General notes – windows — 1General information, Body. Glass repair — 1General information, Body. Use of adhesives — 1General information, Body. Self-adhesive components — 1General information, Body. Noises — 1General information, Body. Preparing for disposal — 1General information, Body. Leaks — 1General information, paint. Safety information — 1General information, paint. General information — 1Genuine products. Filler — 1Genuine products. Priming metal — 1Genuine products. Priming plastic materials — 1Genuine products. Surfacer — 1Genuine products. 2-pack top coats — 1Repair painting work. Paint finish – decorative strips and films — 1Repair painting work. Tips and tricks — 1Air conditioner. Overview of fitting locations — 1Air conditioner. Refrigerant circuit — 1Air conditioner. Valve unit of heat pump — 1Air conditioner. Air conditioner compressor — 1Air conditioner. Control motors — 1Air conditioner. Front heater and air conditioning unit — 1Air conditioner. Air duct — 1Air conditioner. Coolant circuit — 1Air conditioner. Other controlling and regulating components — 1Air conditioner. Air quality improvement system — 11-speed gearbox 0MH, rear, EQ310. Technical data — 11-speed gearbox 0MH, rear, EQ310. Gearbox mechanics,operation, construction,diff — 11-speed gearbox 0MH, rear, EQ310. Final drive, differential, differential lock — 1General information. High voltage — 1Electric drive EIP220, EIA200, EIA210. Technical data — 1Electric drive EIP220, EIA200, EIA210. Engine assy,cylinder block,crankcase — 1Electric drive EIP220, EIA200, EIA210. Engine cooling — 1Electric drive. High-voltage components, charging unit and voltage converter — 1Electric drive. Warning stickers — 1Electric drive. High-voltage battery unit, edge of upper part of battery housing without wax — 1Electric drive. High-voltage battery unit, edge of upper part of battery housing with wax — 1Electric drive. Power and control electronics for electric drive — 1Electric drive. Electric drive motor — 1Electric drive. Motor control unit — 1Electric drive. De-energising high-voltage system — 1Electric drive. Re-energise high-voltage system — 1Electric drive. Potential equalisation lines — 1Electric drive. Charging socket, with charging cable — 1Electric drive. Charging socket, with separate charging cable — 1Electric drive. Charging unit for high-voltage battery — 1Electric drive. Charging unit for high-voltage battery, with integrated voltage converter — 1Electric drive. Vehicle noise & engine sound — 1Electric drive. Accelerator pedal — 1Electric drive. Voltage converter — 1Electric drive. High-voltage cables, all-wheel drive — 1Electric drive. High-voltage cables, rear-wheel drive — 1Front suspension, drive shafts. Front axle — 1Front suspension, drive shafts. Subframe — 1Front suspension, drive shafts. Suspension strut, upper suspension link — 1Front suspension, drive shafts. Lower suspension link, swivel joint — 1Front suspension, drive shafts. Wheel bearing — 1Front suspension, drive shafts. Anti-roll bar — 1Rear suspension, drive shaft. Rear axle — 1Rear suspension, drive shaft. Subframe — 1Rear suspension, drive shaft. Anti-roll bar — 1Rear suspension, drive shaft. Suspension link, track rod — 1Rear suspension, drive shaft. Suspension strut, shock absorber, spring — 1Rear suspension, drive shaft. Wheel bearing assembly, trailing arm — 1Rear suspension, drive shaft. Drive shaft — 1Self-levelling air spring system. Electronically controlled damping — 1Self-levelling air spring system. Vehicle level sender — 1Wheels, tyres. axle align. Wheel alignment — 1Wheels, tyres. axle align. Wheels, tyres — 1Steering. Steering wheel — 1Steering. Steering column — 1Steering. Steering rack — 1Brake system. Technical data — 1ABS, ADR, TCS, EDL, ESP. Overview of fitting locations — 1ABS, ADR, TCS, EDL, ESP. Control unit and hydraulic unit — 1ABS, ADR, TCS, EDL, ESP. Sensors — 1Brake, brake mechanics. Front brake — 1Brake, brake mechanics. Rear brake — 1Brake, brake mechanics. Parking brake — 1Brake, brake mechanics. Brake pedal — 1Brakes, hydraulics, regulator, servo. Brake servo and brake master cylinder — 1Brakes, hydraulics, regulator, servo. Hydraulic system — 1Wheels and Tyres Guide. Wheels, tyres. axle align — 1Wheels, tyres. axle align. Instructions on using the guide — 1Wheels, tyres. axle align. Legislative and technical conditions — 1Wheels, tyres. axle align. Wheel change — 1Wheels, tyres. axle align. Fitting tyre — 1Wheels, tyres. axle align. Wheel bolts — 1Wheels, tyres. axle align. Information on tyres — 1Wheels, tyres. axle align. Handling problems — 1Wheels, tyres. axle align. Evaluating tyres — 1Wheels, tyres. axle align. Tyre wear — 1Starter-current supply-CC. Battery — 1Instruments, GCI. Dash panel insert — 1Instruments, GCI. Horn — 1Windscreen wipewash system. Windscreen wiper system — 1Windscreen wipewash system. Windscreen washer system — 1Windscreen wipewash system. Rear window wiper system — 1Windscreen wipewash system. Rear window washer system — 1Lights, lamps, switches outside. LED headlight — 1Lights, lamps, switches outside. LED matrix headlight — 1Lights, lamps, switches outside. Tail lights — 1Lights, lamps, switches outside. Lights in exterior mirror — 1Lights, lamps, switches outside. Number plate light — 1Lights, lamps, switches outside. Entry and start authorisation system — 1Lights, lamps, switches outside. Steering column switch module — 1Lights, lamps, switches outside. Towing bracket — 1Lights, lamps, switches inside, anti-theft system. Lights — 1Lights, lamps, switches inside, anti-theft system. Controls — 1Lights, lamps, switches inside, anti-theft system. Anti-theft alarm system — 1Lights, lamps, switches inside, anti-theft system. Cigarette lighter, socket — 1Wiring. Relay carriers, fuse holders, electronics boxes — 1Wiring. Control units — 1Infotainment. Componentscontrol units — 1Infotainment. Multifunction steering wheel — 1Driver assist systems. Senders, sensors, control units — 1Driver assist systems. Adaptive cruise control — 1Driver assist systems. Reversing camera system — 1Driver assist systems. Front camera for driver assist systems — 1Driver assist systems. Overhead view camera — 1Electrical system. Starter-current supply-CC — 1Electrical system. Windscreen wipe and wash system — 1Wiring. Wires and lines — 1
~9min read
0102030405021N·mlb·ft
Tightening torque found on this page
  • Assembly overview – bonnet cover
  • Assembly overview - side member trim
  • Assembly overview - water deflector strip
  • Removing and installing bonnet cover
  • Removing and installing water deflector strip
  • Removing and installing retaining strip
  • Removing and installing side member trim
  • Removing and installing A-pillar cover
  • Removing and installing trim panel for A-pillar
  • Removing and installing B-pillar trim on front door
  • Removing and installing B-pillar trim on rear door

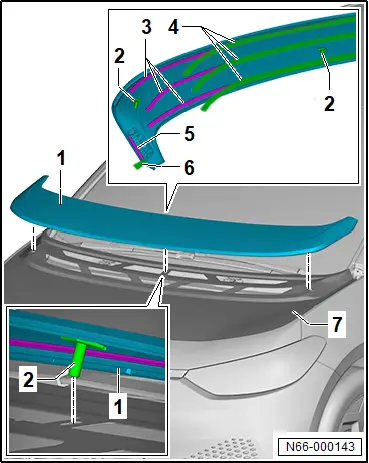
Assembly overview – bonnet cover

Assembly overview – bonnet cover
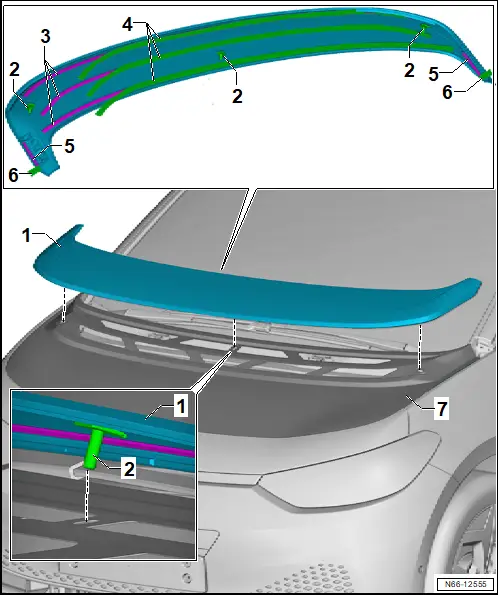
1 - Bonnet cover

❏ Renew after removing

❏ → Rep. gr.66; Removing and installing bonnet cover

2 - Centring pin

❏ Qty. 3

3 - Double-sided adhesive tape

4 - Protective film

5 - Double-sided adhesive tape

6 - Pull-off tab

7 - Bonnet

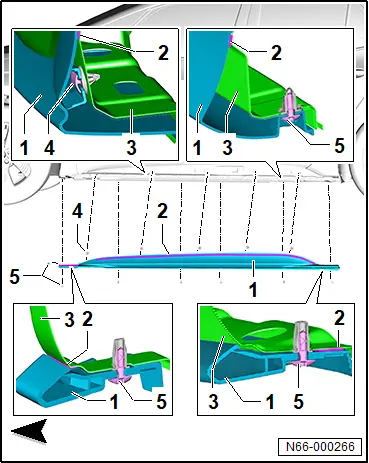
Assembly overview - side member trim

Assembly overview - side member trim

The assembly overview here applies to the left side of the vehicle.
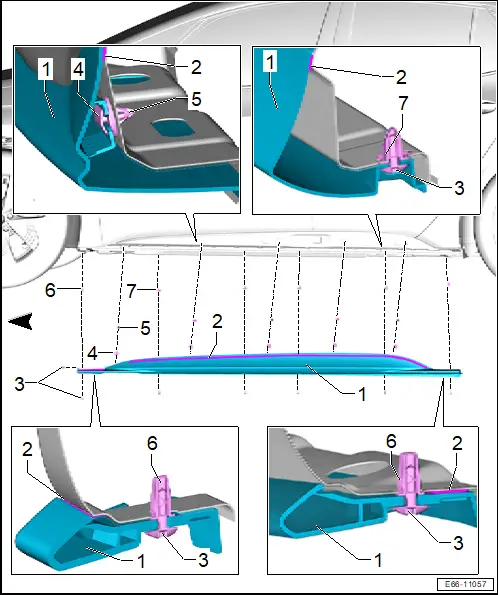
1 - Side member trim

❏ Renew after removing

❏ → Rep. gr.66; Removing and installing side member trim

2 - Adhesive tape

3 - Bolt

❏ 7x

❏ 2 N·m

4 - Clip

❏ 5x

5 - Grommet

❏ Depending on equipment/vehicle version

❏ 5x

6 - Expanding nut

❏ At front and rear.

❏ 2x

7 - Expanding nut

❏ 4x

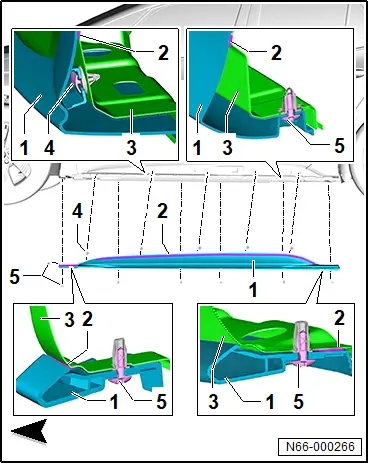
Assembly overview - water deflector strip

Assembly overview - water deflector strip

Overview is shown for right side of vehicle as an example
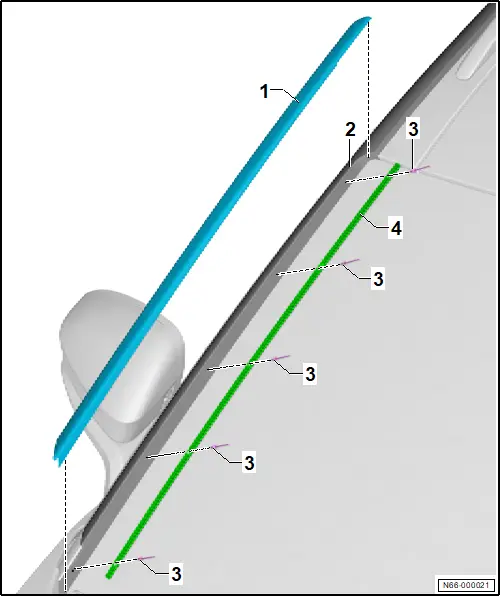
1 - Water deflector

❏ → Rep. gr.66; Removing and installing water deflector strip

2 - A-pillar

3 - Pop rivet

❏ Quantity and position depending on model

❏ Qty. 5 or 6

4 - Retaining strip

❏ → Rep. gr.66; Removing and installing retaining strip

Removing and installing bonnet cover

Removing and installing bonnet cover

Special tools and workshop equipment required

♦ Roller -T40400-

♦ hot air blower -V.A.G 1416-

The bonnet cover will henceforth be referred to as “cover”.

Important

● Observe relevant specifications with regard to temperature, minimum curing period, removal of adhesive residue and cleaning → General information - body; Rep. gr.52; Self-adhesive components; Specifications for self-adhesive components.

Removing

– Use hot air blower -V.A.G 1416- to heat up cover -2- in area of adhesive tape -1-.

– Pull cover -2- starting at one corner -arrow A- off bonnet -2- -arrows B and C-.

Installing

Install in reverse order of removal, observing the following:

– Remove adhesive residue and clean bonding surfaces → General information - body; Rep. gr.52; Self-adhesive components; Specifications for self-adhesive components.

– Align cover -1- with centring pins -2- on bonnet -7-.

– Pull off protective film -4- from double-sided adhesive tape -3-.

– Starting in middle, press cover -1- onto bonnet in area of adhesive strips -7-.

– Roll on cover -1- in area of adhesive tape with a force of 65 N using roller -T40400-.

Important

Observe deviating minimum curing period:

● Observe minimum drying time of 24 hours.
Removing and installing water deflector strip

Removing and installing water deflector strip

Removal and installation are described for the right vehicle side as an example.

Removing

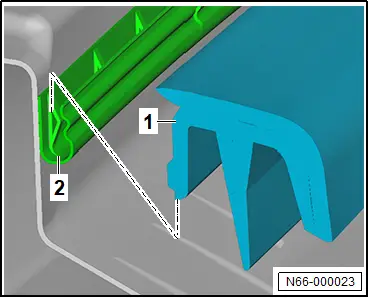
– Starting at bottom, pull water deflector strip -1- out of retaining strip -2-.

Installing

Install in reverse order of removal, observing the following:

– Position upper inner edge of water deflector -1- on upper edge of windscreen.

– Press water deflector strip -1- from above into retaining strip -2-.

Important

● Water deflector strip -1- must engage in clips.
Removing and installing retaining strip

Removing and installing retaining strip

Special tools and workshop equipment required

♦ Drill, commercially available

♦ drill bit, 4 mm in dia., commercially available

♦ pop rivet pliers, commercially available

Removal and installation are described for the right vehicle side as an example.

Removing

– Remove water deflector strip → Rep. gr.66; Removing and installing water deflector strip.

– Remove windscreen → Rep. gr.64; Removing and installing windscreen.

CAUTION

Risk of injury caused by flying metal shavings.

Eyes and skin can suffer irritation or injuries.

– Put on safety goggles.

– Put on protective gloves.

NOTICE

Risk of corrosion damage due to swarf and paint damage

– Remove any swarf.

– Immediately repair any damage to paintwork.

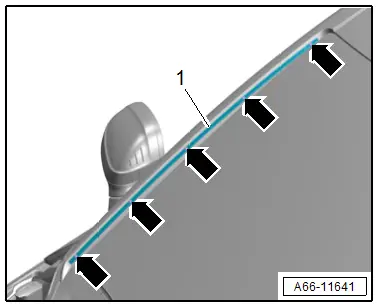
– Drill out pop rivets -arrows- and remove retaining strip -1-.
Installing

Install in reverse order of removal, observing the following:

Note

The left and right retaining strips are not identical.

– Rivet retaining strip starting at top.

Removing and installing side member trim

Removing and installing side member trim

Special tools and workshop equipment required

♦ Roller -T40400-

♦ hot air blower -V.A.G 1416-

Removal and installation are described for left side of vehicle as an example.

Important

● Observe relevant specifications with regard to temperature, minimum curing period, removal of adhesive residue and cleaning → General information - body; Rep. gr.52; Self-adhesive components; Specifications for self-adhesive components.

Removing

– Unscrew bolts -5- from side member trim -1-.

– Use hot air blower -V.A.G 1416- to heat up side member trim -1- in area of adhesive tape -2-.

– Guide commercially available plastic wedge between outer side member -3- and side member trim -1- and detach adhesive tape -2-.

– Remove side member trim -1- with clips -4-.
Vehicles with grommets for clips

– Remove grommets for clips from outer side member.

All vehicles (continued)

Installing

Install in reverse order of removal, observing the following:

– Remove adhesive residue and clean bonding surfaces → General information - body; Rep. gr.52; Self-adhesive components; Specifications for self-adhesive components.

– Press side member trim -1- with clips -4- into outer side member -3-.

– Align side member trim -1- longitudinally.

– Tighten bolt -5- at front of sill.

– Screw in bolts -5- at bottom of sill.

– Use removal aid to pull protective film off double-sided adhesive tape -2- upwards and towards rear.

– Press on side member trim -1- forcefully and evenly in area of adhesive tape -2-.

– Use roller -T40400- in area of adhesive tape -2- to press on side member trim -1- with a force of between 50 N and 70 N.

Important

● The minimum drying time must be adhered to.
Tightening torques

♦ → Rep. gr.66; Assembly overview - side member trim

Removing and installing A-pillar cover

Removing and installing A-pillar cover

Removal and installation are described for the left side of vehicle as an example.

Removing

– Remove water deflector strip → Rep. gr.66; Removing and installing water deflector strip.

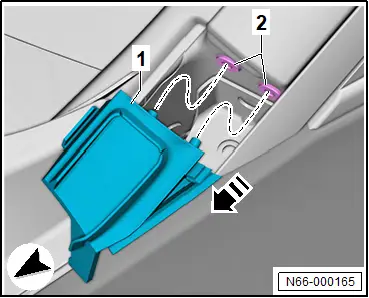
– Lift A-pillar cover -1- in direction of -arrow- out of grommets -2-, and remove it.
Installing

Install in reverse order of removal, observing the following:

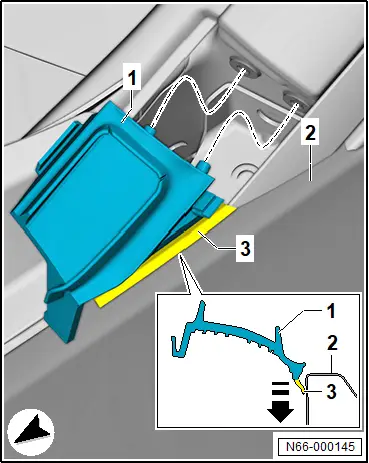
– Following installation of sealing lip -3-, press A-pillar cover -1- in direction of -arrow- behind wing -2-.
Removing and installing trim panel for A-pillar

Removing and installing trim panel for A-pillar

Removal and installation are described for left side of vehicle as an example.

Removing

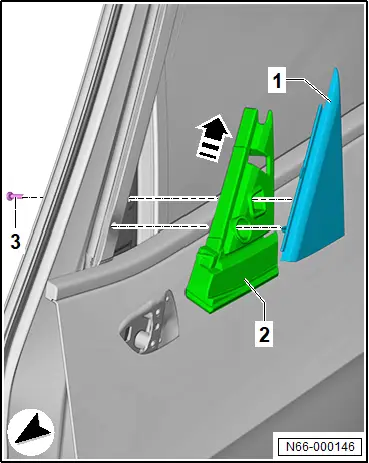
– Remove door trim → General body repairs, interior; Rep. gr.70; Front door trims; Removing and installing front door trim.

– Remove mirror cover trim → Rep. gr.70; Front door trims; Removing and installing mirror cover.

– Unscrew bolt -3-.

– Remove trim -1-.

– Pull insulation -2- out of door in -direction of arrow-.
Installing

Install in reverse order of removal, observing the following:

Tightening torques

ComponentSpecified torquesBolt for A-pillar trim1.7 N·m

Removing and installing B-pillar trim on front door

Removing and installing B-pillar trim on front door

Removal and installation are described for left side of vehicle as an example.

Removing

– Lower front door window completely.

– Remove outer window slot seal → Rep. gr.57; Removing and installing outer window slot seal.

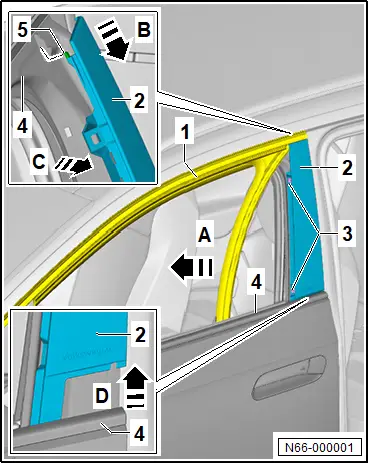
– Pull window channel -1- in area of B-pillar trim on front door -2- in direction of -arrow A- out of front door -4-.

– Unscrew bolts -3- from spreader rivets, and unclip spreader rivets.

– Push B-pillar trim on front door -2- in direction of -arrow B-, and pull it off at top in direction of -arrow C- until guide hooks -5- are released from front door -4-.

– Pull B-pillar trim on front door -2- in direction of -arrow D- out of front door -4-.
Installing

Install in reverse order of removal, observing the following:

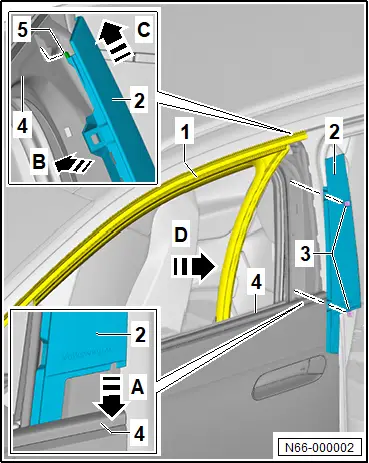
– Guide B-pillar trim on front door -2- in direction of -arrow A- into window slot of front door -4-.

– Push B-pillar trim on front door -2- in direction of -arrow B- against front door -4- and in direction of -arrow C- until guide hooks -5- engage in front door -4-.

– Press in bolts with spreader rivets -3-.

– Insert window channel -1- in direction of -arrow D- in B-pillar trim on front door -2-.
Removing and installing B-pillar trim on rear door

Removing and installing B-pillar trim on rear door

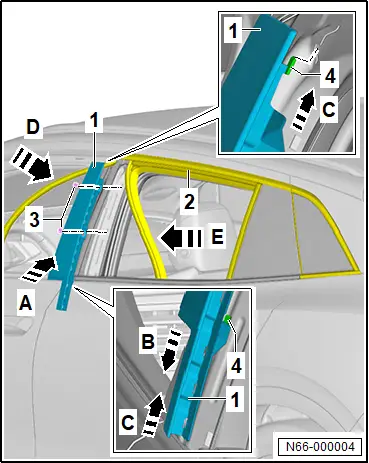
Removal and installation are described for left side of vehicle as an example.

Removing

– Lower rear door window completely.

– Remove outer window slot seal → Rep. gr.58; Removing and installing outer window slot seal.

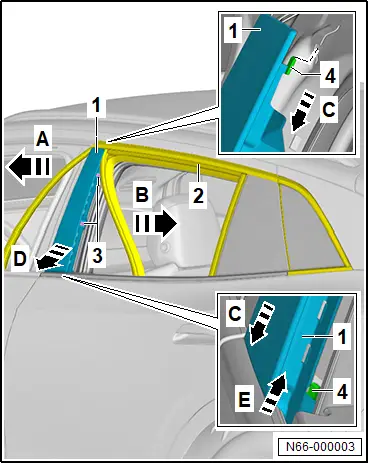
– Pull out window channel -2- in area of B-pillar trim on rear door -1- in direction of -arrow A- and -arrow B-.

– Unscrew bolts -3- from spreader rivets, and unclip spreader rivets.

– Push B-pillar trim on rear door -1- in direction of -arrow C-, and pull it off in direction of -arrow D - until guide hooks -4- are released from window frame.

– Pull out B-pillar trim on rear door -1- in direction of -arrow E-.
Installing

Install in reverse order of removal, observing the following:

– Fit B-pillar trim on rear door -1- in direction of -arrow A- to window frame.

– Guide B-pillar trim on rear door -1- in direction of -arrow B- into window slot.

– Push B-pillar trim on rear door -1- in direction of -arrow C- until guide hooks -4- engage in window frame.

– Press in bolts with spreader rivets -3-.

– Insert window channel -2- in direction of -arrow D- and -arrow E- in B-pillar trim on rear door -1-.