Front suspension, drive shafts. Subframe
- Assembly overview – subframe
- Removing and installing subframe with steering rack, rear wheel drive
- Servicing threads in longitudinal member
- Fixing subframe in position
- Taking up weight of subframe using scissor-type assembly platform
- Preparing scissor-type assembly platform
- Supporting components in vehicle front end
Assembly overview – subframe
Assembly overview – subframe
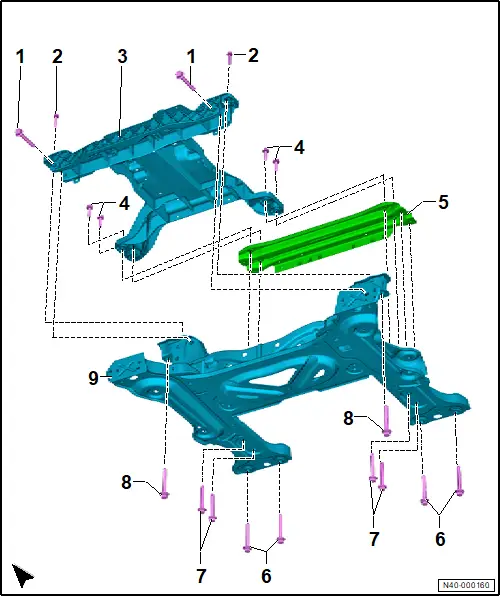
1 - Bolt
❏ Qty. 2
❏ Renew after removing
❏ M 12 x 1.5 x 80
❏ 70 N·m +180°
2 - Bolt
❏ Qty. 2
❏ Renew after removing
❏ M 8 x 40
❏ 16 N·m +90°
3 - Bracket
4 - Bolt
❏ Qty. 4
❏ Renew after removing
❏ M 10 x 35
❏ 50 N·m +90°
5 - Cross member
6 - Bolt
❏ Qty. 4
❏ Renew after removing
❏ M 12 x 1.5 x 95
❏ 70 N·m +180°
7 - Bolt
❏ Qty. 4
❏ Renew after removing
❏ M 12 x 1.5 x 90
❏ 70 N·m +180°
8 - Bolt
❏ Qty. 2
❏ Renew after removing
❏ M 12 x 1.5 x 95
❏ 70 N·m +180°
9 - Subframe
❏ → Rep. gr.40; Removing and installing subframe with steering rack
❏ → Rep. gr.40; Fixing subframe in position
Removing and installing subframe with steering rack, rear wheel drive
Removing and installing subframe with steering rack, rear wheel drive
Special tools and workshop equipment required
♦ ball joint puller -3287A-
♦ scissor-type assembly platform -VAS 6131B-
♦ socket/bit set, 39-piece -VAS 6928-
Removing
Front left vehicle level sender -G78- and front right vehicle level sender -G289- will henceforth be referred to as “front vehicle level sender”.
Steering rack and power steering control unit -J500- will henceforth be referred to as “steering rack”.
 DANGER
High voltage can cause fatal injury.
Danger of severe or fatal injuries from electric shock or electric arcs.
– Have a high-voltage technician (HVT) or a high-voltage expert (HVE) de-energise the high-voltage system.
– → Electric rear-wheel drive EIP220 and all-wheel drive EIA200, EIP220; Rep. gr.93; De-energise high-voltage system; De-energising high-voltage system.
– Detach wheels on front axle → Rep. gr.44; Removing and installing wheel.
– Remove front underbody cladding → General body repairs, exterior; Rep. gr.66; Underbody cladding; Removing and installing front underbody cladding.
– Remove front left and front right wheel housing liner → General body repairs, exterior; Rep. gr.66; Wheel housing liner; Removing and installing front wheel housing liner.
– Remove air intake box of front heater and air conditioning unit → Heating, air conditioning system; Rep. gr.87; Front heater and air conditioning unit; Removing and installing air intake unit of heater and air conditioning unit.
– Remove battery tray → Electrical system; Rep. gr.27; Battery; Removing and installing battery tray.
– → Electric motor; Rep. gr.19; Cooling system/coolant; Draining coolant.
– Remove voltage converter → Electric drive, rear-wheel drive EIP220 and all-wheel drive EIA200, EIP220; Rep. gr.93; Voltage converter; Removing and installing voltage converter [A19].
– Remove heater element (PTC) 3 -Z132- → Heating, air conditioning system; Rep. gr.87; Coolant circuit; Removing and installing heater element 3 [Z132].
– → Rep. gr.40; Support components in vehicle front end.
Vehicles with air deflector
– Remove air deflector on left and right → General body repairs, exterior; Rep. gr.63; Front bumper; Removing and installing air deflector.
All vehicles (continued)
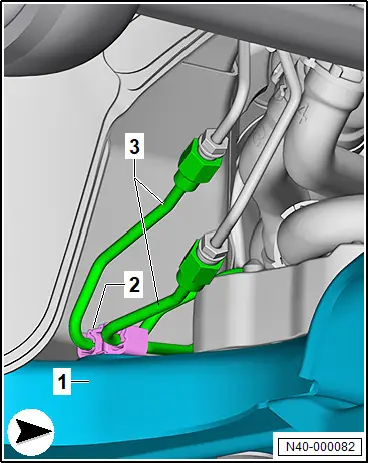
– Unclip retainer -2- for brake lines -3- on subframe -1-.
– Unscrew bolts -6- for brackets -1-, -2- and -3- from subframe -7-.
– Pull out inner pin, and lever off retaining clip -5-.
– Move aside coolant pipe -4- on subframe -7-.

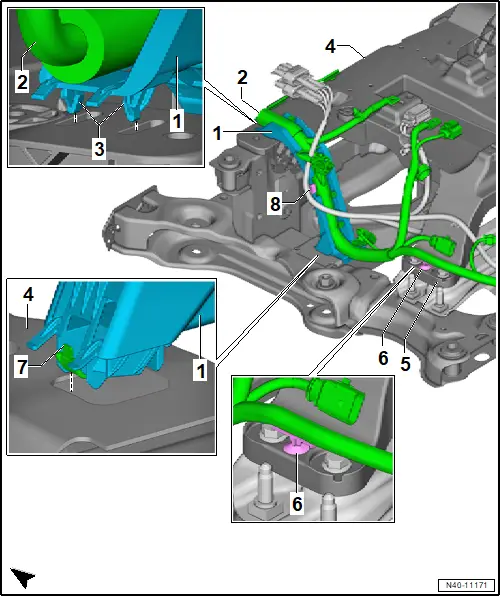
For reasons of clarity, the subframe -4- is shown removed in the illustration.
– Release locking device -3- for cable guide -1- at top of subframe -4-. Push aside electrical wire -2- to do this.
– Pull off cable guide -1- upwards.
– Unclip retaining clip -6- for electrical wire -2- from rear cross member -5-.
– Pull off retaining clip -8-.
– Release locking element -7-, and pull off cable guide upwards.
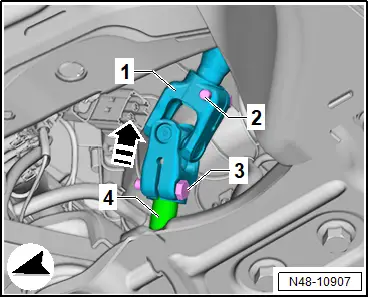
– Unscrew bolt -3-.
– Pull universal joint -1- in direction of -arrow- off steering rack -4-.
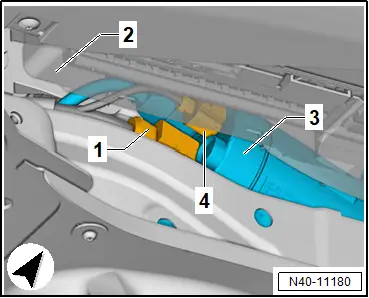
Left-hand drive vehicles
– Disconnect electrical connectors -1- and -4- from steering rack -3-.
– Unclip electrical wire from steering rack.
All vehicles (continued)
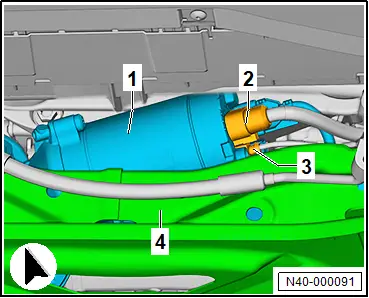
Right-hand drive vehicles
– Disconnect electrical connectors -2- and -3- from steering rack -1-.
– Unclip electrical wire from steering rack.
All vehicles (continued)
Vehicles with front vehicle level sender
– Unbolt front left and front right vehicle level senders from suspension link → Rep. gr.43; Removing and installing front vehicle level senders [G78]/[G289].
All vehicles (continued)
– Detach coupling rods from anti-roll bar on both sides of vehicle, and pull them out of anti-roll bar → Rep. gr.40; Removing and installing coupling rod.
– Remove track rod ball joint -4- from wheel bearing housing -1- on both sides of vehicle.
– Loosen nut -2- on track rod ball joint -4-, but do not unscrew it completely. Counterhold on pin using a suitable tool while doing so.
– To protect thread, leave nut -2- screwed onto pin a few turns.
 NOTICE
Risk of damage to wheel bearing housing! Loosened bushes on wheel bearing housing due to incorrect placement of ball joint puller.
– Position ball joint puller in such a way that fulcrum of bottom support is on bush and not on wheel bearing housing.
– Use ball joint puller -3287A- -A- to press track rod ball joint -4- off wheel bearing housing -1-. Unscrew nut -2-.

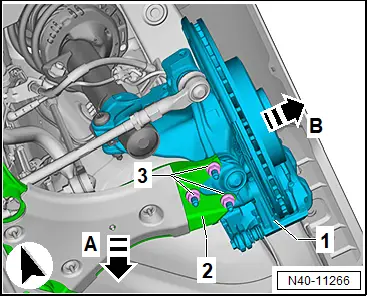
– Detach lower suspension link -2- from swivel joint -1- on both sides of vehicle.
– Unscrew nuts -3-.
– Pull suspension link -2- in direction of -arrow A- off swivel joint.
– Pull wheel bearing housing -1- outwards in direction of -arrow B-.
– Swing aside wheel bearing housing -1- outwards to relieve tension from suspension link -2-.
– Unscrew bolts -arrows- for impact bar -2- from subframe -1-.
– Use socket/bit set, 39-piece -VAS 6928- to unscrew bolt -4- for strut -3-.
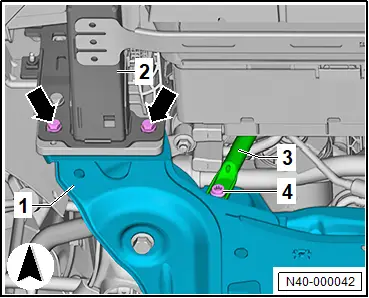
– Unscrew bolts -arrows- for impact bar -2- from subframe -1-.
– Unscrew bolt -4- for strut -3-.

– → Rep. gr.40; Fix subframe in position.
– Use scissor-type assembly platform -VAS 6131B- to lower subframe.
Installing
Install in reverse order of removal, observing the following:
 WARNING
High voltage can cause fatal injury.
Danger of severe or fatal injuries from electric shock or electric arcs.
– Have a high-voltage technician (HVT) or a high-voltage expert (HVE) re-energise the high-voltage system.
– → Electric motor; Rep. gr.93; Re-energising high-voltage system; Re-energising high-voltage system.
Vehicles with front vehicle level sender
– Carry out required function/functions using → Vehicle diagnostic tester → Rep. gr.00; Access to diagnoses.
All vehicles (continued)
Tightening torques
♦ → Rep. gr.40; Assembly overview – subframe
♦ → Rep. gr.40; Assembly overview – wheel bearing
♦ → Rep. gr.48; Assembly overview – steering rack
♦ → Rep. gr.48; Assembly overview – steering column
♦ → Rep. gr.40; Assembly overview – anti-roll bar
♦ → Rep. gr.40; Assembly overview – suspension link, swivel joint
♦ → Rep. gr.48; Assembly overview – track rods
Servicing threads in longitudinal member
Servicing threads in longitudinal member
Repairing the thread in captive nuts in the longitudinal member is possible only under certain conditions → Rep. gr.50.
Fixing subframe in position
Fixing subframe in position
Special tools and workshop equipment required
♦ stud -T10486/1-
 NOTICE
If the subframe is removed, the axle settings may change.
This can influence the driving behaviour of the vehicle.
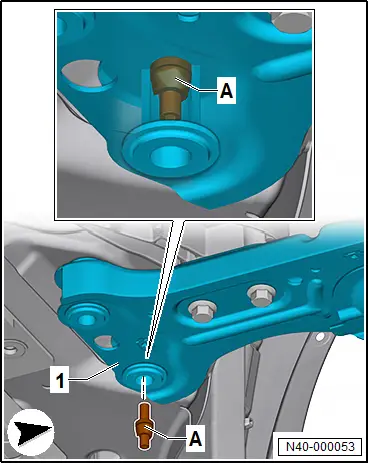
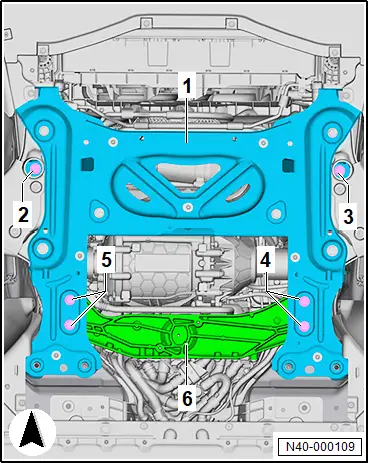
– Secure the subframe in its exact position relative to the body using 4 threaded pins.
– → Rep. gr.40; Take up weight of subframe using scissor-type assembly platform.
– Unscrew bolts -1-.

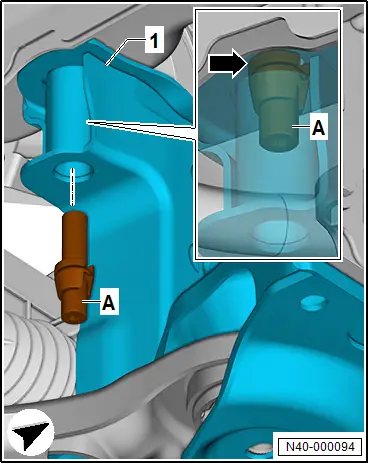
– Screw threaded pin -T10486/1- -A- into outer hole on left side of subframe -1-.
– Tighten threaded pin -T10486/1- -A- to 20 N·m.
– Unscrew bolts -2-.
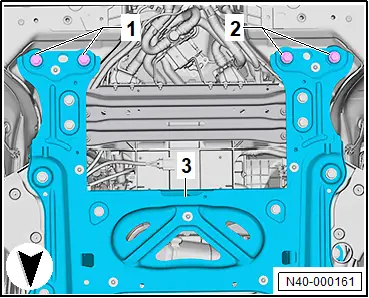
– Screw threaded pin -T10486/1- -A- into outer hole on right side of subframe -1-.
– Tighten threaded pin -T10486/1- -A- to 20 N·m.

– Unscrew bolt -2- on left side of vehicle.
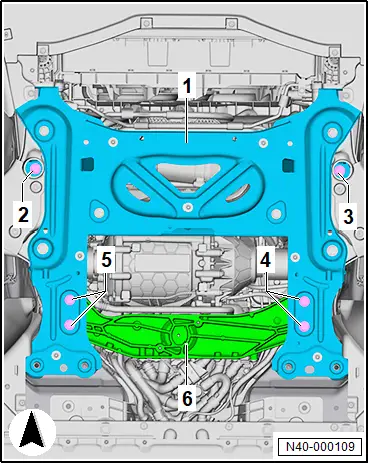
– Screw in threaded pin -T10486/1- -A-, and tighten it to 20 N·m.
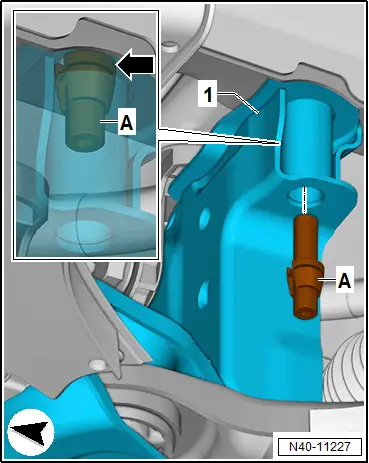
– Unscrew bolt -3- on right side of vehicle.
– Screw in threaded pin -T10486/1- -A-, and tighten it to 20 N·m.
Installing
Install in reverse order of removal, observing the following:
– Only ever unscrew one stud -T10486/1- at a time and replace it with a new bolt.
If the steering wheel is found to be off centre during the road test:
– Perform wheel alignment.
Continued
Tightening torques
♦ → Rep. gr.40; Assembly overview – subframe
♦ → General body repairs, exterior; Rep. gr.66; Underbody cladding; Assembly overview – underbody cladding
Taking up weight of subframe using scissor-type assembly platform
Taking up weight of subframe using scissor-type assembly platform
Special tools and workshop equipment required
♦ scissor-type assembly platform -VAS 6131B-
Removing
– → Rep. gr.40; Prepare scissor-type assembly platform.
– Position scissor-type assembly platform -VAS 6131B- -A- longitudinally under vehicle, align it, and raise it.
– Position supports -2- and -4- on subframe -1-.
– Adjust height of supports -2- and -4-.
– Raise scissor-type assembly platform -VAS 6131B- -A- further.
– Align supports -4- with holes of subframe -1-.
– Align supports -2- with holes of subframe -1-.
– Tighten bolts for supports -2- and -4- on scissor-type assembly platform -VAS 6131B--A- to 40 N·m.
– Align support -3- with cross member at rear of subframe -1-.
– Align height of supports -2-, -3- and -4-, and bolt them on.
– Raise scissor-type assembly platform -VAS 6131B- further, and support subframe -1-.

Preparing scissor-type assembly platform
Preparing scissor-type assembly platform
Special tools and workshop equipment required
♦ Plate -VAS 6131/10-1-
♦ Scissor-type assembly platform -VAS 6131B-
♦ Spindle -VAS 6131/10-5-
♦ Universal support -VAS 6131/13-2-
♦ support set for Audi -VAS 6131/10-
♦ support set for Audi -VAS 6131/10-4-
♦ support set for Audi -VAS 6131/10-7-
Removing
Prepare supports 1:
– Assemble supports using the following tools:
1 - Adapter, support set for Audi -VAS 6131/10-7-
2 - Spindle -VAS 6131/10-5-
3 - Support cone, support set for Audi -VAS 6131/10-4-
4 - Plate -VAS 6131/10-1-
5 - Scissor-type assembly platform -VAS 6131B-
6 - M 10 x 25 bolt, support set for Audi -VAS 6131/10-

Prepare support 2:
– Assemble support using the following tools:
1 - Universal support -VAS 6131/13-2-
2 - Spindle -VAS 6131/10-5-
3 - Support cone, support set for Audi -VAS 6131/10-4-
4 - Plate -VAS 6131/10-1-
5 - Scissor-type assembly platform -VAS 6131B-
6 - M 10 x 25 bolt, support set for Audi -VAS 6131/10-

– Screw bolts for supports by hand into scissor-type assembly platform -VAS 6131B- -3-. Position scissor-type assembly platform -VAS 6131B- -3- horizontally.
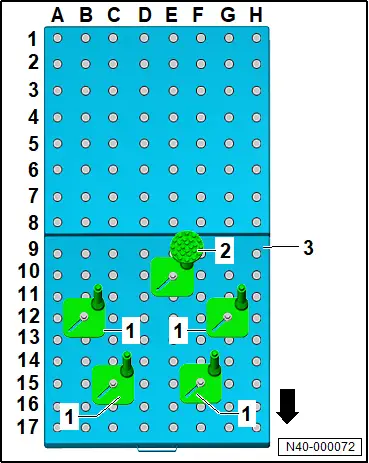 CoordinatesSupportE 102B 121G 121C 151F 151
Supporting components in vehicle front end
Supporting components in vehicle front end
Special tools and workshop equipment required
♦ adapter -10-222A/18-
♦ adapter -10-222A/19-
♦ adapter -10-222A/8-
♦ adapter -T10626/1-
♦ adapter set -T10626-
♦ bracket -T10346/1-
♦ hook -10-222A/20-
♦ support -T10626/2-
♦ support -T10626/3-
♦ support bracket -10-222A-
♦ tensioning belt -T10523-
♦ tube -T40091/1-
Removing
The air conditioner compressor -VX81- will henceforth be referred to as “air conditioner compressor”.
 DANGER
High voltage can cause fatal injury.
Danger of severe or fatal injuries from electric shock or electric arcs.
– Have a high-voltage technician (HVT) or a high-voltage expert (HVE) de-energise the high-voltage system.
– → Electric rear-wheel drive EIP220 and all-wheel drive EIA200, EIP220; Rep. gr.93; De-energise high-voltage system; De-energising high-voltage system.
– Remove air intake box of heater and air conditioning unit → Heating, air conditioning system; Rep. gr.87; Front heater and air conditioning unit; Removing and installing air intake box of heater and air conditioning unit.
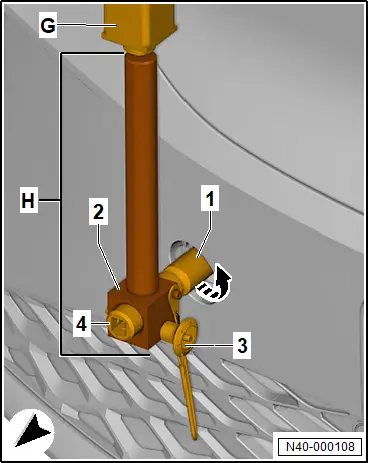
– Remove cap of towing eye -1-.
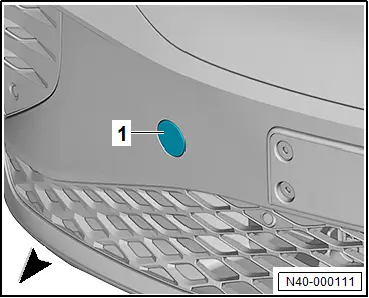
– Screw adapter -T10626/1- -1- in mounting for towing eye in direction of -arrow-.
– Tighten adapter -T10626/1- -1- in direction of -arrow- via ½ inch mounting for square drive -4- to 20 N·m.
– Screw support -T10626/2- -2- into adapter -10-222A/19- -G-.
– Pull out ball locking pin -3- from support -T10626/2- -2-.
– Push support -T10626/2- -2- onto adapter -T10626/1- -1-.
– Selected suitable guide groove in adapter -T10626/1- -1-.
– Secure support -T10626/2- -2- with ball locking pin -3-.
– Turn adapter -10-222A/19- -G- with support -T10626/2- -2- on adapter -T10626/1- -1-, and put it down onto floor.
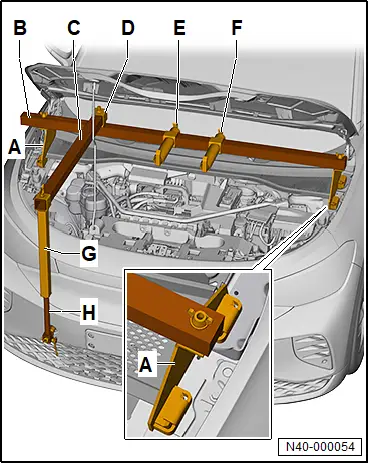
– Push adapter -10-222A/18- -E- and adapter -10-222A/18- -F- onto support bracket -10-222A- -B-.
Important
● Long arm from adapter -10-222A/18- -E- and adapter -10-222A/18- -F- points in direction of travel.
– Mount adapter -10-222A/8- -A- onto support bracket -10-222A- -B- on left and right.
Important
● Side with tool number specification from adapter -10-222A/8- -A- points inwards.
● Elongated hole of cross member from support bracket -10-222A- -B- is located on right-hand side of vehicle.
– Mount support -T10626/3- -D- on elongated hole of cross member from support bracket -10-222A- -B- using M10 × 65 bolt from adapter set -T10626-.
– Place support bracket -10-222A- -B- with both adapters -10-222A/8- -A- onto upper wheel housing longitudinal members.
– Push tube -T40091/1- -C- into support of adapter -10-222A/19- -G-.
– Push tube -T40091/1- -C- into support -T10626/3- -D-.
– Align support bracket.
– Hand-tighten threaded connections of support bracket.
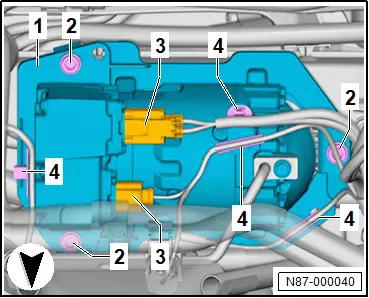
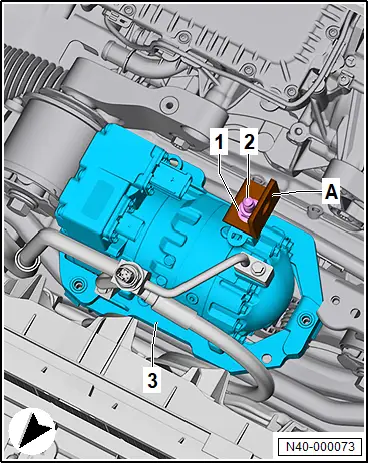
– Disconnect electrical connectors -3- from air conditioner compressor -1-.
– Unclip cable holder -4-.
– Unscrew bolts -2-.
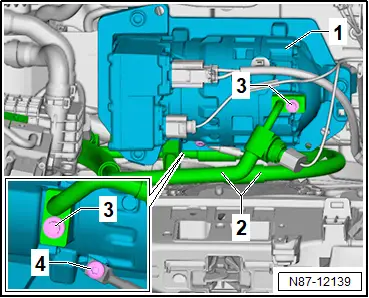
– Unscrew bolt for potential equalisation line -4- on air conditioner compressor -1-.
– Mount bracket -T10346/1- -A- with M6 nut -1- and M6 bolt -2- on air conditioner compressor -3-.
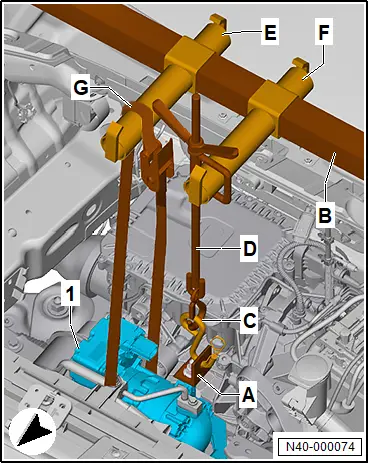
– Attach spindle from support bracket -10-222A- -D- to adapter -10-222A/18- -F-.
– Engage hook -10-222A/20- -C- in bracket -T10346/1- -A-.
– Attach spindle from support bracket -10-222A- -D- to hook -10-222A/20- -C-.
– Guide tensioning strap -T10523- -G- under air conditioner compressor -1-.
– Preload air conditioner compressor -1- slightly via spindle from support bracket -10-222A- -D-; do not raise.
– Lay tensioning strap -T10523- -G- around adapter -10-222A/18- -E-.
– Push end of tensioning strap -T10523- -G- into tensioning strap buckle.
– Preload air conditioner compressor -1- via tensioning belt -T10523- -G-; do not raise.
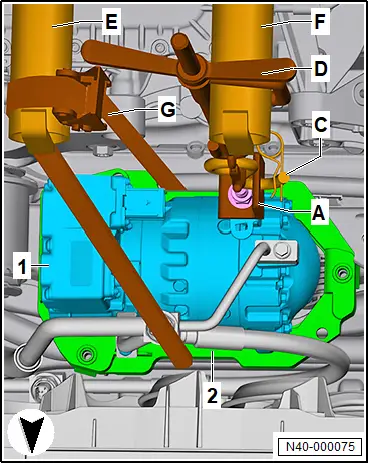
– Raise air conditioner compressor -1- evenly with tensioning belt -T10523- -G- and spindle from support bracket -10-222A- -D- until air conditioner compressor -1- is no longer in contact with subframe -2-.
Installing
Install in reverse order of removal, observing the following:
 WARNING
High voltage can cause fatal injury.
Danger of severe or fatal injuries from electric shock or electric arcs.
– Have a high-voltage technician (HVT) or a high-voltage expert (HVE) re-energise the high-voltage system.
– → Electric motor; Rep. gr.93; Re-energising high-voltage system; Re-energising high-voltage system.
Tightening torques
♦ → Heating, air conditioning system; Rep. gr.87; Air conditioner compressor; Assembly overview – air conditioner compressor