Trim, noise insulation. Interior trims
- Overview of fitting locations – interior trims
- Assembly overview – sill panel moulding
- Assembly overview – A-pillar trim
- Assembly overview – B-pillar trim
- Assembly overview – C-pillar trim
- Assembly overview – foot rest and floor covering
- Removing and installing front sill panel moulding
- Removing and installing rear sill panel moulding
- Removing and installing upper A-pillar trim
- Removing and installing lower A-pillar trim
- Removing and installing A-pillar gap cover
- Removing and installing upper B-pillar trim
- Removing and installing lower B-pillar trim
- Removing and installing C-pillar trim
- Removing and installing floor covering
- Removing and installing foot rest
Overview of fitting locations – interior trims
Overview of fitting locations – interior trims
Overview shown for left side of vehicle as an example
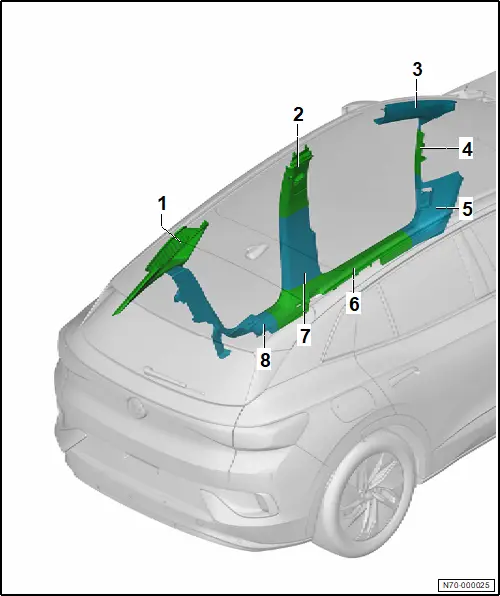
1 - C-pillar trim
❏ → Rep. gr.70; Assembly overview – C-pillar trim
❏ → Rep. gr.70; Removing and installing C-pillar trim
2 - Upper part of B-pillar trim
❏ → Rep. gr.70; Assembly overview – B-pillar trim
❏ → Rep. gr.70; Removing and installing upper B-pillar trim
3 - Upper A-pillar trim
❏ → Rep. gr.70; Assembly overview – A-pillar trim
❏ → Rep. gr.70; Removing and installing upper A-pillar trim
4 - A-pillar gap cover
❏ → Rep. gr.70; Assembly overview – A-pillar trim
❏ → Rep. gr.70; Removing and installing A-pillar gap cover
5 - Lower A-pillar trim
❏ → Rep. gr.70; Assembly overview – A-pillar trim
❏ → Rep. gr.70; Removing and installing lower A-pillar trim
6 - Front sill panel moulding
❏ → Rep. gr.70; Assembly overview – sill panel moulding
❏ → Rep. gr.70; Removing and installing front sill panel moulding
7 - Lower B-pillar trim
❏ → Rep. gr.70; Assembly overview – B-pillar trim
❏ → Rep. gr.70; Removing and installing lower B-pillar trim
8 - Rear sill panel moulding
❏ → Rep. gr.70; Assembly overview – sill panel moulding
❏ → Rep. gr.70; Removing and installing rear sill panel moulding
Assembly overview – sill panel moulding
Assembly overview – sill panel moulding
Overview shown for left side of vehicle as an example
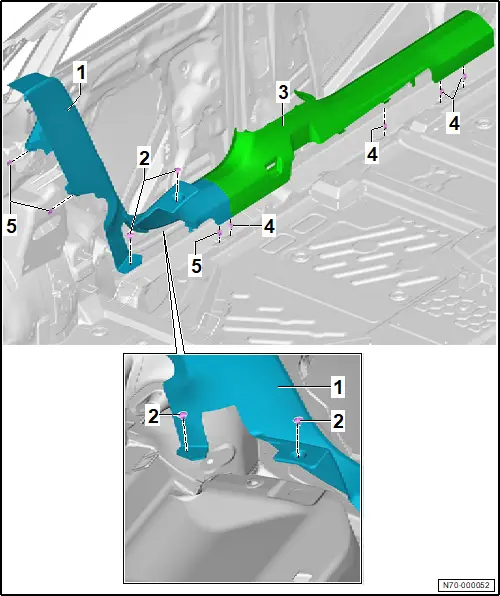
1 - Rear sill panel moulding
❏ → Rep. gr.70; Removing and installing rear sill panel moulding
2 - Plug
❏ Qty. 2
3 - Front sill panel moulding
❏ → Rep. gr.70; Removing and installing front sill panel moulding
4 - Retaining clip
❏ Qty. 4
5 - Retaining clip
❏ Qty. 3
Assembly overview – A-pillar trim
Assembly overview – A-pillar trim
Overview shown for left side of vehicle as an example
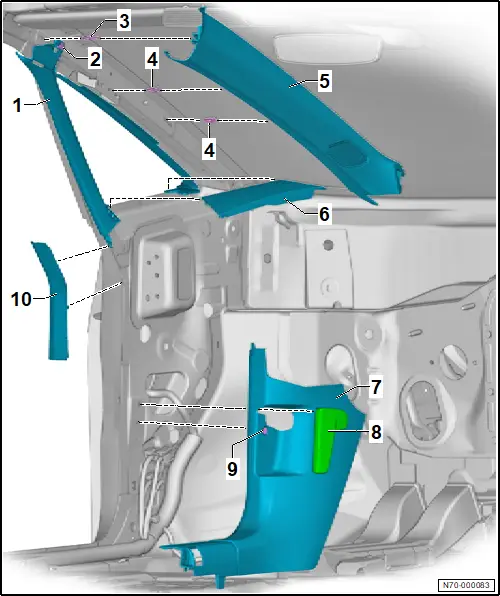
1 - A-pillar trim
2 - Clip
3 - Clip
❏ With barb
❏ Renew after removing
4 - Clip
❏ Qty. 2
5 - Upper A-pillar trim
❏ → Rep. gr.70; Removing and installing upper A-pillar trim
6 - Cover
7 - Lower A-pillar trim
❏ → Rep. gr.70; Removing and installing lower A-pillar trim
8 - Bonnet lock operating lever
❏ → General body repairs, exterior; Rep. gr.55; Bonnet; Removing and installing bonnet lock release lever
9 - Clip
10 - A-pillar gap cover
❏ → Rep. gr.70; Removing and installing A-pillar gap cover
Assembly overview – B-pillar trim
Assembly overview – B-pillar trim
Overview shown for left side of vehicle as an example
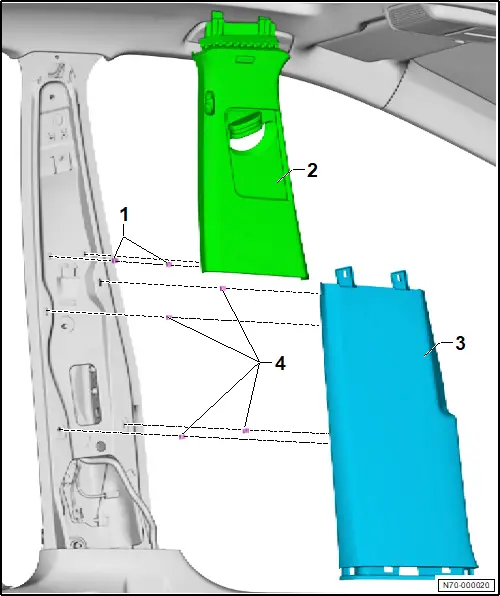
1 - Clip
❏ Qty. 2
2 - Upper part of B-pillar trim
❏ → Rep. gr.70; Removing and installing upper B-pillar trim
3 - Lower B-pillar trim
❏ → Rep. gr.70; Removing and installing lower B-pillar trim
4 - Clip
❏ Qty. 4
Assembly overview – C-pillar trim
Assembly overview – C-pillar trim
Overview is shown for left side of vehicle as an example

1 - C-pillar trim
❏ → Rep. gr.70; Removing and installing C-pillar trim
2 - Guide
3 - Clip
❏ Qty. 8
Assembly overview – foot rest and floor covering
Assembly overview – foot rest and floor covering
The overview shows a left-hand drive vehicle as an example.
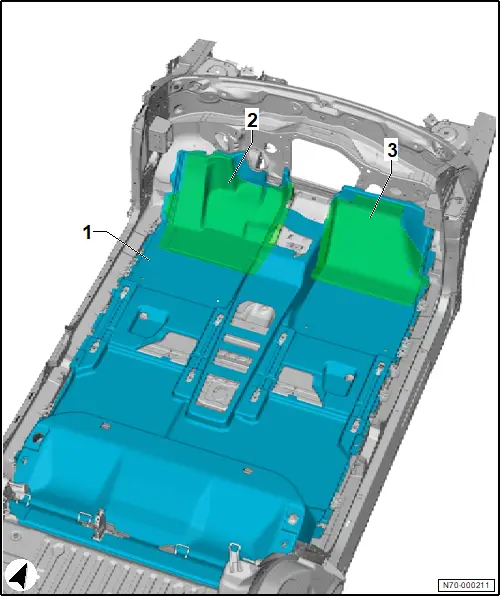
1 - Floor covering
❏ → Rep. gr.70; Removing and installing floor covering
2 - Filler piece, driver side
3 - Filler piece, front passenger side
Removing and installing front sill panel moulding
Removing and installing front sill panel moulding
Special tools and workshop equipment required
♦ release tool -T40280-
Removal and installation are described for the left side of vehicle as an example.
For a better view, the left front seat is not shown.
Removing
– Unclip front sill panel moulding -2- in direction of -arrow A- using commercially available plastic wedge.
– Use commercially available plastic wedge to unclip front sill panel moulding -2- in direction of -arrow B- from lower B-pillar trim -1-.

Installing
Install in reverse order of removal, observing the following:
– Use release tool -T40280- to remove any retaining clips left in body, and insert them into front sill panel moulding for installation.
– Following installation, make sure that the front sill panel moulding is positioned in the inner door seal beading.
Removing and installing rear sill panel moulding
Removing and installing rear sill panel moulding
Special tools and workshop equipment required
♦ release tool -T40280-
♦ removal lever -80-200-
Removal and installation are described for the left side of vehicle as an example.
Removing
– Remove bench seat → Rep. gr.72; Removing and installing bench seat/individual seats.
– Remove front sill panel moulding → Chapter „Removing and installing front sill panel moulding“.
– Remove plugs -1- and -3- from rear sill panel moulding -2- using removal lever -80-200-.

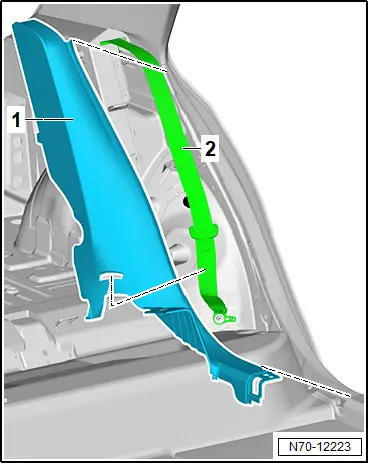
– Release rear sill panel moulding -1- using commercially available plastic wedge.
– Guide rear three-point seat belt -2- out of rear sill panel moulding -1-.
Installing
Install in reverse order of removal, observing the following:
– Use release tool -T40280- to remove any retaining clips left in body, and insert them into rear sill panel moulding for installation.
– Following installation, ensure that the rear sill panel moulding is positioned in the inner door seal beading.
Removing and installing upper A-pillar trim
Removing and installing upper A-pillar trim
Special tools and workshop equipment required
♦ removal tool -T40280-
♦ wedge -T10383-
Removal and installation are described for left side of vehicle as an example.
Removing
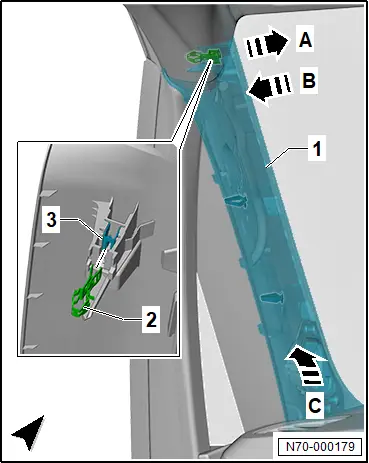
– Detach top A-pillar trim -1- from door seal beading using commercially available plastic wedge.
– Pull off upper A-pillar trim -1- in area of top clip with barb in direction of -arrow A- until stop of clip is reached.
– Push upper A-pillar trim -1- into installation position in direction of -arrow B-.
Note
This separates the clip base -3- and clip head -2- of the clip wit barb.
– Pull off upper A-pillar trim -1- in area of bottom clip in direction of -arrow A-.
– Remove upper A-pillar trim -1- in direction of -arrow C-.
Note
When pulling off the upper A-pillar trim -1-, the head of the clip -2- remains in the body. The clip base -3- remains in the upper A-pillar trim -1-.
– Remove any retaining clips left in body mountings using removal tool -T40280-.
– Remove clip head -2- from body.
– Remove clip base -3- from upper A-pillar trim -1-.
– Remove dash panel end cover → Rep. gr.70; Removing and installing dash panel end cover.
– Remove A-pillar gap cover → Rep. gr.70; Removing and installing A-pillar gap cover.
– Detach cover -2- from A-pillar trim mountings -3- using commercially available plastic wedge -1-.
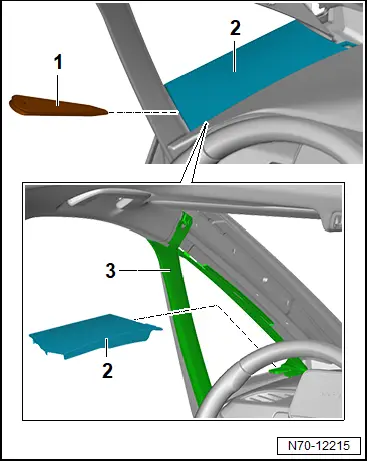
– Using wedge -T10383- -3-, unclip A-pillar trim -1- together with clip -2-.
– Remove A-pillar trim -1-.

Installing
Install in reverse order of removal, observing the following:
– Insert base of clip -2- into lower grooves of trim -arrows a-.
– Slide head of clip -1- into trim and into base of clip -2- in direction of -arrow c- until tab -arrow b- rests against trim on both sides.
– Insert trim into vehicle, and clip it to body.
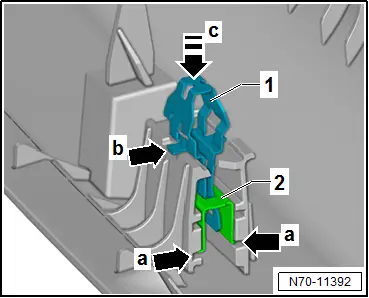
– Following installation, ensure that upper A-pillar trim is positioned in inner door seal beading.
Removing and installing lower A-pillar trim
Removing and installing lower A-pillar trim
Special tools and workshop equipment required
♦ removal tool -T40280-
Removal and installation are described for the left side of vehicle as an example.
Removing
– Release front sill panel moulding in area of A-pillar trim → Chapter „Removing and installing front sill panel moulding“.
– Remove A-pillar gap cover → Rep. gr.70; Removing and installing A-pillar gap cover.
Driver side
– Remove bonnet lock operating lever → General body repairs, exterior; Rep. gr.55; Bonnet; Removing and installing bonnet lock operating lever.
All vehicles (continued)
– Remove clip -2-.
– Free off lower A-pillar trim -1- in area of inner door seal.
– Use commercially available plastic wedge to unclip lower A-pillar trim -1- in direction of -arrow A-.
– Remove lower A-pillar trim -1- in direction of -arrow B-.

Installing
Install in reverse order of removal, observing the following:
– Remove any retaining clips left in body using removal tool -T40280-, and insert them into lower A-pillar trim for installation.
– Renew any damaged securing elements.
– Following installation, ensure that lower A-pillar trim is positioned in inner door seal beading.
Removing and installing A-pillar gap cover
Removing and installing A-pillar gap cover
Removal and installation are described for left side of vehicle as an example.
Removing
– Remove dash panel end cover → Rep. gr.70; Removing and installing dash panel end cover.
– Free off A-pillar gap cover -1- in area of inner door seal.
– Using commercially available plastic wedge, unclip A-pillar gap cover -1- in direction of -arrow-, and remove it.

Installing
Install in reverse order of removal, observing the following:
– Make sure that upper A-pillar gap cover sits in beading of inner door seal following installation.
Removing and installing upper B-pillar trim
Removing and installing upper B-pillar trim
Special tools and workshop equipment required
♦ removal tool -T40280-
Removal and installation are described for left side of vehicle as an example.
– Free off upper B-pillar trim -1- in area of inner door seal.
– Use commercially available plastic wedge to unclip lower B-pillar trim -1- at sides in direction of -arrow A-.
– Remove upper B-pillar trim -1- in direction of -arrow B-.
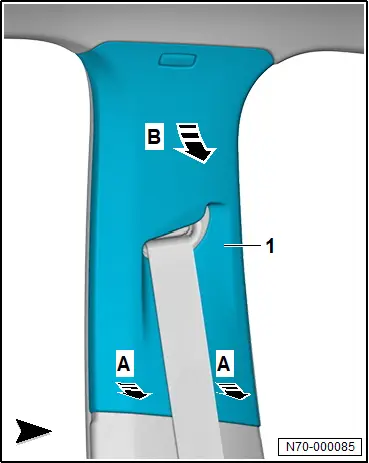
– Remove front belt end fitting → Rep. gr.69; Removing and installing front belt end fitting.
– Guide front seat belt with belt end fitting out of upper B-pillar trim.
Installing
Install in reverse order of removal, observing the following:
– Remove any retaining clips left in body using removal tool -T40280-, and insert them into upper B-pillar trim for installation.
– Guide in front belt end fitting -2- through opening in upper B-pillar trim -1-.

– Position upper B-pillar trim -1- at a slight angle, and insert it in direction of -arrow A-.
– Engage upper B-pillar trim -1- by swivelling it in direction of -arrow B-.
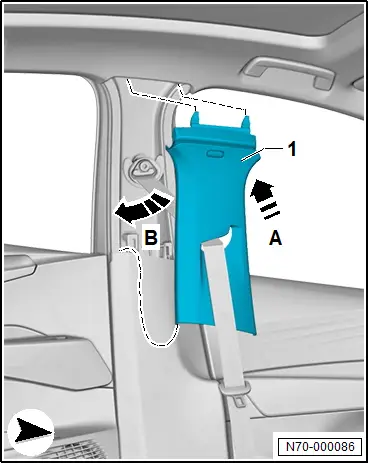
– Following installation, ensure that the upper B-pillar trim is positioned in inner door seal beading.
Removing and installing lower B-pillar trim
Removing and installing lower B-pillar trim
Special tools and workshop equipment required
♦ removal lever -80-200-
♦ removal tool -T40280-
Removal and installation are described for left side of vehicle as an example.
Removing
– Release upper B-pillar trim → Rep. gr.70; Removing and installing upper B-pillar trim.
– Remove front sill panel moulding → Rep. gr.70; Removing and installing front sill panel moulding.
– Starting at bottom, unclip lower B-pillar trim -1- in direction of -arrow- using removal lever -80-200-, and remove it.
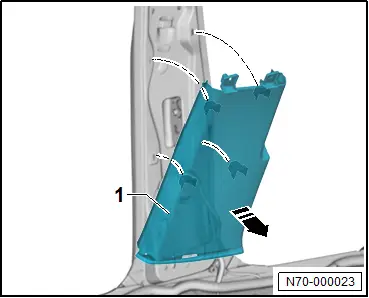
Installing
Install in reverse order of removal, observing the following:
– Remove any retaining clips left in body using removal tool -T40280-, and insert them into lower B-pillar trim for installation.
– Following installation, ensure that lower B-pillar trim is positioned in inner door seal beading.
Removing and installing C-pillar trim
Removing and installing C-pillar trim
Special tools and workshop equipment required
♦ removal tool -T40280-
Removal and installation are described for left side of vehicle as an example.
Removing
– Remove rear shelf.
– Remove rear sill panel moulding → Chapter „Removing and installing rear sill panel moulding“.
– Remove roof end strip → Rep. gr.70; Removing and installing roof end strip.
– Fold rear seat backrest towards front.
– Free off C-pillar trim -1- in area of inner door seal and rear lid seal.
– Detach C-pillar trim -1- from body.
– Guide C-pillar trim -1- through backrest striker aperture -3-.
– Guide out belt webbing -2- through slot in C-pillar trim -1-.
– Disconnect electrical connector.

Installing
Install in reverse order of removal, observing the following:
– Remove any retaining clips left in body using removal tool -T40280-, and insert them into C-pillar trim for installation.
Removing and installing floor covering
Removing and installing floor covering
Removing
– Remove variable luggage compartment floor.
– Remove front seats → Rep. gr.72; Removing and installing front seat.
– Remove rear sill panel mouldings → Rep. gr.70; Removing and installing rear sill panel moulding.
– Remove lower A-pillar trims → Rep. gr.70; Removing and installing lower A-pillar trim.
– Remove tunnel support cover → Rep. gr.70; Removing and installing tunnel support cover.
– Remove foot mats.
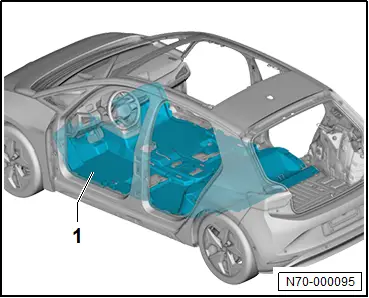
– Lift floor covering -1- and guide out wiring harnesses.
 NOTICE
Risk of damage to floor covering caused by tearing at cut-outs.
– Proceed very carefully when folding the floor covering.
– Remove floor covering.
Installing
Install in reverse order of removal, observing the following:
– Make sure that condensation drain is not compressed.
Removing and installing foot rest
Removing and installing foot rest
Removal and installation are described for the driver side of a left-hand drive vehicle as an example.
Removing
– Detach floor covering in area of foot rest → Rep. gr.70; Removing and installing floor covering.
– Remove foot rest -1-.

Installing
Install in reverse order of removal, observing the following:
– Ensure that condensation drain is positioned correctly.