General information, Body. Use of adhesives
- General notes on the use of adhesives
- Bonding log, inc. working sample for bonding operations that require documentation – introduction and overview
- Minimum drying times for bonded windows
- Preparing old undamaged windows for installing
- Preparing new windows for installation
- Preparing body flange for installing
- Cleaning off excess adhesive
- Installation instructions for bonded windows and glass panels
- Materials for bonded windows
- Bonding log
General notes on the use of adhesives
General notes on the use of adhesives
Safety data sheets
♦ Observe → safety data sheets.
Storage limitations
♦ It is not permissible to process adhesives, activators or primers if the specified shelf life has elapsed.
Important
● Opened primer or activator bottles must not be used any further.
● Only use materials whose packaging does not show any signs of damage.
● Do not use adhesives, primers and activators if the colour and consistency are not stable.
♦ Storage temperature between 10 °C and 25 °C
Specifications for use of paste-like adhesives
♦ Observe the specifications for handling Volkswagen special tools and cartridge openers in the → operating instructions of the tool.
♦ Vehicle, components, adhesive, primer and activator must have acclimatised before processing.
♦ Before starting any work on the bonding surfaces, make sure that the processing temperature has been reached.
♦ Do not carry out welding, grinding and polishing work in the immediate vicinity.
♦ Do not use Teflon or silicone sprays in workshop area.
♦ Cleaned surfaces should only be touched with clean gloves to avoid the transfer of hand sweat and dirt to the bonding surfaces.
♦ Adhesives must be used within the processing time.
♦ The adhesive must be applied and the window or body component joined within the processing time.
♦ Any joining work (e.g. riveting, bolting) in the area of the adhesive bond must be carried out within the processing time.
♦ Make sure that the vehicle is not exposed to any load before the minimum curing period has elapsed.
♦ Do not start any further work on the vehicle until the minimum drying time has elapsed.
Applies for 2-component adhesive
Important
● Press the cartridge and check that both components escape evenly. Then fit the mixing tube.
● To ensure thorough mixing, squeeze out a mixing tube length of fresh adhesive onto a piece of cardboard, and discard before application.
● Due to the risk of the curing process starting, opened 2-component window adhesive cartridges with part number “D 004 660 M4” must not be stored for later use, but must be disposed of together with the mixer after the processing time has expired.
● Opened plastic adhesive cartridges with part number “D 180 KU2 A1” must not be stored for later use for longer than 14 days due to the risk of the curing process starting. They must be disposed of together with the mixer once the processing time has expired.
Bonding log, inc. working sample for bonding operations that require documentation – introduction and overview
Bonding log, inc. working sample for bonding operations that require documentation – introduction and overview
Introduction
For certain bonding processes, new design requirements are placed on the processes of joining or bonding. The internal and external modifications implemented by the manufacturer are based on the updated state of the art in accordance with ISO 21368, in view of:
♦ the increasing importance of bonding in the automotive industry, and of the fact that
♦ bonding is a "special process" that does not allow for the quality of the bond to be tested non-destructively.
Modifications of Workshop Manual
If relevant in terms of design, the vehicle-specific workshop manuals of the upcoming vehicle models will include additional information on:
♦ creating and carrying out working samples;
♦ qualification of personnel; and
♦ filling out the bonding log.
In the bonding log, the bonding process as well as the materials used and the corresponding working sample must be fully documented in accordance with the respective repair description. This is necessary as a proof of the reliability of the bonding process.
The bonding log has been agreed with the brands VW Passenger Cars (VWPKW), Volkswagen Commercial Vehicles, Audi, Škoda and Seat, and will also be introduced by these brands with the upcoming vehicle models.
Qualification
A training module for qualification as a "Volkswagen Group bonding expert", coordinated within the Volkswagen Group, will be made available via the brand-specific “Knowledge Tank”. This training module includes a theoretical and practical final examination for the certificate. Successful participation in this training is recommended to make sure bonding work is carried out in accordance with the relevant safety requirements.
Minimum drying times for bonded windows
Minimum drying times for bonded windows
Special requirements must be considered when replacing bonded windows.
The minimum drying time is the time from bonding in until the vehicle is ready to be used.
The vehicle is safe to use only after the minimum drying time has elapsed.
For the minimum drying time, refer to the processing instructions on the manufacturer’s label.
During the minimum drying time, the vehicle must be standing on a level surface.
The minimum drying time for 2-component window adhesive is 2 hours at a room temperature of between 18 °C and 35 °C.
The minimum drying time for 1-component window adhesive is 6 hours at a room temperature of between 20 °C and 30 °C with a relative humidity of between 30 % and 80 %.
Preparing old undamaged windows for installing
Preparing old undamaged windows for installing
Special tools and workshop equipment required
♦ contour blade set -VAS 852 005-
♦ scraper set -VAS 861 005-
Note
Windows can be installed without centring pins.
 NOTICE
Risk of damage to the primer layer and the ceramic band when cutting back the window adhesive.
– Only cut back the window adhesive as far as specified.
– Do not treat cut-back adhesive beads with activator, primer or cleaning solution.
– Keep bonding surface free of dirt and grease.
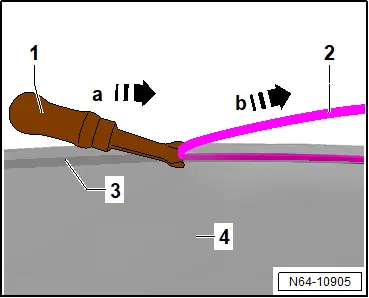
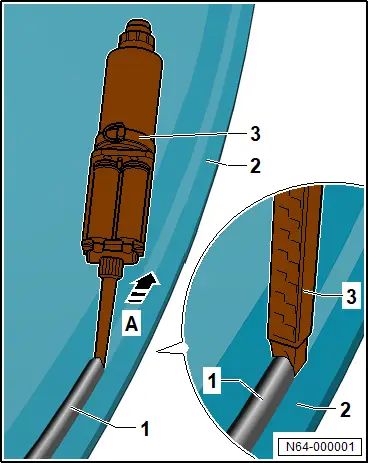
– If reusing an undamaged window -4-, cut back remaining window adhesive -2- just before bonding back in to 1 to 2 mm using scraper -1- from contour blade set -VAS 852 005- or scraper set -VAS 861 005-.
Note
If an undamaged window is reused, the remaining adhesive serves as an adhesion base for the new window adhesive to be applied.
Important
● If bonding is performed later than 2 hours after cutting back the adhesive bead, the adhesive bead must be activated with an activator.
– Shake activator to make sure that all components are mixed in the correct ratio.
Important
● Processing temperature of activator is between 15 °C and 25 °C.
 NOTICE
Risk of damage to paintwork caused by activator.
– Apply activator precisely onto adhesive bead that has been cut back, and do not spill any activator.
– Use applicator to apply activator evenly in one stroke onto adhesive bead that has been cut back.
For drying time, refer to processing instructions on manufacturer’s label.
Important
● Adhere to drying time of 10 minutes.
● Adhesive bond must be made no later than 2 hours after activating.
Preparing new windows for installation
Preparing new windows for installation
Note
The application area for the adhesive bead is not precoated or primed.
For bonding surface area, see marking on new window or removed window.
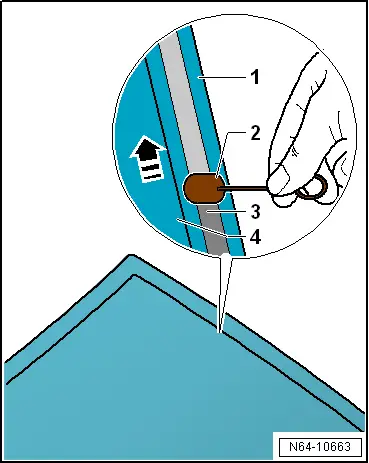
– Clean edge of window -1- and bonding surface marked on new window all around with cleaning solution and lint-free cleaning cloth.
Important
● Adhere to flash-off time of 10 minutes.
● Bonding surface must be dry.
Important
● Processing temperature of primer is between 15 °C and 25 °C.
– Shake primer -3- for at least 2 minutes to make sure that all components are mixed in the correct ratio.
– Apply uninterrupted, thin film of primer -3- evenly in one pass onto bonding surface using applicator -2-.
For drying time, refer to processing instructions on manufacturer’s label.
Important
● Drying time of respective primer must be observed.
● Drying time of primer D 181 220 A1 is 30 minutes.
● Drying time of primer D 009 200 02 is 15 minutes.
● A continuous primer area must be visible.
If primer drying time of 8 hours is exceeded
Important
● Primer may be reapplied once and within 96 hours after the first primer application.
● Primed bonding surfaces must be protected within this period against external influences and dirt.
● Observe processing temperature of primer, and shake primer bottle before opening it.
– Apply full thin film of primer evenly in one pass using applicator.
Preparing body flange for installing
Preparing body flange for installing
Special tools and workshop equipment required
♦ scraper set -VAS 861 005-
 NOTICE
Risk of damage to the primer layer and the paintwork when cutting back the window adhesive
– Only cut back the window adhesive as far as specified.
– Do not treat cut-back adhesive beads with activator, primer or cleaning solution.
– Keep bonding surface free of dirt and grease.
Important
● Do not remove remaining material
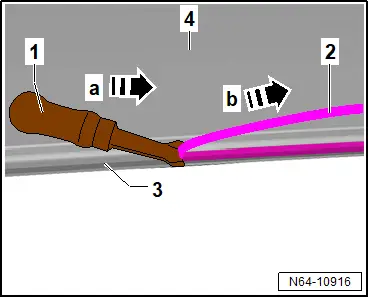
– Use a suitable scraper -1- from scraper set -VAS 861 005- to cut back remaining material -2- on body flange -3- to 1 to 2 mm shortly before bonding flange back in.
Note
Remaining material is the adhesion base for newly applied window adhesive.
If bonding is performed later than 2 hours after cutting back, the remaining material of the adhesive bead must be activated with an activator:
– Shake activator to make sure that all components are mixed in the correct ratio.
Important
● Processing temperature of activator is between 15 °C and 25 °C.
 NOTICE
Risk of damage to paintwork caused by activator
– Apply activator precisely onto adhesive bead that has been cut back, and do not spill any activator.
– Use applicator to apply full thin film of activator evenly in one pass onto adhesive bead that has been cut back.
For drying time, refer to processing instructions on manufacturer’s label.
Important
● Adhere to drying time of 10 minutes
● Adhesive bond must be made no later than 2 hours after activating
Continued
Vehicles with steel-panel body flange:
If the body flange has been repaired or partially renewed, clean and prime corresponding area after painting:
– Clean body flange all around with cleaning solution and lint-free cleaning cloth.
Important
● Adhere to flash-off time of 10 minutes
● Observe processing temperature for primer and shake primer bottle before opening → Rep. gr.52; Preparing new windows for installation.
– Apply full thin film of primer evenly in one pass to paint using applicator.
Important
● A continuous primer area must be visible
● Observe drying time of primer → Rep. gr.52; Preparing new windows for installation.
All vehicles (continued)
If drying time of primer is exceeded by 8 hours:
Important
● Primer may be reapplied once and within 96 hours after the first primer application
● Primed bonding surfaces must be protected within this period against external influences and soiling
● Observe processing temperature for primer and shake primer bottle before opening → Rep. gr.52; Preparing new windows for installation.
– Apply full thin film of primer evenly in one pass to paint using applicator.
Continued
Vehicles with steel-panel body flange:
If laser weld seam on body flange is not covered by the existing adhesive bead:
Continued
– Clean laser weld seam on body flange with cleaning solution and lint-free cleaning cloth.
Important
● Adhere to flash-off time of 10 minutes
● Observe processing temperature for primer and shake primer bottle before opening → Rep. gr.52; Preparing new windows for installation.
– Apply full thin film of primer evenly in one pass using applicator.
Important
● A continuous primer area must be visible
● Observe drying time of primer → Rep. gr.52; Preparing new windows for installation.
 NOTICE
Risk of leaks and corrosion due to improper sealing
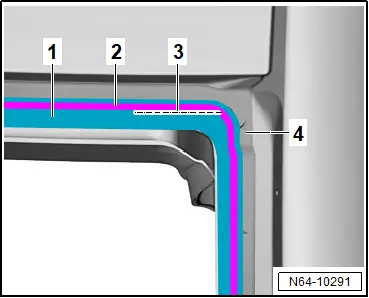
– Seal exposed laser weld seams with window adhesive before bonding the windows.
– Apply primer -1- to laser weld seam -3-.
Important
● Observe relevant information for adhesive → Rep. gr.52; Use of adhesives
– Seal laser weld seam -3- using 2-component window adhesive.
All vehicles (continued)
Touching up paint damage
– If the paintwork structure is damaged, it must be restored according to specifications in the Paintwork manual → Paintwork structure.
Cleaning off excess adhesive
Cleaning off excess adhesive
 NOTICE
Windows may come loose when cleaning work is performed in the vehicle interior.
– When cleaning the vehicle interior, do not push newly installed windows outwards.
– Clean painted surface roughly with lint-free cleaning cloth.
– Remove residual soiling using cleaning solution.
– Clean plastic trim: Allow window adhesive to cure for approx. 1 hour and then peel off.
Installation instructions for bonded windows and glass panels
Installation instructions for bonded windows and glass panels
Special tools and workshop equipment required
♦ cartridge opener -VAS 221 005-
♦ suction lifters -V.A.G 1344-
Important
● Work area, primer, activator, adhesive, vehicle and components must have adjusted to room temperature → Rep. gr.52; Minimum curing periods for bonded windows.
● Observe general information → Rep. gr.52; General information for use of adhesives.
● Adhere to processing temperature for 1-component window adhesive of between 18 °C and 35 °C
● Adhere to processing temperature for 2-component window adhesive of between 18 °C and 28 °C
● Use cartridge opener -VAS 221 005- to open cartridge
● Adapt outlet nozzle of cartridge using suitable workshop equipment to ensure bead cross-section according to specifications → Replacement parts catalogue (ETKA)
 NOTICE
Risk of secondary damage due to rapid curing properties of the window adhesive
Leaks and reduced body stiffness may occur.
– Install window within processing time of 10 minutes after window adhesive has been applied.
Note
The figure shows 2-component window adhesive. For 1-component window adhesive, proceed analogously.
– Apply window adhesive -1- in continuous bead, holding applicator at right angle to window glass -2-.
Note
Don not apply adhesive bead too thick or press glazing too firmly onto the body flange. Since the glazing no longer has sealing lips, excessive window adhesive may be visible in the joint area.
– Using 2 suction lifters -V.A.G 1344-, insert glazing into window aperture, align it to centre and press it in up to spacing lip.
– During the minimum drying time, fix windows in position using commercially available adhesive tape → General information – body; Rep. gr.52; Use of adhesives; General notes on the use of adhesives.
– When renewing components, identification labels from old parts indicating the corresponding spare part numbers in the → Electronic parts catalogue (ETKA) must be attached to the respective new parts as required by registration regulations.
– Renew any illegible or damaged identification labels and information or warning signs found on components of this vehicle, and affix the new ones in the same location. For allocation, see → Electronic parts catalogue (ETKA).
Materials for bonded windows
Materials for bonded windows
It is essential to obtain the part numbers of the materials from the corresponding page in the → Electronic parts catalogue (ETKA).
♦ 1-component glass adhesive 1) 2) 3)
♦ 2-component window adhesive 1) 2) 3)
♦ Activator 1) 2)
♦ Primer 1) 2) 4)
♦ Cleaning solution 1) 5)
♦ Applicator 1) 2)
♦ Wire for cutting device -VAS 6452/2- 6)
♦ Cutting cord -VAS 861 001/1A- 6)
1) Observe processing instructions on the manufacturer’s label.
2) Only use new materials whose expiry date has not yet been reached.
3) Observe → General information – body; Rep. gr.52; Use of adhesives; Minimum drying times for bonded windows.
4) Observe drying time.
5) Observe flash-off time.
6) Wire for cutting device can be used alternatively to cutting cord (and vice versa). Wires and cords are designated for single use only.
Bonding log
Bonding log
Introduction
The requirements for the processes of joining or bonding vary depending on the component. These include, for example, the preparation of a bonding log.
This is necessary as a proof of the reliability of the bonding process.
Important
● A bonding log must be prepared if specified accordingly in the respective repair description.
● In the bonding log, the bonding process as well as the materials used and the corresponding working sample must be fully documented in accordance with the respective repair description.
Working sample
Important
● Ensures and proves that bonding has been carried out correctly.
● The result of the working sample must be documented in the bonding log.
● To create a working sample, apply a bead of adhesive of approx. 10 cm in length to a solid substrate, and evaluate it once the specified minimum drying time has elapsed.
● For evaluation, cut the working sample with a commercially available cutter in several locations, and assess the hardening effect by examining the cut surface.
Exams on working sample with 1-component adhesive bead:
♦ The adhesive must have a firm skin and may not pull threads when touched.
♦ No liquidity must be evident inside the adhesive bead after the minimum drying time.
Exams on working sample with 2-component adhesive bead:
♦ The adhesive must be fully hardened.
♦ No liquidity must be evident inside the adhesive bead.
If the result of the working sample is negative (hardening not complete), process-safe bonding is not ensured. If this is the case, measures need to be taken to ensure proper hardening, which involves consulting the bonding supervisor (four-eyes principle) and, if necessary, repeating the bonding process.
Bonding logUsed for documenting bonding operations that require documentation.Date of bonding operation:Order number:Qualified workshop:
Bonding carried out by (name): Current Workshop Manual used:Yes Ambient conditionsProcessing/component temperatureSpecification: Actual temperature: Air humidity
(for 1-component adhesives)Specification: Actual temperature: PretreatmentCleaning agent (part number, designation): Flash-off time:Minimum time: Actual time: Primer (if required)Product (part number): Batch number: Expiry date: Flash-off times: Minimum time: Actual time: Activator
(if required)Product (part number): Batch number: Expiry date: Flash-off times: Minimum time: Actual time: SurfaceSurface 1 Surface 2 Examples: cleaned surface on new part, primed, cut-back adhesive bead, newly painted (partially or entirely):AdhesiveAdhesive (part number, name)
(note: use of several cartridges possible)
Expiry date:
♦
♦
♦
♦ Batch number(s):
♦
♦
♦
♦ Pot life:Maximum permitted time: Actual time: Working sample:Working sample required according to repair manual?
Yes
_
No
_Sample labelling Exam OK? Yes_No_Note: If exam is not OK (= option “No”), adhesive bond must be renewed according to specifications Deviations/notes:Measures:
Bonding carried out by (signature):