Valve Cover - Removal and Installation
Special Service Tools / General Equipment
| Heat gun | |
| Hose Clamp Removal/Installation Tool |
Materials
| Name | Specification |
|---|---|
| Flange Sealant CU7Z-19B508-A |
WSS-M2G348-A11 |
| Motorcraft® Metal Surface Preparation Wipes ZC-31-B |
- |
| Engine Oil — SAE 5W-20 — Semi-Synthetic Engine Oil XO-5W20-Q1SP |
WSS-M2C945-B1 |
Removal
Valve Cover Only
- Remove the fuel rail.
Refer to: Fuel Rail (303-04B Fuel Charging and Controls — 1.6 L EcoBoost (132 kW/180 L PS) — Sigma, Removal and Installation). - Disconnect the electrical connector.
- Loosen the clamp and remove the hose.
Use common equipment: hose clamp removal/installation tool.

- Disconnect the hose connections, remove the retainer and remove the hoses.
Use common equipment: hose clamp removal/installation tool.
- Remove the oil level indicator.
- Disconnect the electrical connector, remove the bolt and the CMP sensor.

- Disconnect the hose connections, remove the retainer and remove the hoses.
- Disconnect the electrical connectors.
- Remove the bolts and the VCT oil control solenoid.
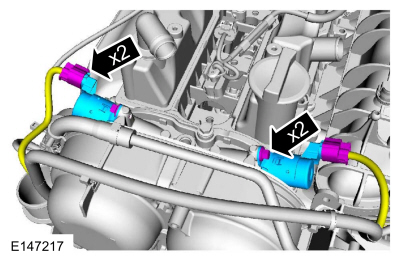
- Inspect the O-ring of the VCT oil control solenoid.

- Remove the bolts and the valve cover.

- Remove and discard the valve cover gasket.

Fuel Pump and Brake Vacuum Pump Mounting Brackets
- Remove the following components:
- Remove the fuel pump.
Refer to: Fuel Pump (303-04B Fuel Charging and Controls — 1.6 L EcoBoost (132 kW/180 L PS) — Sigma, Removal and Installation). - Remove the brake vacuum pump.
Refer to: Brake Vacuum Pump — 1.6 L EcoBoost (132 kW/180 L PS) — Sigma (206-07 Power Brake Actuation, Removal and Installation).
- Remove the fuel pump.
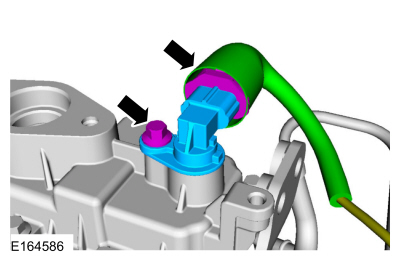
- Slide the protective cover outward and disconnect the electrical connector.
- Remove the bolt and the CMP sensor.
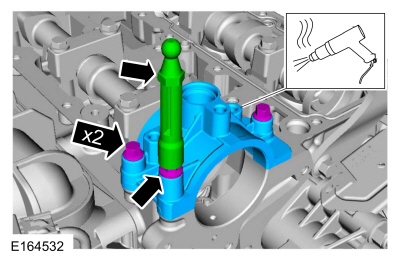
NOTICE: Use a heat gun to soften the flange sealant. This will help remove the fuel pump mounting bracket. Failure to follow these instructions may result in damage to the fuel pump mounting bracket.
- Remove the fuel pump bracket bolts in the sequence shown. Heat and break the adhesive bond.
Use common equipment: heat gun.
- Remove the fuel pump bracket.
- Remove and discard the O-ring.

- Remove the fuel pump bracket bolts in the sequence shown. Heat and break the adhesive bond.
NOTICE: Use a heat gun to soften the flange sealant. This will help remove the brake vacuum pump mounting bracket. Failure to follow these instructions may result in brake damage. Vacuum pump mounting bracket.
- Remove the engine cover stud.
- Remove the bolts and the stud.
- Heat and break the adhesive bond, remove the brake vacuum pump cover.
Use common equipment: heat gun.
Installation
Fuel Pump and Brake Vacuum Pump Mounting Brackets
NOTICE: Do not use metal scrapers, wire brushes, power abrasive discs or other abrasive means to clean sealing surfaces. These tools leave scratches and gouges that create leak paths.
Make sure the mating surfaces are clean and free of foreign material.
Material: Motorcraft® Metal Surface Preparation Wipes / ZC-31-B
- Apply 1.5 mm (0.059 in) diameter beads of sealant as shown in the illustration.
Material: Flange Sealant / CU7Z-19B508-A (WSS-M2G348-A11)
- Install the brake vacuum pump cover, bolts and stud.
Torque: 89 lb-in (10 N·m)
- Install the engine cover stud.
Torque: 89 lb-in (10 N·m)

- Install the brake vacuum pump cover, bolts and stud.
- Tighten the fuel pump bracket bolts in the sequence shown in 4 stages.
Torque:
Stage 1: 27 lb-in (3 N·m)
Stage 2: 80 lb-in (9 N·m)
Stage 3: 97 lb-in (11 N·m)
Stage 4: Tighten bolts 1, 2, 5, 6, 7, 8, 9 and 10 to: 124 lb-in (14 N·m)
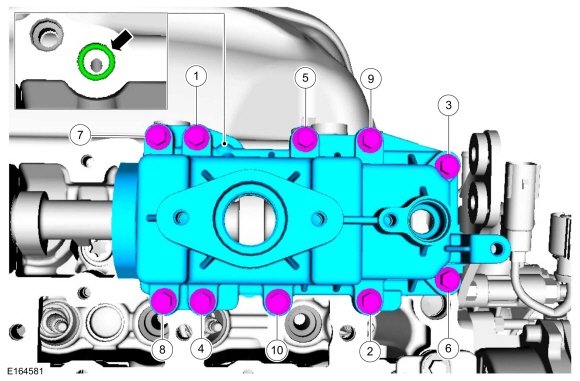
- Tighten the fuel pump bracket bolts in the sequence shown in 4 stages.
- Install the CMP sensor and bolt.
Torque: 80 lb-in (9 N·m)
- Connect the electrical connector and install the protective cover onto the connector.
- Install the CMP sensor and bolt.
- Install the following components:
- Install the brake vacuum pump.
Refer to: Brake Vacuum Pump — 1.6 L EcoBoost (132 kW/180 L PS) — Sigma (206-07 Power Brake Actuation, Removal and Installation). - Install the fuel pump.
Refer to: Fuel Pump (303-04B Fuel Charging and Controls — 1.6 L EcoBoost (132 kW/180 L PS) — Sigma, Removal and Installation).
- Install the brake vacuum pump.
Valve Cover Only
NOTICE: Do not use metal scrapers, wire brushes, power abrasive discs or other abrasive means to clean sealing surfaces. These tools leave scratches and gouges that create leak paths.
Make sure the mating surfaces are clean and free of foreign material.
Material: Motorcraft® Metal Surface Preparation Wipes / ZC-31-B
- Install a new valve cover gasket.

- Apply 1.5 mm (0.059 in) diameter beads of sealant as shown in the illustration.
Material: Flange Sealant / CU7Z-19B508-A (WSS-M2G348-A11)
- Apply 1.5 mm (0.059 in) diameter beads of sealant as shown in the illustration.
Material: Flange Sealant / CU7Z-19B508-A (WSS-M2G348-A11)
- Install the valve cover and bolts in the sequence shown in 3 stages.
Torque:
Stage 1: 44 lb-in (5 N·m)
Stage 2: 80 lb-in (9 N·m)
Stage 3: 89 lb-in (10 N·m)
- Lubricate the O-ring of the VCT oil control solenoid.
Material: Engine Oil - SAE 5W-20 - Synthetic Engine Oil / XO-5W20-Q1SP (WSS-M2C945-B1)
- Install the VCT oil control solenoids, bolts and connect the electrical connectors.
Torque: 71 lb-in (8 N·m) - Install the PCV hose, connect the couplings and secure the retainer.
- Install the oil level indicator. Connect the breather hose.
Use common equipment: hose clamp removal/installation tool.
- Install the CMP sensor and bolt. Connect the electrical connector.
Torque: 80 lb-in (9 N·m)
- Install the PCV hose and clamp.
Use common equipment: hose clamp removal/installation tool.
- If equipped.
Connect the electrical connector.

- Install the PCV hose and clamp.
- Install the fuel rail.
Refer to: Fuel Rail (303-04B Fuel Charging and Controls — 1.6 L EcoBoost (132 kW/180 L PS) — Sigma, Removal and Installation).
Test yourself
A quick Ford Fiesta quiz: every answer comes with an explanation and a link to the manual page.