Ignition Timing Check
PROCEDURE
The procedure described below is intended only to verify the base settings made at the factory. Adjustment is not provided for; therefore, the sole purpose of this check is to evaluate the proper operation of the on-board processor. If the ignition system diagnosis (refer to the Ignition System Operation Check Section) does not identify the cause of incorrect ignition timing, replace the PCM. Drive the vehicle to a service station for this work.
1. Start the engine and warm it up to normal operating temperature.
2. Check and, if necessary, adjust the idle speed (refer to the Maintenance and Adjustments chapter).
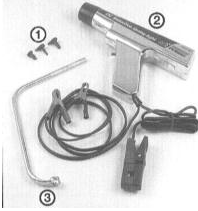
3. With the ignition off, locate the VECI label under the hood and carefully review the instructions for ignition timing. The correct idle speed setting is especially important, since engine speed is directly related to ignition timing. Prepare all required tools.
- 1 - Vacuum plugs - All vacuum hoses that are disconnected must be capped immediately. Plugs of various sizes and shapes are available for this purpose.
- 2 - Inductive timing light - Produces a bright, narrow beam of light flashing in sync with spark plug firing on No. 1 cylinder. Connect to the high-tension lead of the No. 1 spark plug according to the manufacturer's instructions.
- 3 - Special wrench - On some models, access to the distributor hold-down bolt is restricted, and loosening it with a standard wrench is extremely difficult.
4. With the ignition off, connect the timing light according to the manufacturer's instructions. Power for the timing light is usually supplied from the vehicle battery. Install the inductive pickup clamp on the high-tension lead of the No. 1 spark plug (refer to the Specifications in the Engine chapter).
5. Using a jumper wire, short terminals 8 and 13 of the Data Link Connector (DLC) together. This places the PCM into base ignition timing mode.
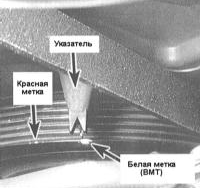
6. Locate the timing marks on the crankshaft pulley.
7. Start the engine, warmed up to normal operating temperature, and aim the timing light at the timing pointer.
8. The red mark on the crankshaft pulley, illuminated by the timing light, should remain stationary and align with the pointer.
9. If timing is found to be out of specification, drive the vehicle to a service station for PCM diagnosis.
10. Stop the engine and disconnect the timing light.
11. Remove the jumper wire from the DLC terminals.
Test yourself
A quick Honda Accord quiz: every answer comes with an explanation and a link to the manual page.