Charging System Diagnosis
PROCEDURE

1. Remember that charging system malfunctions are not necessarily caused by alternator failure.
Always perform the following simple checks first:
a) Check the condition of the battery cables at their connections to the battery terminals. Check that the terminal clamps are securely tightened;
b) Check the battery condition (refer to Battery Testing and Replacement). If necessary, charge the battery or replace it with a new one;
c) Check the condition of the wiring and electrical connections of the alternator and voltage regulator;
d) Check the condition and tension of the alternator drive belt (refer to Maintenance and Adjustments). Replace if necessary;
e) Check that the alternator mounting bolts are securely tightened;
f) Start the engine and assess the level of noise produced by the alternator;
g) On vehicles so equipped, check the condition of the fuses in the underhood fuse block (refer to Body Electrical). If any fuse has blown, investigate and correct the cause of the overload;
h) Check that the charge warning lamp in the instrument cluster operates correctly. With the ignition on and the engine off, the lamp must illuminate. If not, disconnect the 4-pin connector at the rear of the alternator and ground terminal No. 3 (V6 engines) or No. 4 (4-cylinder engines). If the lamp still does not illuminate, check the No. 6 15 A fuse and the lamp filament. Replace as necessary;
i) Check the memory of the powertrain control module for stored trouble codes of the Electrical Load Management (ELD) system (refer to Engine Controls).
2. With the ignition off, use a voltmeter to measure battery voltage at the rear of the alternator with all electrical loads switched off (heater blower, radio, cigarette lighter, cooling fan, etc.). The reading should be approximately 12.5 V, or slightly higher if the engine was running during the last hour.
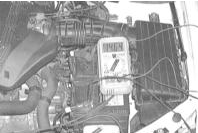
3. Start the engine and repeat the measurement. At 1500 rpm crankshaft speed, the voltage should be 13.8 ÷ 14.8 V.
4. Switch on the high beams, set the cooling fan to maximum speed, switch on the rear window defroster and the radio. With the charging system operating normally, the voltage should drop briefly, then return to the normal operating level of approximately 13.5 V. If the voltage drops below 13 V, the charging system is malfunctioning.
5. Reduce engine speed to idle. The charging voltage must not drop below 13 V. Depressing the brake pedal must not cause a further voltage drop (below 13 V).
Some low-output alternators may allow the output voltage to drop briefly below 13 V; however, it must then recover quickly.
6. Switch off all electrical loads, raise engine speed to 1600 rpm and read the voltmeter again. The voltage must not rise above 15 V (slight deviations, inversely related to ambient temperature, are acceptable).
7. If the voltmeter readings differ from the specified values, replace the alternator and voltage regulator assembly.
Test yourself
A quick Honda Accord quiz: every answer comes with an explanation and a link to the manual page.