ESP (Electronic Stability Program) System
Components and Component Location
Component Location
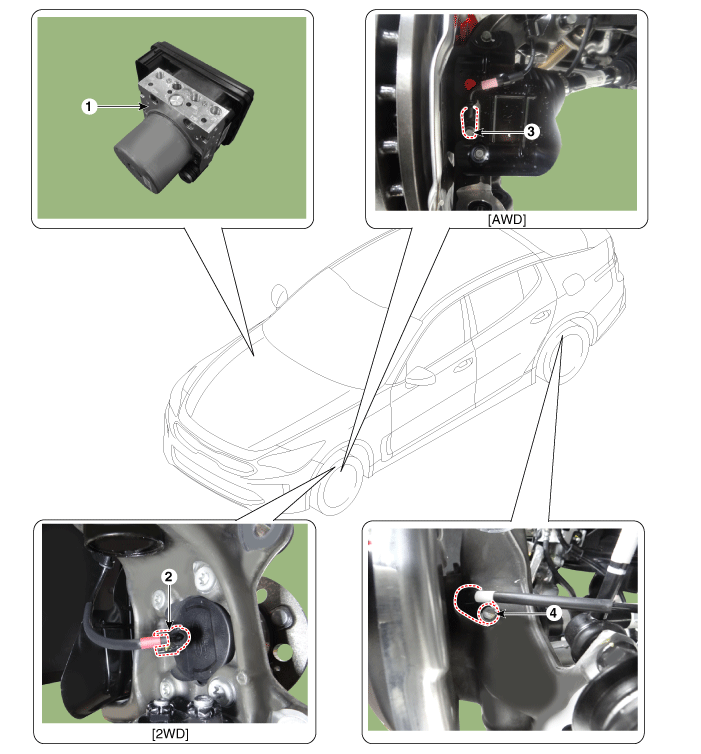
| 1. HECU module 2. Front wheel speed sensor (2WD) |
3. Front wheel speed sensor (AWD) 4. Rear wheel speed sensor |
Description and Operation
ESP Description
The Electronic Stability Program (ESP) recognizes critical driving conditions, such as panic reactions in dangerous situations, and stabilizes the vehicle by intervening in the braking and engine control systems on individual wheels.
ESP adds an additional function known as Active Yaw Control (AYC) to ABS, TCS, EBD and ESP functions. While the ABS/TCS function controls wheel slip during braking and acceleration and thus mainly intervenes in the longitudinal dynamics of the vehicle, the Active Yaw Control stabilizes the vehicle about its vertical axis.
This is achieved by braking individual wheels and adapting the instantaneous engine torque without any action required by the driver.
ESP essentially consists of three components: sensors, an electronic control unit and actuators.
The stability control function operates under all driving and operating conditions. Under certain driving conditions, the ABS/TCS function may be activated simultaneously with the ESP function in response to driver input.
In the event of a failure of the stability control function, the basic safety function of ABS is still maintained.

ESP Control Description
The ESP system includes the ABS/EBD, TCS and AYC functions.
ABS/EBD function: The ECU converts the active sensor signal (current switching) received from the four wheel sensors into a square wave. Using the input of these signals, the ECU calculates the vehicle speed as well as the acceleration and deceleration of each of the four wheels. The ECU then decides whether to activate ABS/EBD or not.
The TCS function prevents wheel slip in the direction of travel by adding brake pressure and reducing engine torque via the CAN bus. The TCS function uses the wheel speed sensor signal to detect wheel slip before the ABS function.
The AYC function prevents unstable vehicle maneuvering. To determine the vehicle maneuver, the AYC function uses signals from the maneuver sensors (yaw rate sensor, lateral acceleration sensor, steering wheel angle sensor).
If the vehicle maneuver is unstable (oversteer or understeer), the AYC function applies brake pressure to a specific wheel and sends an engine torque reduction signal via CAN.
After the ignition is turned on, the ECU continuously diagnoses system failures (self-diagnosis). If a system failure is detected, the ECU informs the driver of the failure through the BRAKE/ABS/ESP warning lamp. (Fail-safe warning)
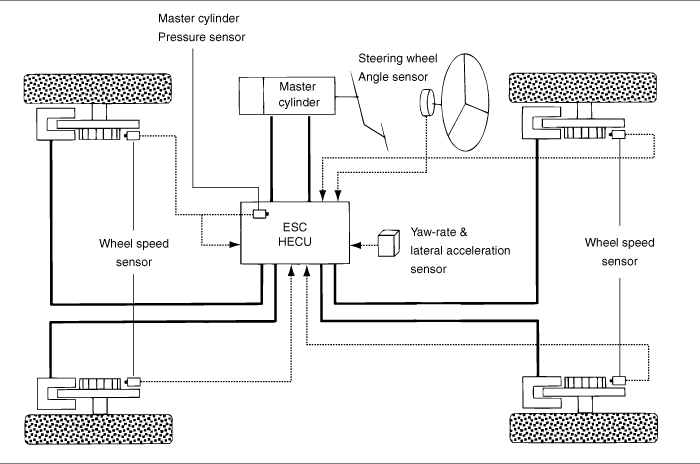
Input and Output Diagram

ESP Operation Mode
ESP Hydraulic System Diagram

ESP Not Operating: Normal Braking.
Solenoid valve Continuity Valve Motor Pump TC Valve IN (NO) OFF OPEN OFF OFF OUT (NC) OFF CLOSE ESP Operation
Solenoid valve Continuity Valve Motor Pump TC Valve Understeer
(Inside Rear Wheel Only)IN (NO) OFF OPEN ON ON OUT (NC) OFF CLOSE Oversteer
(Outside Front Wheel Only)IN (NO) OFF OPEN OUT (NC) OFF CLOSE
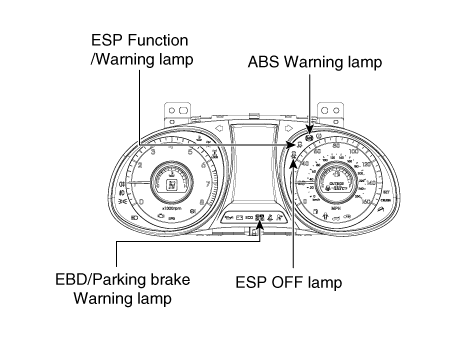
ABS Warning Lamp Module
The ABS warning lamp module indicates the status of the ABS self-check and malfunctions. The ABS warning lamp should illuminate:
During the initialization phase after IGN ON (continuously for 3 seconds).
In case of ABS operation failure during braking.
In diagnostic mode.
When the ECU connector is disconnected from the ECU.
The cluster lamp illuminates when communication with the CAN module is not possible.
EBD/Parking Brake Warning Lamp Module
The EBD warning lamp module indicates the status of the EBD self-check and malfunctions. However, if the parking brake switch is on, the EBD warning lamp is always on regardless of EBD functions. The EBD warning lamp should be on:
During the initialization phase after IGN ON (continuously for 3 seconds).
When the parking brake switch is on or the brake fluid level is low.
When the EBD function has failed.
In diagnostic mode.
When the ECU connector is disconnected from the ECU.
The cluster lamp illuminates when communication with the CAN module is not possible.
ESP Function/Warning Lamp (ESP System)
The ESP function/warning lamp indicates the status of the ESP self-check and system malfunctions.
The ESP function/warning lamp illuminates under the following conditions:
During the initialization phase after IGN ON (continuously for 3 seconds).
When the ESP function is inhibited due to a system failure.
When the ESP system is operating (flashing - 2 Hz).
In diagnostic mode (other than standard mode).
The cluster lamp illuminates when communication with the CAN module is not possible.
ESP OFF Lamp (ESP System)
The ESP OFF lamp indicates the ESP self-check and operating status.
The ESP OFF lamp operates under the following conditions:
In initialization mode after IGN ON (continuously for 3 seconds).
The ESP OFF lamp illuminates when the driver presses the ESP OFF button.
ESP On/Off Switch (ESP System)
The ESP On/Off switch is used to switch the ESP function between ON and OFF states based on driver input.
The On/Off switch is a normally open momentary contact switch. When the contacts close, it switches the circuit to ignition.
The initial state of the ESP function is ON, and the switch toggles the state.
Circuit Diagrams
Schematic Diagrams
EPB applied

Not applicable to EPB
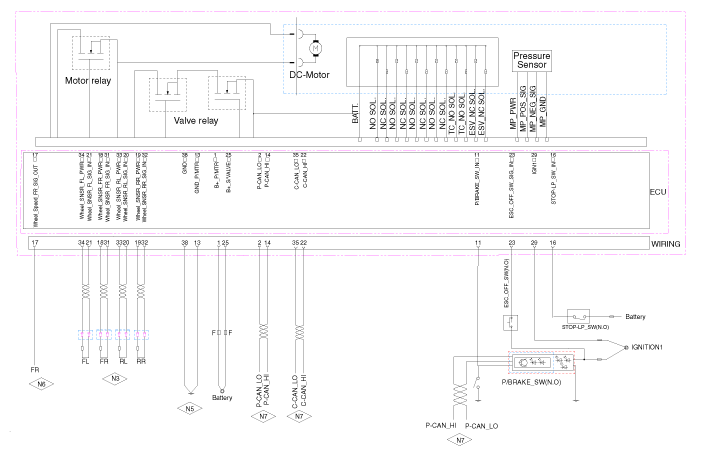
Terminal Function
EPB applied

| Pin No. | Description |
| 1 | Pump Motor Power |
| 2 | Motor Ground (RR) |
| 3 | Motor Power (RPM) |
| 5 | EPB Switch Power, Signal 2 |
| 6 | EPB Switch Power, Signal 1 |
| 8 | EPB Switch Signal 3 Release |
| 9 | EPB Switch Signal 4 Release |
| 10 | Hall Signal Input 1 |
| 11 | Hall Signal Input 2 |
| 12 | Motor Ground (RL) |
| 13 | Motor Power (RL) |
| 14 | Pump Motor Ground |
| 15 | P-CAN HIGH |
| 16 | P-CAN Low |
| 17 | IGN1 |
| 18 | ESP ON/OFF |
| 20 | AVH ON/OFF Signal |
| 21 | Hall Sensor Power (5V) |
| 22 | Hall Signal Input 1 |
| 23 | Hall Sensor Ground |
| 24 | Hall Signal Input 2 |
| 25 | Brake Light Switch Signal |
| 26 | Wheel Speed Sensor Power (RL) |
| 27 | Wheel Speed Sensor Ground (RL) |
| 28 | Wheel Speed Sensor Power (FL) |
| 29 | Wheel Speed Sensor Ground (FL) |
| 30 | B+ |
| 33 | C-CAN High |
| 34 | C-CAN Low |
| 37 | Vacuum Switch Input Signal |
| 38 | Wheel Speed Sensor Output (RR) |
| 39 | Vacuum Pump Output Signal |
| 42 | Wheel Speed Sensor Power (RR) |
| 43 | Wheel Speed Sensor Ground (RR) |
| 44 | Wheel Speed Sensor Power (FR) |
| 45 | Wheel Speed Sensor Ground (FR) |
| 46 | Ground |
Not applicable to EPB

| Pin No. | Description |
| 1 | Pump Motor Power |
| 2 | P-CAN Low |
| 13 | Pump Motor Ground |
| 14 | P-CAN HIGH |
| 16 | Brake Light Switch Signal |
| 17 | Wheel Speed Sensor Output (FR) |
| 18 | Wheel Speed Sensor Power (FR) |
| 19 | Wheel Speed Sensor Power (RR) |
| 20 | Wheel Speed Sensor Signal Ground (RL) |
| 21 | Wheel Speed Sensor Signal Ground (FL) |
| 22 | C-CAN High |
| 23 | ESP ON/OFF Signal |
| 25 | B + |
| 29 | IGN1 |
| 31 | Wheel Speed Sensor Signal Ground (FR) |
| 32 | Wheel Speed Sensor Signal Ground (RR) |
| 33 | Wheel Speed Sensor Power (RL) |
| 34 | Wheel Speed Sensor Power (FL) |
| 35 | C-CAN Low |
| 38 | Ground |
Troubleshooting
Fault Diagnosis
In principle, ESP and TCS control is prohibited when an ABS failure occurs.
If an ESP or TCS failure occurs, only the malfunctioning system control is prohibited.
However, when the solenoid valve relay must be turned off in the event of an ESP malfunction, refer to ABS fail-safe.
ABS fail-safe information is identical to the fail-safe for systems where ESP is not installed.
Diagnostic Trouble Code Memory
It stores the code as long as backup lamp power is connected. (O)
It stores the code as long as HCU power is on. (X)
Malfunction Check
The initial check is performed immediately after the HECU is powered on.
The valve relay check is performed immediately after IG2 is turned on.
It performs the check at all times while IG2 power is on.
Fail-Safe Measures
Turn the system off, perform the following actions, and wait until the HECU shuts down.
Turn off the valve relay.
Stop control during operation and do not take any action until normal condition is restored.
Warning Lamp ON
The ESP warning lamp illuminates for 3 seconds after ignition ON.
The ESP function lamp flashes when ESP is active.
If an ESP failure occurs, the ESP warning lamp illuminates.
The ESP OFF lamp illuminates in the case of
ESP OFF
3 seconds after ignition ON
Standard Diagnostic Flow / Troubleshooting
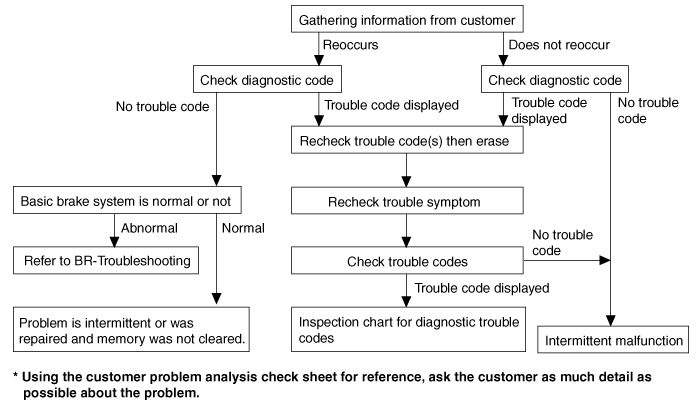
Notes on Diagnosis
The phenomena listed in the following table are not abnormal.
| Condition | Description |
| System Check Sound | When the engine is started, a dull knocking sound may sometimes be heard from the engine compartment. This is because the system performs a self-check. |
| ABS Operation Sound |
|
| ABS Operation (Longer Stopping Distance) | On road surfaces such as snow-covered and gravel roads, the braking distance of vehicles equipped with ABS may sometimes be longer than that of other vehicles. Therefore, advise the customer to drive safely on such roads by reducing vehicle speed. |
| Diagnostic detection conditions may differ depending on the diagnostic trouble code. When checking the symptom after the diagnostic trouble code has been erased, make sure the requirements listed in "Comment" are met. |
|
ABS Checklist
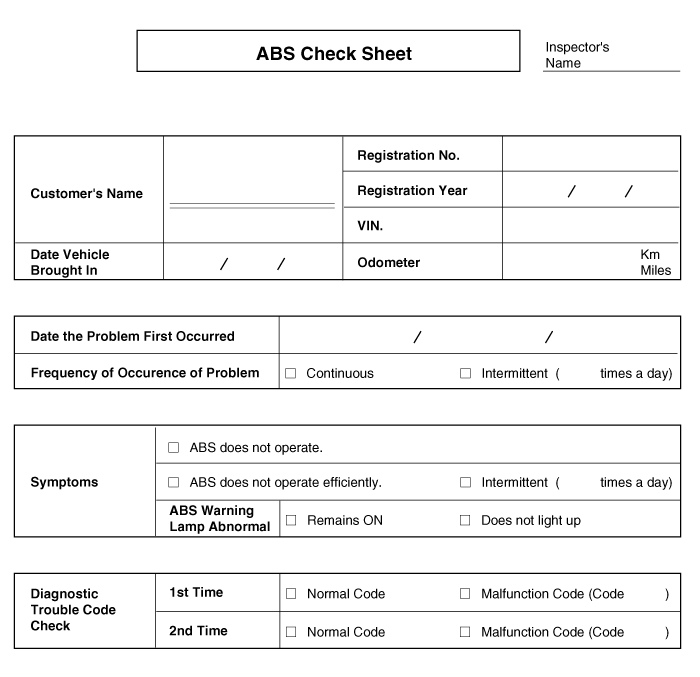
Symptom Table
| Symptom | Suspect area |
| ABS does not operate. | Only if items 1–4 are normal and the problem still occurs, replace the HECU.
|
| ABS does not operate intermittently. | Only if items 1–4 are normal and the problem still occurs, replace the ABS actuator assembly.
|
| Communication with the ABS is not possible. (Communication with any system is not possible) |
|
| Communication with the ABS is not possible. (Communication with ABS only is not possible) |
|
| When the ignition switch is ON (engine off), the ABS warning lamp does not illuminate. |
|
| Even after starting the engine, the ABS warning lamp remains illuminated. |
|

Detection condition
| Symptom Condition | Possible Cause |
| Brake operation depends on driving conditions and road surface conditions, so diagnosis may be difficult. However, if a normal DTC is displayed, check the following possible causes. If the problem still occurs, replace the ESP control module. |
|
Inspection Procedures
Check DTC
Connect the KDS to the data link connector and turn the ignition switch ON.
Make sure that a DTC is output.
Is a DTC output?

▶ Check the power supply circuit. 
▶ Erase the DTC and recheck using the KDS.
Check the power supply circuit.
Disconnect the connector from the ESP control module.
Turn the ignition on, and measure the voltage between terminal 29 of the ESP control module harness-side connector and body ground.
Specification: Approximately B+

Is the voltage within specification?
▶ Check the ground circuit. ▶ Check the harness or connector between the fuse (10A) in the engine compartment junction block and the ESP control module. Repair if necessary.
Check the ground circuit.
Disconnect the connector from the ESP control module.
Check the continuity between terminals 13, 38 of the ESP control module harness-side connector and the ground point.

Is there continuity?
▶ Check the wheel speed sensor circuit. ▶ Repair the open in the wire and the ground point.
Check the wheel speed sensor circuit.
Refer to DTC troubleshooting procedures.
Is this normal?
▶ Check the hydraulic circuit for leakage. ▶ Repair or replace the wheel speed sensor.
Check the hydraulic circuit for leakage.
Refer to hydraulic lines.
Check the hydraulic lines for leaks.
Is this normal?
▶ If the problem remains, replace the ESP control module. ▶ Repair the hydraulic line for leakage. 
Detection condition
| Symptom Condition | Possible Cause |
| Brake operation depends on driving conditions and road surface conditions, so diagnosis may be difficult. However, if a normal DTC is displayed, check the following possible causes. If the problem still occurs, replace the ESP control module. |
|
Inspection Procedures
Check DTC
Connect the KDS to the data link connector and turn the ignition switch ON.
Make sure that a DTC is output.
Is a DTC output?
▶ Check the wheel speed sensor circuit. ▶ Erase the DTC and recheck using the KDS.
Check the wheel speed sensor circuit.
Refer to DTC troubleshooting procedures.
Is this normal?
▶ Check the stop lamp switch circuit. ▶ Repair or replace the wheel speed sensor.
Check the stop lamp switch circuit.
Verify that the stop lamp illuminates when the brake pedal is depressed and goes off when the brake pedal is released.
Measure the voltage between terminal 23 of the ESP control module harness-side connector and body ground while the brake pedal is depressed.
Specification: Approximately B+
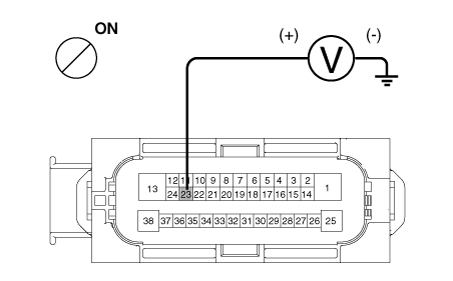
Is the voltage within specification?
▶ Check the hydraulic circuit for leakage. ▶ Repair the stop lamp switch. Repair the open circuit between the ESP control module and the stop lamp switch.
Check the hydraulic circuit for leakage.
Refer to hydraulic lines.
Check the hydraulic lines for leaks.
Is this normal?
▶ If the problem remains, replace the ESP control module. ▶ Repair the hydraulic line for leakage. 
Detection condition
| Symptom Condition | Possible Cause |
| A possible malfunction exists in the power supply (including ground) circuit for the diagnostic line. |
|
Inspection Procedures
Check the power supply circuit for diagnosis.
Measure the voltage between terminal 16 of the data link connector and body ground.
Specification: Approximately B+
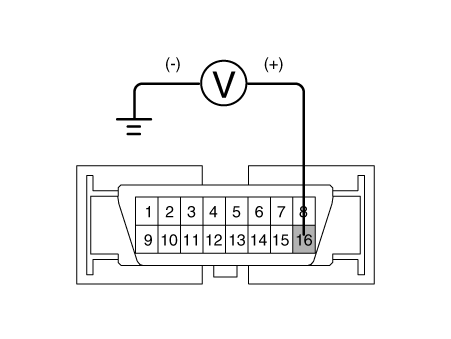
Is the voltage within specification?
▶ Check the ground circuit for diagnosis. ▶ Repair the open circuit in the wire. Check and replace the fuse from the engine compartment junction block.
Check the ground circuit for diagnosis.
Check the continuity of the circuit between terminal 4 of the data link connector and body ground.
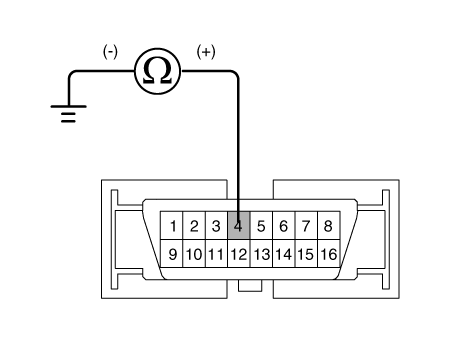
Is there continuity?
▶ Repair the open circuit in the wire between terminal 4 of the data link connector and the ground point. 
Detection condition
| Symptom Condition | Possible Cause |
| If communication with the KDS is not possible, the cause may be an open in the HECU power supply circuit or an open in the diagnostic output circuit. |
|
Inspection Procedures
Check the CAN line continuity.
Disconnect the connector from the ESP control module.
Check the continuity between terminals 26, 14 of the ESP control module connector and terminals 3, 11 of the data link connector.
Is there continuity?
▶ Check the power supply to the ESP control module. ▶ Repair the open circuit in the wire.
Check the power supply to the ESP control module.
Disconnect the connector from the ESP control module.
Turn the ignition on, and measure the voltage between terminal 29 of the ESP control module harness-side connector and body ground.
Specification: Approximately B+
Is the voltage within specification?
▶ Check for a poor ground connection. ▶ Check the harness or connector between the fuse (10A) in the engine compartment junction block and the ESP control module. Repair if necessary.
Check for a poor ground connection.
Check the continuity of the circuit between terminal 4 of the data link connector and the ground point.
▶ Replace the ESP control module and recheck. ▶ Repair the open in the wire or the poor ground connection.

Detection condition
| Symptom Condition | Possible Cause |
| When current flows through the HECU, the ABS warning lamp turns off. Turn the ignition switch to OFF for the initial check. Therefore, if the lamp does not illuminate, the cause may be an open in the lamp power supply circuit, a burned-out bulb, an open in both circuits between the ABS warning lamp and the HECU, or a faulty HECU. |
|
Inspection Procedures
Check the problem.
Disconnect the connector from the ESP control module and turn the ignition on.
Does the ABS warning lamp illuminate?
▶ Recheck after replacing the ESP HECU. ▶ Check the power supply to the ABS warning lamp.
Check the power supply for the ABS warning lamp.
Disconnect the instrument cluster connector (M08) and turn the ignition ON.
Measure the voltage between terminal (M08) 39 of the instrument cluster harness side connector and body ground.
Specification: Approximately B+

Is the voltage within specification?
▶ Check the CAN circuit and the resistance of the ABS warning lamp. ▶ Check whether the fuse is blown.
Check the CAN circuit resistance of the ABS warning lamp.
Disconnect the instrument cluster connector (M08) and turn the ignition OFF.
Measure the resistance between terminals (M08) 32 and 33 of the instrument cluster harness side connector.
Specification: 60 Ω
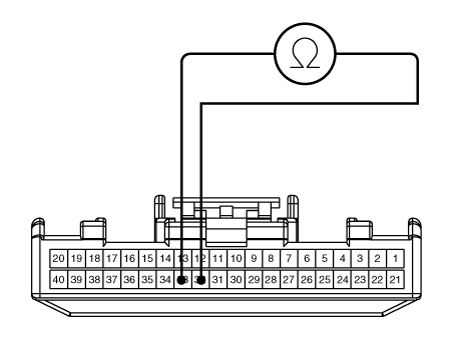
Is the resistance within specification?
▶ Repair the ABS warning lamp or replace the instrument cluster assembly. ▶ Check the CAN electrical circuit of the ABS warning lamp.
Check the CAN circuit wiring of the ABS warning lamp.
Disconnect the instrument cluster (M08) connector and the ESP HECU connector, then turn the ignition off.
Check the continuity between terminal (M08) 32 of the instrument cluster harness-side connector and terminal 26 of the ESP HECU harness-side connector.
Check the continuity between terminal (M08) 33 of the instrument cluster harness-side connector and terminal 14 of the ESP HECU harness-side connector.
Specification: Less than 1 ohm
Is the resistance within specification?
▶ Repair the short circuit in the wiring between terminals 26, 14 of the ESP HECU harness connector and the ABS warning lamp module. ▶ Repair the open circuit in the wiring between terminals 26, 14 of the ESP HECU harness connector and the ABS warning lamp module. 
Detection condition
| Symptom Condition | Possible Cause |
| If the HECU detects a malfunction, it turns on the ABS warning lamp and simultaneously disables ABS control. At this time, the HECU stores the DTC in memory. Even though a normal code is output, if the ABS warning lamp remains on, the cause may be an open or short circuit in the ABS warning lamp circuit. |
|
Inspection Procedures
Check the DTC output.
Connect the KDS to the 16-pin data link connector located behind the driver's seat, in the side kick panel.
Check the DTC output using the KDS.
Is a DTC output?
▶ Perform the DTC troubleshooting procedure (refer to DTC troubleshooting). ▶ Check the CAN circuit and the resistance of the ABS warning lamp.
Check the CAN circuit resistance of the ABS warning lamp.
Disconnect the instrument cluster connector (M08) and turn the ignition OFF.
Measure the resistance between terminals (M08) 32 and 33 of the instrument cluster harness side connector.
Specification: 60 Ω
Is the resistance within specification?
▶ Repair the ABS warning lamp or replace the instrument cluster assembly. ▶ Check the CAN circuit and the ABS warning lamp wiring.
Check the CAN circuit wiring of the ABS warning lamp.
Disconnect the instrument cluster (M08) connector and the ESP HECU connector, then turn the ignition off.
Check the continuity between terminal (M08) 32 of the instrument cluster harness-side connector and terminal 26 of the ESP HECU harness-side connector.
Check the continuity between terminal (M08) 33 of the instrument cluster harness-side connector and terminal 14 of the ESP HECU harness-side connector.
Specification: Less than 1 ohm
Is the resistance within specification?
▶ Repair the short circuit in the wiring between terminals 26, 14 of the ESP HECU harness connector and the ABS warning lamp module. ▶ Repair the open circuit in the wiring between terminals 26 and 14 of the ESP HECU wiring harness connector and the ABS warning lamp module.
Test yourself
A quick Kia Stinger CK quiz: every answer comes with an explanation and a link to the manual page.