Open in Turn Signal Circuit (B1507,B1508)
DESCRIPTION
These DTCs are stored when the combination meter detects an open in the turn signal indicator circuit, a short in the turn signal circuit, or a short in the hazard circuit.
DTC No. | Detection Item | DTC Detection Condition | Suspected Area | Memory | Note |
|---|---|---|---|---|---|
B1507 |
Open in turn signal circuit |
When the IG voltage is 9.5 V or higher and the following condition is detected:
|
|
DTC recorded |
- |
B1508 |
Open in turn signal / hazard circuit |
When the IG voltage is 9.5 V or higher and the following condition is detected:
|
|
DTC recorded |
- |
- *1: for halogen headlight type
- *2: for LED headlight type
WIRING DIAGRAM
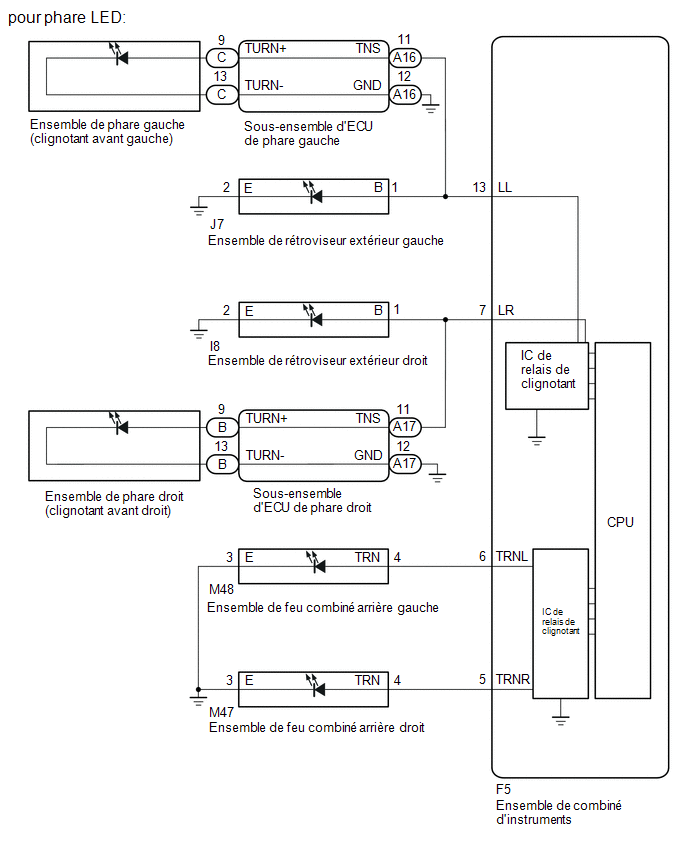
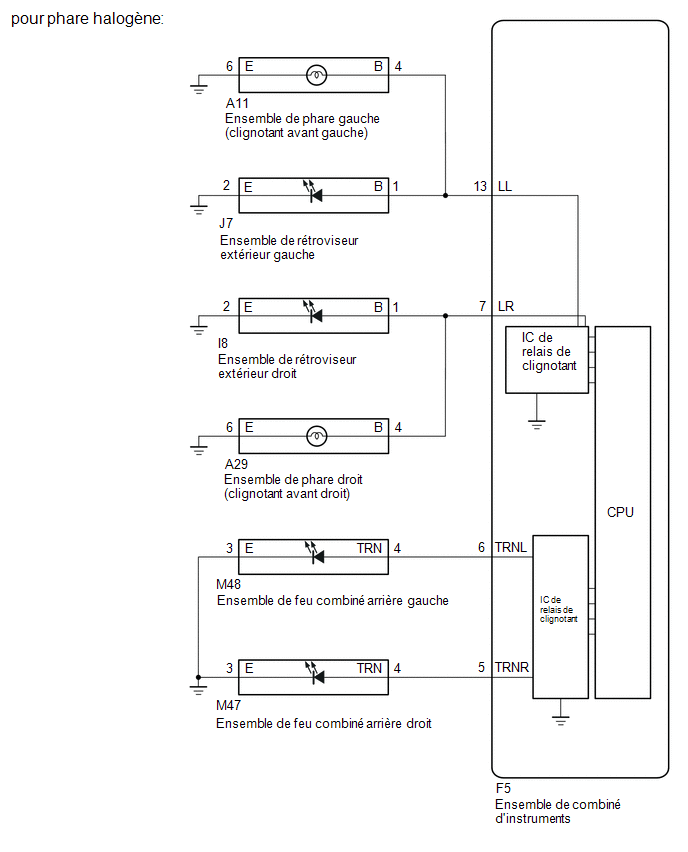
PRECAUTION / NOTICE / HINT
NOTICE:
- Check the bulbs and LEDs of this system before performing the following procedure.
- When replacing the instrument cluster assembly, always use a new part. If an instrument cluster assembly that was installed in another vehicle is used, the stored information will not match the information transmitted by the vehicle, and a DTC may be stored.
PROCEDURE
CHECK LIGHTS
(a) Check the light of each turn signal.
Result:
Result | Proceed to |
|---|---|
The RH side turn signal light does not come on. |
A |
The LH side turn signal light does not come on. |
B |
| B |  |
GO TO STEP 8 |
|

CHECK TURN SIGNAL LIGHT (RH SIDE)
(a) Turn the ignition switch to ON.
(b) Set the headlight high/low beam switch assembly to the RH turn signal switch position.
(c) Check the operation of the turn signal lights (RH side).
Result:
Result | Proceed to |
|---|---|
The front turn signal light assembly (RH side) does not flash. (for LED headlight type) |
A |
The front turn signal light assembly (RH side) does not flash. (for halogen headlight type) |
B |
The side turn signal light assembly (RH side) does not flash. |
C |
The rear turn signal light assembly (RH side) does not flash. |
D |
| B | |
GO TO STEP 5 |
| C | |
GO TO STEP 6 |
| D | |
GO TO STEP 7 |
|
CHECK WIRE HARNESS AND CONNECTOR (RH HEADLIGHT ECU SUB-ASSEMBLY - COMBINATION METER ASSEMBLY OR BODY GROUND)
(a) Disconnect the A17 connector from the RH headlight ECU sub-assembly.
(b) Disconnect the combination meter assembly connector F5.
(c) Measure the resistance according to the value(s) in the table below.
Standard resistance:
Tester Connection | Condition | Specified Condition |
|---|---|---|
A17-11 (TNS) - F5-7 (LR) |
Always |
Below 1 Ω |
A17-12 (GND) - Body ground |
Always |
Below 1 Ω |
A17-11 (TNS) - Body ground |
Always |
10 kΩ minimum |
| NG | |
REPAIR OR REPLACE HARNESS OR CONNECTOR |
|
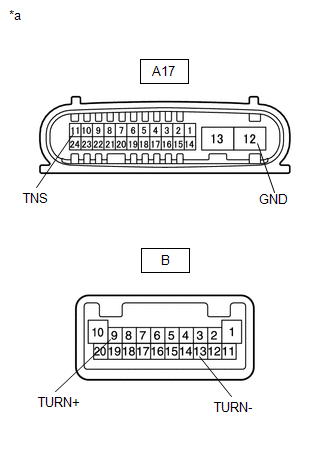
CHECK RIGHT HEADLIGHT ECU SUB-ASSEMBLY
(a) Remove the RH headlight ECU sub-assembly.
Click here
(b) Measure the resistance according to the value(s) in the table below. Standard resistance:
|
|
| OK | |
REPLACE COMBINATION METER ASSEMBLY |
| NG | |
REPLACE RIGHT HEADLIGHT ECU SUBASSEMBLY |
CHECK WIRE HARNESS AND CONNECTOR (RH HEADLIGHT ASSEMBLY - COMBINATION METER ASSEMBLY OR BODY GROUND)
(a) Disconnect the RH headlight assembly connector A29.
(b) Disconnect the combination meter assembly connector F5.
(c) Measure the resistance according to the value(s) in the table below.
Standard resistance:
Tester Connection | Condition | Specified Condition |
|---|---|---|
A29-4 (B) - F5-7 (LR) |
Always |
Below 1 Ω |
A29-6 (E) - Body ground |
Always |
Below 1 Ω |
A29-4 (B) - Body ground |
Always |
10 kΩ minimum |
| OK | |
REPLACE COMBINATION METER ASSEMBLY |
| NG | |
REPAIR OR REPLACE HARNESS OR CONNECTOR |
CHECK WIRE HARNESS AND CONNECTOR (COMBINATION METER ASSEMBLY - RH OUTSIDE REAR VIEW MIRROR ASSEMBLY)
(a) Disconnect the F5 combination meter assembly connector.
(b) Disconnect the I8 connector from the right outer mirror assembly.
(c) Measure the resistance according to the value(s) in the table below.
Standard resistance:
Tester Connection | Condition | Specified Condition |
|---|---|---|
F5-7 (LR) - I8-1 (B) |
Always |
Below 1 Ω |
I8-2 (E) - Body ground |
Always |
Below 1 Ω |
I8-1 (B) - Body ground |
Always |
10 kΩ minimum |
| OK | |
REPLACE COMBINATION METER ASSEMBLY |
| NG | |
REPAIR OR REPLACE HARNESS OR CONNECTOR |
CHECK WIRE HARNESS AND CONNECTOR (RH REAR COMBINATION LIGHT ASSEMBLY - COMBINATION METER ASSEMBLY OR BODY GROUND)
(a) Disconnect the RH rear combination light assembly connector M47.
(b) Disconnect the combination meter assembly connector F5.
(c) Measure the resistance according to the value(s) in the table below.
Standard resistance:
Tester Connection | Condition | Specified Condition |
|---|---|---|
M47-4 (TRN) - F5-5 (TRNR) |
Always |
Below 1 Ω |
M47-3 (E) - Body ground |
Always |
Below 1 Ω |
M47-4 (TRN) - Body ground |
Always |
10 kΩ minimum |
| OK | |
REPLACE COMBINATION METER ASSEMBLY |
| NG | |
REPAIR OR REPLACE HARNESS OR CONNECTOR |
CHECK TURN SIGNAL LIGHT (LH SIDE)
(a) Turn the ignition switch to ON.
(b) Set the headlight high/low beam switch assembly to the LH turn signal switch position.
(c) Check the operation of the turn signal lights (LH side).
Result:
Result | Proceed to |
|---|---|
The front turn signal light assembly (LH side) does not flash. (for LED headlight type) |
A |
The front turn signal light assembly (RH side) does not flash. (for halogen headlight type) |
B |
The front turn signal light assembly (LH side) does not flash. |
C |
The rear turn signal light assembly (LH side) does not flash. |
D |
| B | |
GO TO STEP 11 |
| C | |
GO TO STEP 12 |
| D | |
GO TO STEP 13 |
|
CHECK WIRE HARNESS AND CONNECTOR (COMBINATION METER ASSEMBLY - LH HEADLIGHT ECU SUB-ASSEMBLY OR BODY GROUND)
(a) Disconnect the A16 connector from the LH headlight ECU sub-assembly.
(b) Disconnect the combination meter assembly connector F5.
(c) Measure the resistance according to the value(s) in the table below.
Standard resistance:
Tester Connection | Condition | Specified Condition |
|---|---|---|
A16-11 (TNS) - F5-13 (LL) |
Always |
Below 1 Ω |
A16-12 (GND) - Body ground |
Always |
Below 1 Ω |
A16-11 (TNS) - Body ground |
Always |
10 kΩ minimum |
| NG | |
REPAIR OR REPLACE HARNESS OR CONNECTOR |
|
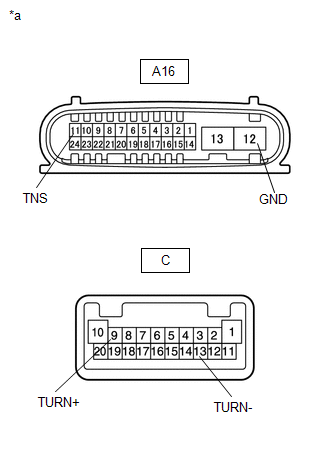
CHECK LEFT HEADLIGHT ECU SUB-ASSEMBLY
(a) Remove the LH headlight ECU sub-assembly.
Click here
(b) Measure the resistance according to the value(s) in the table below. Standard resistance:
|
|
| OK | |
REPLACE COMBINATION METER ASSEMBLY |
| NG | |
REPLACE HEADLIGHT ECU SUB-ASSEMBLY |
CHECK WIRE HARNESS AND CONNECTOR (LH HEADLIGHT ASSEMBLY - COMBINATION METER ASSEMBLY OR BODY GROUND)
(a) Disconnect the A11 connector from the LH headlight assembly.
(b) Disconnect the combination meter assembly connector F5.
(c) Measure the resistance according to the value(s) in the table below.
Standard resistance:
Tester Connection | Condition | Specified Condition |
|---|---|---|
A11-4 (B) - F5-13 (LL) |
Always |
Below 1 Ω |
A11-6 (E) - Body ground |
Always |
Below 1 Ω |
A11-4 (B) - Body ground |
Always |
10 kΩ minimum |
| OK | |
REPLACE COMBINATION METER ASSEMBLY |
| NG | |
REPAIR OR REPLACE HARNESS OR CONNECTOR |
CHECK WIRE HARNESS AND CONNECTOR (COMBINATION METER ASSEMBLY - LH OUTSIDE REAR VIEW MIRROR ASSEMBLY OR BODY GROUND)
(a) Disconnect the F5 combination meter assembly connector.
(b) Disconnect the J7 connector from the left outer mirror assembly.
(c) Measure the resistance according to the value(s) in the table below.
Standard resistance:
Tester Connection | Condition | Specified Condition |
|---|---|---|
J7-1 (B) - F5-13 (LL) |
Always |
Below 1 Ω |
J7-2 (E) - Body ground |
Always |
Below 1 Ω |
J7-1 (B) - Body ground |
Always |
10 kΩ minimum |
| OK | |
REPLACE COMBINATION METER ASSEMBLY |
| NG | |
REPAIR OR REPLACE HARNESS OR CONNECTOR |
CHECK WIRE HARNESS AND CONNECTOR (LH REAR COMBINATION LIGHT ASSEMBLY - COMBINATION METER ASSEMBLY OR BODY GROUND)
(a) Disconnect the LH rear combination light assembly connector M48.
(b) Disconnect the combination meter assembly connector F5.
(c) Measure the resistance according to the value(s) in the table below.
Standard resistance:
Tester Connection | Condition | Specified Condition |
|---|---|---|
F5-6 (TRNL) - M48-4 (TRN) |
Always |
Below 1 Ω |
M48-3 (E) - Body ground |
Always |
Below 1 Ω |
M48-4 (TRN) - Body ground |
Always |
10 kΩ minimum |
| OK | |
REPLACE COMBINATION METER ASSEMBLY |
| NG | |
REPAIR OR REPLACE HARNESS OR CONNECTOR |