Engine Starting System
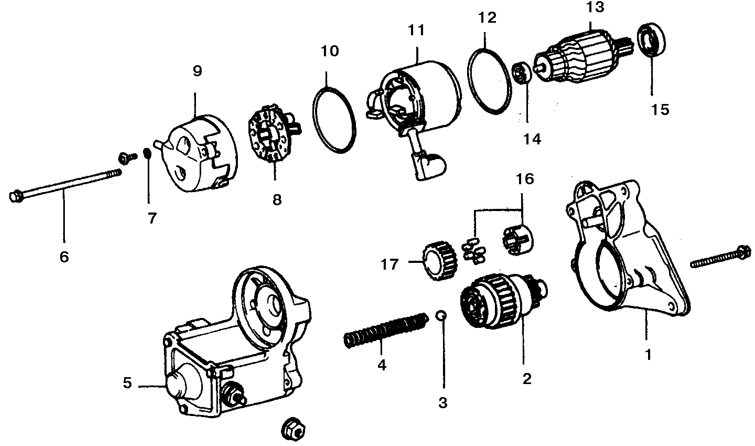
Starter Motor and Solenoid Components
1. Starter front cover
2. Overrunning clutch assembly
3. Steel ball
4. Spring
5. Solenoid assembly
6. Through bolt
7. O-ring
8. Brush holder
9. Rear cover
10. O-ring
11. Starter housing with field coils
12. O-ring
13. Armature
14. Rear bearing
15. Front bearing
16. Bearing
17. Idler gear
The system is designed to start the engine by rotating the crankshaft at the required speed.
The system consists of the battery, starter motor, solenoid and connecting wires. The solenoid is mounted directly on the starter motor.
The starter motor assembly with solenoid is mounted on the upper part of the engine, next to the transmission case.
When the ignition key is turned to the Start position, the solenoid is energized through the auxiliary starting circuit. The solenoid connects the starter motor to the battery. The battery supplies power to the starter motor, and the starter motor rotates the crankshaft, performing the mechanical work of starting the engine.
On vehicles equipped with a manual transmission, the starter motor can only engage when the clutch pedal is depressed. On vehicles with an automatic transmission, the starter motor can only engage when the selector lever is in the Park or Neutral position.
* When repairing starting system components, observe the following precautions:
– Do not operate the starter motor for more than 15 seconds at a time, and allow a pause of at least 2 minutes before the next attempt (otherwise the starter will overheat and fail);
– Because the starter motor is connected directly to the battery, improper handling, overloading or accidental short circuits may cause an electric arc and fire;
– Always disconnect the battery ground cable before beginning repairs on starting system components.
Starter motor electric motor
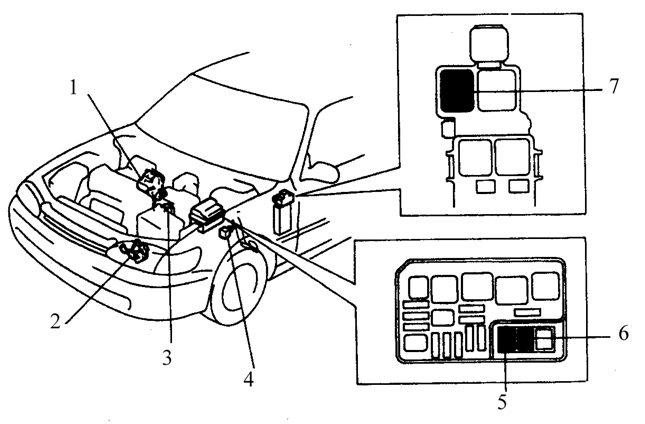
Starter Relay Mounting Locations on Vehicle
1. Starter motor
2. Park/Neutral position switch
3. Main fusible link
4. Auxiliary relay
5. AM1 40 A fuse
6. ALT-H 100 A fuse
7. Starter relay
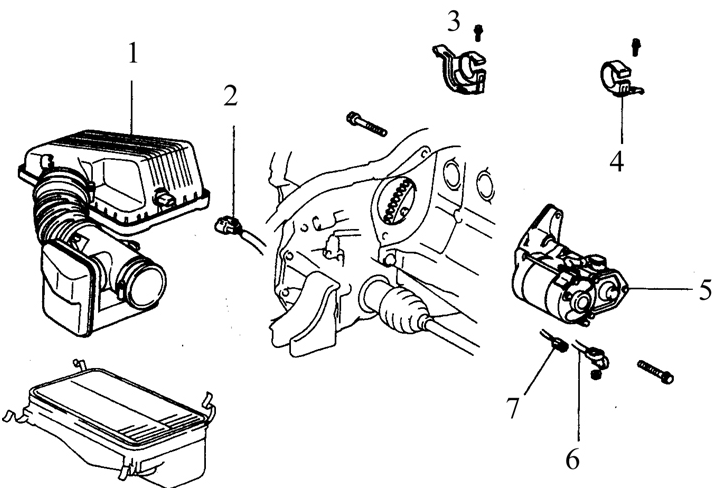
Starter Motor Installation Components
1. Air cleaner cover
2. Intake air temperature sensor connector
3. Wiring clip (vehicles with automatic transmission)
4. Wiring clip (vehicles with manual transmission)
5. Starter motor
6. Starter motor wire
7. Starter motor wire connector
* Before testing the starter motor, make sure the battery is fully charged.
Test Without Removing from Vehicle
PROCEDURE
1. If the starter motor does not turn at all when the key is turned, make sure the selector lever is in the Park or Neutral position (vehicles with automatic transmission).
2. Make sure the battery is charged, and check that the battery and solenoid cable connections are clean and secure.
3. If the starter motor engages when the key is turned but the crankshaft does not turn, the overrunning clutch is seized. In this case, replace the starter motor assembly.
4. If the starter motor does not turn when the key is turned, but solenoid clicks are heard, the solenoid contacts, battery or starter motor (or a tight crankshaft) are faulty.
5. If the solenoid armature click is not heard when the starter is engaged, the cause may be a faulty battery, a blown fusible link (open circuit), a faulty starter auxiliary relay (see figure Starter Relay Mounting Locations on Vehicle), or the solenoid itself.
* To locate the faulty relay, follow the procedure described in subsection 5.3.
6. To test the solenoid, jumper the battery terminal (+) and the ignition switch wire terminal (both terminals are on the solenoid). If the starter motor runs, the solenoid is good, and the ignition switch, starter auxiliary relay or wiring is faulty.
7. If the starter motor still does not run, remove the starter motor assembly with solenoid for disassembly, inspection and repair.
8. If the starter turns the crankshaft but at very low speed, first check the battery state of charge and the reliability and integrity of the connections. The starter will also turn the engine slowly if the crankshaft turns hard or if the engine contains oil of excessively high viscosity.
9. Warm up the engine, then disconnect the high-tension coil wire from the distributor cap and connect it to ground on the engine.
10. Connect the positive voltmeter lead to the battery positive terminal and the negative lead to the battery negative terminal.
11. Engage the starter and read the steady voltmeter value. Starter engagement time must not exceed 15 seconds. Battery voltage at normal crankshaft cranking speed should be 9 V or slightly more. If battery voltage is 9 V or slightly above and crankshaft speed is low, the starter motor is faulty. If voltage is below 9 V and crankshaft speed is low, the probable causes are burnt solenoid contacts, a faulty starter motor, battery self-discharge, or poor contact connections.
* The starter motor assembly with solenoid is not serviceable. If it fails, replace the starter motor assembly with solenoid with a new or remanufactured unit.
Removal
PROCEDURE
1. Disconnect the battery ground cable.
2. Remove the battery from the engine compartment.
3. Disconnect and remove the cruise control unit from the engine compartment (see sub-section 12.20).
4. Disconnect the connectors from the starter motor assembly with solenoid switch.
5. Remove the starter motor mounting bolts (see figure Starter Motor Mounting Components).
6. Remove the bracket from the upper part of the starter motor assembly with solenoid switch.
* First loosen one or two bracket bolts partially, then lower the starter motor with solenoid switch, then remove the remaining bracket and bolts.
Installation
Installation is performed in the reverse order.
Test yourself
A quick Toyota Corolla quiz: every answer comes with an explanation and a link to the manual page.