Outside Rear View Mirror
PROCEDURE
MODELS PRODUCED UNTIL 07.1987 (MANUAL ADJUSTMENT MIRROR)
Outside rear view mirror with manual adjustment, produced until 07.1987 1 – handle; 2 – protective cover; 3 – nut; 4 – bracket; 5 – adjustment mechanism; 6 – gasket; 7 – decorative cover; 8 – mirror; 9 – screw; 10 – bolt
Removal PROCEDURE 1. Remove handle 1. 2. Remove protective cover 2. 3. Remove door panel trim (see subsection 11.16). 4. Unscrew nut 3. 5. Remove decorative cover 7. 6. Unscrew screws 9. 7. Remove mirror 8 together with adjustment mechanism 5. Installation of the outside rear view mirror is performed in the reverse order of removal. MODELS PRODUCED AFTER 07.1987 (MANUAL ADJUSTMENT MIRROR) Starting from 08.1987, the design of the mirror attachment to the body and of the reflective element fastening in the housing was changed.

Outside rear view mirror with manual adjustment, produced from 07.1987 1 – reflective element; 2 – locating pin; 3 – mechanism; 4 – housing; 5 – decorative insert; 6 – gasket; 7 – screw; 8 – pin; 9 – door frame; 10 – handle; 11 – push-in fastener; 12 – protective cover; 13 – nut; 14 – bracket; 15 – adjustment mechanism
Removal and Installation PROCEDURE
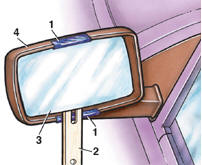
1. When removing the reflective element, stick pieces of insulating tape 1 onto mirror housing 4 to protect the housing.
Pry reflective element 3 up from below and then from above with a wooden spatula 2 and remove it from housing 4. 2. Install the reflective element with pins 2 (see illustration Outside rear view mirror produced from 07.1987) into the seats and gently press the center of reflective element 1 until it seats in place. 3. Other removal and installation steps are similar to the early version (see above). MODELS PRODUCED UNTIL 07.1987 (ELECTRIC ADJUSTMENT MIRROR)
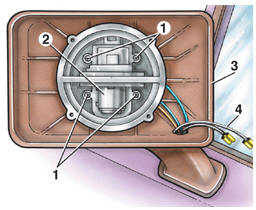
Electric adjustment drive mechanism 1 – screw; 2 – electric motor; 3 – housing; 4 – wires
Removal PROCEDURE
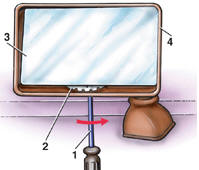
1. Turn latch 2 with screwdriver 1 in the direction indicated by the arrow. Remove reflective element 3 from housing 4. 2. Unscrew screws 1 (see illustration Electric adjustment drive mechanism).
3. Remove electric motor 2. 4. Disconnect wires 4. 5. Remove the switch from the door panel trim. 6. Disconnect the connector. 7. Remove door panel trim (see subsection 11.16). 8. Remove the protective film. 9. Loosen the wire clamp. 10. Disconnect the wire contacts. 11. Unscrew the screws securing the mirror housing to the door and remove it. Installation PROCEDURE 1. Installation of the outside rear view mirror is performed in the reverse order. When installing, connect the wires to the electric motor according to color. 2. Attach the protective film using double-sided adhesive tape.

3. Turn latch 2 fully in the direction indicated by the arrow. Install reflective element 3 into housing 4. Turn latch 2 with screwdriver 1 in the direction opposite to the arrow.
Test yourself
A quick Volkswagen Golf quiz: every answer comes with an explanation and a link to the manual page.