Front Panel
PROCEDURE
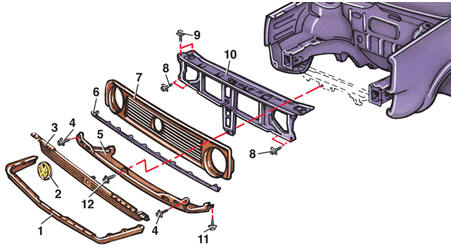
Front end components 1 – decorative trim; 2 – manufacturer's badge; 3 – decorative grille; 4 – bolt; 5 – splash guard; 6 – trim; 7 – cover; 8 – bolt; 9 – bolt; 10 – front panel; 11 – bolt; 12 – screw
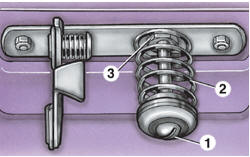
Hood latch adjustment 1 – adjusting screw; 2 – spring; 3 – nut
Removal PROCEDURE 1. Remove the bumper (see subsection 11.1). 2. Remove the radiator grille (see subsection 11.4). 3. Unscrew nine screws and remove decorative trim 1. 4. Unscrew bolts 4 and 12 (3 bolts). 5. Disengage the latch securing decorative grille 3 to front panel 10. 6. Remove splash guard 5 of the radiator grille together with decorative grille 3.
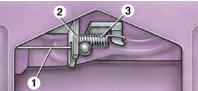
7. Disconnect cable 1 from lever 2 of the hood latch (3 – spring). 8. Disconnect the cable sheath fastener on the front panel. 9. Disconnect the wiring connectors from the headlight and horn connectors.
10. Disconnect the horn wire fasteners from the front panel. 11. Unscrew bolt 11 (see illustration Radiator and cooling fan for 1.1 and 1.3 L engines) or (see illustration Cooling system components for 1.6 and 1.8 L engines). 12. Remove removable bracket 14 (see illustration Radiator and cooling fan for 1.1 and 1.3 L engines) or 15 (see illustration Cooling system components for 1.6 and 1.8 L engines) of the radiator. 13. Unscrew bolt 11 (see illustration Radiator and cooling fan for 1.1 and 1.3 L engines) or 13 (see illustration Cooling system components for 1.6 and 1.8 L engines) securing the radiator. 14. Unscrew bolts 8 and 9 (four on each side). 15. Remove front panel 10 together with the headlights and horn. Installation PROCEDURE 1. Install front panel 10. 2. Tighten bolts 8 and 9 (four on each side). 3. Tighten bolt 11 (see illustration Radiator and cooling fan for 1.1 and 1.3 L engines) or 13 (see illustration Cooling system components for 1.6 and 1.8 L engines) securing the radiator. 4. Install the removable bracket 14 (see illustration Radiator and cooling fan for 1.1 and 1.3 L engines) or 15 (see illustration Cooling system components for 1.6 and 1.8 L engines) of the radiator, respectively. 5. Tighten bolt 11 or 13, respectively. 6. Connect the wiring connectors to the headlight and horn connectors.
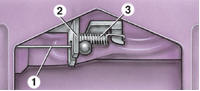
7. Place cable 1 onto lever 2 of the hood latch (3 – spring). 8. Secure the cable sheath to the front panel.
9. Secure the horn wires to the front panel. 10. Install splash guard 5 of the radiator grille and tighten bolts 4 and 12. 11. Install decorative grille 3, snapping it into the slot on the front panel. 12. Install decorative trim 1 and tighten nine screws 11. 13. Install the bumper (see subsection 11.1). 14. Close the hood and check that the latch engages and that the hood is flush with the fenders; adjust if necessary.
15. Install the radiator grille (see subsection 11.4). after adjustment. Hood Latch and Hood Position Relative to Fenders Adjustment PROCEDURE 1. Loosen nut 3 (see illustration Hood latch adjustment) and adjust the latch position with adjusting screw 1 so that the hood closes securely. 2. If the hood and fender surfaces do not align, adjust the rubber dampers on both sides of the latch bracket to the required height, then check the hood latch operation again.
Test yourself
A quick Volkswagen Golf quiz: every answer comes with an explanation and a link to the manual page.