Air Conditioning
General Safety Information and Precautions
When Handling Refrigerant
Liquid refrigerant R-134a evaporates very easily. A drop on your skin may cause local frostbite. Always wear gloves when working with refrigerant.
Standard practice is to wear protective goggles or safety glasses and protective gloves. If refrigerant gets into the eyes, flush immediately with clean water.
The R-134a container is under high pressure. Never leave it in a hot place, and make sure the storage temperature is below 52 °C.
Use an electronic leak detector to check the system for refrigerant leaks. Note that R-134a produces phosgene, a very toxic gas, when it contacts an open flame.
Use only the recommended lubricant for R-134a systems. If a lubricant other than the recommended type is used, system malfunction may occur.
PAG lubricant absorbs moisture from the atmosphere very quickly, so the following precautions must be observed:
When removing refrigerant components from the vehicle, cap the components immediately to prevent moisture from entering.
When installing refrigerant components on the vehicle, do not remove the cap until immediately before connecting the components.
Complete the connection of all refrigerant lines and hoses without delay to prevent moisture from entering the air conditioning system.
Use only recommended lubricant taken from a sealed container.
In the event of an accidental discharge into the system, ventilate the work area before resuming service.

When replacing air conditioning system parts
Never open or loosen a connection until the system has been discharged.
Immediately cap or plug open component fittings to prevent moisture or dirt from entering.
Do not remove the sealing caps from a replacement component until it is ready for installation.
Always install a new O-ring before connecting an open fitting. Lubricate and seal the fitting with refrigerant oil before connecting.

When installing, connect parts
Flange with Guide Pin
Check the new O-ring for damage (use only the specified type) and apply compressor oil to it. Tighten the nut to the specified torque.

Handling of Tubes and Fittings
The internal parts of the refrigeration system will remain chemically stable as long as clean refrigerant free of moisture and refrigerant oil are used. Abnormal amounts of dirt, moisture or air can disturb chemical stability and cause malfunctions or serious damage.
The following precautions must be observed
When the cooling system must be opened, prepare everything needed to service the system in advance, so that the system is not left open longer than necessary.
Close or plug all lines and fittings as soon as they are opened to prevent dirt and moisture from entering.
All lines and components in parts storage must remain capped or sealed until they are ready for use.
Never attempt to bend formed lines to make them fit. Use the correct line for the system you are servicing.
All tools, including the refrigerant dispensing manifold, manifold gauge set, and charging hoses must be kept clean and dry.
Description and Operation
Refrigeration Cycle
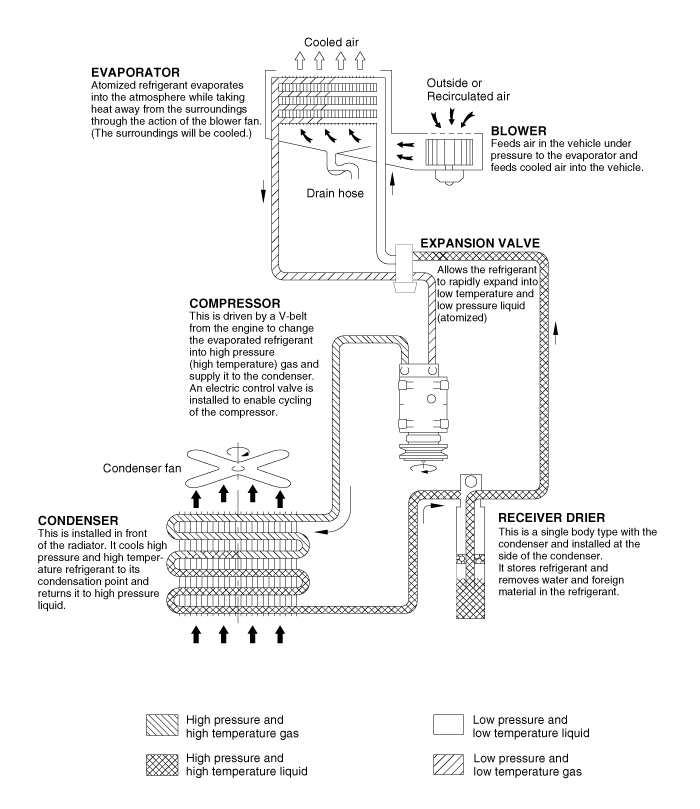
Repair Procedures
Checking Refrigerant Specifications
Check the refrigerant specification label inside the engine compartment.
R-134a R-1234yf Examples 
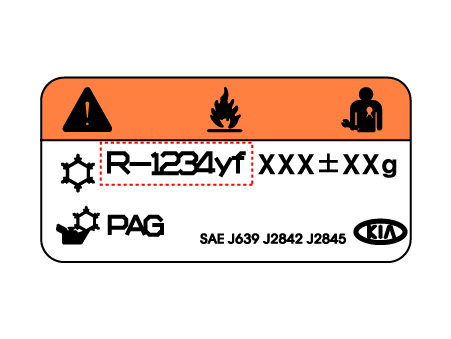
If the refrigerant specification label is not visible, check the diameter of the service port.
R-134a R-1234yf High-pressure side 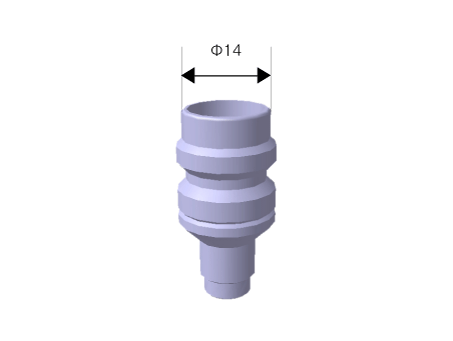

Low-pressure side 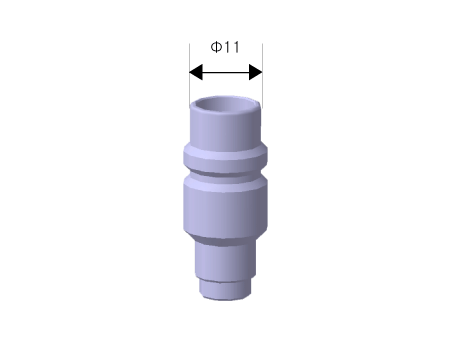
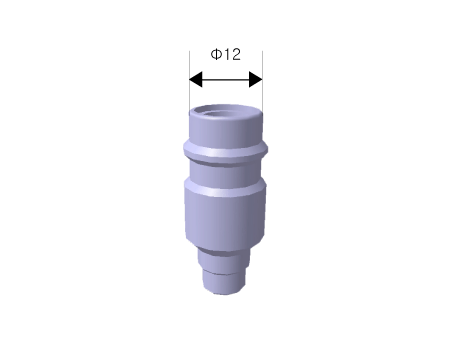
※ The service port diameter for the high/low pressure side depends on the refrigerant specification.
Refrigerant Recovery
Use only UL-certified service equipment meeting SAE J2210 requirements to remove HFC-134a (R-134a) from the air conditioning system.
In case of accidental system discharge, ventilate the work area before resuming service.
Additional health and safety information may be obtained from refrigerant and lubricant manufacturers.
Connect the R-134a refrigerant recovery/recycling/charging system (A) to the high-pressure service port (C) and the low-pressure service port (B) as shown, following the equipment manufacturer's instructions.


Measure the amount of refrigerant oil removed from the air conditioning system after the recovery process is complete. Be sure to add the same amount of new refrigerant oil back into the air conditioning system before charging.
System Evacuation
Use only UL-listed service equipment certified to comply with SAE J2210 when removing HFC-134a (R-134a) from the air conditioning system.
In case of accidental system discharge, ventilate the work area before resuming service.
Additional health and safety information may be obtained from refrigerant and lubricant manufacturers.
When the air conditioning system has been opened to the atmosphere during installation or repair, it must be evacuated using the R-134a recovery/recycling/charging system. (If the system has been open for several days, the receiver/drier must be replaced and the system evacuated for several hours.)
Connect the R-134a refrigerant recovery/recycling/charging system (A) to the high-pressure service port (B) and the low-pressure service port (C) as shown, following the equipment manufacturer's instructions.

If the low pressure does not drop below 93.3 kPa (700 mmHg, 27.6 inHg) within 10 minutes, there may be a leak in the system. Partially charge the system and check for leaks. (Refer to Refrigerant Leak Check.)
Remove the low-pressure valve from the low-pressure service port.
System Charging
Use only UL-listed service equipment certified to comply with SAE J2210 when removing HFC-134a (R-134a) from the air conditioning system.
In case of accidental system discharge, ventilate the work area before resuming service.
Additional health and safety information may be obtained from refrigerant and lubricant manufacturers.
Connect the R-134a refrigerant recovery/recycling/charging system (A) to the high-pressure service port (B) as shown, following the equipment manufacturer's instructions.
Add the same amount of new refrigerant oil to the system as was removed during recovery. Use only the specified refrigerant oil. Charge the system with R-134a or R-1234yf refrigerant. Do not overcharge the system, as this may damage the compressor.
Specified amount
R-134a: 600 ± 25 g (20.0 ± 0.88 oz)
R-1234yf: 570 ± 25 g (22.9 ± 0.88 oz)
Refrigerant Leak Test
Always perform a leak test with an electronic leak detector whenever a refrigerant leak occurs and when performing service operations that involve disconnecting, loosening, or connecting fittings.
If a refrigerant leak is detected, perform the following steps:
Check the tightening torque of the connection fittings, and if they are too loose, tighten them to the specified torque. Check for gas leaks with a leak detector (A).
If the leak continues even after tightening the fitting, drain the refrigerant from the system, disconnect the fittings, and check their sealing surfaces for damage. Always replace them, even if the damage is minor.
Check the compressor oil and add oil if necessary.
Charge the system and recheck for leaks. If no leaks are found, evacuate and recharge the system again.

Components and Component Location
Component Location Index
[Engine Compartment]

| 1. Ambient sensor 2. Receiver-drier 3. Condenser 4. Compressor 5. Drain hose 6. Service port (low pressure) |
7. Service port (high pressure) 8. Air conditioning pressure sensor (APT) 9. Suction and liquid tube assembly 10. Expansion valve 11. Suction hose |
Interior

| 1. Automatic defog sensor 2. Photo sensor 3. Heater and blower |
4. Evaporator temperature sensor 5. Heater and A/C control unit (DATC) |
Test yourself
A quick Kia Stinger CK quiz: every answer comes with an explanation and a link to the manual page.