Remote Central Locking and Alarm
Technical Data
SPECIFICATIONS
| No. | SPECIFICATIONS |
| COMPONENT LOCATION | 3 V |
| Betriebstemperatur | -30 - 80 °C |
| RF modulation | FSK |
| LF modulation | REQUEST |
| RF frequencies | 433.92 MHz |
| Taste number | 3 |
| FUNCTION | Türverriegelung |
| Tailgate release | |
| HECKKLAPPE ENTRIEGELN |
Bauteile und bauteile-Übersicht
BAUTEILE-ÜBERSICHT
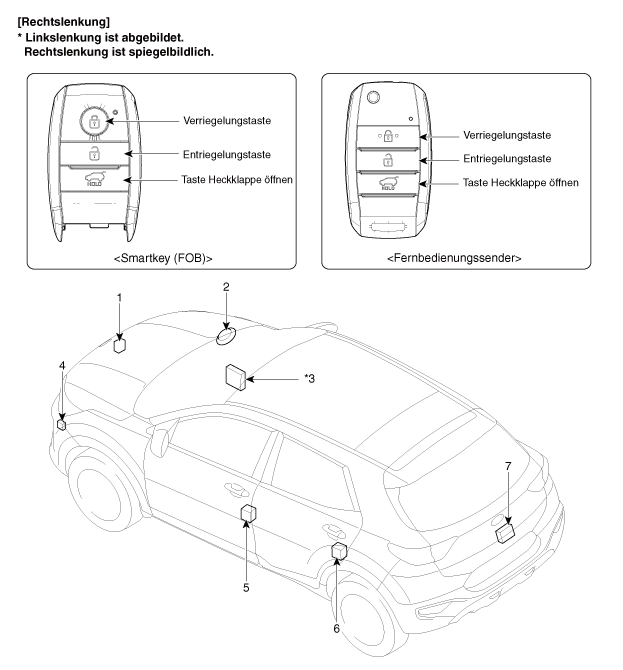
| 1. Hood switch 2. Alarm siren 3. Body control module (BCM) 4. Door lock/unlock buzzer |
5. Front door actuator and switch 6. Rear door actuator and switch 7. Tailgate actuator and switch |
Beschreibung und bedienung
Beschreibung
Alarm system status [A/A status]
| A/A status | Beschreibung |
| DISARM |
|
| AKTIVIERUNG IM WARTEZUSTAND |
|
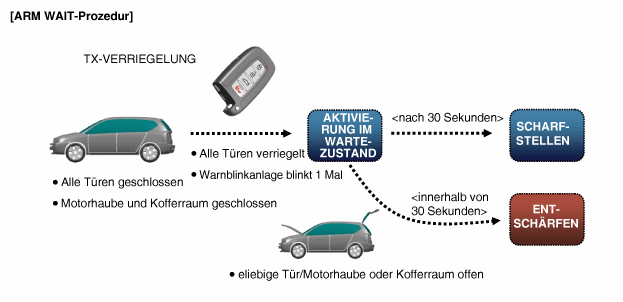
※ Note: For a vehicle with the Smart Key system, the same also applies to the passive door lock function.
| A/A status | Beschreibung |
| ZEITGEBER FÜR AUTOMATISCHE VERRIEGELUNG 1 |
|
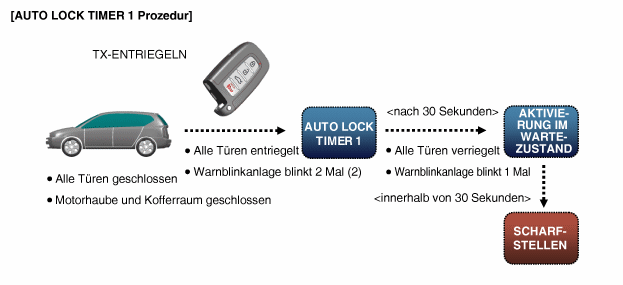
※ Note: For a vehicle with the Smart Key system, the same also applies to the passive door lock function.
| A/A status | Beschreibung |
| ZEITGEBER FÜR AUTOMATISCHE VERRIEGELUNG 2 |
|
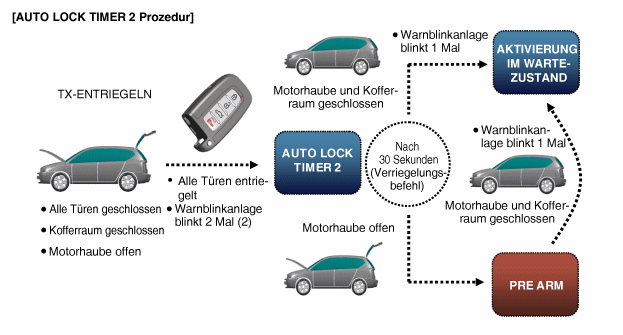
※ Note: For a vehicle with the Smart Key system, the same also applies to the passive door lock function.
| A/A status | Beschreibung |
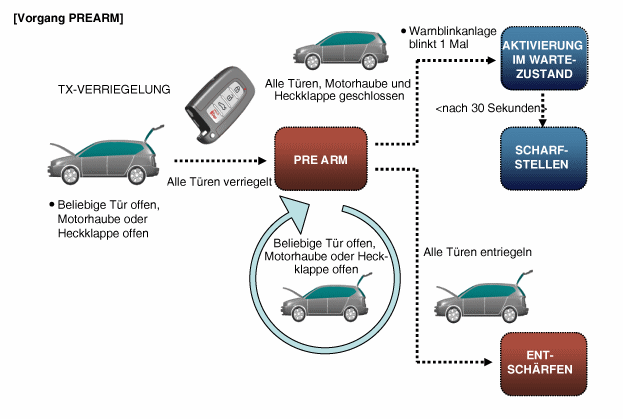
| Im voraus scharfstellen | 1-1 This is the status immediately after switching to "ARM" mode, after AUTO LOCK Timer 2 has expired and all doors are closed. 1-2 As soon as the driver closes the hood or tailgate, the hazard lights flash once, then the vehicle automatically switches from the "ARM WAIT" mode to the "ARM" mode. 2-1 If the LOCK button is pressed while at least one door, the hood or the tailgate is still open, the system switches to "PRE ARM" mode. 2-2 Because the lock all doors signal was output but the conditions for "ARM WAIT" are not met, the vehicle remains in standby mode and switches to ARM mode via ARM WAIT as soon as the open door is closed. 2-3 If intrusion into the vehicle interior is detected in PRE ARM mode, the system switches to DISARM mode. 2-4 In PRE ARM mode the security indicator light flashes. |
| A/A status | Beschreibung |
| SIREN AND HAZARD LIGHTS |
|
| A/A status | Beschreibung |
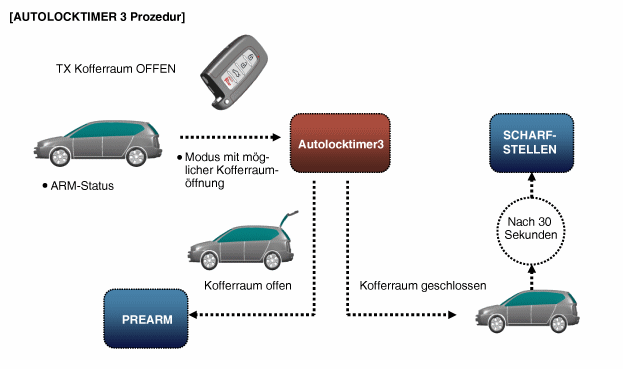
| Timer 3 for automatic locking |
|
| A/A status | Beschreibung |
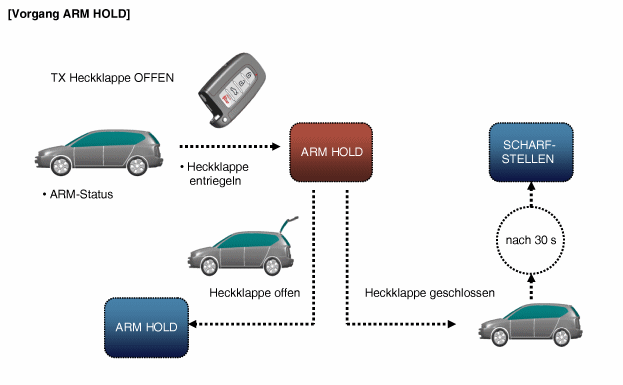
| Activation condition (Alarm stopped: tailgate) ※Option without PTL |
|
Note 1: The ARM HOLD function delays activation of ARM mode for the tailgate only. When ARM HOLD mode is activated, ARM mode is activated for the doors and hood.
Note 2: When the ignition key is used to open the tailgate, the ARM HOLD function operates in the same way, provided that the "Door Theft Alarm" function is activated. If this function is deactivated, the key-based ARM HOLD function is turned off, and opening the tailgate with the key is regarded as theft, which triggers the alarm.
| A/A status | Beschreibung |
| RE ARM (ARM mode is activated again) |
|
| RESET |
|
| A/A status | Beschreibung |
| 30 s Deactivation at KEY ON (Non-smart key version) |
|
| Ist der Modus ARM eingeschaltet, ist das ÖFFNEN der Heckklappe und das entriegeln der Zentralverriegelung nicht erlaubt. |
|
Repair Procedures
INSPECTION
Überprüfung des Vordertürverriegelungsmoduls
Vordere Türverkleidung abbauen.
(Siehe Karosserie - "Vordertürverkleidung")
Vordere Türverkleidung Dichtung abbauen.
(Siehe Karosserie - "Vordertür-Fensterscheibe")
Steckverbinder vom Stellantrieb abziehen.
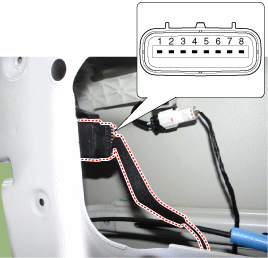
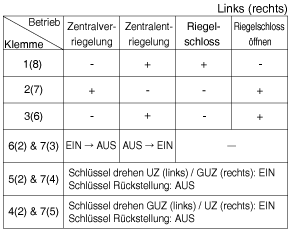
[Central Motor]
Number Connector Terminal Arrangement REFERENCES RIGHT 1 - - 2 Motor 2 COM 3 Motor 3 Lock/Unlock Switch 4 Schlüsselentriegelungsschalter Schlüssel-Verriegelungsschalter 5 Schlüssel-Verriegelungsschalter Schlüsselentriegelungsschalter 6 Lock/Unlock Switch Motor 3 7 COM Motor 2 8 - -
[Door Lock Motor]
Number Connector Terminal Arrangement REFERENCES RIGHT 1 Motor 1 - 2 Motor 2 COM 3 Motor 3 Lock/Unlock Switch 4 Schlüsselentriegelungsschalter Schlüssel-Verriegelungsschalter 5 Schlüssel-Verriegelungsschalter Schlüsselentriegelungsschalter 6 Lock/Unlock Switch Motor 3 7 COM Motor 2 8 - Motor 1 Funktion des Stellantriebs durch Anschließen von Strom und Masse wie unten gezeigt überprüfen. Um eine Beschädigung des Stellantriebs zu vermeiden, nur kurzzeitig Batteriespannung anlegen.
[Central Motor]
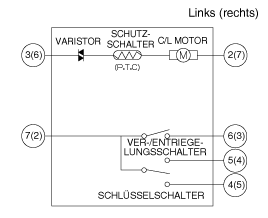
[Door Lock Motor]
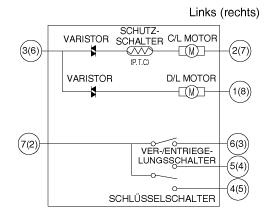
[Central Motor]
(REFERENCE)
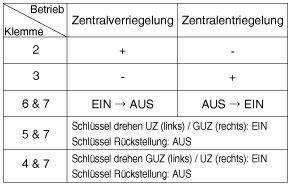
(RIGHT)
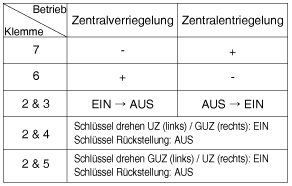
[Door Lock Motor]
Prüfung des Hintertürverriegelungsmoduls
Hintere Türverkleidung abbauen.
(Siehe Karosserie - "Hintertürverkleidung")
Hintere Türverkleidung abbauen.
(Siehe Karosserie - "Hintertürfensterscheibe")
Steckverbinder vom Stellantrieb abziehen.
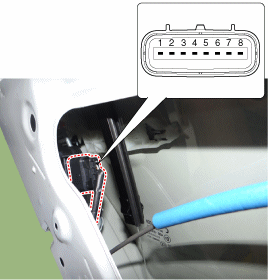
[Central Motor]
Number Connector Terminal Arrangement REFERENCES RIGHT 1 - - 2 Motor 2 COM 3 Motor 3 Lock/Unlock Switch 4 - - 5 - - 6 Lock/Unlock Switch Motor 3 7 COM Motor 2 8 - -
[Door Lock Motor]
Number Connector Terminal Arrangement REFERENCES RIGHT 1 Motor 1 - 2 Motor 2 COM 3 Motor 3 Lock/Unlock Switch 4 - - 5 - - 6 Lock/Unlock Switch Motor 3 7 COM Motor 2 8 - Motor 1 Funktion des Stellantriebs durch Anschließen von Strom und Masse wie unten gezeigt überprüfen. Um eine Beschädigung des Stellantriebs zu vermeiden, nur kurzzeitig Batteriespannung anlegen.
[Central Motor]
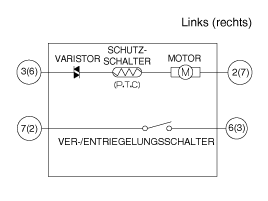
[Door Lock Motor]
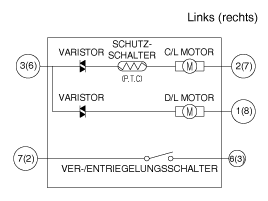
[Central Motor]
(REFERENCE)
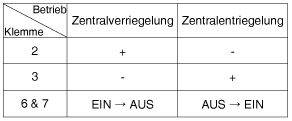
(RIGHT)
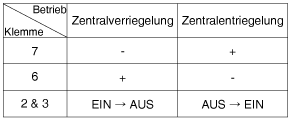
[Door Lock Motor]
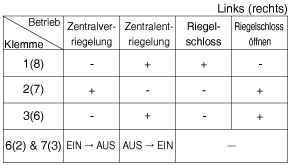
Prüfung des Heckklappenverriegelung Moduls
Heckklappenverkleidung abbauen.
(Siehe Karosserie - "Heckklappenverkleidung")
Die Stecker vom Stellantrieb abziehen.
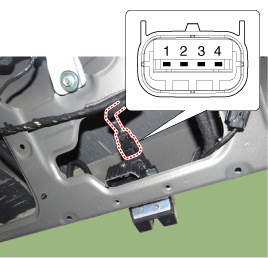
Funktion des Stellantriebs durch Anschließen von Strom und Masse wie unten gezeigt überprüfen. Um eine Beschädigung des Stellantriebs zu vermeiden, nur kurzzeitig Batteriespannung anlegen.
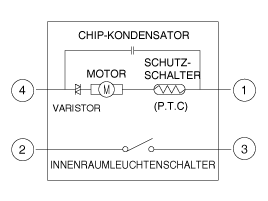
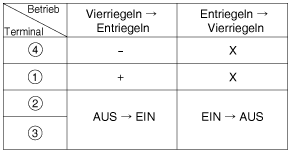
Die Überprüfung der Heckklappe bei vorhandener elektrischer Betätigung bezieht sich auf das Heckklappenmodul.
Überprüfung des Schalters Zum Öffnen der Heckklappe
Batteriemassekabel (-) abklemmen.
Die Heckklappenverkleidung entfernen.
(Siehe Karosserie - "Heckklappenverkleidung")
Steckverbinder des Heckklappen-Öffnungsschalters abziehen.
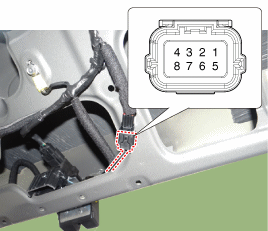
Zwischen den Klemmen in halbverriegeltem Zustand wie unten gezeigt auf Durchgang prüfen.
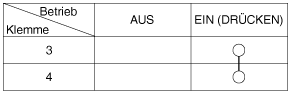
Prüfen des Motorhaubenschalters
Steckverbinder (A) des Motorhaubenschalters abziehen.
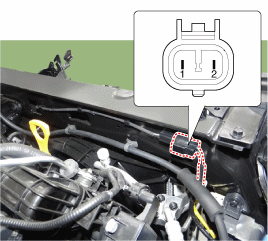
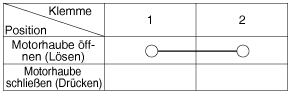
Zwischen den Klemmen und Masse wie unten gezeigt auf Durchgang prüfen.
(Siehe Karosserie - "Haubenschloss")
BERPRÜFUNG DIEBSTAHLHUPE
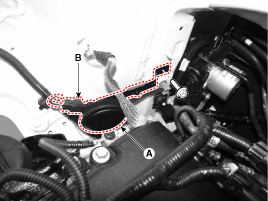
Loosen the mounting bolt, disconnect connector (B), then remove the alarm siren.
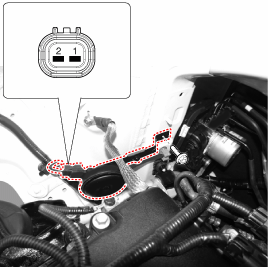
Um die Sirene zu prüfen, B+ an Klemme 2 und Masse an Klemme 1 anlegen.
Test yourself
A quick Kia Stonic quiz: every answer comes with an explanation and a link to the manual page.