Rear Brake Pads
Replacement
PROCEDURE
1. Raise the rear of the vehicle and support it on stands.
2. Remove the rear wheels.
3. Disconnect the parking brake cable first from the bracket, then from the caliper lever.
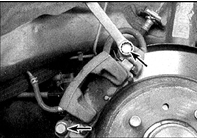
4. Unscrew the caliper guide pins.
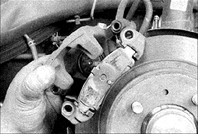
5. Remove the caliper body.
6. After disassembling the caliper, do not depress the brake pedal.
7. Secure the caliper so that the hose is not stretched.
8. Note the orientation of the pad shims and anti-squeal shims (anti-squeal shims are fitted on some vehicles and are located on the upper and lower edges of the pads).

9. Remove the shims.
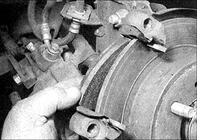
10. Remove the pads.

11. Remove the spring retainers.
12. Check the thickness of the friction linings.
13. If the thickness of at least one lining is below the limit, or the pads are heavily contaminated, replace all pads as a set for one axle.
14. Find and eliminate the cause of contamination.
15. Do not swap pads from side to side to compensate for wear.
16. If the pads are in satisfactory condition, clean them, removing ingrained dirt and large particles.
17. Clean the pad seats in the caliper.
18. Before assembly, check the free movement of the guide pins in the bracket and caliper, and the condition of the rubber boots.
19. Check the condition of the piston seals, the piston for corrosion, and for signs of leakage.
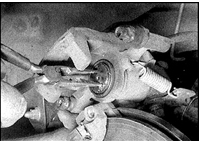
20. If the pads are being replaced, the piston must be pushed back into the cylinder: turn the piston clockwise with round-nose pliers while pressing it into the cylinder.
21. When retracting the piston, monitor the fluid level. Remove excess fluid above the MAX mark on the reservoir using a rubber bulb or syringe.
22. Apply a thin coat of special anti-squeal grease to the pad backing plates, shims and spring clips.
23. Note that new pads are supplied with anti-squeal coating; greasing them is not required.
24. Install the anti-squeal clips, pads and pad retainers in their original positions (clips and retainers are fitted on some vehicles).
25. Install the caliper body. The tab on the back of the pads must engage the recess in the piston.
26. If necessary, rotate the piston.
27. Apply thread-locking compound to the lower caliper guide pin, install the pins and tighten to the specified torque.
28. Check that the caliper slides freely on the guide pins.
29. Connect the parking brake cable in the reverse order of removal, install the cable bracket and spring clip (if equipped). The tab on the bracket must engage the recess in the caliper body.
30. Repeat the above procedure for the brake on the other rear wheel.
31. Adjust the parking brake.
32. Depress the brake pedal several times.
33. Install the wheels and lower the vehicle.
34. Check the fluid level.
35. Before driving, check the brake operation.
Test yourself
A quick Nissan Sunny quiz: every answer comes with an explanation and a link to the manual page.