Master Cylinder
Removal
PROCEDURE
1. Remove the cap and drain the fluid from the reservoir (or pump it out by unscrewing the fitting on the wheel).
2. Disconnect the wires from the fluid level sensor.
3. Clean the fittings on the master cylinder.
4. Mark the fittings so they can be reconnected to their original positions during installation.
5. Loosen the fitting nuts, carefully remove the lines, and plug the openings.
6. Immediately wipe up any spilled fluid.
7. Unscrew the nuts and remove the master cylinder from the vacuum booster.
8. Remove the gasket from the cylinder.
Disassembly. Warning: Before disassembly, obtain a repair kit for the master cylinder type installed on your vehicle.
PROCEDURE
1. Remove the reservoir and take out the reservoir seal (if equipped).
2. Bend back the tabs and remove the cap.
3. On vehicles with ABS, push in the first piston with a wooden drift and loosen the stopper bolt.
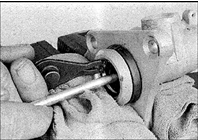
4. Remove the snap ring (if equipped).
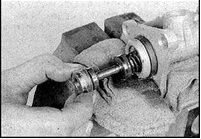
5. Remove the washer, pistons, springs, and cups from the cylinder, noting their installation order. If necessary, push out the piston with compressed air while holding the cylinder in a vise.
6. Thoroughly wash all parts in alcohol or brake fluid and dry them immediately.
7. Inspect all parts. Replace any worn or damaged parts. Note that the master cylinder repair kit includes pistons with seals; seals are not available separately.
8. If the cylinder or piston has scoring, scratches, or signs of corrosion, replace the complete master cylinder.
9. Before assembly, lubricate the piston, cups, and cylinder with brake fluid.
10. Install all parts into the cylinder in their original order.
11. Insert the piston using circular motions to avoid damaging the boot.
12. Install the washer on the end face of the first piston. On vehicles with ABS, the locking bolt must align with the groove in the second piston.
13. On vehicles with ABS, compress the pistons and tighten the locking bolt.
14. Compress the pistons and secure with a new cap (supplied in the repair kit).
15. Bend the tabs of the cap.
16. Check the condition of the reservoir seals and replace if necessary.
17. Fit the seals and install the reservoir.
Installation
PROCEDURE
1. Wipe the surfaces of the cylinder and the vacuum booster and fit a new gasket.
2. Install the cylinder onto the vacuum booster, making sure that the booster pushrod enters the cylinder centrally.
3. Tighten the nuts to the specified torque.
4. Install the lines according to the marks, then screw in and tighten the fittings.
5. Fill the reservoir with brake fluid and bleed air from the hydraulic system.
6. Before driving, check the operation of the brakes.
Test yourself
A quick Nissan Sunny quiz: every answer comes with an explanation and a link to the manual page.