Unlock Warning Switch Circuit
DESCRIPTION
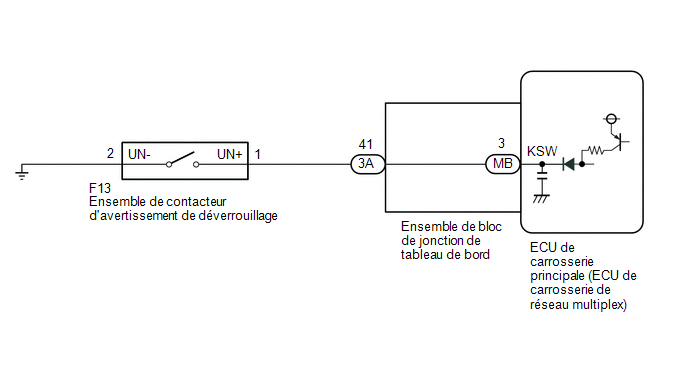
The key unlock warning switch assembly turns on when the key is inserted into the key cylinder and turns off when the key is removed from the key cylinder.
WIRING DIAGRAM
PROCEDURE
READ THE VALUE USING THE TECHSTREAM (KEY UNLOCK WARNING SW)
(a) Connect the Techstream to the DLC3.
(b) Turn the ignition switch to ON.
(c) Turn on the Techstream.
(d) Select the following menus: Body Electrical / Main Body / Data List.
(e) Depending on the Techstream display, record the Data List.
Body Electrical > Main Body > Data ListTester display | Item | Range | Normal Condition | Diagnostic Note |
|---|---|---|---|---|
Key Unlock Warning SW |
Unlock Warning Switch |
ON or OFF |
ON: The key is inserted in the ignition key cylinder. OFF: The key is removed from the ignition key cylinder. |
- |
Key Unlock Warning SW
OK:
When the key is in the key cylinder, "ON" is displayed on the screen.
| OK |  |
GO TO APPLICABLE SYSTEM AS INDICATED IN THE PROBLEM SYMPTOMS TABLE |
|

INSPECT UNLOCK WARNING SWITCH ASSEMBLY
(a) Remove the unlock warning switch assembly.
Click here
(b) Inspect the unlock warning switch assembly.
Click here
| NG | |
REPLACE UNLOCK WARNING SWITCH ASSEMBLY |
|
CHECK THE WIRE HARNESS AND CONNECTOR (INSTRUMENT PANEL JUNCTION BLOCK ASSEMBLY - UNLOCK WARNING SWITCH ASSEMBLY - BODY GROUND)
(a) Disconnect connector 3A from the instrument panel junction block assembly.
(b) Disconnect the F13 unlock warning switch assembly connector.
(c) Measure the resistance according to the value(s) in the table below.
Standard resistance:
Tester Connection | Condition | Specified Condition |
|---|---|---|
3A-41 - F13-1 (UN+) |
Always |
Below 1 Ω |
3A-41 or F13-1 (UN+) - Body ground |
Always |
10 kΩ minimum |
F13-2 (UN-) - Body ground |
Always |
Below 1 Ω |
| NG | |
REPAIR OR REPLACE HARNESS OR CONNECTOR |
|
INSPECT INSTRUMENT PANEL JUNCTION BLOCK ASSEMBLY
(a) Remove the main body ECU (multiplex network body ECU).
Click here
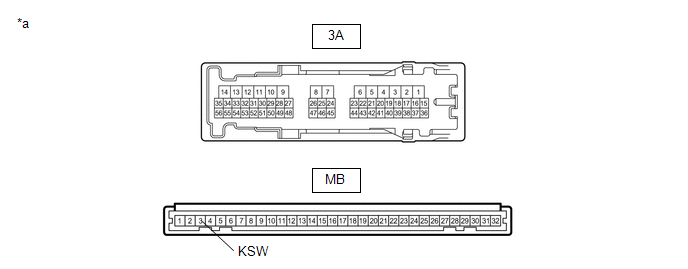
*a |
Component without wire harness connected (instrument panel junction block assembly) |
- |
- |
(b) Disconnect connector 3A from the instrument panel junction block assembly.
(c) Measure the resistance according to the value(s) in the table below.
Standard resistance:
Tester Connection | Condition | Specified Condition |
|---|---|---|
3A-41 - MB-3 (KSW) |
Always |
Below 1 Ω |
| OK | |
REPLACE MAIN BODY ECU (MULTIPLEX NETWORK BODY ECU) |
| NG | |
REPLACE INSTRUMENT PANEL JUNCTION BLOCK ASSEMBLY |