Power Window Switch Malfunction (B2312)
DESCRIPTION
Power window motor assemblies are operated by the multiplex network main switch assembly, the power window switch assembly, or the rear power window switch assemblies. Power window motor assemblies perform the functions of motor, window and ECU.
This DTC is stored when the ECU built into a power window motor assembly and the multiplex network main switch assembly determine that the multiplex network main switch assembly, the power window switch assembly, or the rear power window switch assembly is stuck.
Master SwitchDTC No. | Detection Item | DTC Detection Condition | Suspected Area |
|---|---|---|---|
B2312 |
Power window switch malfunction |
|
Multiplex Network Master Switch Assembly |
Vehicle Operating Conditions |
||||
|---|---|---|---|---|
Sequence 1 | Sequence 2 | Sequence 3 |
||
Diagnostic Condition |
Ignition Switch in ON position |
○ |
○ |
○ |
Malfunction Status |
Multiplex Network Main Switch Assembly Stuck |
○ |
- |
- |
Multiplex Network Main Switch Assembly held in the same position |
- |
○ |
- |
|
Multiplex Network Main Switch Assembly operated |
- |
- |
○ |
|
Detection Duration |
- |
More than 20 seconds |
20 seconds minimum |
|
Number of Trips |
1 trip(s) |
1 trip(s) |
1 trip(s) |
|
HINT:
The DTC is output when the conditions for any one of the sequences in the table above are met.
D Door MotorDTC No. | Detection Item | DTC Detection Condition | Suspected Area |
|---|---|---|---|
B2312 |
Power window switch malfunction |
|
|
Vehicle Operating Conditions |
|||
|---|---|---|---|
Sequence 1 | Sequence 2 |
||
Diagnostic Condition |
Ignition Switch in ON position |
○ |
○ |
Malfunction Status |
Multiplex Network Main Switch Assembly Stuck |
○ |
- |
Multiplex Network Main Switch Assembly held in the same position |
- |
○ |
|
Detection Duration |
- |
More than 20 seconds |
|
Number of Trips |
1 trip(s) |
1 trip(s) |
|
HINT:
The DTC is output when the conditions for any one of the sequences in the table above are met.
P Door MotorDTC No. | Detection Item | DTC Detection Condition | Suspected Area |
|---|---|---|---|
B2312 |
Power window switch malfunction |
|
|
Vehicle Operating Conditions |
|||
|---|---|---|---|
Sequence 1 | Sequence 2 |
||
Diagnostic Condition |
Ignition Switch in ON position |
○ |
○ |
Malfunction Status |
Power Window Switch Assembly Stuck |
○ |
- |
Power Window Switch Assembly held in the same position |
- |
○ |
|
Detection Duration |
- |
More than 20 seconds |
|
Number of Trips |
1 trip(s) |
1 trip(s) |
|
HINT:
The DTC is output when the conditions for any one of the sequences in the table above are met.
RL Door MotorDTC No. | Detection Item | DTC Detection Condition | Suspected Area |
|---|---|---|---|
B2312 |
Power window switch malfunction |
|
|
Vehicle Operating Conditions |
|||
|---|---|---|---|
Sequence 1 | Sequence 2 |
||
Diagnostic Condition |
Ignition Switch in ON position |
○ |
○ |
Malfunction Status |
Rear Power Window Switch Assembly (for left side) stuck |
○ |
- |
Rear Power Window Switch Assembly (for left door) held in the same position |
- |
○ |
|
Detection Duration |
- |
More than 20 seconds |
|
Number of Trips |
1 trip(s) |
1 trip(s) |
|
HINT:
The DTC is output when the conditions for any one of the sequences in the table above are met.
RR Door MotorDTC No. | Detection Item | DTC Detection Condition | Suspected Area |
|---|---|---|---|
B2312 |
Power window switch malfunction |
|
|
Vehicle Operating Conditions |
|||
|---|---|---|---|
Sequence 1 | Sequence 2 |
||
Diagnostic Condition |
Ignition Switch in ON position |
○ |
○ |
Malfunction Status |
Rear Power Window Switch Assembly (for right side) stuck |
○ |
- |
Power Window Switch Assembly (for right door) held in the same position for more than 20 seconds |
- |
○ |
|
Detection Duration |
- |
More than 20 seconds |
|
Number of Trips |
1 trip(s) |
1 trip(s) |
|
HINT:
The DTC is output when the conditions for any one of the sequences in the table above are met.
WIRING DIAGRAM
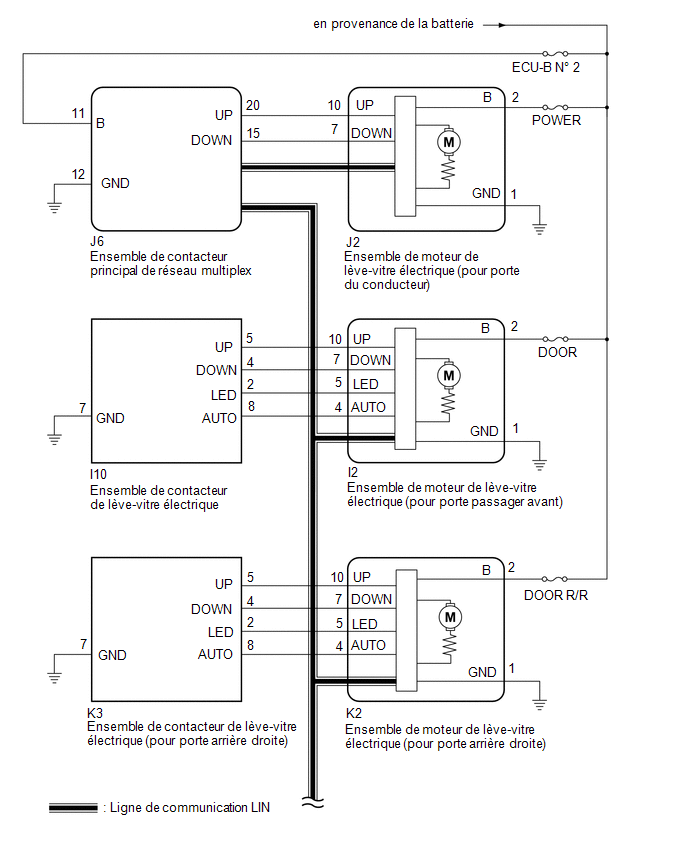
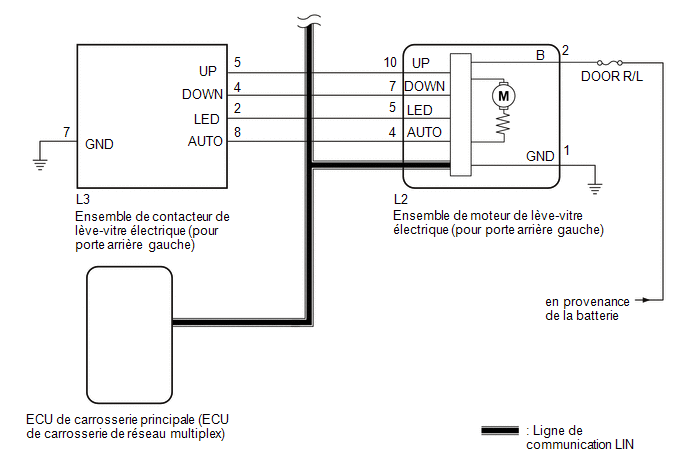
PRECAUTION / NOTICE / HINT
NOTICE:
- DTC B2312 is stored in the multiplex network main switch assembly and in each power window motor assembly.
- If a power window motor assembly has been replaced with a new one, initialize the power window control system.
Click here

- Check the fuses for the circuits related to this system before performing the following procedure.
- The power window control system uses the LIN communication system. Check the communication function by following the procedure described in the HOW TO USE TROUBLESHOOTING section. Perform troubleshooting of the power window control system after confirming that the communication system operates normally.
Click here
HINT:
If DTC B2312 is no longer output after the DTC has been cleared, the DTC was output because the switch was held in the same position continuously.
PROCEDURE
CHECK WHETHER DTCs ARE OUTPUT
(a) Clear the DTCs.
Click here
(b) Check DTCs.
Click here
OK:
DTC B2312 is not output.
| OK |  |
END (DTC IS STORED BECAUSE SWITCH WAS OPERATED FOR AT LEAST 20 SECONDS) |
|

CHECK WHETHER DTCs ARE OUTPUT
(a) Check the parts for which this DTC was output.
Result:
Result | Proceed to |
|---|---|
DTC output by multiplex network main switch assembly |
A |
DTC output by the power window motor assembly (for driver side) |
B |
DTC output by the power window motor assembly (for front passenger side) |
C |
DTC output by the power window motor assembly (for rear LH door) |
D |
DTC output by the power window motor assembly (for rear RH door) |
E |
| A | |
REPLACE MULTIPLEX NETWORK MAIN SWITCH ASSEMBLY |
| C | |
GO TO STEP 7 |
| D | |
GO TO STEP 10 |
| E | |
GO TO STEP 13 |
|
READ VALUE USING TECHSTREAM (D-DOOR MOTOR)
(a) Connect the Techstream to the DLC3.
(b) Turn the ignition switch to ON.
(c) Turn on the Techstream.
(d) Select the following menu items: Body Electrical / D-Door Motor / Data List.
(e) Read the Data List by following the instructions on the Techstream.
Body Electrical > D-Door Motor > Data ListTester display | Item | Range | Normal Condition | Diagnostic Note |
|---|---|---|---|---|
D Door P/W Up SW |
Driver door power window manual UP switch signal |
OFF or ON |
OFF: Driver door power window manual close switch not operated ON: Driver's side door power window manual close switch is operated |
- |
D Door P/W Down SW |
Driver's side door power window manual DOWN switch signal |
OFF or ON |
OFF: Driver's side door power window manual open switch is not operated ON: Driver's side door power window manual open switch is operated |
- |
Tester display |
|---|
D Door P/W Up SW |
D Door P/W Down SW |
OK:
On the Techstream screen, ON or OFF is displayed accordingly.
| OK | |
REPLACE POWER WINDOW MOTOR ASSEMBLY (FOR DRIVER DOOR) |
|
CHECK WIRE HARNESS AND CONNECTOR (MULTIPLEX NETWORK MAIN SWITCH ASSEMBLY - DOOR POWER WINDOW MOTOR ASSEMBLY (FOR DRIVER DOOR))
(a) Disconnect the J6 connector from the multiplex network main switch assy.
(b) Disconnect connector J2 from the power window motor assembly (for driver door).
(c) Measure the resistance according to the value(s) in the table below.
Standard resistance:
Tester Connection | Condition | Specified Condition |
|---|---|---|
J6-20 (UP) or J2-10 (UP) - Body ground |
Always |
10 kΩ minimum |
J6-15 (DOWN) or J2-7 (DOWN) - Body ground |
Always |
10 kΩ minimum |
| NG | |
REPAIR OR REPLACE HARNESS OR CONNECTOR |
|
REPLACE MULTIPLEX NETWORK MAIN SWITCH ASSEMBLY
(a) Replace the multiplex network main switch assembly.
Click here
|
CHECK WHETHER DTCs ARE OUTPUT
(a) Clear the DTCs.
Click here
(b) Check DTCs.
Click here
OK:
DTC B2312 is not output.
| OK | |
END (MULTIPLEX NETWORK MAIN SWITCH ASSEMBLY IS DEFECTIVE) |
| NG | |
REPLACE POWER WINDOW MOTOR ASSEMBLY (FOR DRIVER DOOR) |
READ VALUE USING TECHSTREAM (P-DOOR MOTOR)
(a) Connect the Techstream to the DLC3.
(b) Turn the ignition switch to ON.
(c) Turn on the Techstream.
(d) Select the following menu items: Body Electrical / P-Door Motor / Data List.
(e) Read the Data List by following the instructions on the Techstream.
Body Electrical > P-Door Motor > Data ListTester display | Item | Range | Normal Condition | Diagnostic Note |
|---|---|---|---|---|
P Door P/W Auto SW |
Front passenger side power window auto switch signal |
OFF or ON |
OFF: Front passenger door power window auto close or open switch not operated ON: Front passenger door power window auto close or open switch operated |
- |
P Door P/W Up SW |
Front passenger door power window manual close switch signal |
OFF or ON |
OFF: Front passenger door power window manual close switch not operated ON: Front passenger door power window manual close switch operated |
- |
P Door P/W Down SW |
Front passenger door power window manual open switch signal |
OFF or ON |
OFF: Front passenger door power window manual open switch not operated ON: Front passenger door power window manual open switch operated |
- |
Tester display |
|---|
P Door P/W Auto SW |
P Door P/W Up SW |
P Door P/W Down SW |
OK:
On the Techstream screen, ON or OFF is displayed accordingly.
| OK | |
REPLACE POWER WINDOW MOTOR ASSEMBLY (FOR FRONT PASSENGER DOOR) |
|
INSPECT POWER WINDOW SWITCH ASSY
(a) Remove the power window switch assembly.
Click here
(b) Inspect the power window switch assembly.
Click here
| NG | |
REPLACE POWER WINDOW SWITCH ASSEMBLY |
|
CHECK WIRE HARNESS AND CONNECTOR (POWER WINDOW SWITCH ASSEMBLY - POWER WINDOW MOTOR ASSEMBLY (FOR FRONT PASSENGER DOOR))
(a) Disconnect the I2 connector from the power window motor assembly (for front passenger door).
(b) Measure the resistance according to the value(s) in the table below.
Standard resistance:
Tester Connection | Condition | Specified Condition |
|---|---|---|
I10-5 (UP) or I2-10 (UP) - Body ground |
Always |
10 kΩ minimum |
I10-8 (AUTO) or I2-4 (AUTO) - Body Ground |
Always |
10 kΩ minimum |
I10-4 (DOWN) or I2-7 (DOWN) - Body Ground |
Always |
10 kΩ minimum |
| OK | |
REPLACE POWER WINDOW MOTOR ASSEMBLY (FOR FRONT PASSENGER DOOR) |
| NG | |
REPAIR OR REPLACE HARNESS OR CONNECTOR |
READ THE VALUE DISPLAYED BY THE TECHSTREAM (RL-DOOR MOTOR)
(a) Connect the Techstream to the DLC3.
(b) Turn the ignition switch to ON.
(c) Turn on the Techstream.
(d) Select the following menu items: Body Electrical / RL-Door Motor / Data List.
(e) Read the Data List by following the instructions on the Techstream.
Body Electrical > RL-Door Motor > Data ListTester display | Item | Range | Normal Condition | Diagnostic Note |
|---|---|---|---|---|
RL Door P/W Auto SW |
Rear left door power window auto switch signal |
OFF or ON |
OFF: Rear left door power window auto close or open switch not operated ON: Rear left door power window auto close or open switch operated |
- |
RL Door P/W Up SW |
Rear left door power window manual close switch signal |
OFF or ON |
OFF: Rear left door power window manual close switch not operated ON: Rear left door power window manual close switch operated |
- |
RL Door P/W Down SW |
Rear left door power window manual open switch signal |
OFF or ON |
OFF: Rear left door power window manual open switch not operated ON: Rear left door power window manual open switch operated |
- |
Tester display |
|---|
RL Door P/W Auto SW |
RL Door P/W Up SW |
RL Door P/W Down SW |
OK:
On the Techstream screen, ON or OFF is displayed accordingly.
| OK | |
REPLACE POWER WINDOW MOTOR ASSEMBLY (FOR REAR LH DOOR) |
|
INSPECT REAR POWER WINDOW SWITCH ASSEMBLY (FOR REAR LH DOOR)
(a) Remove the rear power window switch assembly (for LH door).
Click here
(b) Inspect the rear power window switch assembly (for LH door).
Click here
| NG | |
REPLACE REAR POWER WINDOW SWITCH ASSEMBLY (FOR LH DOOR) |
|
INSPECT WIRE HARNESS AND CONNECTOR (REAR POWER WINDOW SWITCH ASSEMBLY (FOR LH DOOR) - POWER WINDOW MOTOR ASSEMBLY (FOR REAR LH DOOR))
(a) Disconnect the L2 connector from the power window motor assembly (for rear left door).
(b) Measure the resistance according to the value(s) in the table below.
Standard ResistanceTester Connection | Condition | Specified Condition |
|---|---|---|
L3-5 (UP) or L2-10 (UP) - Body Ground |
Always |
10 kΩ minimum |
L3-4 (DOWN) or L2-7 (DOWN) - Body Ground |
Always |
10 kΩ minimum |
L3-8 (AUTO) or L2-4 (AUTO) - Body Ground |
Always |
10 kΩ minimum |
| OK | |
REPLACE POWER WINDOW MOTOR ASSEMBLY (FOR REAR LH DOOR) |
| NG | |
REPAIR OR REPLACE HARNESS OR CONNECTOR |
READ THE VALUE DISPLAYED BY THE TECHSTREAM (RR-DOOR MOTOR)
(a) Connect the Techstream to the DLC3.
(b) Turn the ignition switch to ON.
(c) Turn on the Techstream.
(d) Select the following menu items: Body Electrical / RR-Door Motor / Data List.
(e) Read the Data List by following the instructions on the Techstream.
Body Electrical > RR-Door Motor > Data ListTester display | Item | Range | Normal Condition | Diagnostic Note |
|---|---|---|---|---|
RR Door P/W Auto SW |
Rear right door power window auto switch signal |
OFF or ON |
OFF: Rear right door power window auto close or open switch not operated ON: Rear right door power window auto close or open switch operated |
- |
RR Door P/W Up SW |
Rear right door power window manual close switch signal |
OFF or ON |
OFF: Rear right door power window manual close switch not operated ON: Rear right door power window manual close switch operated |
- |
RR Door P/W Down SW |
Rear right door power window manual open switch signal |
OFF or ON |
OFF: Rear right door power window manual open switch not operated ON: Rear right door power window manual open switch operated |
- |
Tester display |
|---|
RR Door P/W Auto SW |
RR Door P/W Up SW |
RR Door P/W Down SW |
OK:
On the Techstream screen, ON or OFF is displayed accordingly.
| OK | |
REPLACE POWER WINDOW MOTOR ASSEMBLY (FOR REAR RH DOOR) |
|
CHECK REAR POWER WINDOW SWITCH ASSEMBLY (FOR RIGHT DOOR)
(a) Remove the rear power window switch assembly (for RH door).
Click here
(b) Inspect the rear power window switch assembly (for RH door).
Click here
| NG | |
REPLACE REAR POWER WINDOW SWITCH ASSEMBLY (FOR RH DOOR) |
|
INSPECT WIRE HARNESS AND CONNECTOR (REAR POWER WINDOW SWITCH ASSEMBLY (FOR RH DOOR) - POWER WINDOW MOTOR ASSEMBLY (FOR REAR RH DOOR))
(a) Disconnect the K2 connector from the power window motor assembly (for rear right door).
(b) Measure the resistance according to the value(s) in the table below.
Standard ResistanceTester Connection | Condition | Specified Condition |
|---|---|---|
K3-5 (UP) or K2-10 (UP) - Body Ground |
Always |
10 kΩ minimum |
K3-4 (DOWN) or K2-7 (DOWN) - Body Ground |
Always |
10 kΩ minimum |
K3-8 (AUTO) or K2-4 (AUTO) - Body Ground |
Always |
10 kΩ minimum |
| OK | |
REPLACE POWER WINDOW MOTOR ASSEMBLY (FOR REAR RH DOOR) |
| NG | |
REPAIR OR REPLACE HARNESS OR CONNECTOR |