Power Window Motor Malfunction (B2311)
DESCRIPTION
Power window motor assemblies are operated by the multiplex network main switch assembly, the power window switch assembly, or the rear power window switch assemblies. Power window motor assemblies perform the functions of motor, window and ECU.
This DTC is stored when a power window motor assembly malfunctions, or when the ECU built into the power window motor assembly determines that the fully closed position of the power window has deviated by approximately 20 mm (0.787 in.) or more from the normal position.
D Door MotorDTC No. | Detection Item | DTC Detection Condition | Suspected Area |
|---|---|---|---|
B2311 |
Power window motor malfunction |
|
|
Vehicle Operating Conditions |
|||
Sequence 1 |
Sequence 2 |
||
Diagnostic Condition |
During operation of the fully closed position system |
- |
○ |
Malfunction Status |
The power window motor assembly (for driver door) malfunctions |
○ |
- |
The window position has deviated by approximately 20 mm (0.787 in.) or more from the normal position |
- |
○ |
|
Detection Duration |
- |
- |
|
Number of Trips |
1 trip(s) |
1 trip(s) |
|
HINT:
The DTC is output when the conditions for any one of the sequences in the table above are met.
P Door MotorDTC No. | Detection Item | DTC Detection Condition | Suspected Area |
|---|---|---|---|
B2311 |
Power window motor malfunction |
|
|
Vehicle Operating Conditions |
|||
Sequence 1 |
Sequence 2 |
||
Diagnostic Condition |
During operation of the fully closed position system |
- |
○ |
Malfunction Status |
The power window motor assembly (for front passenger door) malfunctions |
○ |
- |
The window position has deviated by approximately 20 mm (0.787 in.) or more from the normal position |
- |
○ |
|
Detection Duration |
- |
- |
|
Number of Trips |
1 trip(s) |
1 trip(s) |
|
HINT:
The DTC is output when the conditions for any one of the sequences in the table above are met.
RL Door MotorDTC No. | Detection Item | DTC Detection Condition | Suspected Area |
|---|---|---|---|
B2311 |
Power window motor malfunction |
|
|
Vehicle Operating Conditions |
|||
Sequence 1 |
Sequence 2 |
||
Diagnostic Condition |
During operation of the fully closed position system |
- |
○ |
Malfunction Status |
The power window motor assembly (for rear LH door) malfunctions |
○ |
- |
The window position has deviated by approximately 20 mm (0.787 in.) or more from the normal position |
- |
○ |
|
Detection Duration |
- |
- |
|
Number of Trips |
1 trip(s) |
1 trip(s) |
|
HINT:
The DTC is output when the conditions for any one of the sequences in the table above are met.
RR Door MotorDTC No. | Detection Item | DTC Detection Condition | Suspected Area |
|---|---|---|---|
B2311 |
Power window motor malfunction |
|
|
Vehicle Operating Conditions |
|||
Sequence 1 |
Sequence 2 |
||
Diagnostic Condition |
During operation of the fully closed position system |
- |
○ |
Malfunction Status |
The power window motor assembly (for rear RH door) malfunctions |
○ |
- |
The window position has deviated by approximately 20 mm (0.787 in.) or more from the normal position |
- |
○ |
|
Detection Duration |
- |
- |
|
Number of Trips |
1 trip(s) |
1 trip(s) |
|
HINT:
The DTC is output when the conditions for any one of the sequences in the table above are met.
WIRING DIAGRAM
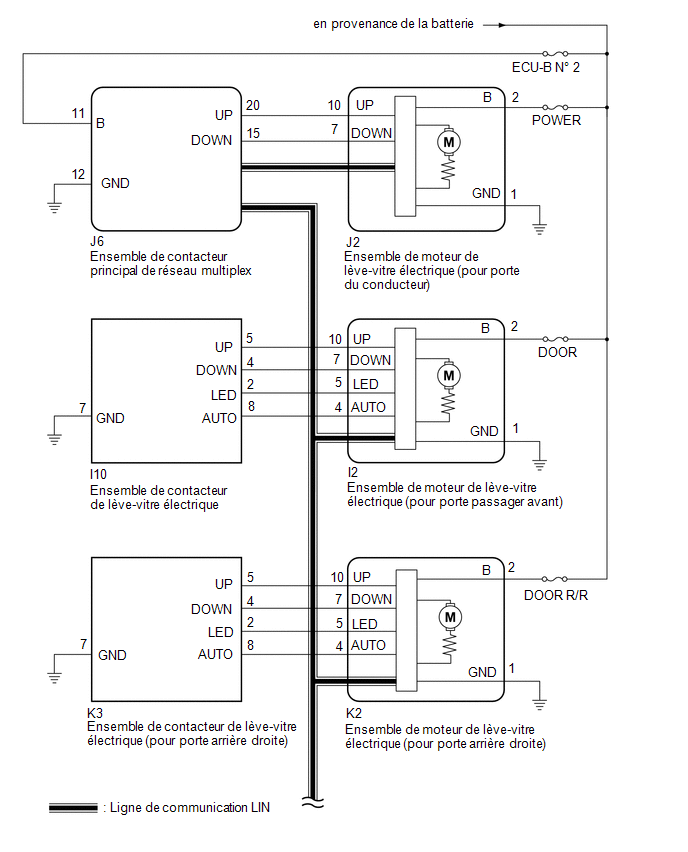
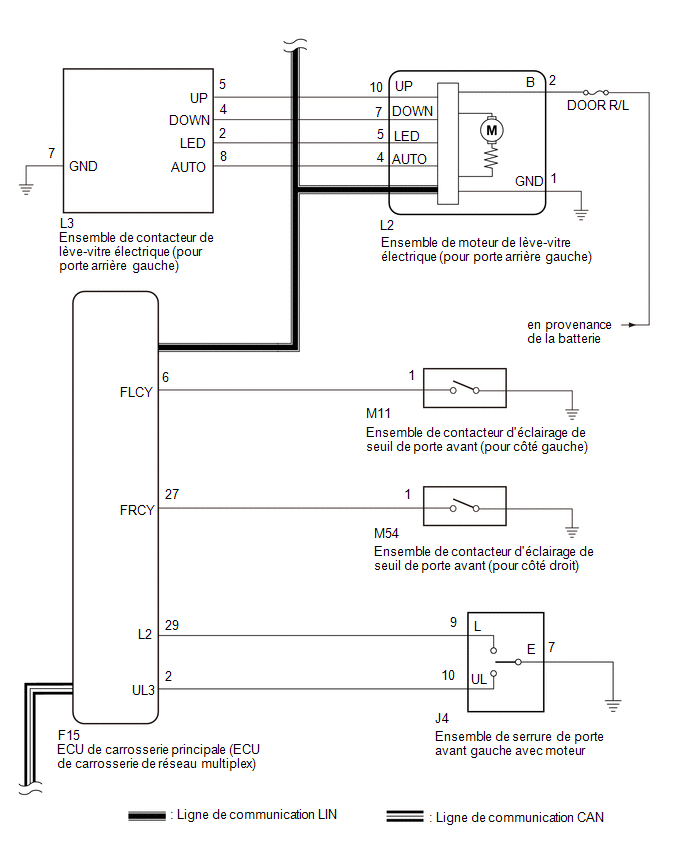
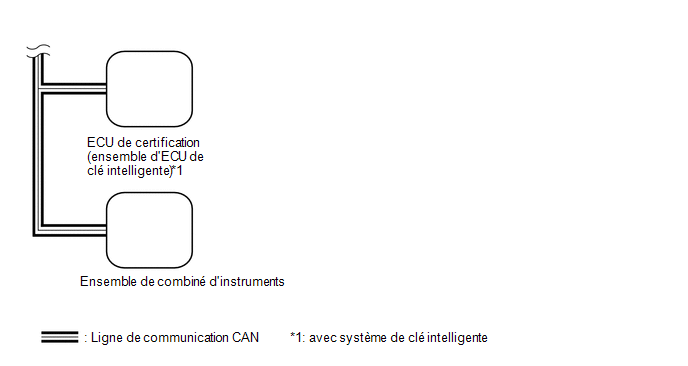
PRECAUTION / NOTICE / HINT
NOTICE:
- DTC B2311 is stored in each power window motor assembly.
- If a power window motor assembly has been replaced with a new one, initialize the power window control system.
Click here

- If a power window regulator motor assembly and a door window regulator sub-assembly have been removed and installed, or if a power window regulator motor assembly has been reused when a door window or door window guide has been replaced, initialize the power window control system.
Click here
- Check the fuses for the circuits related to this system before performing the following procedure.
- The power window control system uses the LIN communication system. Check the communication function by following the procedure described in the HOW TO USE TROUBLESHOOTING section. Perform troubleshooting of the power window control system after confirming that the communication system operates normally.
Click here
PROCEDURE
CHECK WHETHER DTCs ARE OUTPUT
(a) Clear the DTCs.
Click here
(b) Check DTCs.
Click here
OK:
DTC B2311 is not output.
| OK |  |
USE SIMULATION METHOD TO CHECK |
|

CHECK WHETHER DTCs ARE OUTPUT
(a) Check the parts for which this DTC was output.
Result:
Result | Proceed to |
|---|---|
DTC output by the power window motor assembly (for driver side) |
A |
DTC output by the power window motor assembly (for front passenger side) |
B |
DTC output by the power window motor assembly (for rear LH door) |
C |
DTC output by the power window motor assembly (for rear RH door) |
D |
| B | |
GO TO STEP 4 |
| C | |
GO TO STEP 5 |
| D | |
GO TO STEP 6 |
|
CHECK WIRE HARNESS AND CONNECTOR (POWER WINDOW MOTOR ASSEMBLY (FOR DRIVER DOOR) - BATTERY AND BODY GROUND)
(a) Measure the voltage according to the value(s) shown in the table below. Standard voltage:
|
|
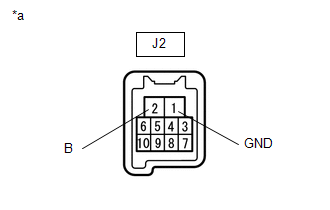
(b) Measure the resistance according to the value(s) in the table below.
Standard resistance:
Tester Connection | Condition | Specified Condition |
|---|---|---|
J2-1 (GND) - Body ground |
Always |
Below 1 Ω |
| OK | |
GO TO STEP 7 |
| NG | |
REPAIR OR REPLACE HARNESS OR CONNECTOR |
CHECK WIRE HARNESS AND CONNECTOR (POWER WINDOW MOTOR ASSEMBLY (FOR FRONT PASSENGER DOOR) - BATTERY AND BODY GROUND)
(a) Measure the voltage according to the value(s) shown in the table below. Standard voltage:
|
|
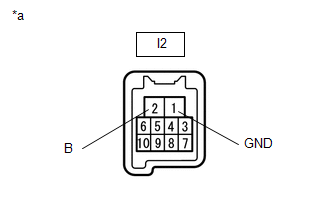
(b) Measure the resistance according to the value(s) in the table below.
Standard resistance:
Tester Connection | Condition | Specified Condition |
|---|---|---|
I2-1 (GND) - Body ground |
Always |
Below 1 Ω |
| OK | |
GO TO STEP 7 |
| NG | |
REPAIR OR REPLACE HARNESS OR CONNECTOR |
CHECK WIRE HARNESS AND CONNECTOR (POWER WINDOW MOTOR ASSEMBLY (FOR REAR LH DOOR) - BATTERY AND BODY GROUND)
(a) Measure the voltage according to the value(s) shown in the table below. Standard voltage:
|
|
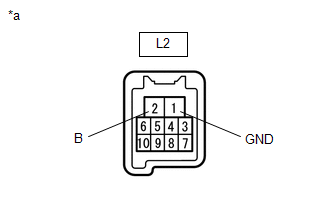
(b) Measure the resistance according to the value(s) in the table below.
Standard resistance:
Tester Connection | Condition | Specified Condition |
|---|---|---|
L2-1 (GND) - Body ground |
Always |
Below 1 Ω |
| OK | |
GO TO STEP 7 |
| NG | |
REPAIR OR REPLACE HARNESS OR CONNECTOR |
CHECK WIRE HARNESS AND CONNECTOR (POWER WINDOW MOTOR ASSEMBLY (FOR REAR LH DOOR) - AUXILIARY BATTERY AND BODY GROUND)
(a) Measure the voltage according to the value(s) shown in the table below. Standard voltage:
|
|
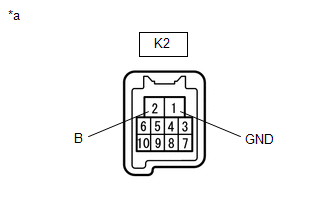
(b) Measure the resistance according to the value(s) in the table below.
Standard resistance:
Tester Connection | Condition | Specified Condition |
|---|---|---|
K2-1 (GND) - Body ground |
Always |
Below 1 Ω |
| NG | |
REPAIR OR REPLACE HARNESS OR CONNECTOR |
|
PERFORM ACTIVE TEST USING TECHSTREAM (APPLICABLE LOCATION)
(a) Connect the Techstream to the DLC3.
(b) Turn the ignition switch to ON.
(c) Turn on the Techstream.
(d) Select the following menu items: Body Electrical / (desired system) / Active Test.
HINT:
Perform the active test of the power window motor assembly whose ECU stored DTC B2311.
(e) Perform the Active Test by following the Techstream instructions.
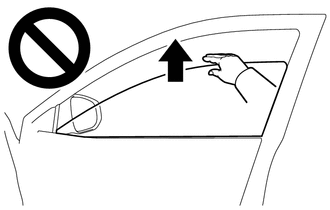
CAUTION:
During this test, take care not to injure yourself on moving vehicle parts. During the Active Test, the anti-pinch function does not operate.
 Body Electrical > D-Door Motor > Active Test
Tester display | Item | Control Range | Diagnostic Note |
|---|---|---|---|
Power Window |
Power Window |
OFF / DOWN / UP |
- |
Tester display | Item | Control Range | Diagnostic Note |
|---|---|---|---|
Power Window |
Power Window |
OFF / DOWN / UP |
- |
Tester display | Item | Control Range | Diagnostic Note |
|---|---|---|---|
Power Window |
Power Window |
OFF / DOWN / UP |
- |
Tester display | Item | Control Range | Diagnostic Note |
|---|---|---|---|
Power Window |
Power Window |
OFF / DOWN / UP |
- |
Power Window
Body Electrical > P-Door Motor > Active TestPower Window
Body Electrical > RL-Door Motor > Active TestPower Window
Body Electrical > RR-Door Motor > Active TestPower Window
OK:
Each power window operates normally.
Result:
Result | Proceed to |
|---|---|
OK |
A |
NG (driver side power window) |
B |
NG (front passenger door window) |
|
NG (rear LH side power window) |
C |
NG (rear RH side power window) |
| B | |
REPLACE POWER WINDOW MOTOR ASSEMBLY (FOR DRIVER DOOR OR FRONT PASSENGER DOOR) |
| C | |
REPLACE POWER WINDOW MOTOR ASSEMBLY (FOR REAR LH DOOR OR REAR RH DOOR) |
|
PERFORM INITIALIZATION (APPLICABLE LOCATION)
(a) Initialize the power window motor assembly.
Click here
HINT:
Initialize the power window motor assembly whose ECU stored DTC B2311.
|
CHECK POWER WINDOW CONTROL SYSTEM (APPLICABLE LOCATION)
(a) Confirm that the power window operates normally by opening and closing it.
Click here
HINT:
Check the operation of the power window for which DTC B2311 was stored.
OK:
Each power window operates normally.
Result:
Result | Proceed to |
|---|---|
OK |
A |
NG (driver side power window) |
B |
NG (front passenger door window) |
|
NG (rear LH side power window) |
C |
NG (rear RH side power window) |
| B | |
REPLACE POWER WINDOW MOTOR ASSEMBLY (FOR DRIVER DOOR OR FRONT PASSENGER DOOR) |
| C | |
REPLACE POWER WINDOW MOTOR ASSEMBLY (FOR REAR LH DOOR OR REAR RH DOOR) |
|
CHECK WHETHER COMPONENT PARTS ARE INSTALLED CORRECTLY
(a) Check that the power window components are installed correctly.
OK:
The power window components are installed correctly.
| NG | |
INSTALL PARTS CORRECTLY |
|
CHECK WHETHER DTCs ARE OUTPUT
(a) Turn the ignition switch OFF.
(b) Wait at least 10 seconds, then turn the ignition switch to ON.
(c) Check the DTCs.
Click here
OK:
DTC B2311 is not output.
Result:
Result | Proceed to |
|---|---|
OK |
A |
NG (driver side power window) |
B |
NG (front passenger door window) |
|
NG (rear LH side power window) |
C |
NG (rear RH side power window) |
| A | |
END |
| B | |
REPLACE POWER WINDOW MOTOR ASSEMBLY (FOR DRIVER DOOR OR FRONT PASSENGER DOOR) |
| C | |
REPLACE POWER WINDOW MOTOR ASSEMBLY (FOR REAR LH DOOR OR REAR RH DOOR) |