On-board diagnostic system
* This trouble code reading procedure does not apply to vehicles manufactured from 1996 onward that are equipped with the OBD-II system. Diagnosing these vehicles requires a special scan tool that reads various levels of coded information. If the on-board computer fails, the vehicles must be diagnosed at a dealer service department or a specialized repair shop.
The electronic control unit has a self-diagnostic system that detects and identifies faults throughout the system. When the control unit detects a fault, the following occurs: the CHECK ENGINE warning light illuminates, the type of fault is identified, and diagnostic codes are recorded and stored in memory. The electronic control unit stores fault codes assigned to each specific type of fault. These codes are erased when the electronic fuel injection system fuse is replaced with the ignition switched off.
The CHECK ENGINE warning light on the instrument panel illuminates when the ignition key is turned to the ON position (engine not running). After the engine starts, the light should go out. If the warning light does not go out, the self-diagnostic system has detected a fault.
Reading Diagnostic Trouble Codes
On-Board Diagnostic System – Diagnostic Trouble Codes
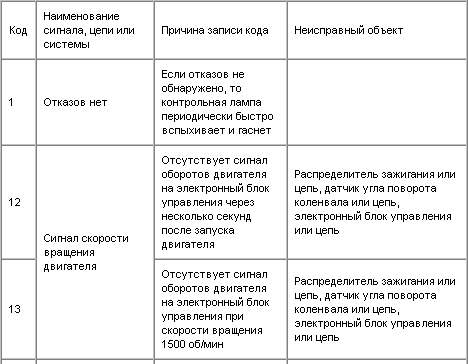

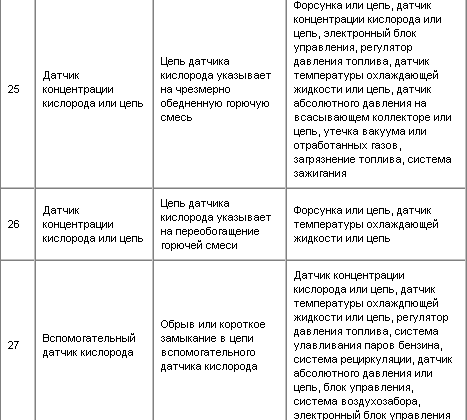

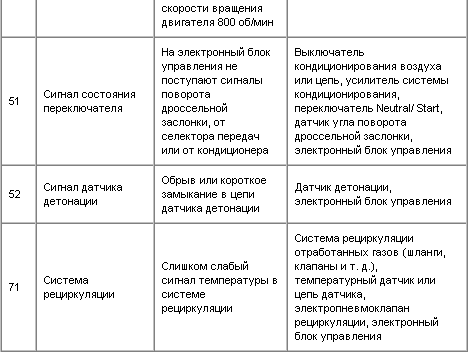
Reading
PROCEDURE
1. To read diagnostic trouble codes, first make sure that the battery voltage is at least 11 V, the throttle valve is fully closed, the transmission shift lever is in neutral, the switches on the instrument panel are off, and the engine has reached normal operating temperature.
2. Turn the ignition key to the ON position (do not start the engine).
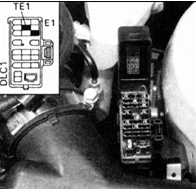
3. Short terminals TE1 and E1 of the diagnostic connector together using a jumper wire.
* Access to the self-diagnostic system is provided either through diagnostic connector N1, located in the engine compartment, or through diagnostic connector N2, mounted under the instrument panel on the driver's side.
4. Read the diagnostic code by counting the flashes of the CHECK ENGINE warning light on the instrument panel. The normal system condition corresponds to code N1 on all vehicles. Code N1 is shown by the warning light flashing periodically at 0.25-second intervals.
5. The code number is displayed and read as follows. First, a series of flashes is shown, the number of which corresponds to the first digit of the code, followed by a pause, then a second series of flashes, the number of which corresponds to the second digit of the code. For example, code 24 (intake air temperature sensor code) is displayed as follows: two flashes first, then a pause, and then 4 more flashes. The duration of the flashes is the same, but the pause durations between the digits of the code differ. The only exception is code 1 (normal operation), which flashes continuously without pauses.
6. If there are any faults in the system, the corresponding fault codes are stored in the computer memory, and the light will flash as many times as needed to identify the fault code. If more than one fault code is stored in memory, these codes will be displayed in ascending order (from lowest to highest), with a pause between them. After the warning light has displayed the code with the largest number of flashes, there is another pause, and the entire code display sequence repeats from the beginning.
* When diagnostic trouble codes 25, 26, 27 and 71 are displayed, a special self-diagnostic function called "double-check logic" is used. The essence is that the final fault record is stored in memory based on data from two driving cycles of the vehicle. First, during the trip, the code with the specified number is temporarily stored in memory. Then the engine must be stopped, after which it is started again and a second trip is made. After the second trip, the fault is permanently stored in the memory of the electronic control unit. This procedure ensures that a persistent fault is recorded and eliminates false recording. In principle, the self-diagnostic system ensures persistent recording of faults with the specified codes; however, if the owner wants to verify the reliability of the code recording, two confirmation trips must be made and the codes checked for retention.
7. To correctly interpret the codes by the indicator lamp flashes, carefully observe the pauses between the end of one code and the start of the next. Otherwise, the number of flashes may be misidentified and the code display misinterpreted. (The duration of the pauses depends on the model year.)
Cancel
PROCEDURE
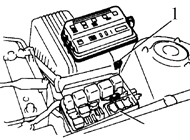
1. After replacing or repairing the faulty component, the fault code stored in the computer memory must be cleared. To do this, with the ignition switched off, remove the 15 A fuse (1) of the electronic fuel injection system for at least 10 seconds.
2. The stored code can also be cleared by disconnecting the battery ground cable; however, this will also erase other useful information (clock settings or radio presets).
3. If the diagnostic code is not cleared, it will remain stored in the memory of the electronic control unit and will appear along with new codes if further faults are detected.
4. If any work on the engine requires disconnecting the battery ground cable, always check the diagnostic code record beforehand.
Test yourself
A quick Toyota Corolla quiz: every answer comes with an explanation and a link to the manual page.