Exhaust Manifold
* Perform the work on a cold engine.
Removal
PROCEDURE
1. Disconnect the battery ground cable.

2. Remove the five mounting bolts (indicated by arrows) and remove the upper heat shield from the manifold.
* The design also includes a lower shield, which is attached to the manifold from below. It does not need to be removed.
3. Soak the exhaust manifold nuts and bolts and the nuts securing the exhaust pipe to the manifold with penetrating fluid. After soaking, remove the nuts securing the exhaust pipe.

4. Remove the upper bolt (upper arrow) securing the exhaust manifold bracket (if equipped). Loosen the two manifold bracket bolts securing it to the cylinder block (lower arrows).
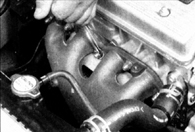
5. Remove the nuts and bolts and remove the manifold together with the gasket.
Installation
PROCEDURE
1. Scrape all gasket material residue and carbon deposits from the mating surfaces of the manifold and cylinder head. If there are signs of leakage through the gasket, check the manifold mating surface for distortion at a specialist workshop and resurface if necessary.
2. Install a new gasket over the manifold mounting studs on the cylinder head. The markings on the gasket must face away from the cylinder head, and the arrow must point toward the transmission.
3. Install the exhaust manifold and install the bolts and nuts in their original positions.
4. Tighten the nuts and bolts in three or four steps to the specified torque (see subsection 3.1.1.1). Tighten the bolts and nuts from the center toward the outer edge of the manifold.
5. Install the remaining components in the reverse order of removal.
6. Start the engine and check the exhaust manifold connections for leaks.
Test yourself
A quick Toyota Corolla quiz: every answer comes with an explanation and a link to the manual page.