Intake Manifold
Removal
* If the intake manifold bolts are removed only to remove the cylinder head, the manifold can simply be disconnected from the head and moved aside toward the engine compartment wall without disconnecting the hoses, wiring or mechanical linkages. The procedures for removing the intake manifold as a separate unit are described below.
PROCEDURE
1. Disconnect the battery ground cable.
2. Remove the throttle body and throttle linkage, referring to the procedure in Subsection 5.12. Depressurize the fuel system, observing all precautions.
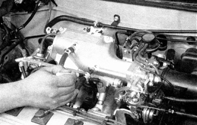
3. Mark and disconnect the crankcase ventilation hoses and other vacuum hoses from the intake manifold, including the manifold absolute pressure sensor hose, the brake booster vacuum hose and the idle air control valve hose for air conditioning activation.
4. The intake manifold can be removed together with the injectors and the fuel rail. If the injectors must be removed from the intake manifold, refer to Subsection 3.2.21.
5. Disconnect the EGR valve connector (if equipped), mark and disconnect the vacuum hoses from the EGR pipe, remove the bolts and remove the pipe from the intake manifold. Move the pipe assembly aside. On 1.3 L engines, disconnect the wiring connector from the control air valve and the hoses from the air intake pipe.
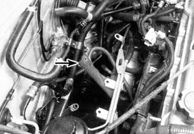
6. Remove the upper bolt securing the intake manifold support (indicated by arrow), working from under the vehicle.
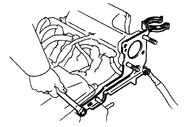
7. On vehicles with 1.6 L and 1.8 L engines built from 1993 to 1995, remove the intake manifold bracket from the cylinder head.
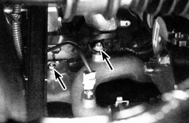
8. Working from under the vehicle, remove the wiring harness bolt (right arrow) from the coolant pipe and cylinder head, then remove the lower manifold bolts (one indicated by the left arrow) and the two nuts securing the pair of steel shields to the lower part of the manifold.
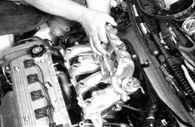
9. Disconnect the ground strap, remove the nuts and bolts and remove the intake manifold from the vehicle.
Installation
PROCEDURE
1. Clean the sealing surfaces of the intake manifold and cylinder head with lacquer thinner or acetone. If there are signs of leakage through the gasket, check the intake manifold mating surface for distortion at a specialist workshop and resurface if necessary.
2. On 1.6 L and 1.8 L engines, the intake manifold consists of two sections, so the new gasket set includes a gasket for the air chamber cover. Do not remove the air chamber cover except in case of leakage at the joint or if the gasket has reached the end of its service life. If the gasket needs to be replaced, unscrew the cover bolts, clean the surfaces, install a new gasket and install the cover. Tighten the cover bolts to the torque specified in subsection 3.1.1.1.
3. Install a new gasket, install the intake manifold in place, and install the nuts and bolts.
4. Tighten the nuts and bolts in three or four steps to the specified torque (see subsection 3.1.1.1). Tighten the bolts and nuts from the center toward the outer edge of the manifold to prevent distortion.
5. Install the remaining components in the reverse order of removal.
6. Before starting the engine, check that the throttle valve linkage moves smoothly.
7. Start the engine and check the vacuum connections for leaks and check for coolant leaks.
8. Take the vehicle on a test drive and check the operation of all auxiliary systems and units, including the cruise control system.
Test yourself
A quick Toyota Corolla quiz: every answer comes with an explanation and a link to the manual page.