Oil Pan

Locations for applying RTV sealant to the oil pan mating surface (engines 1.3 and 1.6 L)

Locations for applying RTV sealant to the oil pan mating surface (engines 1.8 L)
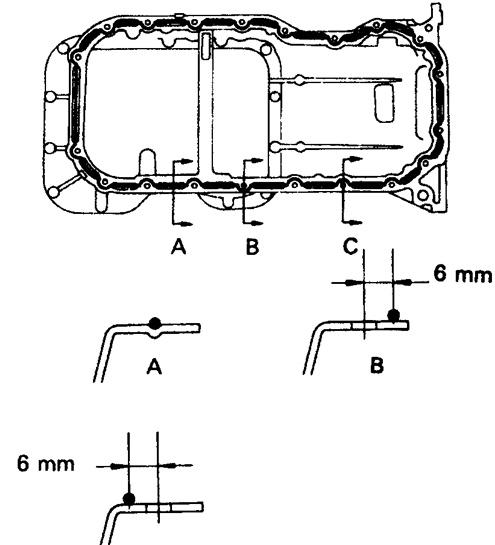
Locations for applying RTV sealant to the reinforcement section of the engine and transmission (engines 1.8 L)
Removal
PROCEDURE
1. Disconnect the battery ground cable.
2. Apply the parking brake and chock the rear wheels.
3. Raise the front of the vehicle and support it on stands.
4. Remove the two plastic engine splash shields.
5. Drain the engine oil and remove the oil filter. Remove the oil level indicator tube and the dipstick.
6. Disconnect the connector from the oxygen sensor.
7. Remove the two nuts securing the front exhaust pipe section to the exhaust manifold, and the two bolts (with nuts) securing the pipe to the rear muffler section.
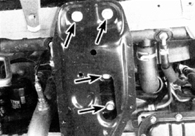
8. Remove the two bolts (arrows) securing the body frame side bracket and the two nuts (arrows) securing the engine mount on the radiator side.
Engines 1.3 and 1.6 L

9. On engines 1.6 L, remove the bolts (indicated by arrows) and remove the transmission-to-engine bracket.
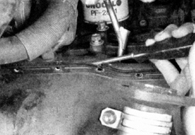
10. Remove the bolts and remove the oil pan. If the pan is stuck and cannot be removed, try to loosen it by very carefully prying it with a small screwdriver or scraper. Do not damage the mating surfaces of the cylinder block and oil pan during removal, otherwise oil leaks may occur.
Engines 1.8 L
11. On engines 1.8 L, the steel oil pan is attached to the aluminum alloy reinforcement section, which is designed to increase the rigidity of the transmission-to-engine mounting. The bracket provided on engines 1.6 L is not present.
* The manufacturer specifies a high-strength sealant for the oil pan gasket, which makes it difficult to separate the steel pan from the aluminum partition. Break the seal with a scraper, working carefully and without rushing.

12. Remove the bolts and the studs' nuts around the perimeter of the oil pan, then carefully pry the pan by inserting a tool between the pan and the aluminum section. Do not damage the soft surface of the section or the mating surface of the pan.
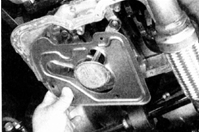
13. Remove the two bolts and two nuts securing the oil baffle plate and remove the plate. Remove the bolts securing the oil pickup with the strainer and remove the pickup for cleaning.
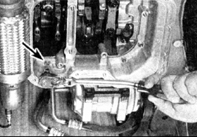
14. If necessary, remove the nuts and bolts securing the reinforcement section to the cylinder block and transmission. Carefully pry and remove the section, taking care not to scratch the mating surface. Six bolts are located in the area that was covered by the oil pan. One of the bolts has a hex socket head (indicated by arrow).
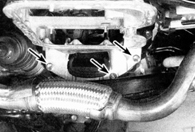
15. To access the bolts between the reinforcement section and the transmission (indicated by arrows), it will be necessary to bend the exhaust pipe down at the flexible joint and lower the body frame side bracket.
* Do not apply force to the section until you have made sure that all fasteners are removed. Two hex socket bolts are located at the front right of the section. To remove them, a hex key with a swivel head is required. If such a key is not available (which allows loosening an internal hex bolt at a slight angle), remove the A/C compressor and bracket (see subsection 4.12), after which the bolts can be loosened with a standard L-shaped hex key.
Installation
PROCEDURE
1. Thoroughly scrape residual sealant material from the mating surfaces of the cylinder block and oil pan. Clean the sealing surfaces with lacquer thinner or acetone.
2. Make sure the threaded holes in the cylinder block are clean.
3. Check the oil pan mating surface for distortion, especially near the bolt holes. If necessary, straighten the mating surface with a hammer while the pan rests on a wooden board.
4. Check the condition of the oil pickup, check for cracks and clogging of the strainer. On engines 1.3 and 1.6 L, thoroughly clean the oil pickup (if removed) and replace the O-ring before installation. Tighten the oil pickup bolts and nuts to the torque specified in subsection 3.1.1.1).
5. Apply beads of sealant about 5 mm in diameter to the mating surface of the oil pan (on engines 1.3 and 1.6 L) (see figure. Locations for RTV sealant on the oil pan mating surface (engines 1.3 and 1.6 L)) or the reinforcement section (on engines 1.8 L) (see figure. Locations for RTV sealant on the engine and transmission reinforcement section (engines 1.8 L)).
* The part must be installed no later than 5 minutes after applying the sealant.
6. Carefully install the oil pan (or reinforcement section) onto the cylinder block and install the bolts. Tighten the oil pan bolts in three or four steps to the torque specified in subsection 3.1.1.1), starting from the center. On engines 1.8 L, install the oil baffle plate and the oil pickup with strainer. Replace the oil pickup tube seal. On engines 1.8 L, tighten the aluminum reinforcement section bolts to the specified torque and install the oil pan, after first applying beads of sealant (see figure. Locations for RTV sealant on the oil pan mating surface (engines 1.8 L)).
7. Carry out the remaining installation steps in reverse order. Fill the engine with oil and replace the filter. Replace the exhaust pipe and muffler gaskets.
8. Start the engine and check for leaks.
Test yourself
A quick Toyota Corolla quiz: every answer comes with an explanation and a link to the manual page.