GENERAL INFORMATION
Specifications
Types and Quantities of Lubricants and Fluids
Fuel
Petrol engines
All models except those equipped with AJQ engines:
Unleaded gasoline, not lower than AI-95 (RON 95)
Unleaded gasoline not lower than AI-91 (RON 91) may be used, but engine power will be reduced.
Models with AJQ engines:
Unleaded gasoline not lower than AI-
98. Use of unleaded gasoline minimum RON 95 is permitted, but engine power will be reduced.
Diesel engines
Diesel fuel to DIN EN 590 1) Cetane number not less than 49 Biodiesel fuel to DIN 51606 3) RME Fuel tank Capacity 55 L or 62 L on all-wheel drive models, including reserve 7 L or 8 L on all-wheel drive models Windshield washer Type Water with concentrate S (summer) or W (winter), or alcohol (no more than 15%) with water Capacity 3 L, 5.5 L with headlight washers Engine oil (Also refer to the Automotive chemicals, oils and lubricants subsection.) Type For models from model year 2000 (MJ 00), the service interval (WIV) is extended and new AUDI engine oil requirements apply. Gasoline engines // Diesel engines Built up to 4/99 (MJ 98) 500 00, 501 01, 502 00 // 500 00 + 505 00 or 501 01 + 505 00 From 5/99 (MJ 00) without WIV 500 00, 501 01, 502 00 // 500 00 + 505 00, 505 00, 505 01 From 5/99 (MJ 00) with WIV 503 00, 503 01 // 506 00, 506 01 Audi S3 503 01 // – + means both specifications must be stated on the oil container
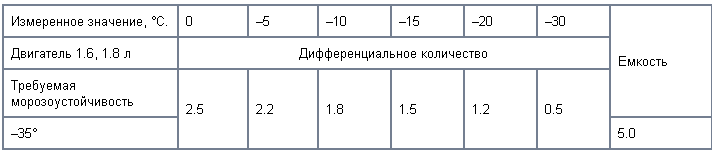
SF/SG (diesel CD) oils to API specification, or A2/A3 to ACEA specification (diesel B3 or B4) may be used Viscosity 5W30 (cold climate), 20W40 (hot climate) Capacity, with filter change All engines 4.5 L Difference between “max” and “min” marks on dipstick 1 liter Cooling system Mixture of soft water (60%) and antifreeze concentrate (40%) Antifreeze concentrate G12 A8D (red) or conforming to TL-VW 774 D (do not mix with any other) System capacity Engines 1.6, 1.8 L 5 L Amount of antifreeze added to the cooling system to ensure the required frost protection (the same amount of coolant must be drained), l
Use only “G12” (red). Do not use “G11” (green). Do not mix G11 and G
12. This may cause severe engine damage.
The table below shows how much antifreeze must be added to obtain the desired frost protection.
Example: Measurement shows frost protection down to −10 °C. In this case, 2.2 L of coolant must be drained from the cooling system and 2.2 L of pure antifreeze added. Protection is then provided down to −35 °C.
Manual transmission Type Synthetic G052 SAE 75W90 to specification “G 50” Capacity 020 (engines 1.6 L) 1.9 L 02A (engines 1.8 L) 2 L Automatic transmission Type ATF ESSO EGL 71 141 or AUDI–ET No. G052 162 A2 (light yellow) Capacity When changing 3.0 Total 5.3 L Final drive oil for automatic transmissions 0.8 L, synthetic oil G052 145…SAE 75W90 Haldex clutch oil for all-wheel drive models 0.2 L of Haldex clutch oil to specification G 052 175 A1 Steering G 002 000 Brake system 1.5 L, FMVSS DOT 4 Drive shaft lubrication Lubricant type AUDI G 000 603 Lubricant quantity Outer joint, ball and tripod type Joint Ø 81 mm Total 80 g Quantity in joint 40 g Quantity in boot 40 g Joint Ø 90 mm Total 120 g Quantity in joint 80 g Quantity in boot 40 g Inner joint, ball type Joint Ø 94 mm Total 90 g Quantity in joint 40 g Quantity in boot 50 g Joint Ø 100 mm Total 120 g Quantity in joint 50 g Quantity in boot 70 g Inner joint, tripod type Total 180 g Quantity on front side of joint 90 g Quantity on back side of joint 90 g Battery terminal grease Bosch Ft 40 v 1
Values for idle speed check
Idle speed, rpm AEH, AGN 760 – 880 AGU, AQA 800 – 920 1.9 TDI 875 – 950 CO level, % max 0.5 CO2 level, % 14.5 – 16.0 O2 level, % 0.1 – 0.5 Values for check at 2500 – 2800 rpm Lambda value 0.97 – 1.03 CO level, % 0.3 Spark plugs
Engine designation / Type / Electrode gap, mm
AEH, AGN / NGK BKUR 6 ET-10 or AUDI 101000033AA / 1.0
AGU / Bosch F7LTCR or AUDI 101000051AA / 1.0
Wrench size 16 mm Glow plugs Beru GN 855 Bosch 0 250 202 022 Champion CH 171 Lucas/CAV HDS 342 Tire size // Wheel size // Offset 195/65 R15 91H // 6J x 15 H2 // 38 mm 185/65R15 88Q/T/H M+S // 6J x 15 H2 // 38 mm 205/65 R15 89H // 6J x 15 H2 // 38 mm 205/55 R16 91V // 6J x 15 H2 // 44.5 mm 185/65R15 // 6J x 15 H2 // 38 mm Spare tire T125/90 R15 Tire pressure, front // rear, bar Average load Tires 195/65 R15, 205/65 R15, 205/55 R16 1.8 // 1.8 Tires 185/65R15, 225/45 R17W 2.1 // 2.1 Full load Tires 195/65 R15, 205/65 R15, 205/55 R16 2.2 // 2.7 Tires 185/65R15, 225/45 R17W 2.5 // 2.8 Compact spare tire 4.2 // 4.2 Nominal tire pressure values for all standard tire sizes fitted at the factory (summer tires, all-season tires) are shown on the label on the inside of the fuel filler flap. The pressure for the emergency spare tire is shown on the sidewall of the tire. Wheel nuts M14x1.5x27.5, wrench size 17 mm Tire speed rating symbols S up to 180 km/h T up to 190 km/h H up to 210 km/h V up to 240 km/h W up to 270 km/h ZR over 270 km/h
CAUTION
The word "reinforced" at the end of the tire marking indicates a reinforced construction.Tightening torques for threaded connections
Torque specifications are also given in the text and in some illustrations*. Oil drain plugs in oil pan 30 N·m Automatic transmission filler plug 15 N·m Haldex clutch oil drain plug, all-wheel drive models 15 N·m Haldex clutch filler plug, all-wheel drive models 30 N·m Spark plugs 30 N·m, 25 N·m Wheel nuts 120 N·m This Section is designed to help the do-it-yourself owner keep the vehicle at maximum efficiency, economy, safety and reliability. Further in this Section you will find a complete schedule of routine maintenance procedures, as well as Sections describing the maintenance of individual vehicle systems. The Sections include descriptions of visual inspections, adjustments, component replacement and other useful advice. Illustrations of the engine compartment and underbody will help you locate individual components. By maintaining the vehicle according to the mileage and time schedule and following the detailed instructions below, you will have a clear maintenance program capable of ensuring long and reliable service of your vehicle. Remember that this plan is comprehensive, and performing some of its items while neglecting others will not produce the expected result.
Routine Maintenance
While servicing the vehicle, you will soon find that many procedures can and should be combined, since the work involved is similar. For example, if the vehicle is raised for chassis lubrication, you should at the same time, while you are under the vehicle, inspect the exhaust system, suspension, steering system and fuel system. If the wheels are removed for other work, it makes sense to check the brake components. And finally, suppose you have had to borrow or rent a torque wrench. Even if you need it only to tighten the spark plugs, you can also check the tightening torque of as many critical nuts and bolts as time allows.
The first step in carrying out the vehicle maintenance program is self-preparation. Carefully study the contents of all Sections relating to the upcoming procedures, then prepare all necessary materials, equipment and tools. If you are concerned about encountering problems when performing certain specific work, consult a specialist or a person who has already performed this work.
Service performed according to the service interval indicator on the instrument panel
CAUTION
For model year 2000 (MJ00) and later, an extended service interval (WIV) applies (vehicles with the "Long-Life Service" system). Vehicles with this system can be identified by the number "QG1" in the service booklet or on the vehicle data plate. The vehicle data plate is located in the luggage compartment next to the spare wheel recess.On vehicles with the “Long–Life–Service” system, thanks to careful operation and gentle driving conditions, the service interval of 15,000 km or 12 months may be doubled. Thus, the maximum service interval is 30,000 km or 24 months, and the service due point is signaled by the service interval indicator on the instrument panel. The driver is warned approximately 3000 km in advance by the message “service in 3000 km” after each ignition switch-on. Once the service due point defined by the control unit is reached, the message “service” “service now” appears. Service must then be performed immediately. On vehicles that have covered less than 3000 km during the service interval, this warning appears without the preliminary signal.
Under very severe operating conditions, service on vehicles with the “Long–Life–Service” system may be performed after 15,000 km or every 12 months.
Service always includes oil change and related work.
Vehicles having the characteristics listed below may be equipped with the “Long–Life–Service” system:
1. Special (“flexible”) service interval indicator.
2. Sensor for low engine oil level.
3. Brake pad wear indicator.
4. Long-life engine oil AUDI–Norm 503 00 (gasoline) or 506 00 (diesel).
5. Low-maintenance lead-calcium battery.
CAUTION
On vehicles with the "Long-Life Service" system whose system is filled with oil other than AUDI-Norm 503 00 or 506 00, the service interval indicator must be set to 15,000 km or 12 months. This is done by resetting the indicator using the setting button on the instrument panel.On vehicles without the “Long–Life–Service” system, oil change and service must be performed in accordance with the maintenance schedule.
Service intervals depend on the time elapsed since the last service and on mileage.
When service is due, after switching on the ignition and starting the engine, for one minute the service indicator signal appears instead of the odometer reading on the tachometer display.
One or both of the following indicators will flash:
service OIL (oil change and related work) or service INSP (inspection service).
The indicator uses time or distance traveled since the last reset of the indicator as the basis for calculating service cycles. In this calculation, 1000 km or 10 days are taken into account between the appearance of the indicator and performing service. No other factors are taken into account.
After service has been performed, the service indicator must be reset to its initial (zero) position.
CAUTION
In addition, at every service, AUDI service centers read the fault memory of the engine control, ABS, airbag and anti-theft system electronic control units using the V.A.G 1551 fault reader. For this purpose, it is recommended to visit a service center at regular intervals. Note that some faults, for example a failed engine management sensor, do not cause a noticeable loss of vehicle performance. Control units have an emergency operating mode or operate on substitute values, which the driver cannot detect. Fault memory is read via the diagnostic connector.On vehicles with or without the “Long–Life–Service” system, the service interval indicator must be reset after service or oil change is performed. If this is done using the setting buttons on the instrument panel, the indicator is set to “not flexible”. In this case, the standard service schedule applies to the vehicle, according to time and distance traveled. If the indicator is set to “flexible”, it must be reset using a fault code reader or the vehicle diagnostic system at a service station.
Resetting the service interval indicator
 Instrument panel 1 – adjustment button 2 – trip meter button 3 – odometer display
The service interval indicator can be reset in two different ways: at a service station, the V.A.G. 1551 fault memory reader is used for this purpose, connected to the diagnostic connector on the center console. If this tool is not available, the indicator can be reset to its initial position using the trip meter and clock reset button on the instrument panel as follows:
CAUTION
In this case, the service indicator set to "flexibel" (flexible) is set to "nicht flexibel" (not flexible).PROCEDURE
1. Switch off the ignition, ignition key in the 0 position.
2. Press and hold button -2- of the trip odometer.
3. Switch on the ignition. The message "service OEL" appears on trip odometer display -3-. Release button -2-.
4. Pull button -1- of the clock out for approximately 2 seconds. This resets the "service OEL" message. Depending on the date of the indicator, the message "service OEL" remains or three dashes (– – –) appear.
5. Press button -2- once more and release it. The display switches to the message "service INSP".
6. Pull adjustment button -1- next to the tachometer out for approximately 2 seconds. The service interval indicator is reset. Depending on the date of the indicator, the message "service OEL" remains or three dashes (– – –) appear.
7. Switch off the ignition.
CAUTION
When the battery is disconnected, the indicator readings are retained.Test yourself
A quick Audi A3 quiz: every answer comes with an explanation and a link to the manual page.