Checking Tires and Tire Pressure
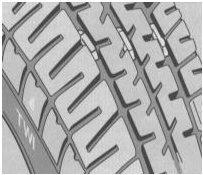 Tread wear indicators at 1.6 mm depth are located at the positions marked TWI on the sidewall
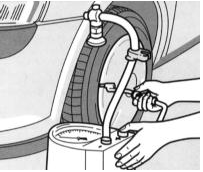 Checking Tire Air Pressure
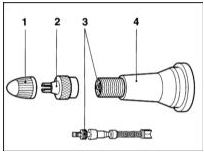 Tire valve 1 and 2 – rubber and metal caps 3 – valve 4 – valve body
PROCEDURE
1. Depending on model and equipment, AUDI vehicles may have tires and wheels of various sizes. Wheels have an offset of 38 mm. Offset is the distance from the wheel centerline to the mounting surface on the brake disc or drum. Wheel bolts for steel and alloy wheels have the same dimensions.
CAUTION
When installing alloy wheels from other manufacturers, wheel bolts of different sizes may be required.Technology is constantly developing. Older models may permit different tire pressure values. The dimensions specified in the vehicle documents are decisive.
2. When driving sportily, it is recommended to increase the front and rear tire pressure by 0.2 bar. When increasing pressure, use the base value for the various load conditions.
3. Winter tires usually require an inflation pressure 0.2 bar higher than summer tires. Follow the tire manufacturer's recommendations for winter tires.
4. Since winter tires have a speed restriction, a plate indicating the maximum speed must be mounted within the driver's field of view. Wheel Rim Markings
Example: 6 J x 15:
6 – rim width in inches; J – letter designation of rim flange height and contour; x – designation of one-piece well-base rim; 15 – rim diameter in inches. Maximum permissible lateral runout at rim flange: 1.2 mm; maximum permissible radial runout at rim seat: 0.8 mm.
Tire Designation
Example: 195/70 R 14 89 H
195 – tire width in mm; /70 – aspect ratio (cross-section height is 70% of width). If no aspect ratio is given (e.g., 175 R 14), a 'normal' aspect ratio is assumed, which is 82%. H – speed rating, H: up to 210 km/h. R – radial construction; 14 – rim diameter in inches; 89 – load index.
CAUTION
If the designation M+S appears between the figures 14 and 89, the tires are winter tread tires.H – maximum permissible speed rating symbol. The speed symbol follows the tire size. Speed symbols apply to both summer and winter tires.
Speed Rating Symbols
Q 160 H 210 S 180 V 240 T 190 W 270
Tire Manufacturing Date
The tire manufacturing date is located on the tire in the manufacturer's code.
Example: DOT CUL2 UM8 019 TUBELESS
DOT – Department of Transportation (USA); CU – abbreviation of manufacturer's name; L2 – tire size; UM8 – tire version; 01 – week of manufacture: 1st work week of 1999; TUBELESS – tubeless (TUBETYPE – tire with tube).
5. Regular tire inspections will help you avoid problems caused by roadside stops due to a flat tire. In addition, such inspections provide valuable information about possible steering and suspension problems before they cause serious damage.
6. Tires are equipped with built-in tread wear indicators, which become visible when the tread depth reaches 1.6 mm, at which point the tire is considered worn. This value is the minimum permissible tread depth; in most cases it is recommended to replace tires when tread depth is 2 mm or less. Tread depth can also be measured with a simple and inexpensive tool known as a tread depth gauge.
7. Pay attention to
CAUTION
check for any unusual tread wear. Tread defects such as cupping, bulges, flat spots and more pronounced wear on one side indicate incorrect wheel alignment angles and/or wheel imbalance. If any of these defects are found, have them corrected at a tire workshop.8. Carefully inspect the tire for cuts, punctures, and embedded nails or staples. Sometimes a tire punctured by a nail retains pressure for some time or leaks very slowly.
If a 'slow leak' is suspected, first check the valve core for leakage. Then inspect the tread for embedded foreign objects or previously repaired punctures that have started leaking again. If a puncture is suspected, confirm it by applying soapy water to the suspected area. If there is a leak, the solution will form bubbles. If the puncture is not too large, the tire can usually be repaired at any tire service shop.
9. Carefully inspect the inner sidewalls of the tires for signs of brake fluid leakage. If any are present, check the brake system immediately.
10. Maintaining correct tire pressure extends tire service life, helps save fuel and improves overall ride comfort. A special tire pressure gauge is required to check tire pressure.
CAUTION
Always keep an accurate pressure gauge in your glove box. Readings from gauges built into air hose nozzles at service stations are often inaccurate.11. Always check tire pressure on cold tires (i.e., before driving the vehicle). Checking pressure on warm or hot tires will result in readings that are too high due to thermal expansion of the tires. In this case, never release air, because after the tires cool, the pressure will be below specification.
12. Remove the protective cap from the valve protruding from the wheel rim or hub cap, then press the gauge adapter firmly onto the valve. Read the gauge and compare the reading with the value specified in the Specifications. Be sure to reinstall the protective cap to prevent dirt and moisture from entering the valve mechanism. Check the pressure in all four tires and, if necessary, inflate them to the recommended pressure.
13. Do not forget to maintain the required pressure in the spare tire as well. Checking Tire Air Pressure
14. Check tire air pressure only when tires are cold.
15. Remove the valve cap.
16. Check tire air pressure once a month and during service, including the spare tire.
17. In addition, check tire air pressure before each long trip, since the thermal load on the tires increases in this case.
18. The required tire air pressure is shown on the label located on the inside of the fuel filler door.
CAUTION
When using winter tires, increase the air pressure by 0.2 bar above the specified value.19. The air pressure for the narrow spare tire is indicated on the wheel rim. Checking the Valve
CAUTION
Valve extensions used must be checked for damage and contamination that could cause leaks. Replace the extensions if necessary.20. Remove the rubber protective cap and the metal cap.
21. Apply a small amount of soapy solution or saliva to the valve. If an air bubble forms, tighten valve core 3 using cap 2.
CAUTION
Use only the protective cap to tighten the valve.2. 1 – rubber protective cap; 4 – valve.
22. Check the valve again. If bubbles continue to appear and the valve cannot be tightened, replace it at a service station.
23. Be sure to reinstall the protective cap.
Examples of Typical Tire Tread Wear
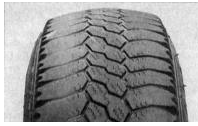 Shoulder Wear
Insufficient tire pressure causes the tire to overheat during driving due to excessive deflection, so the tread is not pressed sufficiently against the road surface. This results in loss of traction and excessive tread wear, not to mention the risk of tire failure due to overheating.
Check and adjust tire pressure.
Incorrect camber (one-sided wear)
Repair or replace suspension components.
Aggressive Cornering
Reduce speed!
 Center Wear
Overinflation
Excessive tire pressure leads to accelerated wear of the center of the tread, reduced grip on the road, harsher ride, and an increased risk of a catastrophic tire failure.
Check and adjust tire pressure.
If you have inflated the tires above the value specified in the Specifications for carrying heavy loads, be sure to reduce the pressure to the normal value when returning to normal driving conditions.
 Uneven Wear
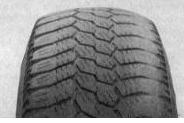
Front tires may wear unevenly as a result of incorrect wheel alignment. Wheel alignment can be checked and adjusted for a reasonable fee at most tire service shops.
Incorrect Camber or Caster
Repair or replace suspension components.
Suspension Defect
Repair or replace suspension components.
Wheels Out of Balance
Balance the wheels.
Front Wheel Toe Incorrectly Set
Adjust the front wheel alignment.
CAUTION
fraying of the tread pattern edges, which indicates wear, is best detected by touch. Unscrew the oil drain plug from the oil pan and drain the oil completely
Test yourself
A quick Audi A3 quiz: every answer comes with an explanation and a link to the manual page.