Wheel Rotation and Replacement. Snow Chains
 Wheel Rotation Diagram
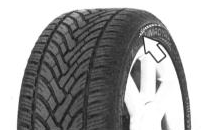 Tire designed to rotate in the direction indicated by the arrow only
PROCEDURE
1. Wheel rotation can be performed when signs of uneven tread wear appear. However, note that if all four wheels are rotated, you will eventually have to replace all tires at the same time.
Since this procedure requires raising the vehicle and removing the wheels, also check the operation of the brake components.
CAUTION
Even if you do not plan to rotate the wheels, at least check that the wheel mounting bolts are tightened securely.2. If the front tires wear faster, it is recommended to swap the front and rear tires. This equalizes the service life of all four tires.
3. Refer to Jacking and Towing for the correct procedure for raising the vehicle and changing a wheel.
4. Raise the vehicle with a hoist or place it on stands so that all four wheels are off the ground. Make sure the vehicle is securely supported! Safety precautions
Do not replace a single tire separately. Replace the tires on one axle as a set. Tires with greater tread depth must be installed on the front wheels. Front and rear wheels must have tires of the same size and type, and on all-wheel-drive vehicles also of the same manufacturer and tread pattern. Tires that have been in service for more than 6 years should be used only in an emergency, and care must be taken when driving the vehicle. When replacing or removing tubeless tires, always replace the valve.
5. If tires with a directional tread pattern are used, indicated by an arrow on the sidewall, the specified direction of rotation must be observed. Only in this way can the required road characteristics be achieved, namely hydroplaning resistance, road holding, low noise and low wear. If, due to an accident, the spare wheel must be installed with the opposite direction of rotation, such use must be temporary only, since the above road characteristics cannot be achieved in this case. This applies especially to driving on wet roads. Therefore, it is recommended to match the driving speed to road conditions and reinstall the tire in accordance with the specified direction of rotation. Spare wheel
6. The spare wheel can be installed on either the front or the rear axle.
7. The spare wheel is intended for temporary use only and should be replaced with a standard wheel as soon as possible.
8. After installing the spare wheel, the tire pressure must be 4.2 bar.
9. With the spare wheel installed, do not exceed 80 km/h. Avoid maximum acceleration, hard braking and sharp turns.
10. When the spare wheel is installed, the ground clearance at the corresponding axle is reduced by approximately 30 mm.
11. Do not use spare wheels from other vehicle models.
12. Do not install two or more spare wheels. Wheel replacement
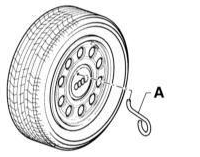
3. Remove the wheel trim cover. To do this, use the pry bar and wire hook from the tool kit. Hook the wire hook into the hole in the cover or onto its edge. Pass the pry bar through the hook and pull the bar away from the wheel to remove the cover.
14. On a vehicle standing on the ground, apply the parking brake and loosen the wheel bolts.
15. Raise the corresponding side of the vehicle and secure it on stands.
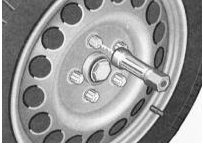

16. Remove the upper wheel bolt and screw the guide pin in its place. The guide pin makes it easier to install the spare wheel.
CAUTION
Light alloy wheels are protected from corrosion by a clear coating. Take care not to damage the coating. If the coating is damaged, apply a coat of clear lacquer to the wheel.17. To prevent the wheel discs from sticking to the hub, apply a thin layer of grease to the hub flange that centers the wheel disc before installing the wheel.
18. Zinc-plated wheel bolts may only be used on steel stamped wheels.
19. Alloy wheels are secured only with chrome wheel bolts that have a conical rotating washer. This washer, fitted under the bolt head, protects the wheel surface when the bolts are tightened.
20. Do not lubricate the threads of the wheel bolts before installation.
21. Standard wheel bolts have dimensions M14 x 1.5 x 27.
5. Wrench size 17 mm.
22. Tighten the wheel bolts evenly in several stages in a diagonal sequence.
23. Wheel bolt tightening torque 120 N·m. Snow chains
24. Chains must be installed on the front wheels only, including on all-wheel-drive vehicles.
25. Snow chains may only be fitted to tires of size 195/65 R
15. Snow chains must not be fitted to the spare wheel for technical reasons.
26. Use only fine-mesh chains that protrude no more than 15 mm (including the locking links).
27. When installing snow chains, remove the full wheel covers and the wheel decorative rings. For safety reasons, the wheel bolts must be protected by special caps.
28. Before driving on a road free of snow, remove the snow chains. They degrade vehicle handling, increase tire wear and wear out quickly themselves.
Test yourself
A quick Audi A3 quiz: every answer comes with an explanation and a link to the manual page.