Brake Fluid Replacement
GENERAL Required special tools:
– Flare nut wrench for the bleeder screw. – Transparent plastic hose with an inner diameter of 6 mm and a container for collecting brake fluid.
CAUTION
Do not reuse used brake fluid.Observe the safety precautions when working with brake fluid, refer to the Brake Fluid subsection.
Brake fluid absorbs moisture through the pores of the brake hoses and the reservoir vent opening. As a result, the boiling point of the fluid decreases during operation. Under heavy brake loads this can even lead to vapor formation, which reduces braking effectiveness.
Brake fluid must be replaced with new fluid every 2 years, preferably in spring. When driving frequently in mountainous terrain, the fluid must be replaced more often.
At a dealer service center, air is normally bled from the brake system using a special device. However, this can also be done without this device. In this case, the brake system is bled by operating the brake pedal. This requires an assistant.
CAUTION
If the fluid level drops sharply while bleeding the brake system, air is being drawn into the ABS pump. In this case, the air must be bled at a dealer service center using a special device. When any brake hose is replaced, the air must also be bled from the system at a dealer service center. Until this is done, the vehicle must not be driven.Bleeding sequence:
PROCEDURE
1. Right rear caliper
2. Left rear caliper
3. Right front caliper
4. Left front caliper
PROCEDURE
1. Mark the brake fluid level on the reservoir with a felt-tip pen. After replacing the fluid, restore the previous level. This prevents overfilling the system when replacing the brake pads.
2. Unscrew the brake fluid reservoir cap.
CAUTION
It is not possible to suction the brake fluid out of the reservoir with a single bottle, because a mesh screen is rigidly installed in the filler neck.3. Vehicles with a manual transaxle: Since the clutch hydraulic system uses brake fluid, bleed air from the clutch hydraulic system. Refer to the Bleeding the Clutch Hydraulic System subsection.
CAUTION
When bleeding the clutch slave cylinder, at least 100 cm3 (0.1 L) of brake fluid must be drained in order to replace the fluid with new fluid.4. Fill the reservoir with new brake fluid up to the MAX mark.
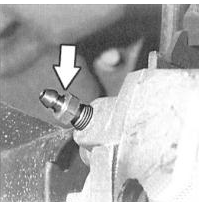
5. Carefully loosen the bleeder screws without unscrewing them completely. It is recommended to spray the bleeder screws with rust penetrant 2 hours before bleeding. If the bleeder screws cannot be loosened, have this operation performed at a dealer service center.
6. Fit a clean transparent hose onto the right rear caliper bleeder screw and place a suitable container under it. To access the bleeder screw, either remove the wheel, raise the vehicle, or position the vehicle over an inspection pit.
7. Place the manual transaxle in neutral and apply the parking brake. Start the engine and let it idle.
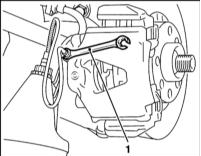
8. Have an assistant press the brake pedal several times to build pressure in the system. Hold the pedal depressed. Using the flare nut wrench, open the bleeder screw on the right rear caliper. Close the bleeder screw when the pedal reaches the floor. Release the pedal.
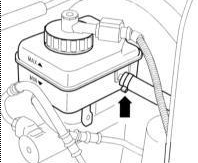
9. Vehicles with a manual transaxle: With the engine running, drain brake fluid until its level in the reservoir reaches the level of the clutch master cylinder connection fitting (arrow). Do not allow the fluid level to drop significantly, otherwise air may enter the system through the reservoir. Only add new fluid to the system.
10. Close the bleeder screw.
11. Vehicles with a manual transaxle: Since the clutch hydraulic system uses brake fluid, bleed air from the clutch hydraulic system. Refer to the Bleeding the Clutch Hydraulic System subsection.
CAUTION
To replace the brake fluid in the clutch hydraulic system, at least 100 cm3 (0.1 L) must be drained from the slave cylinder.12. Fill the reservoir with new brake fluid up to the MAX mark.
13. Drain the old brake fluid from the other calipers in the following sequence: right rear, left rear, right front, left front.
CAUTION
The drained brake fluid must be clean and free of air bubbles. About 250 cm3 of fluid must be drained from each caliper.14. Press the brake pedal and check the free travel. It must not exceed 1/3 of the pedal travel.
15. Fill the reservoir with brake fluid to the previous level.
16. Screw the cap onto the reservoir.
CAUTION
, check for reliable operation:– Are the brake lines and hoses secured? – Are the brake hoses located in their retaining clips? – Are the bleeder screws tightened? – Is there a sufficient amount of fluid in the system?
17. With the engine running, check the system for leaks. To do this, press the brake pedal about 10 times with a force of 200 – 300 N (equivalent to 20 – 30 kg). The brake pedal must not move back. Check all connections for leaks.
18. To finish, check the brakes on a road with light traffic. Make at least one hard braking application and check ABS operation (ABS operation is indicated by pulsation of the brake pedal during braking).
CAUTION
Watch the traffic following your vehicle. The effect of the ABS is most noticeable on a road without a surface (unpaved road).Do not pour brake fluid together with household waste or into any other location. Local authorities should provide information on brake fluid collection points.
Test yourself
A quick Audi A3 quiz: every answer comes with an explanation and a link to the manual page.