Checking the Cooling System Operation
GENERAL INFORMATION
Hoses, like drive belts, tend to fail at the most inconvenient moment. To avoid problems caused by a burst radiator or heater hose, inspect them carefully as shown in the illustration.

Checking the Cooling System and Coolant Freeze Protection
PROCEDURE
1. Many serious engine malfunctions are caused by cooling system faults. If the vehicle is equipped with an automatic transmission, its operation and service life are also directly related to the cooling system.
2. The cooling system must be checked with the engine cold. It is best to do this before the first trip of the day, or at least three hours after the engine has been shut off.
3. Slowly remove the radiator cap, taking care in case the engine is not fully cooled. Thoroughly rinse the cap inside and out with clean water. Also rinse the radiator filler neck. Signs of corrosion in the filler neck mean the coolant must be replaced (refer to Coolant Replacement). The coolant inside the radiator should be relatively clean and clear. If it has a brownish color, drain the system and fill it with new coolant.
4. Thoroughly inspect the radiator hoses and the smaller-diameter heater hoses. Check the cooling system hoses along their entire length and replace any hose that is cracked, swollen, or worn. Cracks are easier to detect when the hose is squeezed by hand. Pay particular attention to
CAUTION
Hose clamps that secure hoses to cooling system components can cut or puncture the hoses, resulting in coolant leakage.5. Make sure all hose connections are secure. Coolant leaks usually appear as white or rust-colored deposits at the point of seal failure. If your vehicle uses wire-type hose clamps, consider replacing them with screw-type clamps.
6. Using compressed air or a soft brush, clean the front of the radiator (and the air conditioning condenser, where fitted). Remove all insects, leaves, and other debris from the radiator fins. Be very careful not to damage the fins or cut your fingers on them.
7. If the coolant level keeps dropping and you find no leaks, pressure-test the radiator cap and the entire cooling system. Checking Coolant Freeze Protection
CAUTION
Do not allow antifreeze to contact your skin or the painted surfaces of the vehicle. If contact occurs, immediately flush with plenty of water. Antifreeze is extremely toxic and can be fatal if swallowed. Do not leave antifreeze in an open container or spilled on the floor; its sweet smell can easily attract children or pets. Check local regulations for disposing of used antifreeze. Many areas have special collection centers that accept it.Before the winter season, always check the antifreeze concentration in the coolant, especially if plain water has been added to the system during operation. Required special tool:
– Antifreeze tester. An optical tester, HAZET No. 4810, is also available.
Required operating materials and parts:
— Antifreeze with corrosion inhibitor "G12" (red color, designation "G 012 A8D to TL-VW 774 D") and clean water free of lime. Checking
8. Warm up the engine slightly so that the upper radiator hose heats up. When measuring antifreeze concentration, the coolant temperature should be about +20°C. Safety Note
Open the expansion tank cap carefully when the engine is hot. There is a risk of scalding! Place a rag over the cap. Open the cap only when the coolant temperature is no higher than +90°C.
9. Carefully unscrew the expansion tank cap.
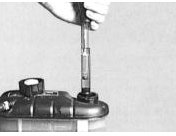
10. Draw coolant into the hydrometer tube using the bulb.
11. In our climate, an antifreeze concentration that protects the system down to –25°C is sufficient; in particularly cold climates, protection down to –35°C is required. Adding Antifreeze If protection down to –25°C is required, the antifreeze concentration in the coolant must be 40 %. If protection down to –35°C is required, the antifreeze concentration must be 50 %.
CAUTION
If a higher degree of freeze protection is required, the antifreeze concentration can be increased to 60 %. This concentration provides protection down to –40°C. If the concentration is increased above this level, the engine's freeze protection decreases and the coolant's heat-transfer properties also deteriorate.Vehicles up to chassis number "8LVA006233" (produced approximately up to the end of 1996) are factory-filled with G11-ABC antifreeze or another antifreeze marked "to TL-VW 774 C". It can be recognized by its green color. Starting with chassis number "8LVA006234", AUDI G
12. G12 or another antifreeze marked "to TL-VW 774 D" may be used to fill the system. G12 antifreeze is red.
CAUTION
G11 and G12 must not be mixed. This can cause severe engine damage. Brown coolant (a mixture of G11 and G12) must be replaced immediately.Engines designed for G11 may be converted to the modified G12 antifreeze.
12. Close the radiator cap. After a test drive, check the antifreeze concentration again, referring to the Specifications.
Test yourself
A quick Audi A3 quiz: every answer comes with an explanation and a link to the manual page.