Removal and Installation of Wheel Cylinders
If leaks occur, the wheel cylinders must be replaced. The manufacturer does not recommend attempting to repair these brake components.
REMOVAL
PROCEDURE
1. Raise the rear of the vehicle and support it on safety stands. Chock the front wheels.
2. Remove the brake drum and shoes (refer to Section Rear Drum Brake Shoe Replacement).
3. Clean the wheel cylinder and the surrounding surfaces of dirt.
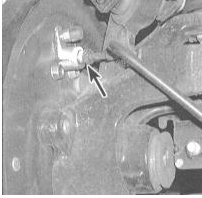
4. Disconnect the hydraulic line from the rear of the wheel cylinder. To avoid rounding the fitting flats, use a special flare-nut wrench. When disconnecting, do not pull on the metal brake line tube, to avoid deforming it, which could significantly complicate reconnection. Immediately plug the open end of the brake line to minimize fluid loss and prevent dirt from entering the hydraulic system.
5. Disconnect the hydraulic line from the rear of the wheel cylinder (see accompanying illustration). To avoid rounding the fitting flats, use a special flare-nut wrench. When disconnecting, do not pull on the metal brake line tube, to avoid deforming it, which could significantly complicate reconnection. Immediately plug the open end of the brake line to minimize fluid loss and prevent dirt from entering the hydraulic system.
If there are traces of brake fluid on the friction linings of the brake shoes, replace the shoes and thoroughly clean the brake drum friction surface.
INSTALLATION
PROCEDURE
1. Apply RTV sealant to the mating surfaces of the wheel cylinder and the brake backing plate. Install the cylinder in its original position and connect the hydraulic line. Do not tighten the fitting nut yet.
2. Install the mounting bolts and tighten them securely. Now the fitting nut can be fully tightened. Install the shoe assembly.
3. Bleed the brake system (refer to Section Brake System Bleeding).
4. Before operating the vehicle, make sure the brakes function properly.
Test yourself
A quick Honda Accord quiz: every answer comes with an explanation and a link to the manual page.