Installation of Brake Master Cylinder
A faulty master cylinder must be replaced. The manufacturer does not recommend attempting to repair the master cylinder.
PROCEDURE
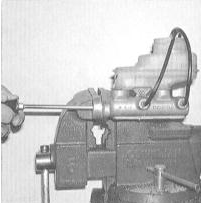
1. Before installation, bleed the new master cylinder on a workbench. For convenience, clamp the cylinder mounting flange in a vise with soft jaws. You will then need to simultaneously operate the piston in the cylinder and observe the flow of brake fluid expelled through the outlet fitting.
Connect a pair of tubes from a special bleeding kit (available at automotive accessory stores) to the master cylinder outlet fittings.
2. Fill the reservoir with fresh brake fluid of the specified type (refer to Chapter Maintenance and Adjustments).
3. Slowly push the pistons into the cylinder (a large Phillips-head screwdriver is most convenient for this). Air should begin to exit the pressure chambers into the reservoir. Make sure both tube ends are fully submerged in the brake fluid in the reservoir to prevent air from being drawn back into the cylinder when the pistons are released.
4. Continue bleeding until the fluid expelled through the tubes is completely free of air bubbles.
5. Disconnect the tubes one at a time, immediately capping the open fitting ends. Close the master cylinder reservoir cap.
6. Place the master cylinder onto the studs on the brake booster assembly and, hand-tighten the mounting nuts for now.
7. Screw the brake line fittings into the cylinder. Since the cylinder is not yet fully secured, its position can be adjusted slightly to ease threading the fittings. Take care not to strip the threads.
8. Tighten the master cylinder mounting nuts to the specified torque, then firmly tighten the fitting connections.
9. Install the front strut brace and tighten its fasteners to the specified torque.
10. Fill the brake master cylinder reservoir with fresh brake fluid and bleed the hydraulic system (refer to Brake System Bleeding). To bleed the master cylinder on the vehicle (if not done on the workbench), an assistant will be needed to operate the brake pedal. Ask the assistant to pump the pedal several times, then hold it in the fully depressed position. Loosen the fitting nut, releasing the mixture of air and brake fluid from the cylinder. Repeat until the expelled fluid is completely free of air bubbles. Bleed the second fitting in the same manner.
Keep clean rags on hand to immediately remove any brake fluid that gets on painted body surfaces.
11. Before operating the vehicle, make sure the brakes function properly.
Test yourself
A quick Honda Accord quiz: every answer comes with an explanation and a link to the manual page.