Torque Sensor 1 (C1511-C1514,C1517)
DESCRIPTION
The torque sensor converts the torque sensor input received from the steering wheel into electrical signals and then sends them to the EPS ECU assembly.
DTC No. | Detection Item | DTC Detection Condition | Suspected Area | Warning indicated | Return to normal state | Note |
|---|---|---|---|---|---|---|
C1511 |
Torque sensor 1 |
Torque sensor malfunction |
|
EPS warning light comes on |
The ECU determines that the system has returned to normal, or the ignition switch is turned back to ON |
- |
C1512 |
Torque sensor 2 |
Torque sensor malfunction |
|
EPS warning light comes on |
The ECU determines that the system has returned to normal, or the ignition switch is turned back to ON |
- |
C1513 |
Excessive torque sensor deviation |
Torque sensor malfunction |
|
EPS warning light comes on |
The ECU determines that the system has returned to normal, or the ignition switch is turned back to ON |
- |
C1514 |
Torque sensor power supply voltage |
Torque sensor malfunction |
|
EPS warning light comes on |
Ignition switch turned to ON again |
- |
C1517 |
Torque hold |
Torque sensor malfunction |
|
EPS warning light comes on |
Ignition switch turned to ON again |
- |
WIRING DIAGRAM
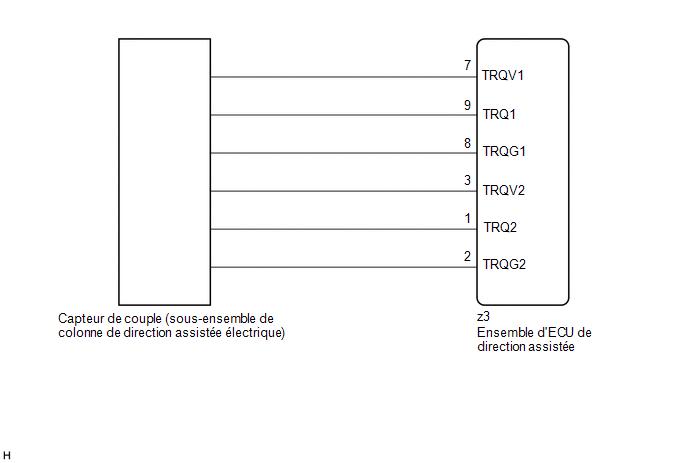
PRECAUTION / NOTICE / HINT
NOTICE:
- When the electric power steering column sub-assembly has been replaced, perform torque sensor zero point calibration.
Click here

- If the power steering ECU assembly has been replaced, perform the assist card writing and the torque sensor zero point calibration.
Click here
PROCEDURE
CHECK CONNECTOR CONNECTION CONDITION
(a) Check the connection condition of the torque sensor connector.
OK:
The torque sensor connector is properly connected to the EPS ECU assembly.
| NG |  |
CONNECT CONNECTOR |
|

CHECK EPS ECU ASSEMBLY (TRQV VOLTAGE)
(a) Turn the ignition switch to ON. |
|
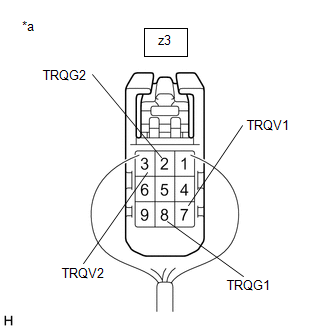
(b) Measure the voltage according to the value(s) in the table below.
Standard voltage:
Tester Connection | Condition | Specified Condition |
|---|---|---|
z3-7 (TRQV1) - z3-8 (TRQG1) |
Ignition Switch in ON position |
4,5 à 5,5 V |
z3-3 (TRQV2) - z3-2 (TRQG2) |
Ignition Switch in ON position |
4,5 à 5,5 V |
| NG | |
REPLACE EPS ECU ASSEMBLY |
|
CHECK EPS ECU ASSEMBLY (TRQ1, TRQ2 VOLTAGE)
(a) Start the engine. |
|
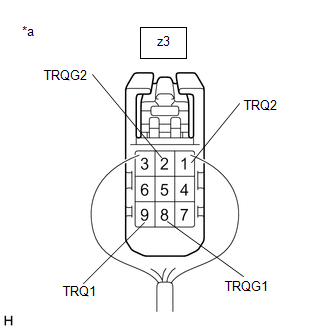
(b) Measure the voltage according to the value(s) in the table below.
Standard voltage:
Tester Connection | Condition | Specified Condition |
|---|---|---|
z3-9 (TRQ1) - z3-8 (TRQG1) |
Engine running and steering wheel not turned (no load) |
2,3 à 2,7 V |
Engine running and steering wheel turned to the right, vehicle stopped |
2,5 à 3,8 V |
|
Engine running and steering wheel turned to the left, vehicle stopped |
1,2 à 2,5 V |
|
z3-1 (TRQ2) - z3-2 (TRQG2) |
Engine running and steering wheel not turned (no load) |
2,3 à 2,7 V |
Engine running and steering wheel turned to the right, vehicle stopped |
1,2 à 2,5 V |
|
Engine running and steering wheel turned to the left, vehicle stopped |
2,5 à 3,8 V |
(c) Under each condition, measure the voltage at terminals TRQ1 and TRQ2, and calculate the sum.
Standard voltage:
Tester Connection | Condition | Specified Condition |
|---|---|---|
Sum of the voltage between z3-9 (TRQ1) and z3-8 (TRQG1) and the voltage between z3-1 (TRQ2) and z3-2 (TRQG2) |
Engine running and steering wheel not turned (no load) |
Between 4.75 V and 5.25 V |
Engine running and steering wheel turned to the right, vehicle stopped |
||
Engine running and steering wheel turned to the left, vehicle stopped |
| OK | |
REPLACE EPS ECU ASSEMBLY |
| NG | |
REPLACE ELECTRIC POWER STEERING COLUMN SUB-ASSEMBLY |