Transmission Control Switch Circuit
DESCRIPTION
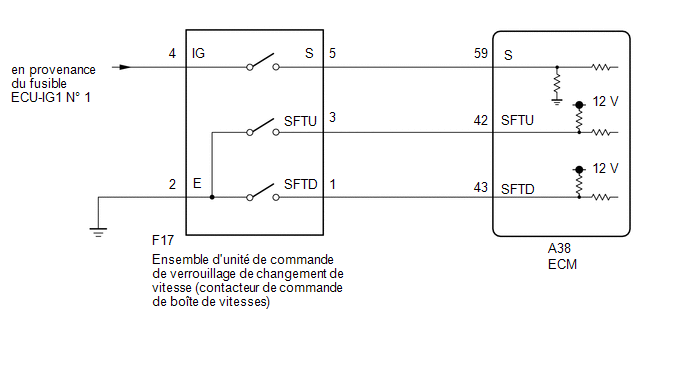
After moving the shift lever to the M position, the gear range can be changed between M1 and M7 using the transmission control switch. Moving the shift lever to "+" once upshifts to the next higher gear, and moving the shift lever to "-" downshifts to the next lower gear.
WIRING DIAGRAM
PRECAUTION / NOTICE / HINT
NOTICE:
- Perform initialization when replacing related components of the continuously variable transaxle.
Click here

- Make sure no DTCs are stored after performing initialization.
Click here
- Check the fuses for the circuits related to this system before performing the following procedure.
PROCEDURE
CHECK WHETHER DTCs ARE OUTPUT
(a) Connect the Techstream to the DLC3.
(b) Turn the ignition switch to ON.
(c) Turn on the Techstream.
(d) Select the following menu items: Powertrain / Engine and ECT / Trouble Codes.
Powertrain > Engine and ECT > Trouble Codes(e) Read the DTCs using the Techstream.
Result:
Result | Proceed to |
|---|---|
No DTCs are output |
A |
DTCs are output |
B |
| B |  |
GO TO DTC CHART |
|

READ VALUE USING TECHSTREAM (SPORTS MODE SELECTION SW)
(a) Connect the Techstream to the DLC3.
(b) Turn the ignition switch to ON.
(c) Turn on the Techstream.
(d) Select the following menus: Powertrain / Engine and ECT / Data List.
Powertrain > Engine and ECT > Data ListSports Mode Selection SW
(e) Depending on the Techstream display, record the Data List.
Powertrain > Engine and ECT > Data ListTester display | Item | Range | Normal Condition | Diagnostic Note |
|---|---|---|---|---|
Sports Mode Selection SW |
Sport mode select switch position |
OFF or ON |
|
- |
Result:
Result | Proceed to |
|---|---|
The displayed data is within the range shown under "Normal Condition". |
A |
The displayed data is not within the range shown under "Normal Condition". |
B |
| B | |
GO TO STEP 8 |
|
READ VALUE USING TECHSTREAM (SPORTS SHIFT UP SW AND SPORTS SHIFT DOWN SW)
(a) Connect the Techstream to the DLC3.
(b) Turn the ignition switch to ON.
(c) Turn on the Techstream.
(d) Select the following menus: Powertrain / Engine and ECT / Data List.
(e) Depending on the Techstream display, record the Data List.
Powertrain > Engine and ECT > Data ListTester display | Item | Range | Normal Condition | Diagnostic Note |
|---|---|---|---|---|
Sports Shift Up SW |
Sport Mode Upshift Switch Position |
OFF or ON |
|
- |
Sports Shift Down SW |
Sport Mode Downshift Switch Position |
OFF or ON |
|
- |
Tester display |
|---|
Sports Shift Up SW |
Sports Shift Down SW |
Result:
Result | Proceed to |
|---|---|
The displayed data is within the range shown under "Normal Condition". |
A |
The displayed data is not within the range shown under "Normal Condition". |
B |
| A | |
CHECK FOR INTERMITTENT PROBLEMS |
|
INSPECT SHIFT LOCK CONTROL ECU ASSEMBLY (SHIFT CONTROL SWITCH)
(a) Disconnect the F17 shift lock control ECU assembly (shift control switch) connector. |
|
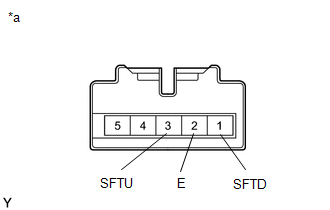
(b) Measure the resistance according to the value(s) in the table below.
Standard resistance:
Tester Connection | Condition | Specified Condition |
|---|---|---|
3 (SFTU) - 2 (E) |
Shift lever held at "+" |
Below 1 Ω |
3 (SFTU) - 2 (E) |
Shift lever in M position |
10 kΩ minimum |
1 (SFTD) - 2 (E) |
Shift lever held at "-" |
Below 1 Ω |
1 (SFTD) - 2 (E) |
Shift lever in M position |
10 kΩ minimum |
| NG | |
REPLACE SHIFT LOCK CONTROL UNIT ASSEMBLY (TRANSMISSION CONTROL SWITCH) |
|
CHECK WIRE HARNESS AND CONNECTOR (SHIFT LOCK CONTROL UNIT ASSEMBLY (TRANSMISSION CONTROL SWITCH) - BODY GROUND)
(a) Disconnect the shift lock control ECU assembly (shift control switch) connector. |
|
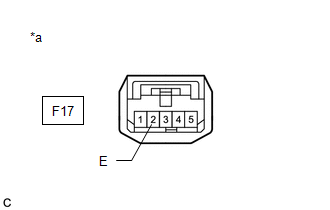
(b) Measure the resistance according to the value(s) in the table below.
Standard resistance:
Tester Connection | Ignition switch position | Specified Condition |
|---|---|---|
F17-2 (E) - Body ground |
Always |
Below 1 Ω |
| NG | |
REPAIR OR REPLACE WIRE HARNESS OR CONNECTOR (TRANSMISSION CONTROL SWITCH - ECM) |
|
CHECK WIRE HARNESS AND CONNECTOR (TRANSMISSION CONTROL SWITCH - ECM)
(a) Disconnect the ECM connector. |
|
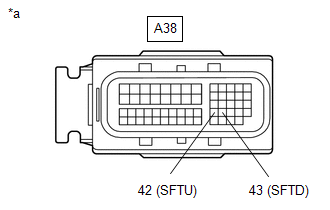
(b) Measure the resistance according to the value(s) in the table below.
Standard resistance:
Tester Connection | Condition | Specified Condition |
|---|---|---|
A38-43 (SFTD) - Body ground |
Shift lever held at "-" |
Below 1 Ω |
A38-43 (SFTD) - Body ground |
Shift lever in M position |
10 kΩ minimum |
A38-42 (SFTU) - Body ground |
Shift lever held at "+" |
Below 1 Ω |
A38-42 (SFTU) - Body ground |
Shift lever in M position |
10 kΩ minimum |
| NG | |
REPAIR OR REPLACE WIRE HARNESS OR CONNECTOR (TRANSMISSION CONTROL SWITCH - ECM) |
|
REPLACE ECM
(a) Replace the ECM.
Click here
| NEXT | |
PERFORM INITIALIZATION |
INSPECT SHIFT LOCK CONTROL ECU ASSEMBLY (SHIFT CONTROL SWITCH)
(a) Disconnect the F17 shift lock control ECU assembly (shift control switch) connector. |
|
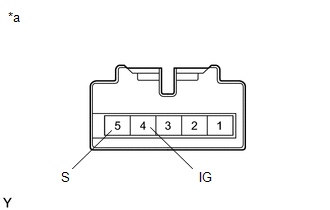
(b) Measure the resistance according to the value(s) in the table below.
Standard resistance:
Tester Connection | Condition | Specified Condition |
|---|---|---|
4 (IG) - 5 (S) |
Shift lever in M position |
Below 1 Ω |
4 (IG) - 5 (S) |
Shift lever in a position other than M |
10 kΩ minimum |
| NG | |
REPLACE SHIFT LOCK CONTROL UNIT ASSEMBLY (TRANSMISSION CONTROL SWITCH) |
|
CHECK WIRE HARNESS AND CONNECTOR (POWER SOURCE OF SHIFT LOCK CONTROL UNIT ASSEMBLY (TRANSMISSION CONTROL SWITCH))
(a) Disconnect the shift lock control ECU assembly (shift control switch) connector. |
|
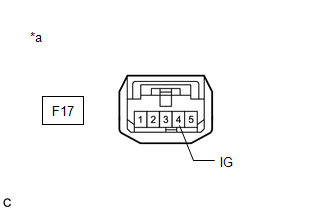
(b) Measure the voltage according to the value(s) in the table below.
Standard voltage:
Tester Connection | Ignition switch position | Specified Condition |
|---|---|---|
F17-4 (IG) - Body ground |
Ignition Switch in ON position |
11 à 14 V |
F17-4 (IG) - Body ground |
Ignition Switch in OFF position |
Below 1 V |
| NG | |
INSPECT POWER SOURCE CIRCUIT (SHIFT CONTROL SWITCH) |
|
CHECK WIRE HARNESS AND CONNECTOR (TRANSMISSION CONTROL SWITCH - ECM)
(a) Disconnect the F17 shift lock control ECU assembly (shift control switch) connector.
(b) Disconnect the A38 ECM connector.
(c) Measure the resistance according to the value(s) in the table below.
Standard resistance:
Tester Connection | Condition | Specified Condition |
|---|---|---|
F17-5 (S) - A38-59 (S) |
Always |
Below 1 Ω |
F17-5 (S) - Body Ground and Other Terminals |
Always |
10 kΩ minimum |
A38-59 (S) - Body Ground and Other Terminals |
Always |
10 kΩ minimum |
| NG | |
REPAIR OR REPLACE WIRE HARNESS OR CONNECTOR (TRANSMISSION CONTROL SWITCH - ECM) |
|
REPLACE ECM
(a) Replace the ECM.
Click here
| NEXT | |
PERFORM INITIALIZATION |