Temporary tyre sealant*. Temporary tyre sealant kit* - Placement. Temporary tyre sealant kit* - Overview. Temporary tyre sealant* - Handling
The Temporary Mobility Kit (TMK) for the Volvo S80 (2nd generation, 2013–2016) provides a quick temporary solution for a tire puncture. This section describes the kit components, how to use the sealant, and where the kit is stored in the vehicle. It includes special notes on safe use of the compressor and the maximum driving distance after sealing. Tips on follow-up checks and on replacing the bottle and hose support safe operation.
Temporary Tire Sealing*
The Temporary Mobility Kit (TMK) is used to seal a tire after a puncture and to check and adjust the tire pressure.
The Temporary Mobility Kit consists of a compressor and a bottle of sealant. The sealant is used for temporary repair.
Replace the sealant bottle before its expiry date and after use. The sealant effectively seals tires whose tread has been damaged by objects.
CAUTIONThe tire sealing kit is intended exclusively for sealing tires with a puncture in the tread.
The tire sealing kit is only suitable to a limited extent for sealing tires damaged on the sidewall. Do not seal tires with the temporary tire sealing kit if the tires have larger damage, cuts or similar damage. Connect the compressor to one of the 12 V sockets in the vehicle.
Select the socket closest to the tire being repaired.
IMPORTANTIf the compressor is connected to one of the two 12 V sockets in the center console, no other electrical consumer may be connected to the other socket.
CAUTIONThe compressor for temporary tire sealing is tested and approved by Volvo.
Related information
- Temporary Tire Sealing* - Operation
- Temporary Tire Sealing* - Follow-up Check
- Temporary Mobility Kit* - Overview
- Tools
Temporary Mobility Kit* - Location
The Temporary Mobility Kit (TMK) is used to seal a tire after a puncture and to adjust the tire pressure.
Location of the tire sealing kit
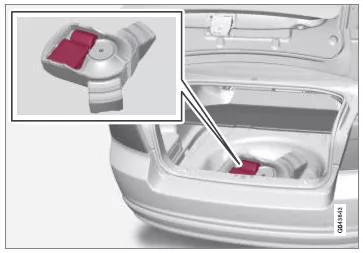
The tire sealing kit is stored under the luggage compartment floor.
CAUTIONThe tire sealing kit is intended exclusively for sealing tires with a puncture in the tread.
IMPORTANTIf the compressor for tire sealing is connected to one of the two sockets in the center console, no other electrical consumer may be connected to the other socket.
CAUTIONThe compressor for temporary tire sealing is tested and approved by Volvo.
Related information
- Temporary Mobility Kit* - Overview
- Temporary Mobility Kit* - Sealant
- Temporary tire sealant
Temporary Mobility Kit* - Overview
Overview of the parts included in the Temporary Mobility Kit (TMK).
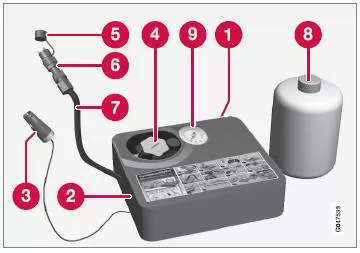
- Label, maximum permissible speed
- Switch
- Cable
- Bottle holder (orange cap)
- Protective cap
- Pressure reducing valve
- Air hose
- Sealant bottle
- Pressure gauge
Related information
- Temporary Mobility Kit* - Location
- Temporary Mobility Kit* - Sealant
- Temporary tire sealant
Temporary Tire Sealing* - Operation
Seal a hole with the Temporary Mobility Kit (TMK).
Temporary Tire Sealing
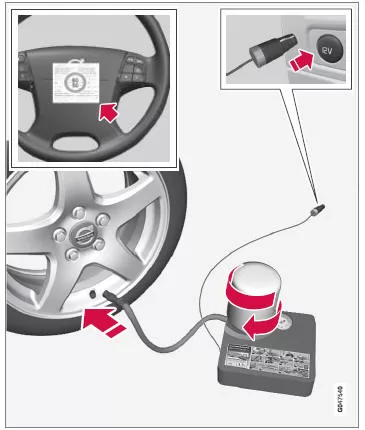
For information on the function of the individual parts, see Temporary Mobility Kit* - Overview
1. When sealing a defective tire on a busy road, set up a warning triangle and switch on the hazard warning lights.
If the puncture was caused by a nail or similar object, leave it in the tire. The foreign object helps seal the wheel.
2. Remove the maximum permissible speed label (on one side of the compressor) and attach it to the steering wheel.
WARNINGAfter sealing the tire with the temporary tire sealing kit, do not drive faster than 80 km/h. Volvo recommends visiting a Volvo authorized workshop to inspect the sealed tire (maximum driving distance 200 km).
Service personnel can decide whether the tire can be repaired or must be replaced.
WARNINGThe sealant may cause skin irritation. In case of skin contact, wash the liquid off immediately with soap and water.
3. Check that the switch is in position 0 and lay out the cable and air hose.
CAUTIONDo not remove the seal on the bottle before use. The seal is removed automatically when the bottle is screwed on.
4. Unscrew the orange cap and unscrew the bottle cap.
5. Screw the bottle firmly into the bottle holder.
WARNINGDo not unscrew the bottle. It has a non-return valve that prevents leakage.
6. Connect the hose from the compressor to the valve.
7. Connect the cable to the 12 V socket and start the engine.
CAUTIONIf the compressor is connected to one of the two 12 V sockets in the center console, no other electrical consumer may be connected to the other socket.
WARNINGNever leave children unattended in the vehicle with the engine running.
8. Set the switch to position I.
WARNINGNever stand next to the tire while the compressor is pumping. If cracks or bulges appear, switch off the compressor immediately. Do not continue driving. It is recommended to contact an authorized tire workshop.
CAUTIONWhen the compressor starts, the pressure may rise to up to 6 bar, but it drops after approx. 30 seconds.
9. Inflate the tire for 7 minutes.
IMPORTANTRisk of overheating. The compressor must not run for more than 10 minutes.
10. Switch off the compressor to check the pressure on the pressure gauge.
The minimum pressure is 1.8 bar, the maximum 3.5 bar. (If the tire pressure is too high, release air using the pressure reducing valve.)
WARNINGIf the pressure drops below 1.3 bar, the tire is too severely damaged. Do not continue driving. Contact an authorized tire service center.
11. Switch off the compressor and disconnect the cable from the 12 V socket.
12. Disconnect the hose from the tire valve and fit the valve cap.
13. Drive immediately for approx. 3 km (maximum speed: 80 km/h) so that the sealant can seal the tire.
CAUTIONDuring the first rotations of the tire, sealant may spray out of the sealed hole.
WARNINGWhen pulling away, make sure no persons are standing near the vehicle where they could be splashed with sealant. Keep a distance of at least two meters.
Related information
- Temporary tire sealant*
- Temporary Tire Sealing* - Follow-up Check
- Temporary Mobility Kit* - Overview
The Temporary Mobility Kit (TMK) of the Volvo S80 (2nd gen) allows you to seal a damaged tire and inflate tires. It is only suitable for punctures in the tread, not for sidewall damage. The compressor must not be operated for more than 10 minutes to prevent overheating.
After sealing, drive the tire immediately for 3 km and then check the tire pressure. Volvo recommends having the tire checked or replaced by a workshop to ensure safety.
The system combines practical emergency assistance with clear safety information.
Test yourself
A quick Volvo S80 quiz: every answer comes with an explanation and a link to the manual page.