Distributor
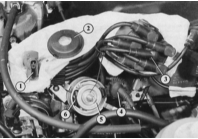
Distributor of 5-cylinder engine, disassembled
1 – distributor rotor;
2 – dust cover;
3 – distributor cap;
4 – connector;
5 – perforated diaphragm;
6 – Hall sensor.
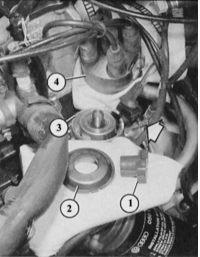
To open the distributor: pry the retaining clips (arrows) with a screwdriver, lift the distributor cap (4) off the housing (3), remove the distributor rotor (1), remove the dust cover (2).

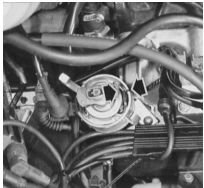
TDC position of the distributor: the contact plate of the distributor rotor must be aligned with the mark on the edge of the housing (arrow). The mark is visible with the dust cover removed.
Models with 4- and 5-cylinder engines
The distributor is, in a certain sense, two-level. Different work is performed at each level:
In the high-tension section, the distributor rotor distributes the ignition pulse to the spark plugs.
In the lower level of the distributor is the Hall sensor, which generates the control pulses.
Disassembling the distributor
PROCEDURE
Pry the metal retaining clips of the cap with a screwdriver.
Disconnect the ground wire from the shielding.
Remove the distributor cap, leaving the high-tension leads connected.
Remove the distributor rotor, then remove the dust cover located below it.
When installing, insert the dust cover so that the guide projection engages the groove on the edge of the distributor housing.
The distributor rotor has a projection that engages the recess on the distributor shaft.
The distributor cap also has a projection as an anti-rotation feature; it must engage the cutout in the distributor housing.
Checking the distributor
PROCEDURE
Remove the distributor cap. It must be clean both inside and outside, so that conductive deposits of dirt, abrasion products or moisture do not divert high-tension current from the ignition system.
The contact carbon in the center must be smooth and shiny, and move without sticking or jamming.
The distributor rotor must not be burnt at the contact tip or in the potting compound of the interference suppression resistor between the center contact and the tip.
A correctly selected distributor rotor must be marked "R1".
Streaks on the distributor cap, like those from a graphite pencil, are signs of current leakage, which have burned these streaks due to dirt or moisture.
This can be temporarily corrected by scraping them off with a screwdriver or knife and covering them with a layer of adhesive, nail polish or, failing better options, simply lipstick.
Removing the distributor
PROCEDURE
Removal: set the No. 1 cylinder to the ignition TDC position, see chapter Engines.
Remove the distributor cap.
Unscrew the bolt on the distributor clamp (at the base), remove the distributor.
Installation: the distributor shaft and crankshaft must still be in the TDC position (check).
Only models with 4-cylinder engine: the slot on the end of the oil pump shaft must be positioned in the distributor opening parallel to the crankshaft.
Turn the distributor shaft so that the contact plate of the distributor rotor aligns with the mark on the edge of the distributor housing.
Insert the distributor, turning its housing if necessary, until it aligns with the mark. Finally, adjust the ignition timing, see the end of this chapter.
Test yourself
A quick Audi 80 quiz: every answer comes with an explanation and a link to the manual page.