Interior equipment
Power windows
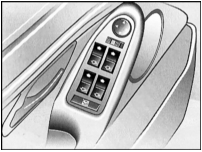
Power windows can be operated after turning the ignition key to position 1.
If the two-position switch is pressed without passing the detent point, the window will move for as long as the switch is held in this position.
A brief press of the switch past the detent point activates the one-touch mode, in which the window moves automatically.
To stop it, press the switch again in the same way.
The front passenger door and the rear of the vehicle (if the rear doors are equipped with power windows*) have separate switches under the windows.
When leaving the vehicle, always take the ignition key with you so that, for example, children cannot operate the power windows and injure themselves.
After the ignition is switched off, the power windows remain operational if:
- the key is in position 1 or 0
- the key is removed from the lock, and on some export versions, until the front doors are opened
or
- within 15 minutes after the first door is opened
For automatic opening and closing of the windows by turning the key in the door lock or using the remote control, refer to the Locks and Anti-Theft Alarm section.
Power Window Anti-Pinch Function
If the window touches the rack contact at the upper edge of the opening while rising, the window will stop and lower slightly.
This function can be deactivated (for example, if an unauthorized person attempts to enter the vehicle from outside) by holding the window switch in the one-touch control position.
Window Lockout Switch
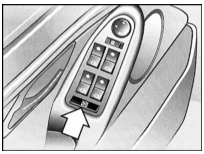
It allows you to prevent the power windows from being operated from the rear seat, for example by children seated there.
If children are seated in the rear seat, always press the lockout switch. Uncontrolled closing of the windows may result in injury.
Tilt/Slide Sunroof*
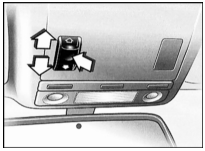
The sunroof can be operated after turning the ignition key to position 1.
• Tilt up: press the switch. The headliner panel will slide back only a few centimeters.
• Slide open: move the switch rearward to the detent.
• Slide closed: move the switch forward to the detent.
Uncontrolled or careless closing of the sunroof may result in injury. When leaving the vehicle, always remove the key from the ignition lock so that, for example, children cannot operate the sunroof and injure themselves.
There will be no vacuum or drafts in the cabin if the air vents are fully open and, if necessary, the air supply is increased while the sunroof is open or tilted.
After the ignition is switched off, the sunroof remains operational if:
- the key is in position 1 or 0
- the key is removed from the lock,
and on some export versions:
- until the front doors are opened, or
- within 15 minutes after they are first opened
For automatic opening and closing of the sunroof by turning the key in the door lock or using the remote control, refer to the Locks and Anti-Theft Alarm section.
Automatic* Opening and Closing
The sunroof opens and closes automatically if you move the switch in the corresponding direction past the detent and then release it.
When the sunroof is open, briefly touching the switch in the "Tilt up" direction moves the sunroof to the fully tilted position.
When the sunroof is tilted, briefly touching the switch in the "Open" direction moves the sunroof to the fully open position.
Briefly touching the switch again stops the movement.
The closed sunroof cannot be tilted up in this mode.
Anti-Pinch Function
If the sunroof encounters an obstacle approximately midway through its closing travel, it will stop and move back slightly.
This function can be deactivated (for example, if the sunroof moves stiffly in its guides in cold weather, or if an unauthorized person attempts to enter the vehicle from outside) by moving the switch past the detent and holding it in this position.
Power Loss or Malfunction
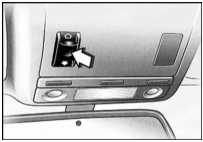
After a power interruption (for example, after disconnecting the battery terminal), the sunroof can only be tilted up. In this case:
1. Tilt the sunroof up to the stop.
2. Hold the switch pressed for approximately one second.
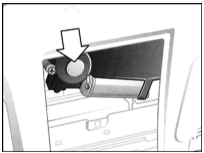
If there is an electrical malfunction, the sunroof can be opened or closed manually. To do this:
1. Remove the dome lamp, reach through the opening and push the sunroof panel out.
2. Remove the cap (shown by the arrow) and, using the hex key from the vehicle tool kit, turn the sunroof drive mechanism in the required direction.
Tilt/Slide Sunroof with Glass Sunshade
The sunroof is operated and functions in exactly the same way as described above. To fully open a tilted sunroof, hold the switch in the "Open" position until the sunroof reaches the required position.
When the sunroof tilts up, the headliner panel slides back slightly, and when opening, it opens together with the sunroof. It remains in the open position and can be closed at any time if necessary.
Sunshade*
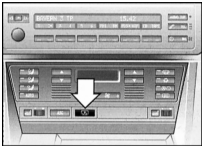
To activate the sunshade, press the switch. The sunshade operates only after turning the ignition key to position 1.
Rear side window sunshades*
Pull each sunshade by the loop and secure it in its holder.
Seats
The seats, as the most important element of the chain connecting the occupant, the chassis and the road, were developed with particular care. State-of-the-art methods were used, such as CAD (computer-aided design), finite element methods, and electronically controlled test systems.
The degree of damping of impacts from the road surface was carefully matched to the characteristics of the chassis. The stable seat structure, together with the seat belts, belt tensioners and, of course, the airbags, provides the highest level of safety. Thanks to the multi-layer seat cushion filling, a high proportion of natural fibers and a complex internal ventilation system, the occupant feels relaxed and does not tire while driving, even on long trips. The lumbar and shoulder supports ensure the optimum position of the spine.
Seat adjustment
For your personal safety, observe the following seat adjustment rules.
Do not adjust the driver's seat while the vehicle is moving. Unexpected movement of the seat may cause loss of vehicle control and result in an accident. The seat belt must fit as close to the body as possible. Otherwise, in a frontal collision the lap belt may slide up over the hips and injure the lower abdomen. In addition, if the belt does not fit closely, its restraining effect is delayed.
Do not allow the front seatback to recline far back while the vehicle is moving (this applies especially to the passenger seat), as in an accident there is a risk of the occupant sliding under the seat belt, which then cannot perform its protective function.
Do not move the front seats rearward when the vehicle is traveling downhill (for example, on multi-level parking ramps or mountain roads), as this may disengage the automatic belt height adjustment system.
Manually adjusted seats

1. Fore-and-aft adjustment: Pull the lever and slide the seat to the desired position. After releasing the lever, gently rock the seat forward and backward to make sure it is locked securely.
2. Height adjustment: Pull the lever and adjust the seat height by loading the cushion with your body weight or by rising from it.
3. Backrest adjustment: Pull the lever and adjust the backrest angle by leaning back against it or leaning forward.
4. Seat cushion tilt adjustment (driver's seat only): Pull the lever and move the cushion to the required position.
To relieve the spinal discs, sit with the seat moved fully rearward, with your entire back supported by the backrest. The ideal posture is one in which the head is in line with the spine.
To reduce muscle strain on long trips, the backrest angle may be increased slightly. However, you must still be able to control the vehicle, with your hands placed at the top of the steering wheel and your elbows slightly bent.
Lumbar support*
See the description of the comfort seat below.
Head restraints
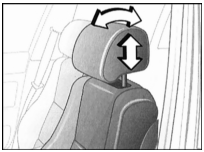
The head restraints can be adjusted for height by pulling them up out of their guides or pushing them down.
The angle of the head restraints can be adjusted by rotating them about their horizontal axis.
Head restraints reduce the risk of neck injury in an accident.
The center of the head restraints should be approximately at ear level.
Sport seats*
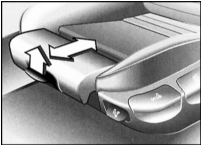
This seat has an additional thigh support adjustment.
Pull the lever and set the thigh support to the position most comfortable for you.
Power-adjustable seat*
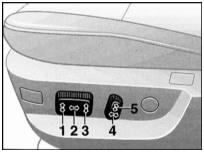
1 — Seat cushion tilt adjustment
2 — Fore-and-aft seat adjustment
3 — Seat height adjustment
4 — Backrest angle adjustment
5 — Head restraint height adjustment
The head restraint angle is adjusted manually.
For your personal safety, always observe the adjustment instructions given above.
Comfort seat*
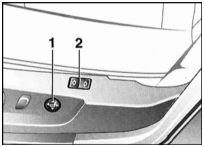
This seat is additionally equipped with lumbar and shoulder support adjustments.
1. Lumbar support
Press the front or rear of the switch to increase or decrease the curvature of the backrest, respectively.
Press the upper or lower part of the switch to move the curved zone up or down.
The backrest contour can be shaped so that its protruding part fits into the hollow of the lower spine, providing support to it.
This supports the upper pelvis and spine, promoting correct and relaxed seating.
2. Shoulder support
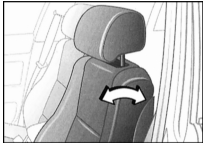
Pressing the two-position switch changes the angle of the upper part of the backrest.
This adjustment also provides back support in the shoulder area. This makes the seating position more relaxed and relieves shoulder muscle tension.
Seat adjustment will be optimal if the recommendations below are followed.
For driver and front passenger:
1. Move the upper part of the backrest fully rearward.
2. Adjust the seat to the optimal seating position as described above.
3. Move the upper part of the backrest forward to provide comfortable shoulder support.
For front passenger with the backrest reclined rearward:
1. Move the upper part of the backrest fully rearward.
2. Slightly increase the cushion tilt.
3. Slightly increase the backrest tilt.
4. Move the upper part of the backrest forward.
When adjusting the longitudinal seat position, make sure the seat belt still fits snugly against the body; otherwise it will not be able to perform its protective function.
Seat heaters*
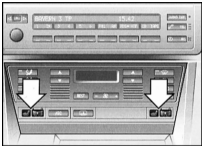
To heat the seat cushion and backrest, first turn the ignition key to position 2. Press the button to switch the heater on and off.
When the seat heater is on, the green indicator lamp built into the button is lit.
The heating intensity is set with the knurled wheel; regulation is thermostatically controlled.
Minimum temperature
Maximum temperature
Steering Wheel Position Adjustment
Manual adjustment
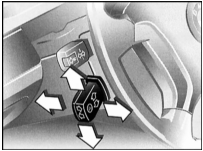
1. Pull the locking lever down.
2. Sit in the correct driving position, then adjust the longitudinal position and tilt angle of the steering wheel.
3. Return the locking lever to its original position.
To avoid an accident, do not adjust the steering wheel while the vehicle is moving.
Power adjustment*
The steering wheel can be adjusted in four directions, corresponding to the positions of the switch lever.
To avoid an accident, do not adjust the steering wheel while the vehicle is moving.
For information on the memory function for the steering wheel, seat and mirrors, refer to the material below in this Section.
Heated steering wheel*
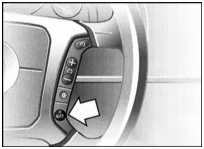
To heat the steering wheel, first turn the ignition key to position 2. Press the button indicated by the arrow to switch the heater on and off.
When the steering wheel heater is on, the indicator lamp built into the button is lit.
If the vehicle is equipped with a multifunction steering wheel without a heater button, the recirculation mode button is located in its place (refer to the Controls and Instruments Section).
Mirrors
Outside rearview mirrors
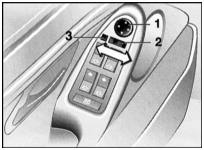
1 — four-way mirror position adjustment switch
2 — switch for selecting the left or right mirror
3 — button for folding and unfolding the mirrors (only with the anti-glare mirror package*, see below)
Pressing the mirror button folds the mirrors against the body or extends them outward. This is convenient when driving through a car wash, driving on narrow streets, and for returning the mirrors to their normal position if they were accidentally moved forward.
The mirrors can be folded against the body only when the vehicle is stationary or at a speed of no more than 10 km/h.
Mirror position can also be adjusted manually by turning them by the edge of the glass.
For information on the memory function for the mirrors, steering wheel and seat, refer to the material below in this Section.
The outer, aspherically curved part of the reflective surface provides a wider field of view than the inner, convex part, at the cost of some image distortion. As a result, the rear view angle increases and the so-called blind spot is reduced.
The mirror on the passenger side has a more convex reflective surface than the driver's mirror. Objects seen in it appear farther away than they really are. Therefore, it is only conditionally suitable for judging the distance to vehicles approaching from behind. The same applies to the outer aspherical part of the mirror.
Electric heating
Both mirrors are heated automatically, depending on air temperature, when the ignition key is turned to position 2.
Interior rearview mirror
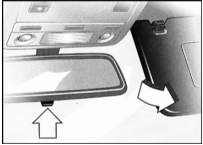
To reduce the glare from headlights of vehicles behind you, turn the small lever.
Illuminated vanity mirrors*
To use the mirror, flip the sun visor down and, if the mirror cover is closed, slide the cover to the side.
The mirror lights come on as soon as the ignition key is turned to position 1.
Sun visors
The visors can not only be flipped down but also swung aside toward the side windows.
Anti-glare interior rearview mirror*
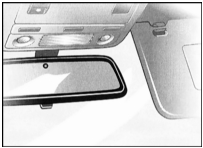
The reflectance of the mirror automatically and smoothly decreases depending on the brightness of the general lighting and the glare from the headlights of vehicles behind.
When the reverse gear is engaged or the AT selector lever is moved to position R, the mirror automatically switches to full reflection without dimming.
For the mirror to operate properly, keep its photocells unobstructed and clean. The light sensor facing forward in the mirror housing measures the light intensity in front of the vehicle. The second light sensor is located in the mirror itself. The electronic control system compares the light intensity values from the front and the rear. The difference between the values determines the change in electrical voltage applied to the liquid crystal layer of the mirror. This layer responds to the voltage change and provides smooth dimming of the mirror. Thus, there is no need to adjust the degree of mirror dimming manually, which allows the driver to concentrate fully on the road.
Anti-glare mirror package*
Both outside rear view mirrors are also equipped with automatic smooth dimming. In addition, using switch 3 (illustration), they can be folded and unfolded sideways.
Memory system for seat, mirror and steering wheel position*
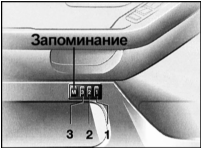
Up to three seat, mirror and steering wheel (if power steering wheel adjustment is provided) positions can be stored and recalled.
The memory system does not include recall of the lumbar support position.
Storing
1. Insert the key into the ignition switch and turn it to position 1 or 2.
2. Adjust the seat, mirrors and steering wheel to a comfortable position for you.
3. Press the MEMORY button. The indicator lamp built into it will light up.
4. Press button 1, 2 or 3 as desired. The indicator lamp will go out.
Recall
Ignition key in position 1:
Press and release the desired button (1, 2 or 3).
Operating any power seat adjustment switch or pressing one of the memory buttons will immediately interrupt the adjustment process.
Driver's door closed and ignition key turned to position 0 or 2 or removed:
Hold the desired button (1, 2 or 3) pressed until the adjustment process is fully completed.
If the MEMORY button is pressed accidentally, press it again to turn off the indicator lamp.
Automatic mirror adjustment when reversing
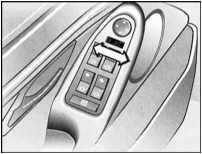
1. Set the mirror control switch (shown by arrow) to the "Driver's mirror" position.
2. When the reverse gear is engaged or the AT selector lever is moved to position R, the mirror on the passenger side tilts slightly so that, for example, when parking you can see the lower part of the vehicle's side and the edge of the curb.
You can also disable this function by setting the mirror control switch to the "Passenger's mirror" position.
Glove box

• Opening:
Pull the handle. The glove box light will come on.
• Closing:
Close the lid by pressing it upward.
• Locking:
To lock the glove box, use the key from the central locking system. After that, it can only be unlocked with the central locking key.
To avoid injury in an accident, it is recommended not to leave the glove box open unnecessarily.
Rechargeable portable lamp*
The lamp is located on the left side of the glove box.
Thanks to the built-in device that protects its battery from overcharging, it can be kept permanently plugged into the socket.
The lamp plug must only be inserted into the socket when the lamp is switched off, otherwise there is a risk of overloading and damaging the lamp.
Storage compartments for small items
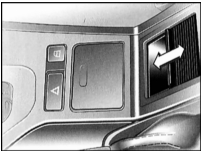
The front lid of the storage compartment on the sloped side of the center console is sliding.
When the vehicle is equipped with a cassette holder*, each cassette compartment opens by pressing a small button.
The open compartment is located to the left of the steering column.
If the vehicle is equipped with a compartment with a hinged lid*, pull the handle downward to open it, and to close it, press the lid upward.
The compartment on the center console between the two front seats. To open the compartment, grasp the recess at the front and pull the lid upward. A telephone can be installed in this compartment if you choose to equip your vehicle with one.
Pockets or recesses for small items are also located on each door and on the back of the front seatbacks*.
Beverage can holder*
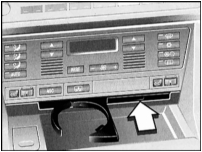
There are two beverage can holders in the front of the center console compartment, and two at the rear, at the end of the center console under the grilles.
They open with a simple press, and to close them, push the holders back in.
Front ashtray*
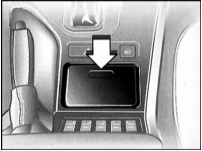
Opening:
The ashtray opens with a simple press in the direction shown by the arrow.
Extinguish cigarettes in the ashtray receptacle without applying excessive force, after first tapping off the ash.
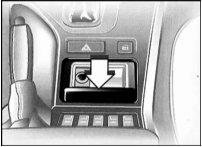
Cleaning:
Press the edge of the lid (as shown by the arrow). The ashtray will rise upward, after which it can be removed from its holder.
Cigarette lighter*
Press the recess (shown by the arrow) and push the cigar lighter into the socket.
Once it has popped back out, it can be removed.
Hold the hot cigar lighter only by the handle to avoid the risk of burns.
The cigar lighter remains operational after the key is removed from the ignition lock. Therefore, never leave children unattended in the vehicle.
Power outlet
This socket can be used as a power outlet for connecting a portable lamp, vacuum cleaner and other electrical loads with a power consumption of up to approximately 200 W and an operating voltage of 12 V. On vehicles equipped for non-smokers, the cigar lighter is covered by a removable cap. To avoid damaging the socket, do not attempt to insert an unsuitable plug into it.
Rear ashtrays*
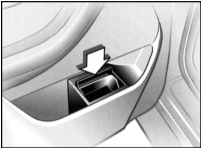
Opening:
The ashtray opens by pressing the recess.
Cleaning:
Press the edge of the lid (as shown by the arrow).
The ashtray will rise up, after which it can be removed.
Long-load carrier*

The rear seat backrest is split in a 1/3:2/3 ratio. To carry long items, you can fold down each of these sections of the backrest.
To fold down a section of the backrest, grasp the recess and pull the backrest forward (arrow 1).
When reinstalling, make sure the backrest is securely locked in place. The red latch must move down (arrow 2).
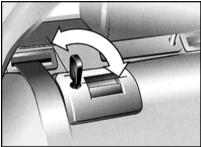
You can lock each section of the backrest using the key from the central lock.
This prevents access to the luggage compartment from the passenger compartment, which is convenient when you hand over the door and ignition key 3 (refer to Section Locking Devices and Anti-Theft Alarm) to a hotel parking attendant.
Ski bag*
The bag can be used to carry up to four pairs of skis without concern for their condition or for soiling the passenger compartment.
Taking into account the length of the bag and the additional space in the luggage compartment, skis up to 2.10 m long can be loaded into the vehicle. When loading skis 2.10 m long, the capacity of the bag is reduced, so that no more than two pairs of skis of the specified maximum length can be placed in it.
Removing the rear center armrest
(Not provided when the long-load carrier is used on the vehicle. Refer to the materials below).
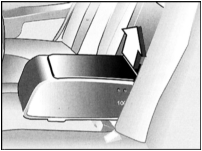
1. Fold down the center armrest.
2. Remove the trim panel secured with hook-and-loop fasteners and place it on the armrest.
3. Grasp the front of the armrest with one hand and the rear of the armrest with the other hand, and pull it up sharply (as shown by the arrow).
Installing the armrest
Insert the armrest from above and press it down until it clicks into the holders.
Make sure the side pivots do not damage the seat upholstery.
Loading
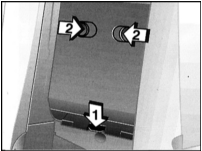
1. Press the button shown by arrow 1. The tailgate hatch in the luggage compartment will unlock.
2. Squeeze the latches shown by arrows 2 and fold down the cover.
3. Spread out the bag and place it between the front seats. The zipper is designed to simplify access to items loaded in the bag, as well as for quick drying.

4. Secure the loading hatch cover on the luggage compartment side to the magnetic holders located on the underside of the shelf behind the rear seat.
Make sure that skis are loaded into the bag only when clean, and avoid damaging the bag with sharp edges.
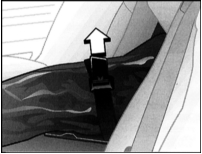
Skis or other long items loaded into the bag must be secured with the strap sewn to the bag, tightened using the buckle provided for this purpose.
To stow the bag, perform the steps in reverse order.
Ski bag used in combination with the long-load carrier
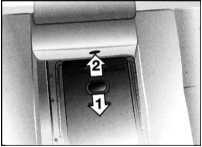
1. Fold down the rear center armrest, remove the trim panel secured with hook-and-loop fasteners and place it on the armrest.
2. Press down button 1 and fold the cover forward.
3. Press button 2. The cover in the luggage compartment is unlocked.
Test yourself
A quick BMW 1 quiz: every answer comes with an explanation and a link to the manual page.