Transmission Overhaul
Special Service Tools / General Equipment
 |
100-001 (T50T-100-A) Slide hammer |
 |
100-002 (TOOL-4201-C) Dial Indicator Holding Fixture |
 |
205-153 (T80T-4000-W) Handle |
 |
211-061 (T78P-3504-H1) Puller, Roll Pin |
 |
303-D011 (D80L-100-G) Drive Pin (3/16 inch diameter) |
 |
303-D019 (D80L-100-K) Collet, 3/4 to 7/8 inch |
 |
307-003 (T57L-500-B) Holding Fixture, Transmission |
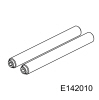 |
307-091 Handle, Torque Converter TKIT-2009TS-F |
 |
307-300 Gauge Bar, Selective Shims TKIT-1994-LMH/MH2 TKIT-1994-F TKIT-1994-FLM/FM |
 |
307-566 Torque Converter Retainer TKIT-2006C-FFMFLM TKIT-2006C-LM TKIT-2006C-RYAD |
 |
307-574 Front Clutch Spring Compressor TKIT-2006UF-FLM TKIT-2006UF-REAR |
 |
307-578 Input Shaft Support Seal Installer (back plate, multiple rings) TKIT-2006UF-FLM TKIT-2006UF-REAR |
 |
307-581 Manual Lever Seal Installer TKIT-2006UF-FLM TKIT-2006UF-ROW |
 |
307-584 2-6 Spring Compressor TKIT-2006UF-FLM TKIT-2006UF-REAR |
 |
307-589 Overdrive Clutch and Balance Piston Service Kit TKIT-2006UF-FLM TKIT-2006UF-REAR |
 |
307-625 Support, Bench Mount TKIT-2008ET-FLM TKIT-2008ET-ROW |
 |
307-626 Installer, Differential Seal TKIT-2008ET-FLM TKIT-2008ET-RING |
 |
307-627 Installer, Converter Seal TKIT-2008ET-FLM TKIT-2008ET-RYAD |
 |
307-628 Protector, Low Reverse Piston Seal TKIT-2008ET-FLM TKIT-2008ET-REAR |
 |
307-629 Protector, Low Reverse / 1-2-3-4 Piston Seal TKIT-2008ET-FLM TKIT-2008ET-REAR |
 |
307-630 Center Support Piston Spring Tool TKIT-2008ET-FLM TKIT-2008ET-REAR |
 |
307-632 Protector, 2-6 Piston Seal TKIT-2008ET-FLM TKIT-2008ET-REAR |
 |
307-633 2-6 Return Spring Piston Compressor TKIT-2008ET-FLM TKIT-2008ET-REAR |
 |
307-635 Protector, Turbine Shaft Seal TKIT-2008ET-FLM TKIT-2008ET-RYAD |
 |
307-691 Tester, Torque Converter Leak |
 |
307-718 Installer, Axle Seal TKIT-2013B-FL TKIT-2013B-RYAD |
 |
307-723 Installer, Turbine Seal TKIT-2014A-FL |
 |
307-732 Torque Converter Flush Tool Kit |
| Flat-blade screwdriver | |
| Magnetic receptacle | |
| Hydraulic Press | |
| Long-Nose Pliers | |
| Puller | |
| Strike with a fist | |
Materials
| Name | Specification |
|---|---|
| Motorcraft® Ultra Silicone Sealant TA-29 |
WSS-M4G323-A8 |
| Motorcraft® MERCON® LV Automatic Transmission Fluid XT-10-QLVC |
WSS-M2C938-A MERCON® LV, |
All vehicles
- For component types and base part numbers, refer to
Refer to: Transmission Description (307-01A Automatic Transmission - 6-Speed Automatic Transmission - 6F35, Description and Operation). - Install the special tools.
Use special service tool: 307-732 Torque Converter Flush Tool Kit, 307-625 Fixture, Bench Mount.
- Install the transmission on the bench-mounted holding fixture.
Use the special service tools: 307-003 (T57L-500-B) Holding Fixture, Transmission, 307-625 Fixture, Bench Mount.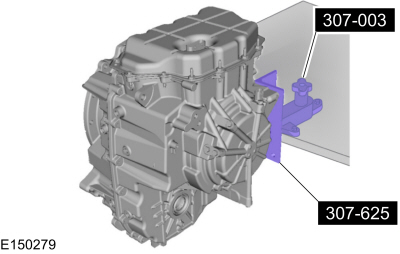
- Remove the special tool.
Use the special service tool: 307-566 Retainer, Torque Converter.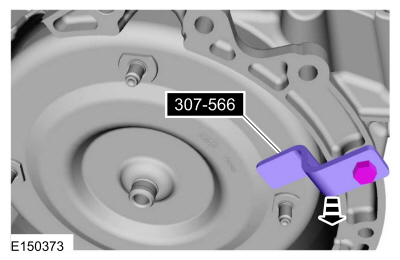
NOTICE: The torque converter is heavy. Take care not to drop it, as this may cause damage.
Using the special tools, remove the torque converter from the transmission.
Use the special service tool: 307-091 Handle, Torque Converter.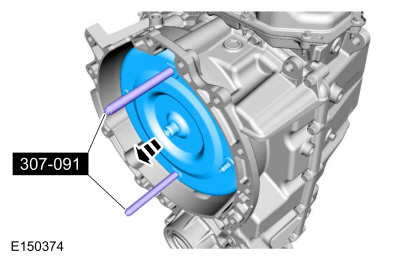
A new or remanufactured torque converter must be installed if one or more of the following statements is true:- The sealing surface has a groove worn by the seal.
- A torque converter malfunction has been determined based on complete diagnostic procedures.
- The torque converter stud or studs, threaded inserts, hub or impeller bushing are damaged.
- The torque converter has external discoloration (due to overheating).
- There is evidence of water or antifreeze contamination.
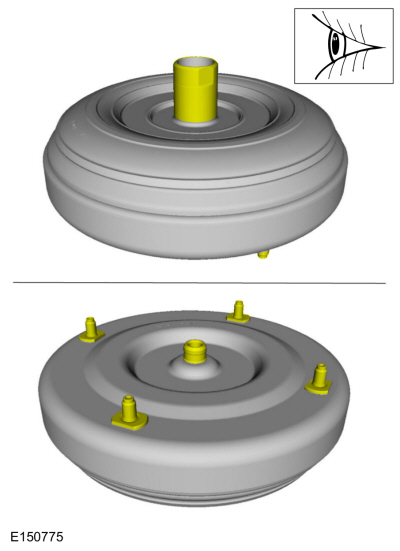
Flush the torque converter using a heated transmission cooler flush fluid.
- The torque converter must be flushed each time the transmission is overhauled. It is mandatory to have the proper equipment and to follow the procedure when flushing the torque converter. Equipment REQUIRED for flushing:
- Maintain the transmission fluid temperature at 140°F or higher.
- Pulsing transmission fluid during cleaning
- Flow meter capable of GPM
- Filter rated 100 micron or less
- Air purge capability before and after flushing
- If equipment meeting the above specifications is not available, the torque converter must be flushed manually. Go to Flushing the Torque Converter Manually. The following steps in this procedure apply.
- Check and top up the transmission fluid level in the heated transmission cooler flush system with transmission fluid.
- Turn on the heater and let the transmission fluid in the heated transmission cooler flush system warm for 15-30 minutes to reach 60 °C before use.
- Place the torque converter in an arbor press. Support the torque converter on the mounting pads.
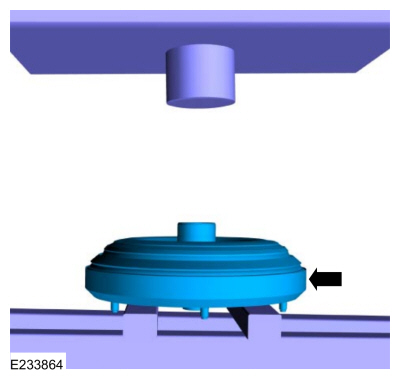
- Using the special tools, assemble the correct turbine shaft simulator to the torque converter, flush the hub and install it on the torque converter hub.
Use special service tool: 307-732 Torque Converter Flush Tool Kit.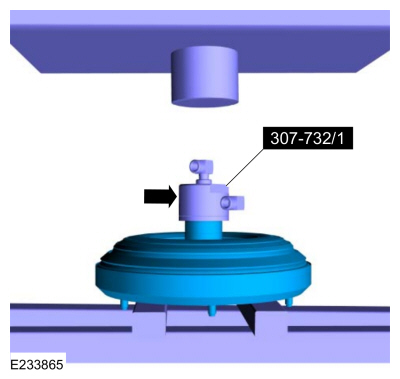
- Using the special tool, install the slotted cover.
Use special service tool: 307-691 Tester, Torque Converter Leak.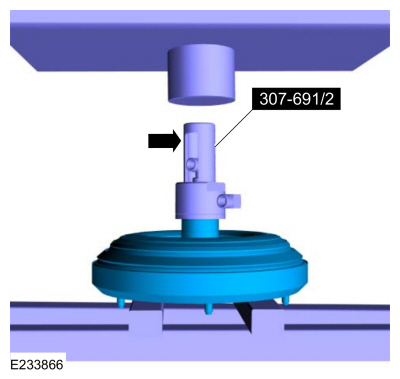
- Apply sufficient press force to seat the torque converter hub flush with the converter hub.
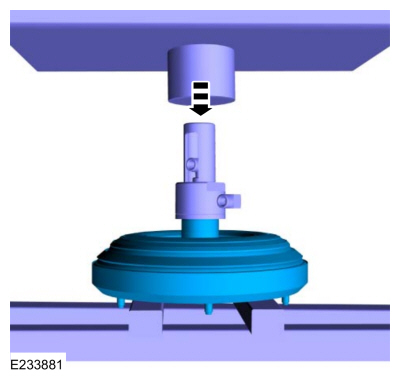
Connect the flushing machine to the converter hub.- Red hose on top.
- Blue hose on bottom.
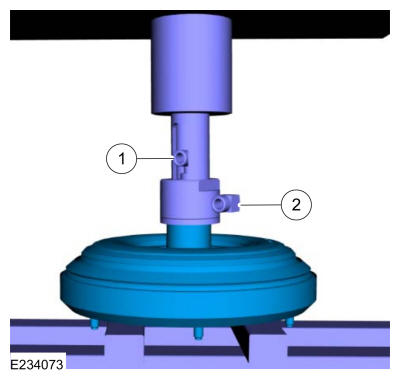
- Follow the equipment instructions to purge the transmission fluid from the torque converter before starting the flushing procedure.
- Flush the converter forward for 15 minutes.
- Periodically monitor the GPM flow meter during the flushing procedure. A flow rate above 2.0 gal/min is required to dislodge contamination remaining behind the TCC plate. Flush the machine filter(s) if the flow rate drops below 2 gal/min.
- Follow the equipment instructions to flush the torque converter.
- Allow the torque converter and equipment to cool for 30 minutes before starting work.
- Disconnect the hoses and remove the special tools.
Flush the torque converter manually.
NOTICE: Do not use water-based cleaners or mineral spirits to clean or flush the torque converter, otherwise transmission damage will occur. Use only clean transmission fluid designated for the transmission and torque converter being serviced.
- Pour a small amount of transmission fluid from the torque converter onto absorbent white cloth or through filter paper.
- Inspect the transmission fluid for contamination. The transmission fluid must not contain metal particles. If metal contamination is found, do not continue manual flushing. The torque converter must be flushed with the transmission cooler flushing machine heated.
- Drain the remaining transmission fluid from the torque converter.
- Using only the recommended transmission fluid, add 1.9 L (2 liters) of clean transmission fluid to the torque converter and swirl by hand.
Material: Motorcraft® MERCON® LV Automatic Transmission Fluid / XT-10-QLVC (WSS-M2C938-A) (MERCON® LV)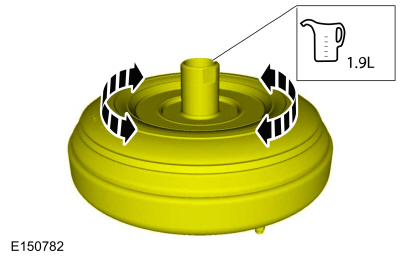
- Thoroughly drain the transmission fluid.
Auto Start-Stop
NOTICE: Do not use power tools to loosen the auxiliary transmission fluid pump bolts, as damage may result.
Remove the bolts and remove the auxiliary transmission fluid pump.- Heat the bolts to soften the Loctite®.
- Remove and discard the bolts.
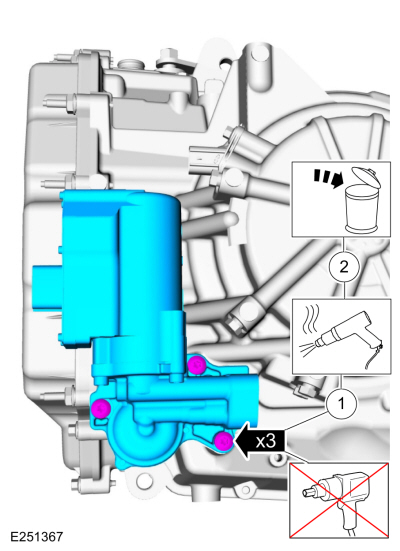
- Remove the auxiliary transmission fluid pump gasket.
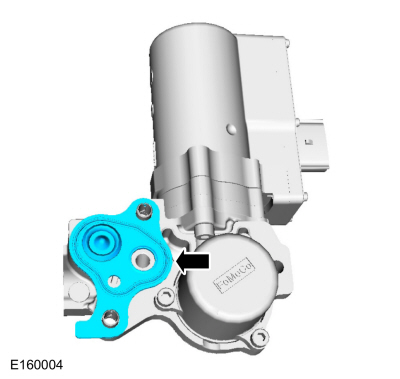
- Remove the auxiliary transmission fluid pump feed tube assembly.
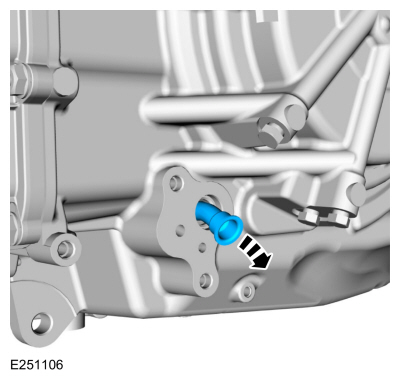
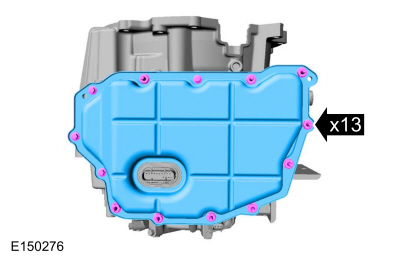
All vehicles
- Remove the main control body cover bolts and the main control body cover.
- Disconnect the OSS sensor electrical connector.

- Disconnect the TR sensor electrical connector.
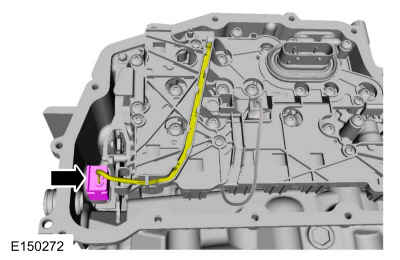
- Remove the main control to cover seal.
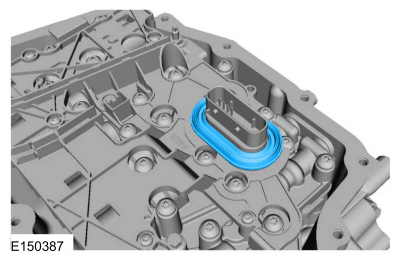
NOTICE: If the transmission internal wiring harness frame has melted due to overheating, the transmission and cooler must be replaced.
Remove the main control adjusting nut and the main control body-to-transmission case bolts, then remove the main control body.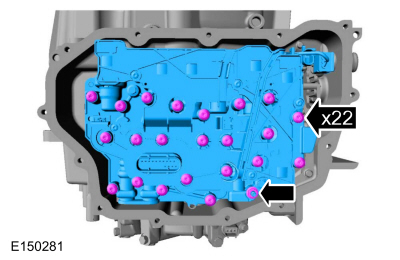
- Inspect the main control body for damage. If damaged, install a new main control body. If the main control assembly is not damaged, disassemble the main control body and clean it.
Refer to: Main Regulator Valve Body (307-01A Automatic Transmission - 6-Speed Automatic Transmission - 6F35, Overhaul).
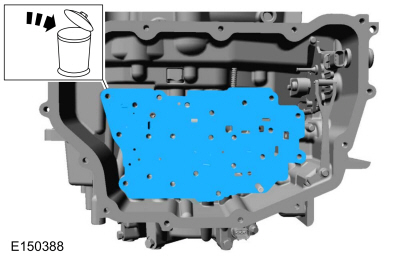
- Remove and discard the main control and transmission case separator plate.
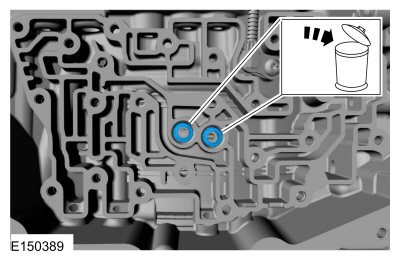
- Remove and discard the forward (1, 2, 3, 4) clutch and low/reverse clutch main control-to-transmission case seal.
- Remove the TSS sensor bolt and the TSS sensor.
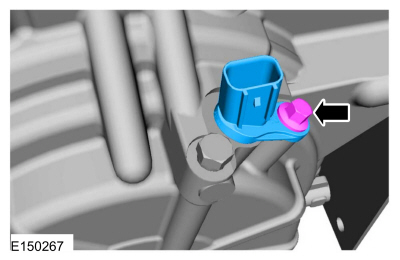
- Remove the TR sensor retaining spring bolt and the TR sensor retaining spring.
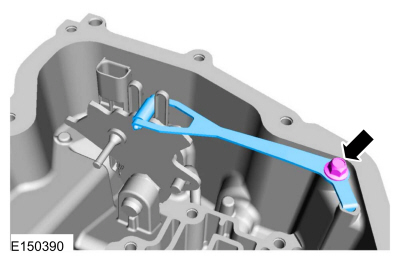
- Remove the OSS sensor bolt and the OSS sensor.
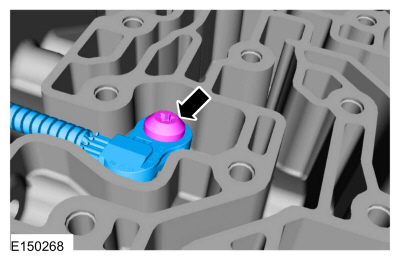
- Remove the torque converter housing bolts.
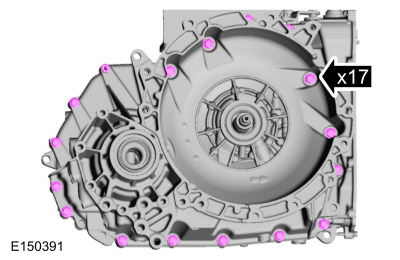
- Disconnect the torque converter housing from the transmission case.
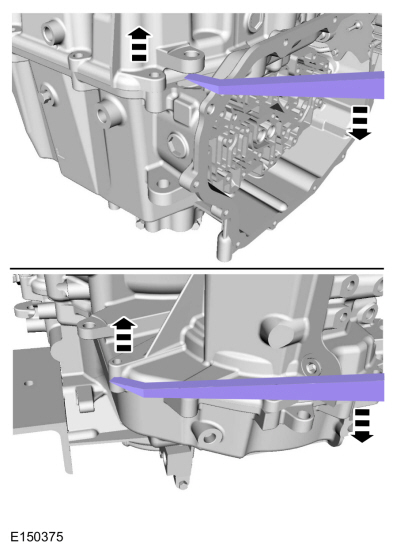
- Remove the torque converter housing from the transmission case.

- Remove the No. 15 differential thrust bearing.
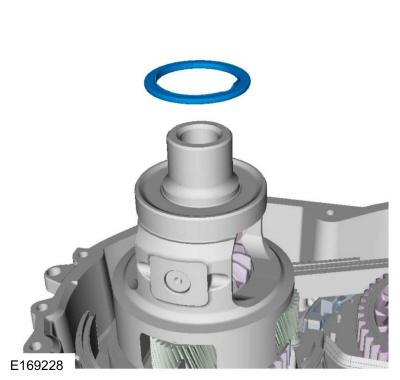
- Remove the differential assembly.
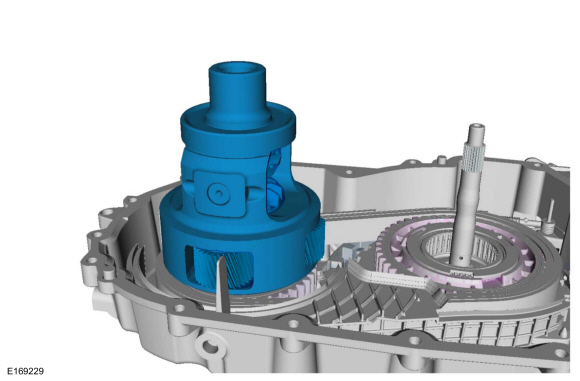
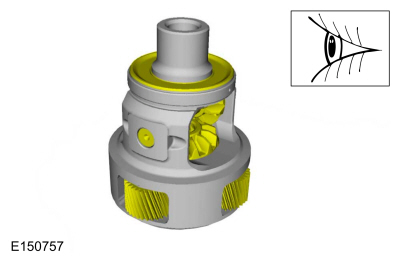
- Make sure the bearings rotate freely and do not move excessively back and forth or side to side. Check for damage or excessive wear. If necessary, install a new differential.
- Remove the differential sun gear.
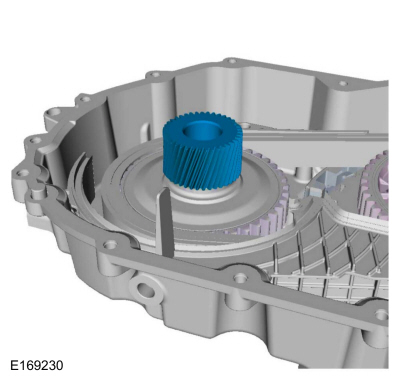
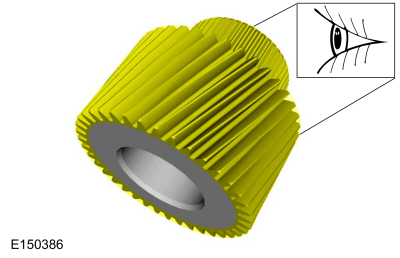
- Inspect the differential sun gear for damage or wear and install a new one if necessary.
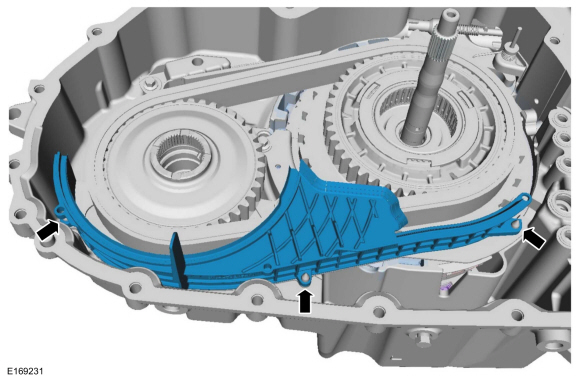
- Remove the differential transmission fluid baffle.
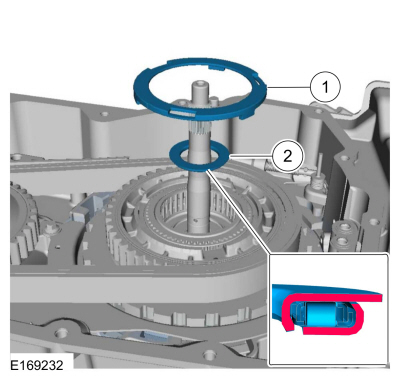
- Remove the No. 13 thrust washer.
- Remove the No. 11 drive sprocket thrust bearing.
- Remove the drive and driven sprockets and chain together.
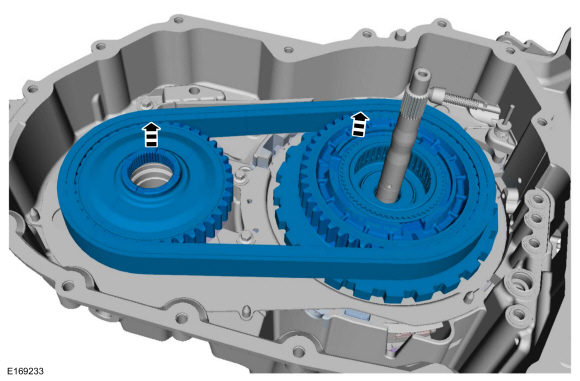
- Remove the drive chain from the drive and driven sprockets.
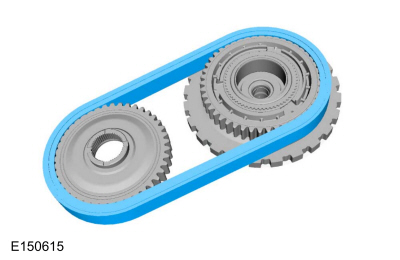
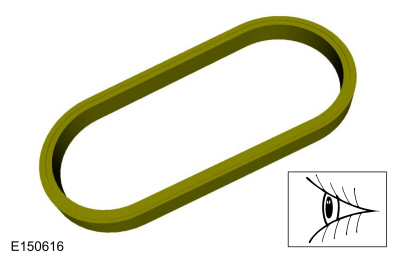
Clean and inspect the drive chain for damage or excessive wear. If necessary, install a new chain.- Check the chain link tension or slack.
- Make sure the chain moves freely.
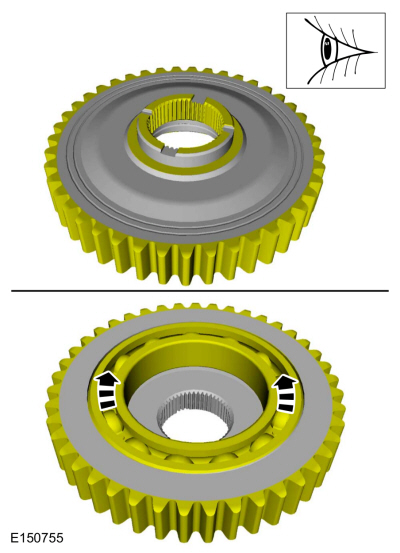
Inspect the driven sprocket for damage or excessive wear and install a new one if necessary.- Chain teeth
- Spline teeth
- Thrust bearing surfaces
- Bearing
- Remove the snap ring and remove the drive sprocket from the front planetary gear hub/parking gear assembly.
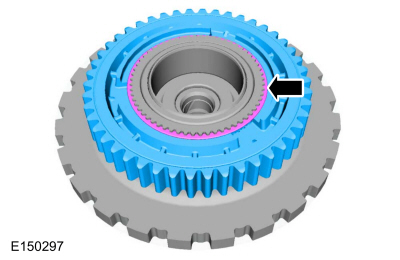
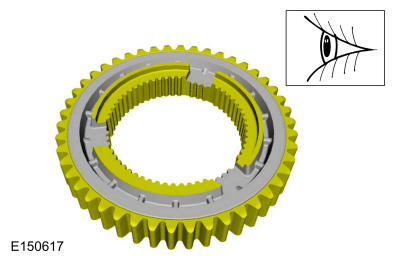
Inspect the drive sprocket for damage or excessive wear and install a new one if necessary.- Chain teeth
- Spline teeth
- Thrust washer surface
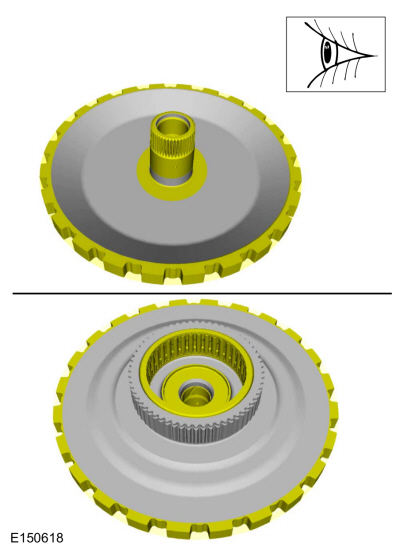
Inspect the front planetary gear hub/parking gear assembly for damage or excessive wear and install a new one if necessary.- Parking gear teeth
- Spline teeth
- Thrust washer surface
- Thrust bearing surface
- Bearing surfaces
- Needle bearing
- Install the drive sprocket onto the front planetary gear hub/parking gear assembly and install the snap ring.
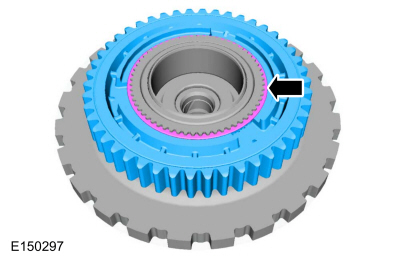
- Install the drive chain onto the drive and driven sprockets.
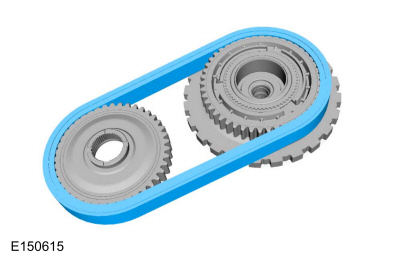
- Remove the No. 12 driven sprocket thrust bearing.
- Remove the No. 10 front sun gear and thrust bearing assembly.
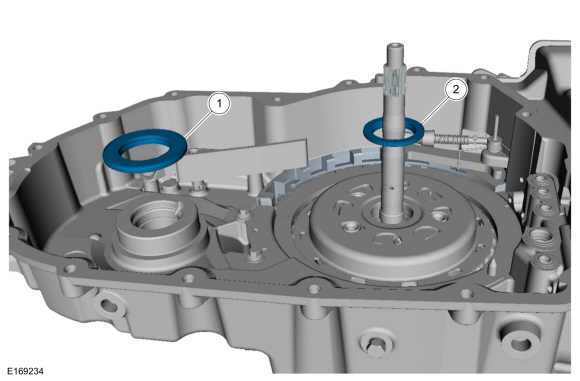
- Remove the fluid reservoir bolts and the fluid reservoir.
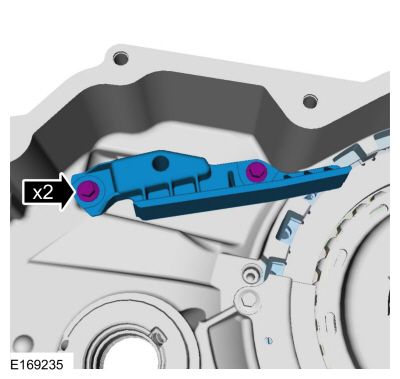
- Remove the transmission fluid deflector bolts and the transmission fluid deflector.
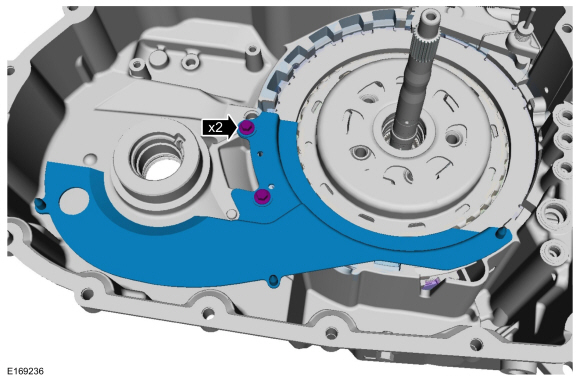
- Remove the retaining pin and spring.

- Remove the parking pawl.
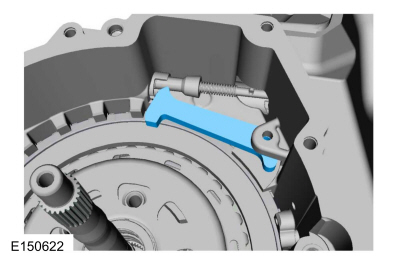
- Remove the forward (1, 2, 3, 4) clutch snap ring.
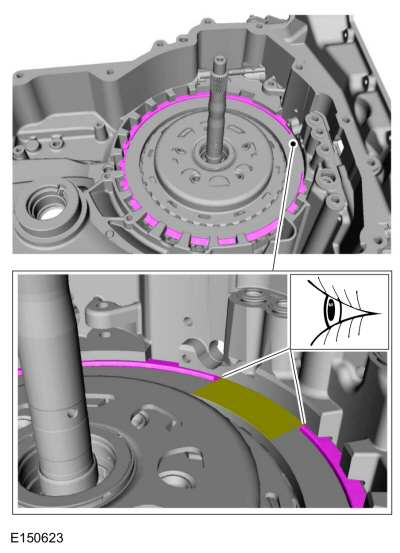
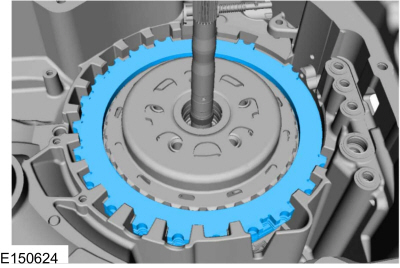
- Remove the forward (1, 2, 3, 4) clutch apply plate, clutch pack assembly and wave spring.
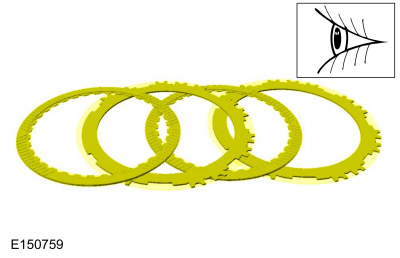
- Inspect the clutch plate and apply plate surfaces for damage or excessive wear.
- Remove the front planetary sun gear and housing assembly.
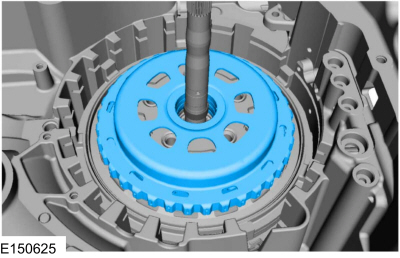
Clean and inspect the front planetary sun gear and housing assembly for damage or wear. Install a new one if necessary.- Gear teeth
- Clutch pack surfaces with housing
- Thrust bearing surfaces

- Remove the front planetary carrier/rear ring gear assembly.
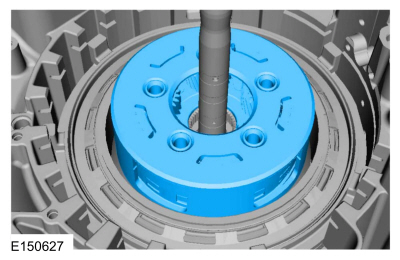
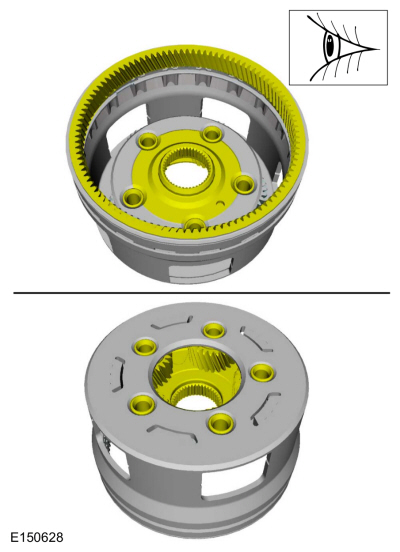
Clean and inspect the front planetary carrier/rear ring gear assembly for damage or excessive wear. Install a new one as necessary.- Gear teeth
- Gear surfaces
- Gear bearings
- Spline teeth
- Thrust bearing
- Thrust bearing surfaces
- Ring gear teeth
- Remove thrust bearing No. 7.
- Remove thrust bearing No. 8.
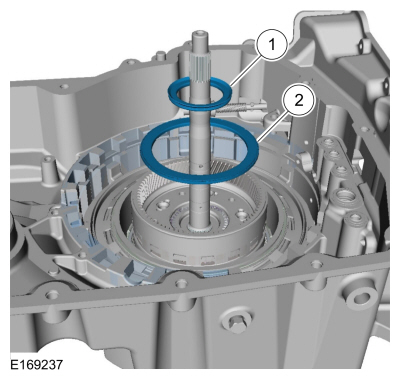
- Remove the center planetary carrier/front ring gear assembly.
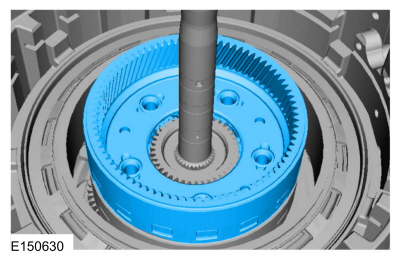
Clean and inspect the center planetary carrier/front ring gear assembly for damage or excessive wear. Install a new one as necessary.- Gear teeth
- Gear surfaces
- Gear bearings
- Spline teeth
- Thrust bearing surfaces
- Ring gear teeth
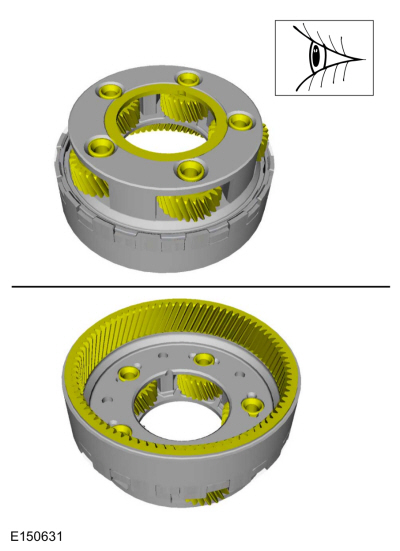
- Remove the center planetary sun gear.
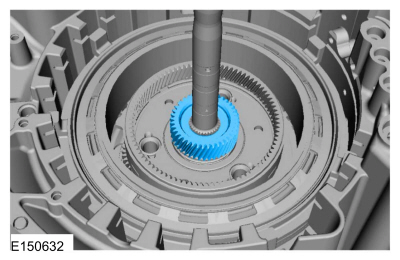
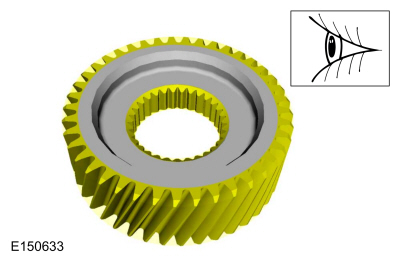
Clean and inspect the center planetary sun gear for damage or excessive wear. Install a new one if necessary.- Sun gear teeth
- Spline teeth
- Remove thrust bearing No. 5.
- Remove thrust bearing No. 6.
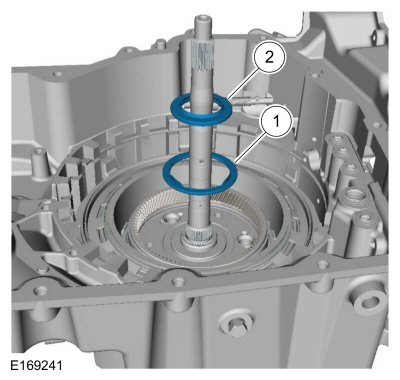
- Remove the center support assembly.
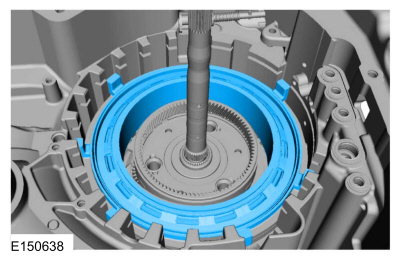
- Remove the rear planetary carrier/center ring gear assembly.
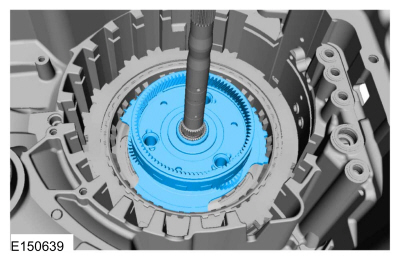
Clean and inspect the rear planetary carrier/center ring gear assembly for damage or excessive wear. Install a new one as necessary.- Gear teeth
- Gear surfaces
- Gear bearings
- Spline teeth
- Thrust bearing surfaces
- Thrust bearing
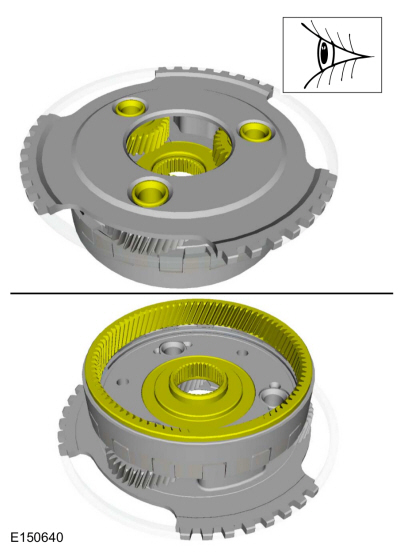
- Remove the low/reverse wave spring, clutch pack and pressure plate.
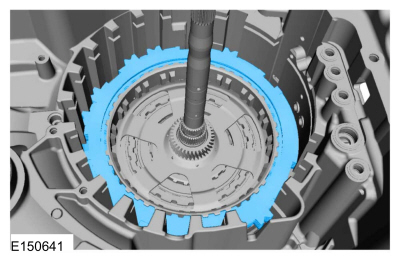
- Inspect the low/reverse clutch pack and pressure plate surfaces for damage or excessive wear. Install new parts if necessary.
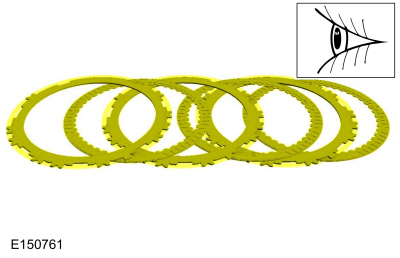
- Remove the low one-way clutch (OWC).
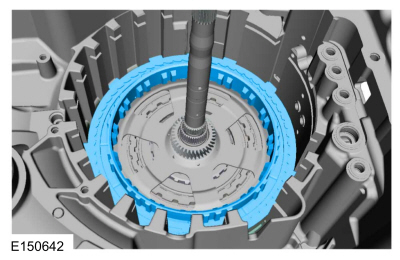
NOTICE: Do not clean in water or water-based solvents. Damage to the component may occur.
Clean and inspect the low one-way clutch (OWC) for cracks and damaged splines. The inner race must rotate clockwise and lock when rotated counterclockwise. If any damage is found, or the clutch does not rotate or lock, install a new low one-way clutch (OWC).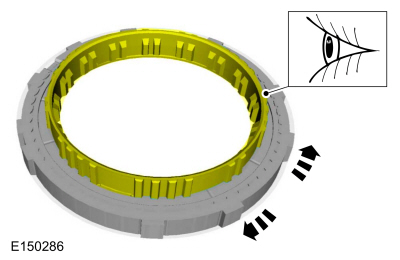
- Inspect the intermediate (2, 6) clutch surface for damage. If the surface is burnt or excessively worn, install a new one-way clutch (OWC).
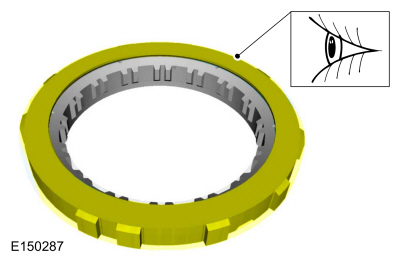
- Remove the rear planetary sun gear and housing assembly and remove the intermediate (2, 6) clutch from the assembly.
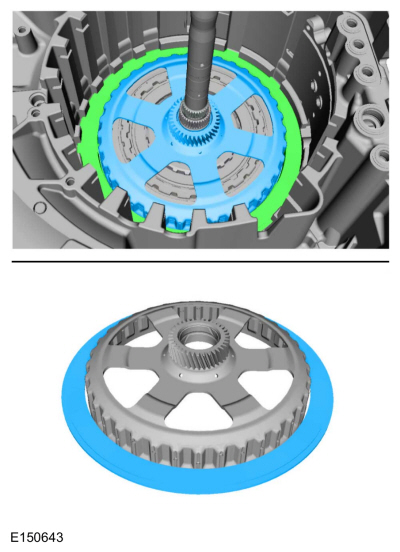
- Inspect the intermediate (2, 6) clutch surface for damage or excessive wear. Install a new one if necessary.
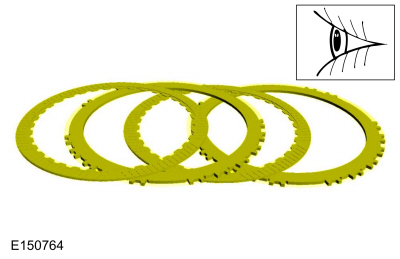
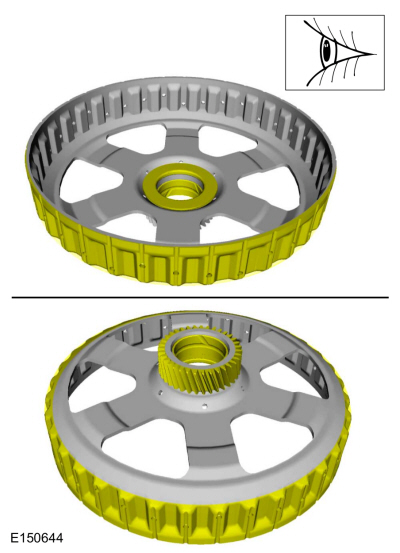
Clean and inspect the rear planetary sun gear and housing assembly for damage or wear. Install a new one if necessary.- Sun gear teeth
- Clutch pack surfaces with housing
- Bearing surfaces
- Remove the pressure plate and wave spring.
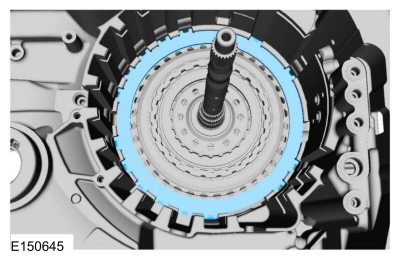
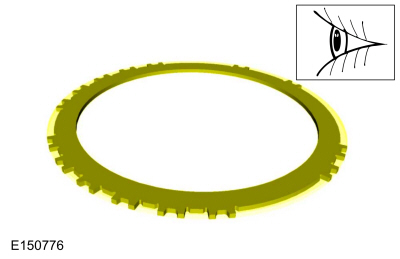
- Inspect the pressure plate surface for damage or excessive wear. Install a new one if necessary.
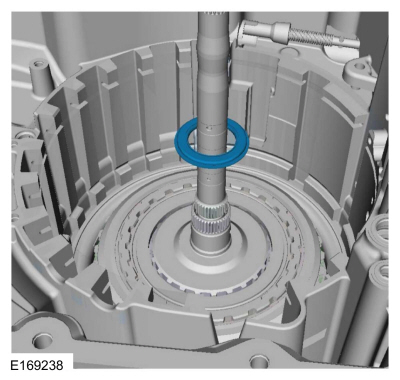
- Remove thrust bearing No. 3.
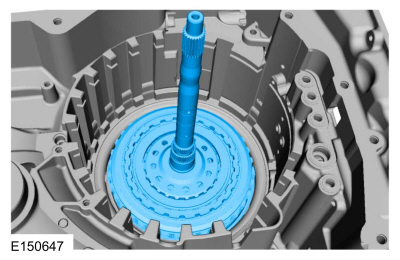
- Remove the overdrive/direct clutch assembly.
- Remove thrust bearing No. 1.
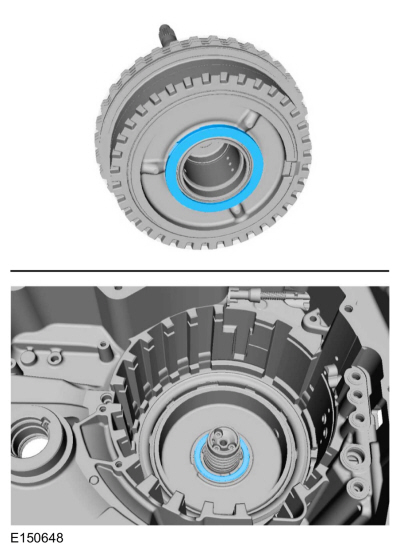
- Remove the intermediate (2, 6) clutch snap ring.
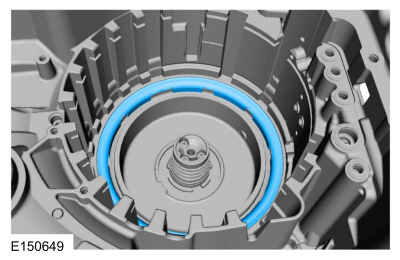
- Remove the clutch strut bolts and clutch strut.
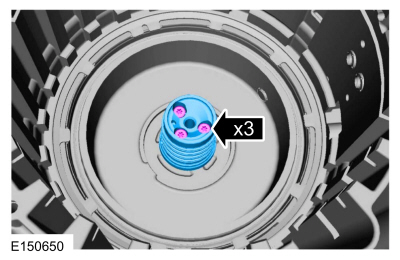
- Remove the intermediate (2, 6) clutch return spring snap ring.
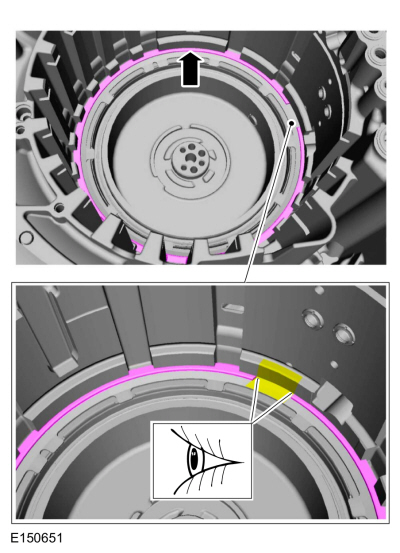
- Remove the intermediate (2, 6) clutch return spring.
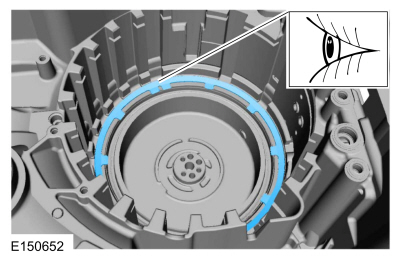
- Remove the intermediate (2, 6) clutch piston.
Use general equipment: long-nose pliers.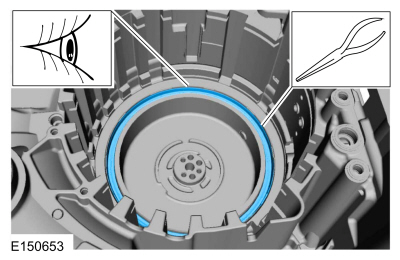
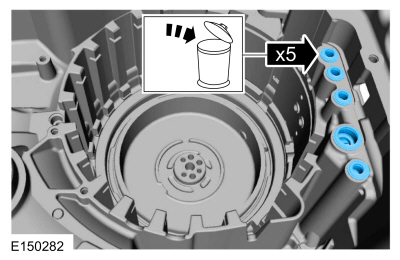
- Remove and discard the clutch feed seals.
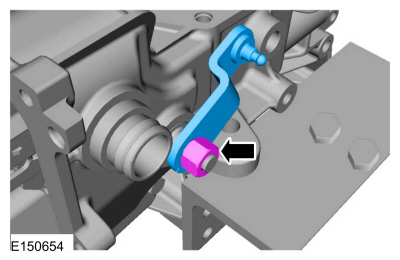
- Remove the manual control shaft nut and the manual control lever from the manual control shaft.
NOTICE: Do not insert the manual control shaft pin through the manual control shaft. The manual control shaft pin will contact the transmission case, causing transmission case damage.
Using the special tool, remove the manual control shaft pin from the manual control shaft.
Use special service tool: 211-061 (T78P-3504-H1) Roll pin remover.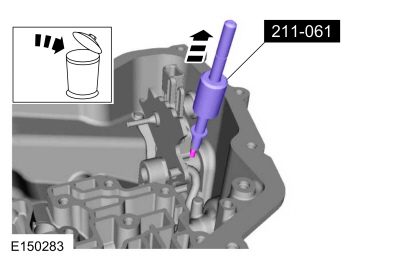
- Remove the manual control shaft.
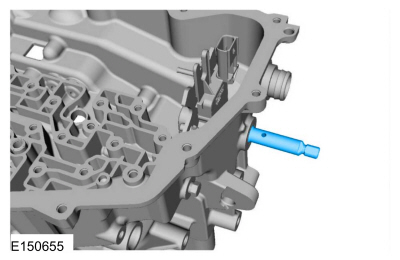
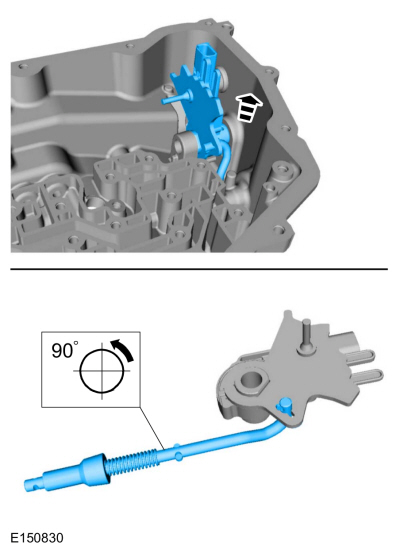
- Remove the TR sensor and the parking pawl actuator rod, then remove the parking pawl actuator rod from the TR sensor.
- Remove and discard the manual control shaft seal.
Use general equipment: flat-blade screwdriver.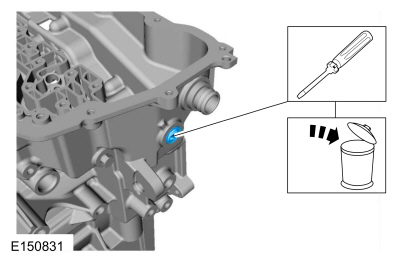
- Remove and discard the left halfshaft seal.
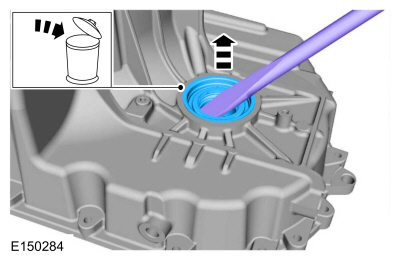
NOTICE: If there is evidence of excessive wear or damage on the left transmission case bushing or the left axle shaft bushing surface, a new left transmission case bushing and a new left axle shaft must be installed, otherwise excessive noise or transmission failure may occur.
Clean and inspect the left transmission case bushing and the left axle shaft bushing surface for damage or excessive wear. If the left transmission case bushing or the left axle shaft shows signs of excessive wear or damage, install new components.
Refer to: Transmission Case (307-01A Automatic Transmission - 6-Speed Automatic Transmission - 6F35, Disassembly and Assembly of Sub-Assemblies).
NOTICE: Do not use metal scrapers, wire brushes, power abrasive discs or other abrasive means to clean sealing surfaces. These tools leave scratches and gouges that create leak paths.
Make sure the mating surfaces are clean and free of foreign material.
Refer to: Cleaning and Preparing RTV Sealing Surfaces (303-00 Engine System - General Information, General Procedures).
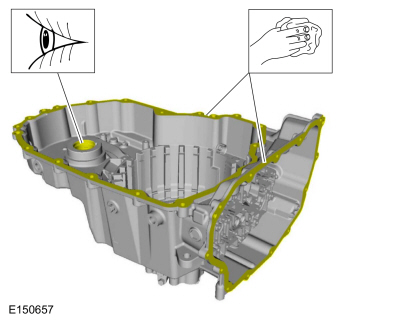
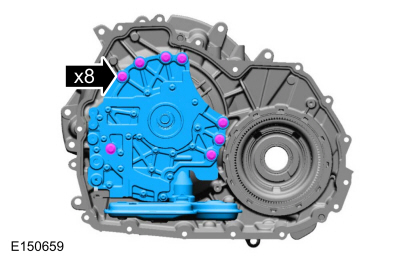
- Remove the pump and torque converter housing bolts and the pump and filter assembly.
- Remove and discard the RH axle shaft seal.
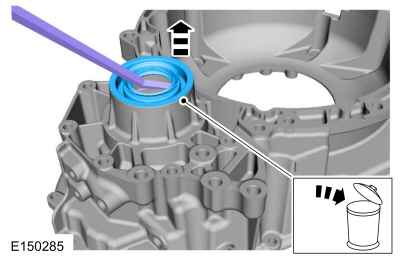
- Inspect the torque converter housing and the differential ring gear for damage or excessive wear. If the differential ring gear shows signs of excessive wear or damage, replace the differential ring gear.
Refer to: Transmission Case (307-01A Automatic Transmission - 6-Speed Automatic Transmission - 6F35, Disassembly and Assembly of Sub-Assemblies).
NOTICE: Do not use metal scrapers, wire brushes, power abrasive discs or other abrasive means to clean sealing surfaces. These tools leave scratches and gouges that create leak paths.
Make sure the mating surfaces are clean and free of foreign material.
Refer to: Cleaning and Preparing RTV Sealing Surfaces (303-00 Engine System - General Information, General Procedures).
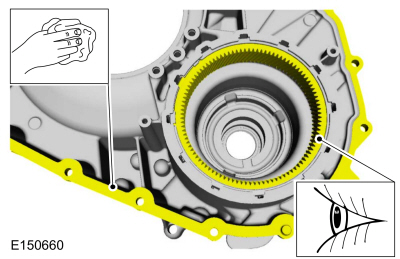
- Inspect the torque converter housing and the differential ring gear for damage or excessive wear. If the differential ring gear shows signs of excessive wear or damage, replace the differential ring gear.
- Rotate the transmission fluid filter 90 degrees clockwise and remove the transmission fluid filter from the pump assembly.
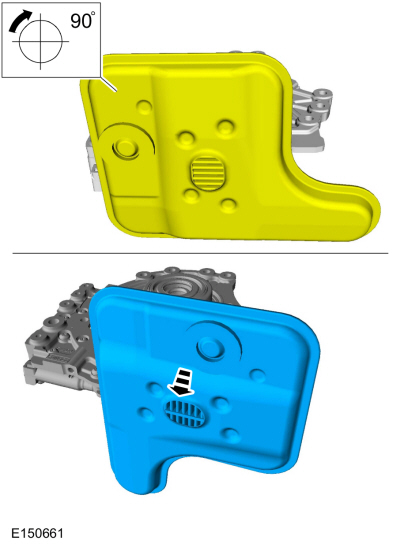
- Remove the magnet from the transmission fluid filter and discard the transmission fluid filter.
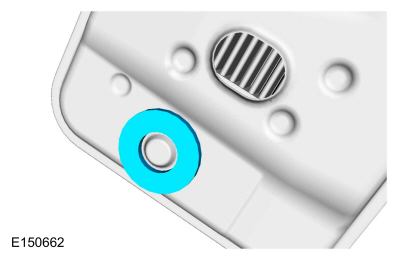
- Assemble the special tools, then remove and discard the input shaft seal.
Use the special service tools: 100-001 (T50T-100-A) Slide Hammer, 303-D011 (D80L-100-G) Drive Pin (3/16 inch diameter), 303-D019 (D80L-100-K) Collet, 3/4 to 7/8 inch.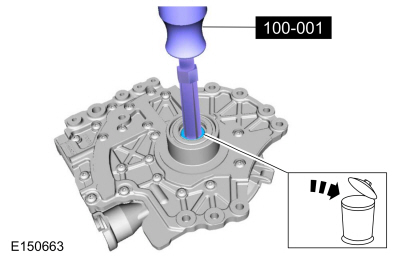
- Remove the O-ring from the pump assembly and torque converter housing.
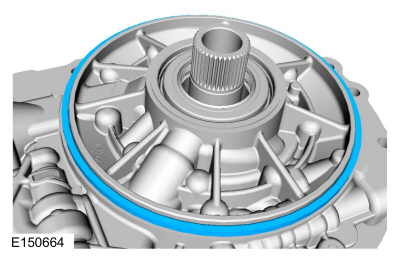
- Remove the torque converter hub seal snap ring.
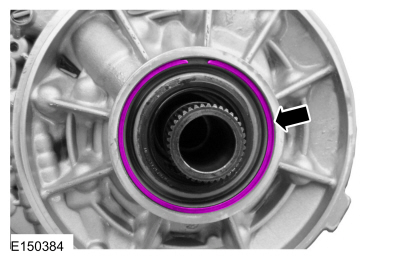
- Using a dent puller, remove the torque converter hub seal.
Use the general equipment: Puller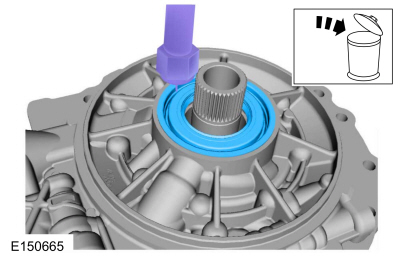
- Position the pump assembly on the torque converter housing and hand-tighten the 2 pump-to-torque converter housing bolts.
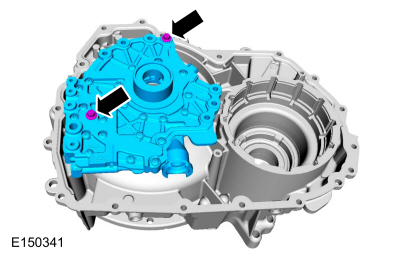
- Loosen the pump bolts.
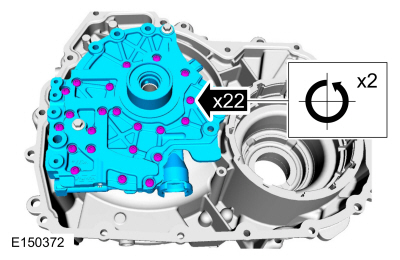
- Remove the pump-to-torque converter housing bolts and remove the pump assembly from the torque converter housing.
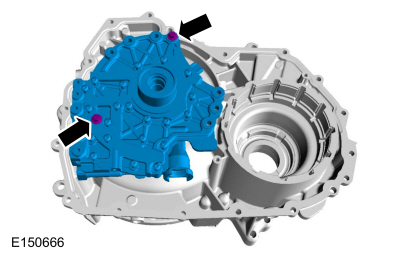
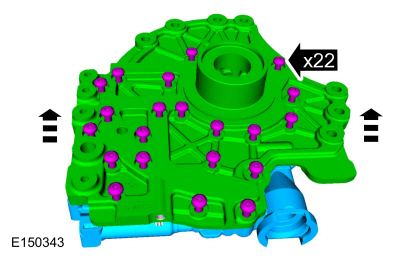
- Remove the pump bolts and separate the pump assembly halves.
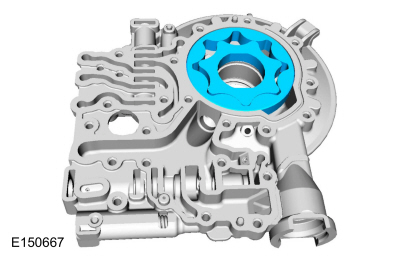
- Remove the pump gears.
- Compress the main pressure regulator valve spring with a screwdriver and remove the retainer using a magnet.
Use common shop equipment: Flat-blade screwdriver
Use common shop equipment: Magnetic pickup tool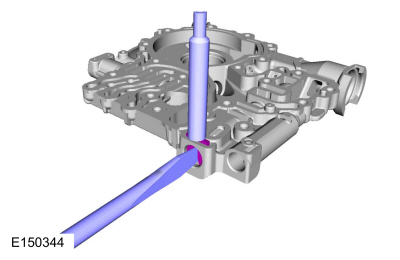
- Install an M4 bolt into the valve and remove the main pressure regulator valve assembly.
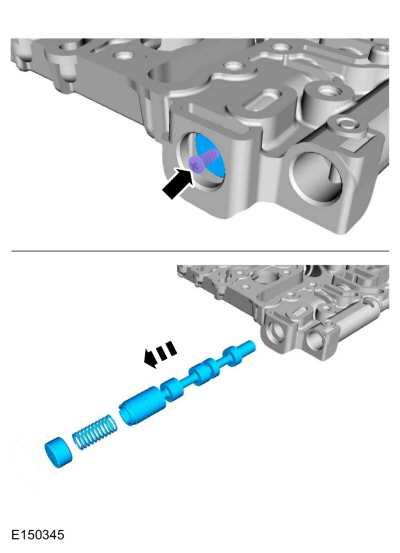
- Compress the TCC regulator valve spring with a screwdriver and remove the retainer using a magnet.
Use common shop equipment: Flat-blade screwdriver
Use common shop equipment: Magnetic pickup tool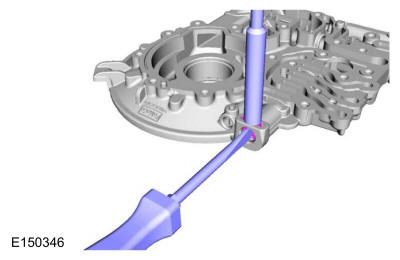
- Remove the TCC regulator valve assembly.
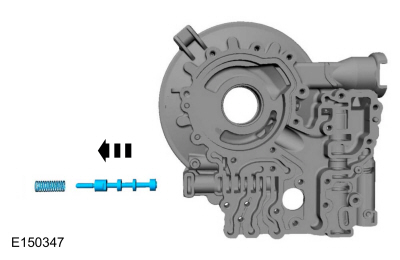
- Clean and dry all pump assembly components.
- Inspect the pump inner and outer gears for damage or excessive wear. Install new gears as necessary.
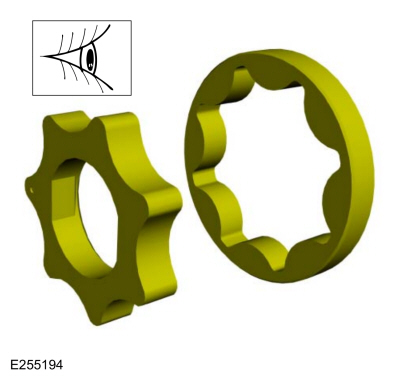
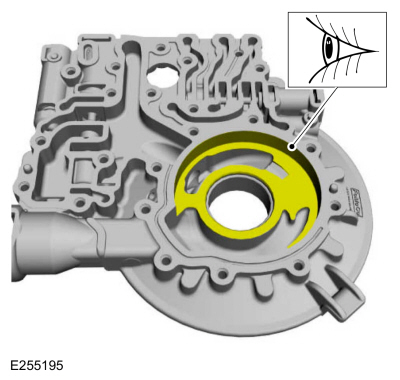
Inspect the pump body for damage or excessive wear. Install a new pump body as necessary.- Pump inner and outer gear to pump body face.
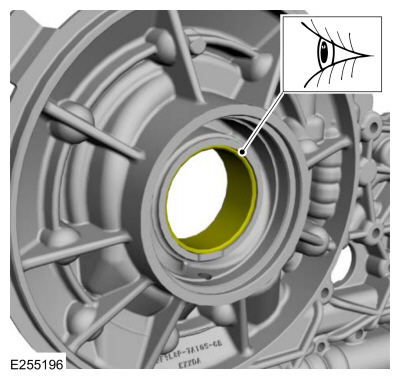
- Inspect the torque converter hub bushing for damage or excessive wear. Install a new bushing as necessary.
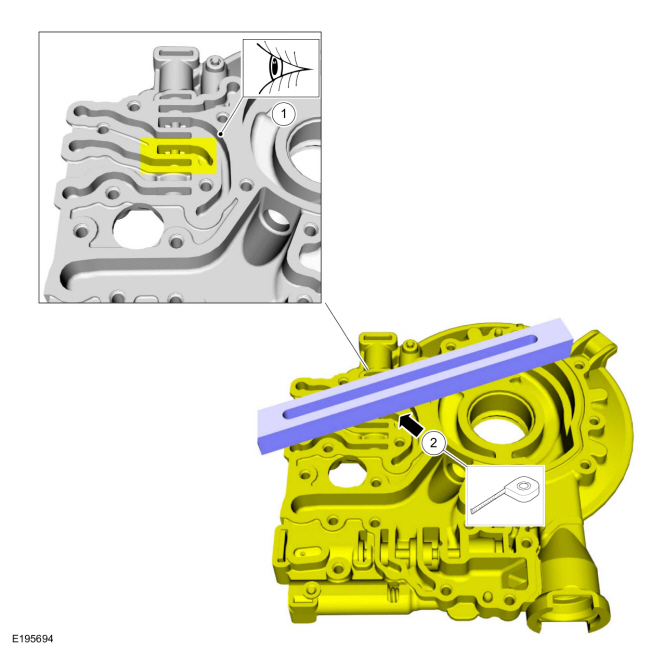
- Inspect the aluminum pump body near the TCC regulator valve for scratches or contamination.
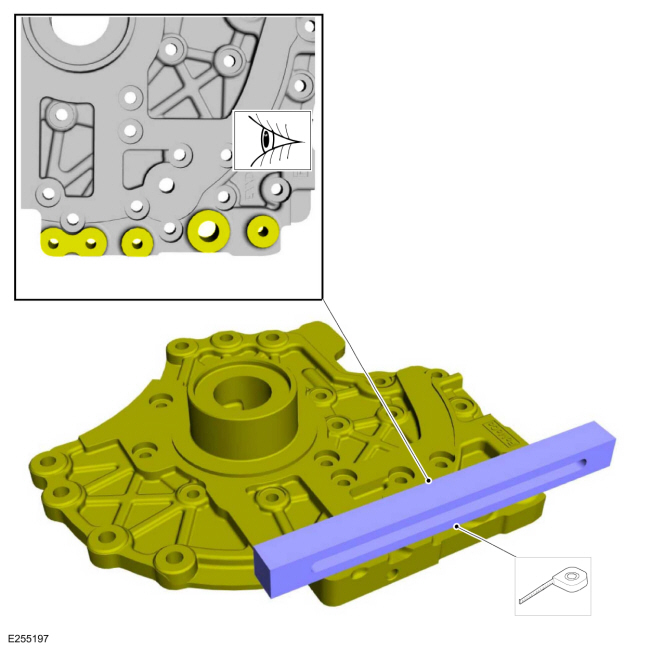
- Using a straightedge, inspect the aluminum pump body near the TCC regulator valve for surface distortion that could cause internal pressure leaks. Inspect the hydraulic passages for blockage.
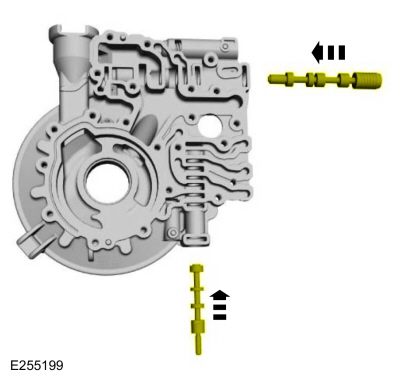
- Install the TCC regulator valve and the main pressure regulator valve into the pump body. Make sure each valve moves freely in its bore in the pump body and falls under its own weight.
- Using a straightedge, inspect the pump body for surface distortion in the area of the pump body and pump seal.
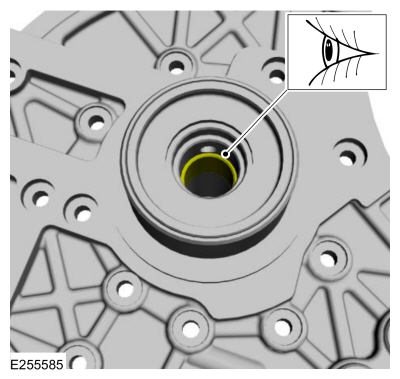
- Inspect the stator bushing for damage or excessive wear. Install a new bushing as necessary.
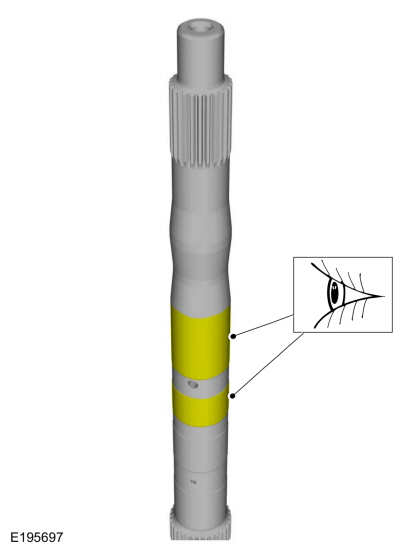
- Inspect the turbine shaft support bushing for wear or scoring that could cause pressure leaks. Install new bushings as necessary.
- Assemble the TCC regulator valve assembly and the main pressure regulator valve assembly and install the valves into the pump. Compress the valve springs with a screwdriver and install the retainers.
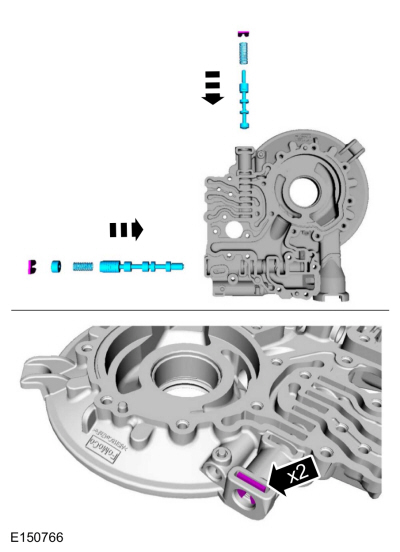
- Install the pump gears.
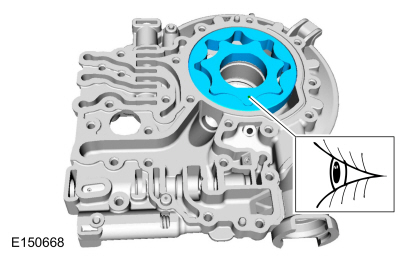
- Install the stator support onto the pump body and hand-tighten the pump bolts.
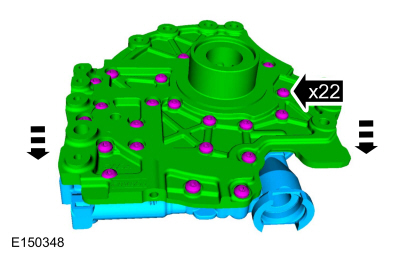
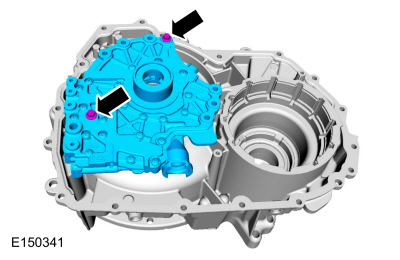
- Install the pump assembly into the torque converter housing and hand-tighten the 2 pump bolts to the torque converter housing.
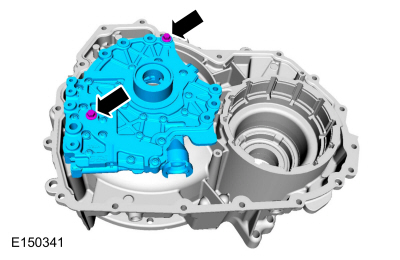
- Tighten the pump bolts.
Torque: 89 lb-in (10 N·m)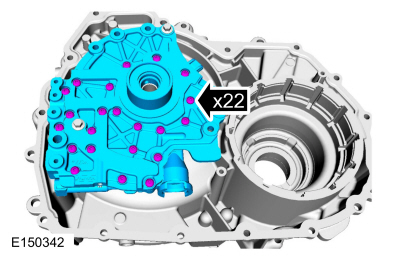
- Remove the pump-to-torque converter housing bolts and remove the pump assembly from the torque converter housing.
- Install the new torque converter hub seal on the special tool.
Use the special service tool: 307-627 Installer, Converter Seal.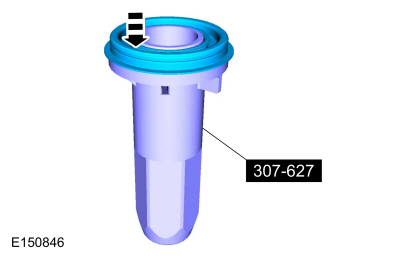
- Using the special tool, install the new torque converter hub seal.
Use the special service tool: 307-627 Installer, Converter Seal.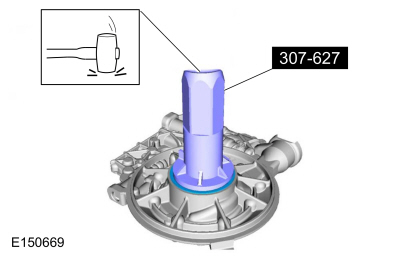
- Install the torque converter hub seal snap ring.
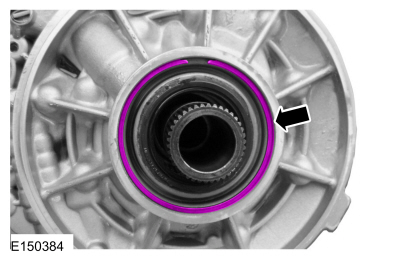
- Install a new pump assembly O-ring onto the torque converter housing.
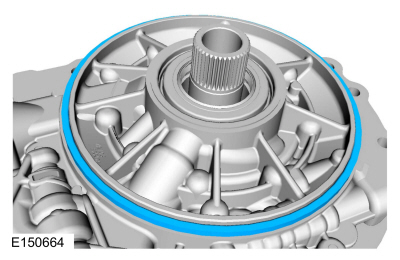
- Install the new input shaft seal on the special tool.
Use the special service tool: 307-723 Installer, Turbine Seal.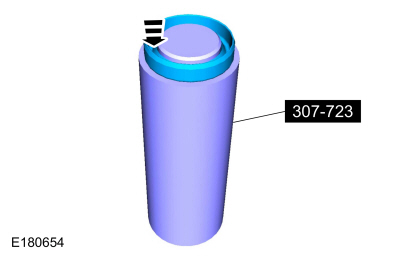
- Using the special tool, install the input shaft seal.
Use the special service tool: 307-723 Installer, Turbine Seal.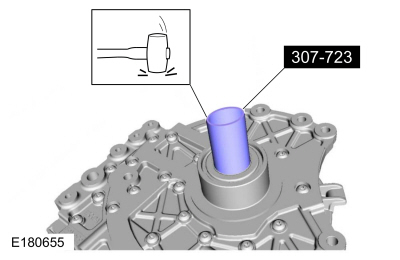
- Install a new O-ring onto the new transmission fluid filter and lubricate it with transmission fluid.
Material: Motorcraft® MERCON® LV Automatic Transmission Fluid / XT-10-QLVC (WSS-M2C938-A) (MERCON® LV)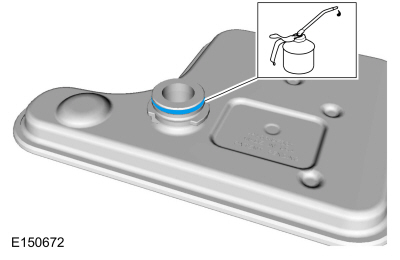
- Install the magnet onto the transmission fluid filter.
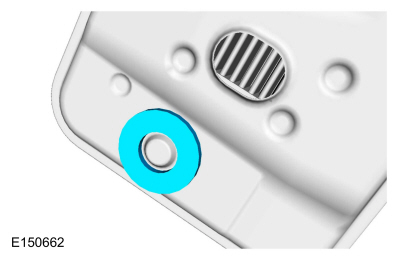
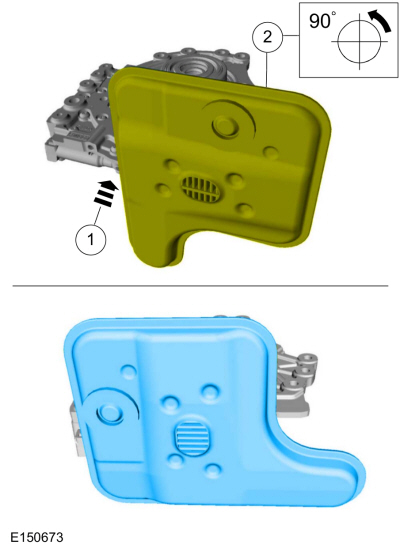
Install a new transmission fluid filter.- Position the transmission fluid filter in the pump assembly.
- Rotate the transmission fluid filter counterclockwise 90 degrees.
NOTICE: The center support low/reverse clutch side return spring, piston retainer or snap ring is not interchangeable with the center support forward clutch side. When disassembling the center support, be careful not to mix up low/reverse clutch side components with the forward clutch side of the center support. Failure to assemble the center support with components on the correct side will result in damage to the center support, low/reverse or forward clutch.
Using the special tool and a press, compress the low/reverse clutch return spring and remove the snap ring and the retaining ring.
Use special service tool: 307-630 Center support piston spring tool.
Use common shop equipment: Hydraulic press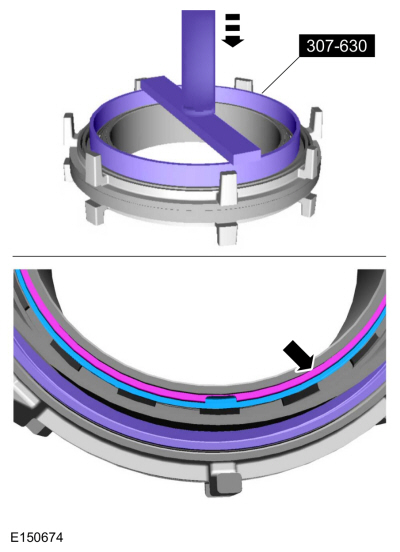
- Remove the low/reverse clutch return spring.
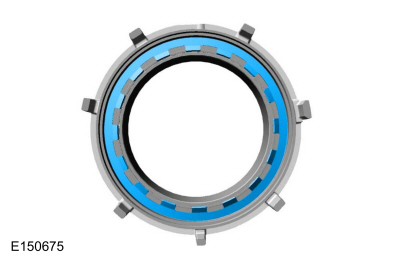
- Apply 483 kPa (70 psi) air pressure to the low/reverse clutch piston port and remove the low/reverse clutch piston.
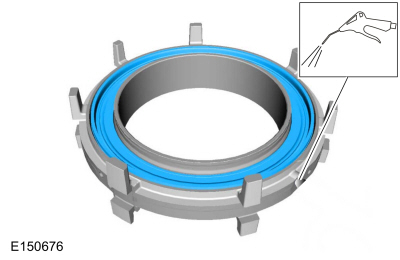
- Using the special tool and a press, compress the forward (1, 2, 3, 4) clutch return spring and remove the snap ring and the retaining ring.
Use special service tool: 307-630 Center support piston spring tool.
Use common shop equipment: Hydraulic press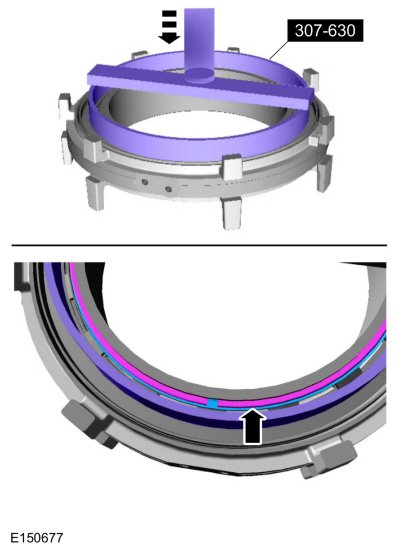
- Remove the return spring from the forward (1, 2, 3, 4) clutch piston.
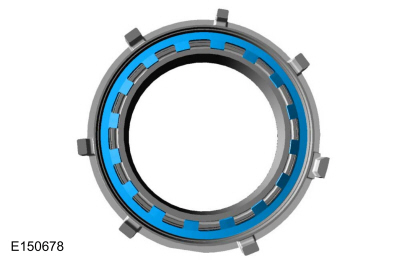
- Apply 483 kPa (70 psi) air pressure to the forward (1, 2, 3, 4) clutch piston port and remove the forward (1, 2, 3, 4) clutch piston.
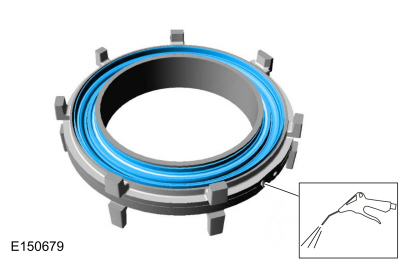
- Clean and inspect the center support for damage. Install a new center support as necessary.
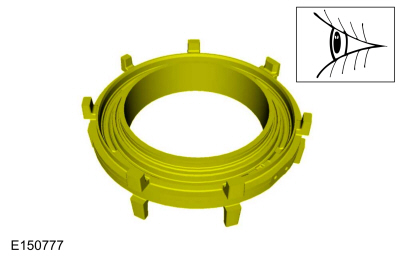
- Install the special tools on the center support on the forward clutch piston side.
Use special service tool: 307-628 Protector, low reverse piston seal. , 307-629 Protector, low reverse/1-2-3-4 piston seal.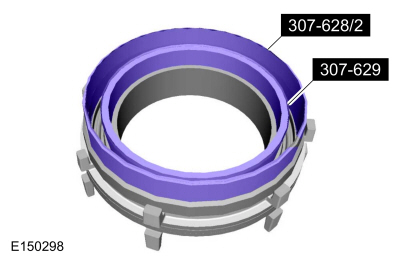
- Lubricate the sealing surfaces of the forward (1, 2, 3, 4) clutch piston with petroleum jelly.
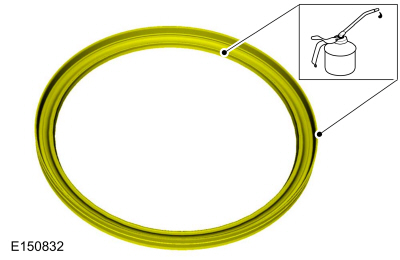
- Place the forward (1, 2, 3, 4) clutch piston on the special tools and press it into the center support.
Use special service tool: 307-628 Protector, low reverse piston seal. , 307-629 Protector, low reverse/1-2-3-4 piston seal.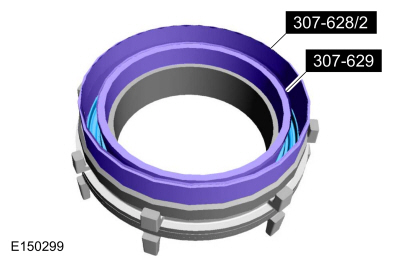
NOTICE: The center support piston return spring, retaining ring, or retaining ring stopper on the low/reverse clutch side are not interchangeable with the forward clutch side of the center support. When assembling the center support, be careful not to mix up the components on the low/reverse clutch side with those on the forward clutch side of the center support. Failure to assemble the center support with components on the correct side will result in damage to the center support, low/reverse or forward clutch.
Install the return spring onto the forward (1, 2, 3, 4) clutch piston.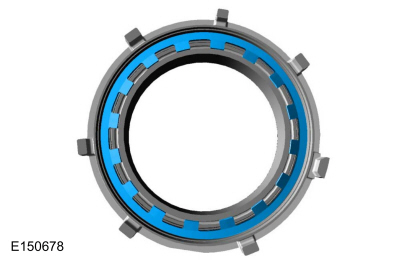
- Using the special tools and a press, compress the forward clutch return spring (1, 2, 3, 4) and install the retaining ring stopper and retaining ring.
Use special service tool: 307-630 Center Support Piston Spring Tool.
Use common equipment: Hydraulic press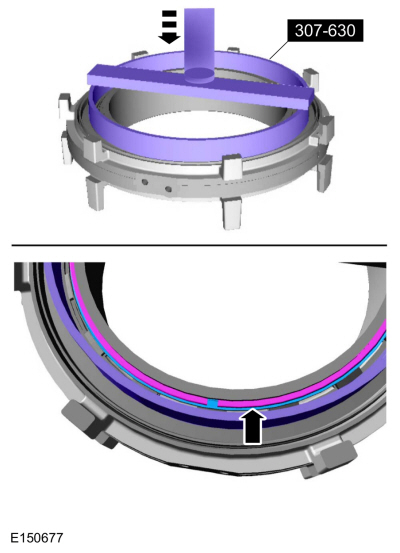
- Inspect the retaining ring to make sure it has seated in the groove in the center support.
Use common equipment: Flat-head screwdriver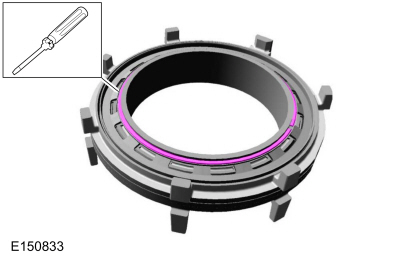
- Turn the center support over and install the special tools on the low/reverse piston side of the center support.
Use special service tool: 307-628 Low/Reverse Piston Seal Protector.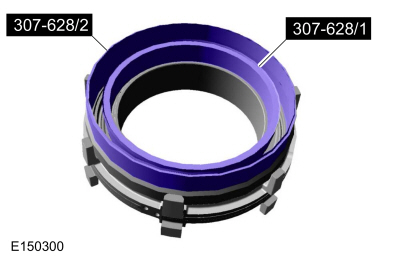
- Apply petroleum jelly to the low/reverse piston sealing surfaces.
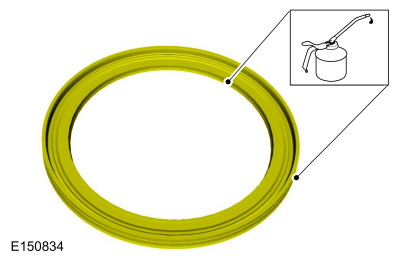
- Place the low/reverse clutch piston on the special tools and press it into the center support.
Use special service tool: 307-628 Low/Reverse Piston Seal Protector.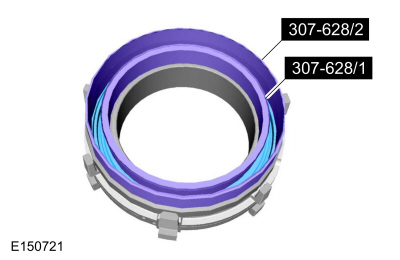
- Install the low/reverse piston return spring.
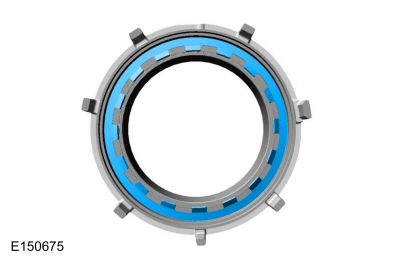
- Using the special tools and a press, compress the low/reverse clutch return spring and install the retaining ring and retaining ring stopper.
Use special service tool: 307-630 Center Support Piston Spring Tool.
Use common equipment: Hydraulic press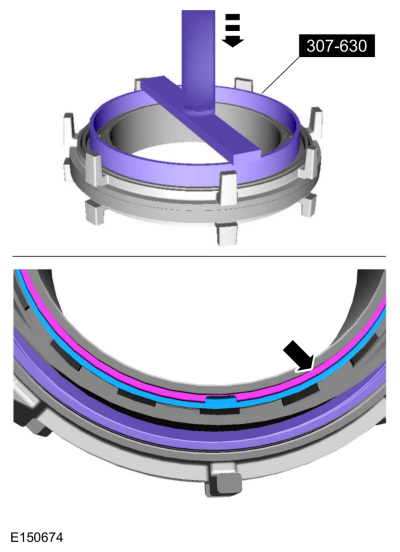
- Inspect the retaining ring to make sure it has seated in the groove in the center support.
Use common equipment: Flat-head screwdriver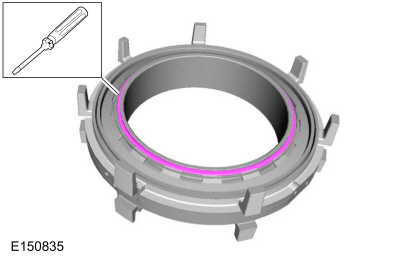
- Remove and discard the 4 Teflon® seals.
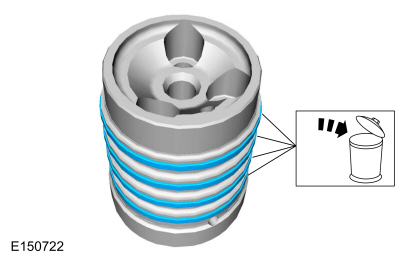
- Clean and inspect the forward clutch hub support for damage. Install a new forward clutch hub support if damaged.
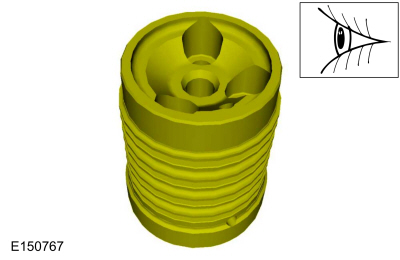
- Install the special tool on the forward clutch hub support and adjust the special tool so that the lower edge of the tool aligns with the upper edge of the lower Teflon® seal groove.
Use special service tool: 307-578 Input Shaft Support Seal Installer (Back Plate, Multiple Rings).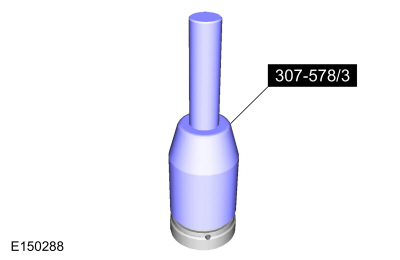
- Install a new Teflon® seal on the special tool.
Use special service tool: 307-578 Input Shaft Support Seal Installer (Back Plate, Multiple Rings).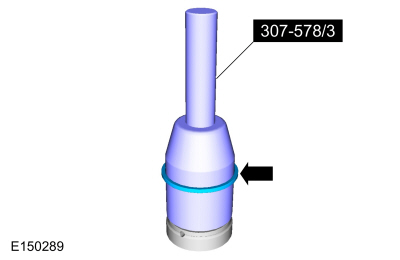
- Install the special tool 307-578/2 onto 307-578/3. Using special tool 307-578/2, install the Teflon® seal onto the forward clutch hub support tower and into the groove.
Use special service tool: 307-578 Input Shaft Support Seal Installer (Back Plate, Multiple Rings).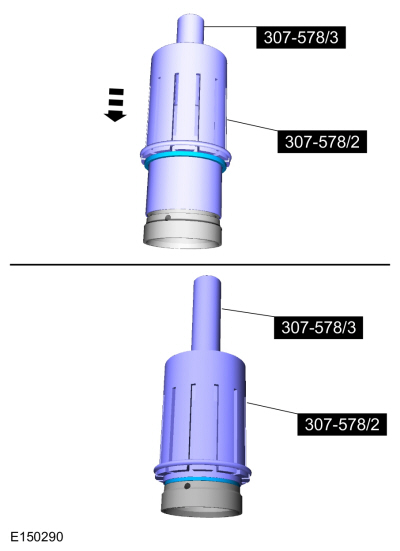
- Remove the tools and repeat the steps for the remaining 3 Teflon® seals.
Use special service tool: 307-578 Input Shaft Support Seal Installer (Back Plate, Multiple Rings).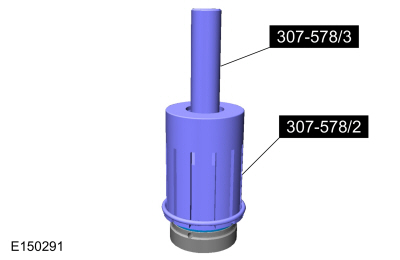
- Install the special tool on the forward clutch hub support to determine the size of the 4 Teflon® seals.
Use special service tool: 307-578 Input Shaft Support Seal Installer (Back Plate, Multiple Rings).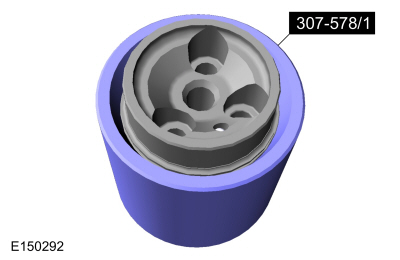
- Remove the input shaft retaining ring.
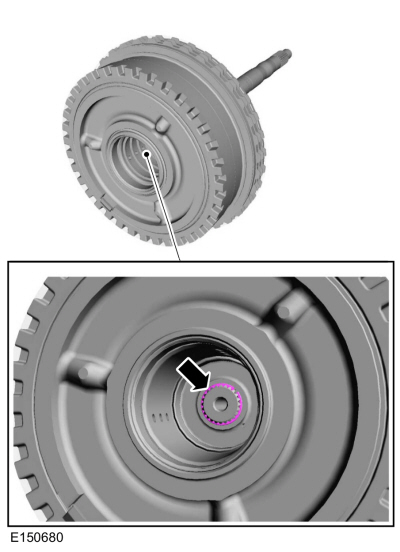
- Remove the input shaft.
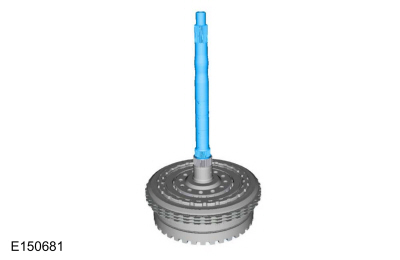
- Remove the overdrive clutch hub (4, 5, 6).
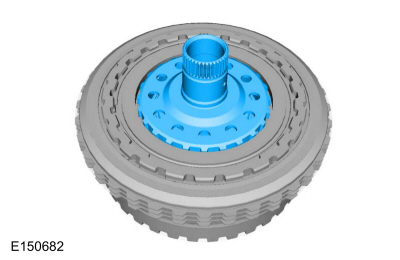
- Remove the overdrive clutch hub (4, 5, 6) and No. 2 thrust bearing.
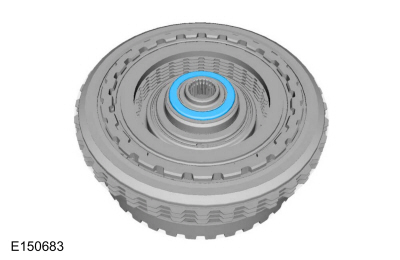
- Remove the overdrive clutch (4, 5, 6) retaining ring.
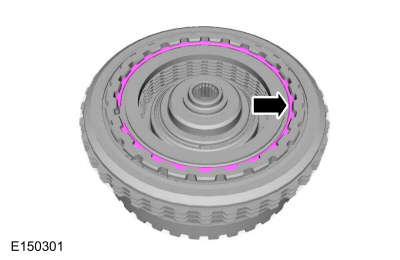
- Remove the overdrive clutch (4, 5, 6) pressure plate and clutch pack assembly.
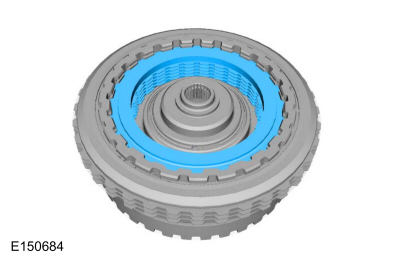
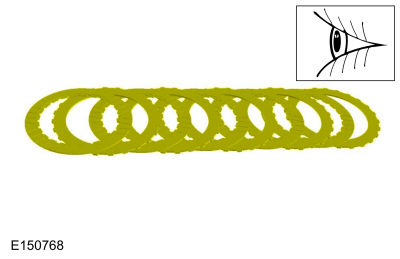
- Inspect the clutch plate and apply plate surfaces for damage or excessive wear.
- Install the special tools on the balance piston.
Use special service tool: 307-584 2-6 Spring Compressor, 307-589 Overdrive Clutch and Balance Piston Service Kit.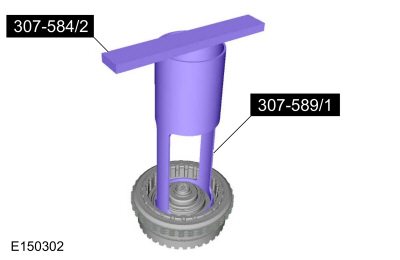
- Using a press, compress the overdrive clutch (4, 5, 6) return spring and remove the retaining ring.
Use special service tool: 307-584 2-6 Spring Compressor, 307-589 Overdrive Clutch and Balance Piston Service Kit.
Use common equipment: Hydraulic press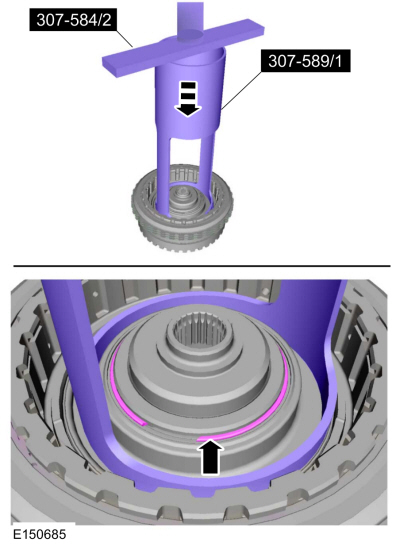
- Remove and discard the balance piston.
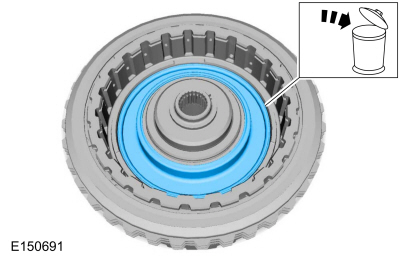
- Remove the overdrive piston return spring (4, 5, 6).
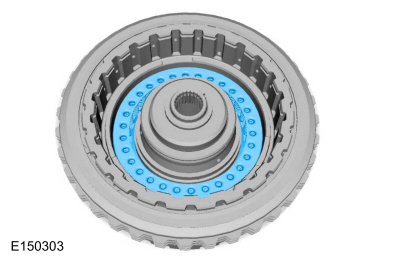
- Install the forward clutch hub support into the transmission case and install the forward clutch hub support bolts.
Torque: 106 lb-in (12 N·m)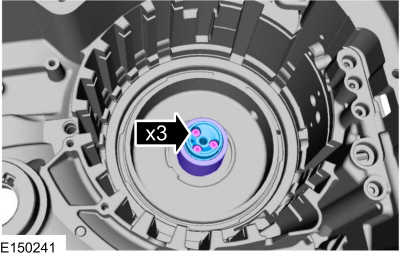
- Remove the special tool.
Remove special service tool: 307-578 Input Shaft Support Seal Installer (Back Plate, Multiple Rings).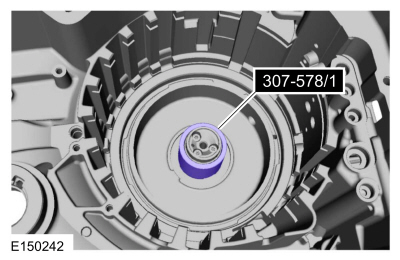
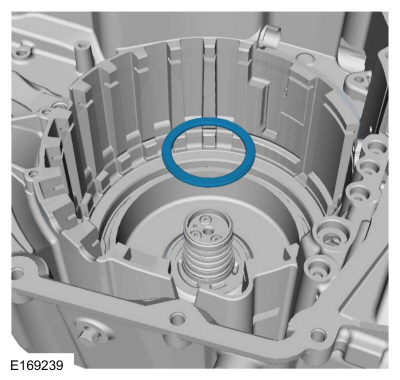
- Install the No. 1 overdrive/direct clutch thrust bearing assembly.
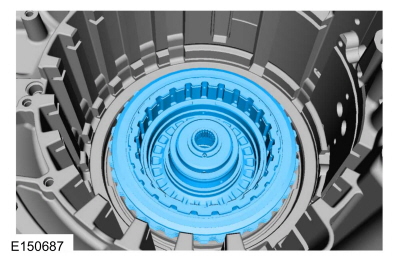
- Place the overdrive/direct clutch assembly into the transmission case.
- Apply compressed air to the overdrive clutch (4, 5, 6) piston port and remove the overdrive clutch (4, 5, 6) piston.
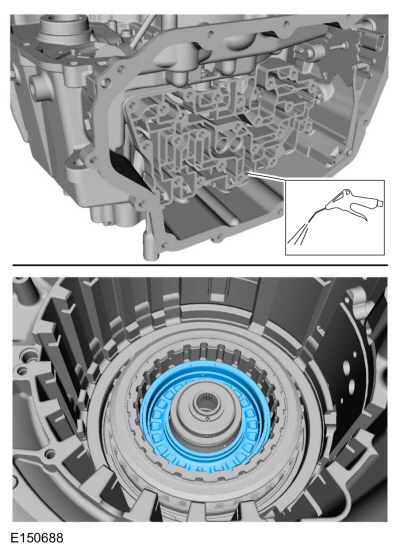
- Remove the overdrive/direct clutch assembly from the transmission case.
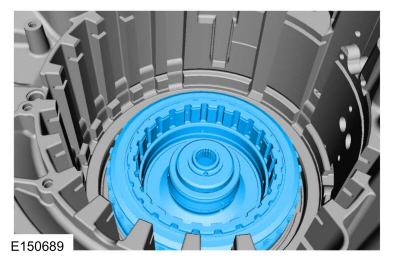
- Remove and discard the overdrive clutch (4, 5, 6) piston seal from the overdrive/direct clutch assembly.
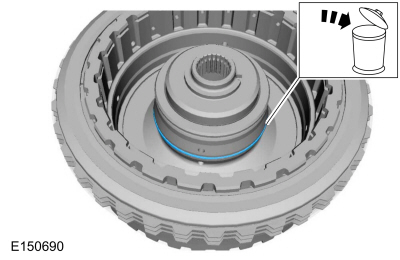
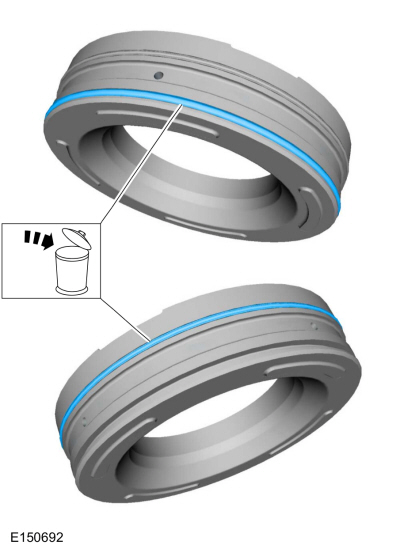
- Remove and discard the seals from the overdrive clutch (4, 5, 6) piston.
NOTICE: Compress the direct clutch piston return spring only far enough to relieve the tension on the direct clutch cylinder retaining ring. If the piston is compressed too far, the piston alignment tab may break off.
Install the special tools on the direct clutch (3, 5, R) cylinder. Using a press, compress the direct clutch (3, 5, R) piston return spring and remove the retaining ring.- Do not touch the overdrive/direct clutch hub and input shaft assembly with the direct clutch (3, 5, R) cylinder.
- Remove the snap ring.
Use special service tool: 307-584 2-6 Spring Compressor, 307-589 Overdrive Clutch and Balance Piston Service Kit.
Use common equipment: hydraulic press
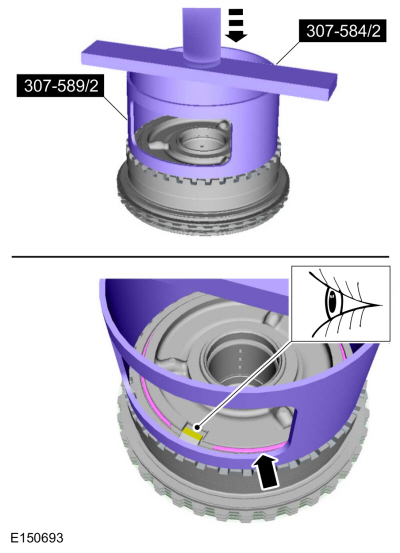
- Remove the direct (3, 5, R) clutch cylinder.
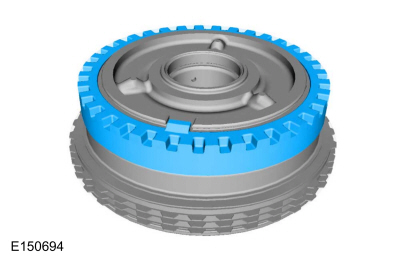
- Remove and discard the direct (3, 5, R) clutch piston.
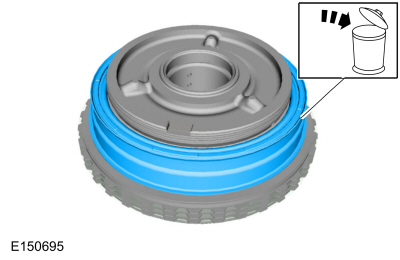
- Remove the direct (3, 5, R) clutch piston return spring.
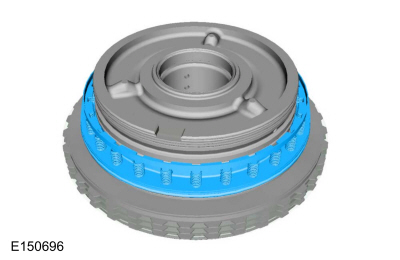
Remove the direct (3, 5, R) clutch snap ring.- Slightly lift the direct (3, 5, R) clutch so that the snap ring floats freely.
- Using the tool, compress the snap ring.
- Allow the direct (3, 5, R) clutch and pressure plate to drop so that the snap ring exits the pressure plate groove.
- Remove the snap ring.
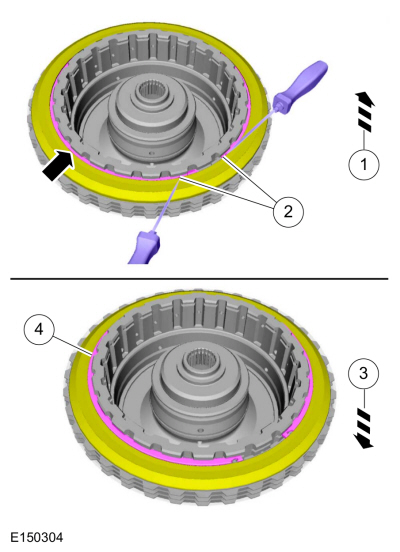
- Remove the direct (3, 5, R) clutch pressure plate, friction pack and wave spring.
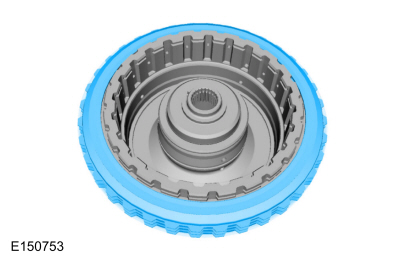
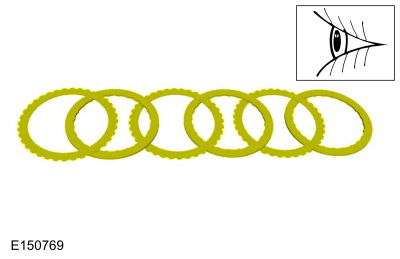
- Inspect the clutch plate and apply plate surfaces for damage or excessive wear.
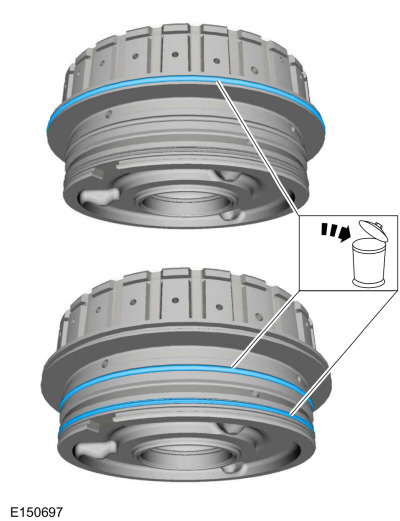
- Remove and discard the direct clutch (3, 5, R) piston seals.
- Clean and inspect the overdrive/direct clutch assembly for damage or excessive wear, and install new components as necessary.
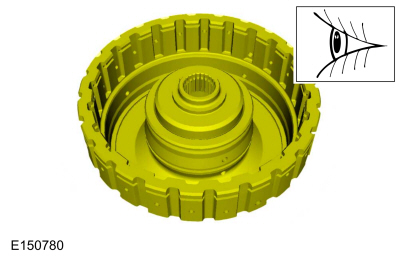
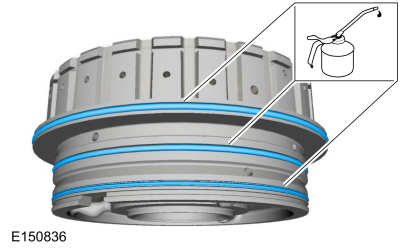
- Install new direct (3, 5, R) clutch piston seals and lubricate the seals with petroleum jelly.
- Install the direct (3, 5, R) clutch wave spring.
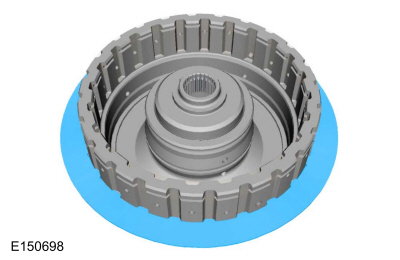
- Soak the direct (3, 5, R) clutch friction pack in transmission fluid.
Material: Motorcraft® MERCON® LV Automatic Transmission Fluid / XT-10-QLVC (WSS-M2C938-A) (MERCON® LV)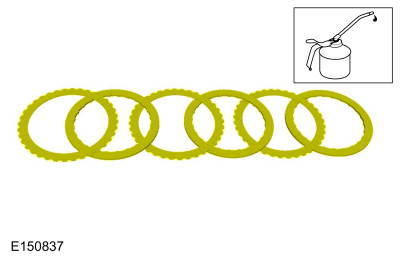
- Install the direct (3, 5, R) clutch assembly and pressure plate.
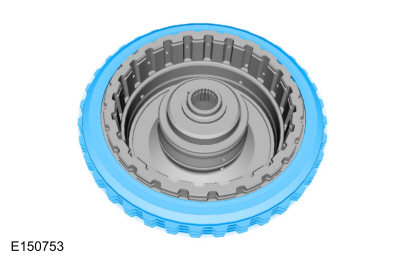
Install the direct (3, 5, R) clutch snap ring.- Compress the snap ring.
- Lift the direct (3, 5, R) clutch so that the snap ring is in the pressure plate groove.
- Release the tension on the snap ring.
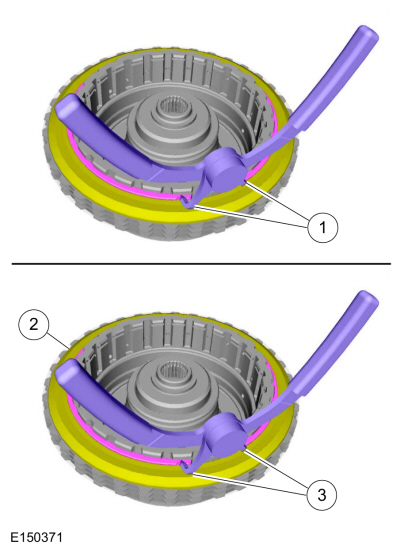
- Install the direct (3, 5, R) clutch piston return spring.
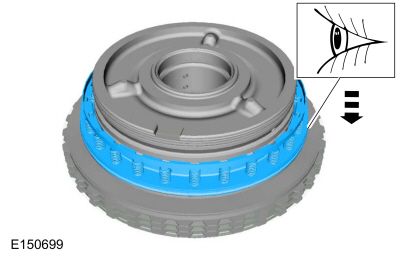
- Lubricate the new direct (3, 5, R) clutch piston with petroleum jelly and install the piston.
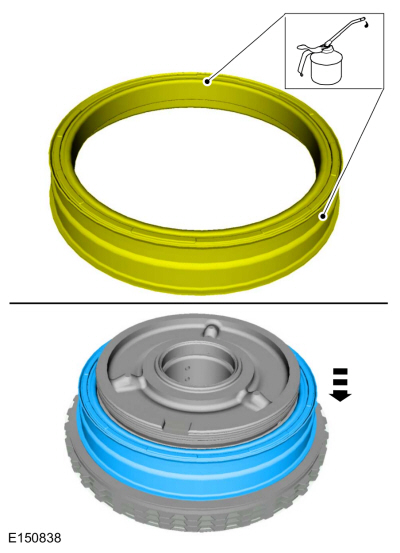
- Install the direct (3, 5, R) clutch cylinder.
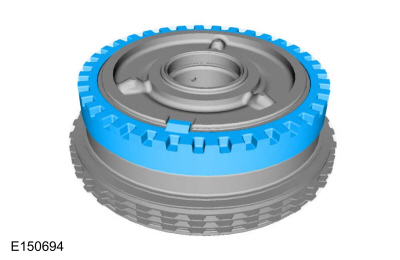
NOTICE: Compress the direct clutch piston return spring only far enough to relieve the tension on the direct clutch cylinder retaining ring. If the piston is compressed too far, the piston alignment tab may break off.
Install the special tools on the direct (3, 5, R) clutch cylinder. Using a press, compress the direct (3, 5, R) clutch piston return spring and install the snap ring.- Do not touch the overdrive/direct clutch hub and input shaft assembly with the direct clutch (3, 5, R) cylinder.
- Install the snap ring.
Use special service tool: 307-584 2-6 Spring Compressor, 307-589 Overdrive Clutch and Balance Piston Service Kit.
Use common equipment: hydraulic press
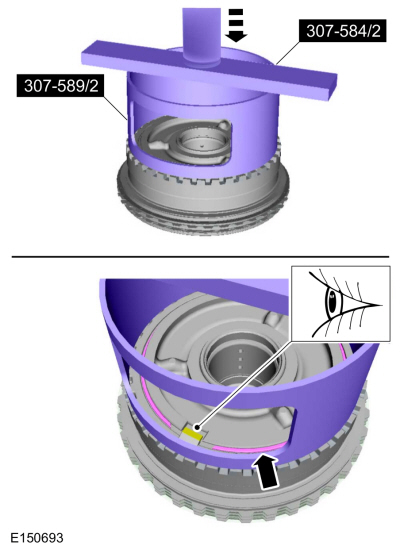
- Install new overdrive (4, 5, 6) clutch piston seals and lubricate the seals with petroleum jelly.
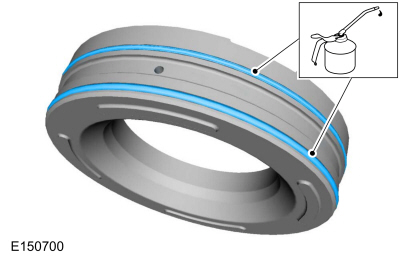
- Install a new inner overdrive (4, 5, 6) clutch piston seal and lubricate the seal with petroleum jelly.
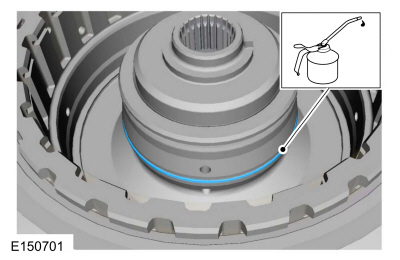
- Install the overdrive (4, 5, 6) clutch piston in position.
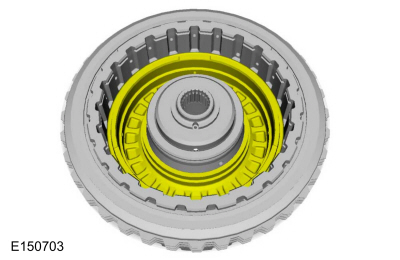
- Using special tools, install the overdrive (4, 5, 6) clutch piston into the overdrive/direct clutch assembly by hand.
Use special service tool: 307-589 Overdrive Clutch and Balance Piston Service Kit.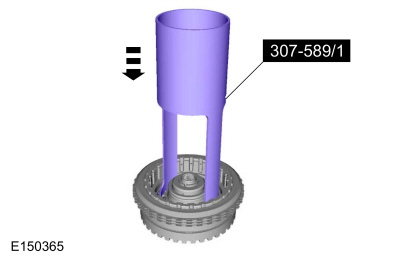
- Install the overdrive (4, 5, 6) clutch piston return spring.
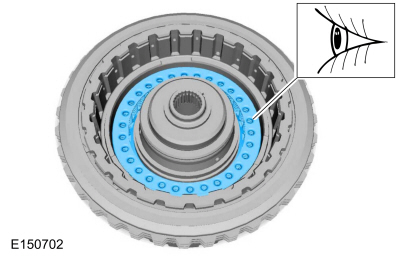
- Lubricate the seals on the new balance piston and install the piston in position.
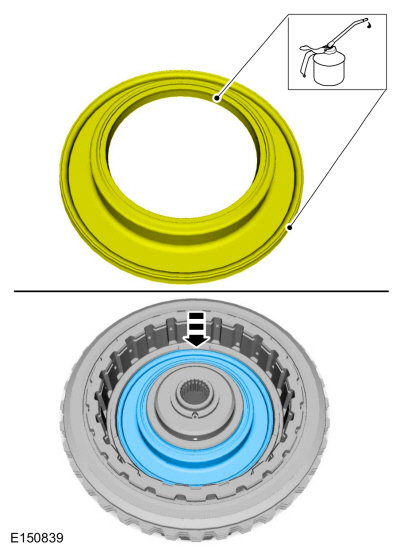
- Install the special tools on the balance piston.
Use special service tool: 307-584 2-6 Spring Compressor, 307-589 Overdrive Clutch and Balance Piston Service Kit.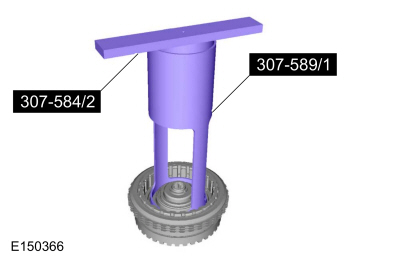
- Using a press, compress the overdrive (4, 5, 6) clutch return spring and install the snap ring.
Use special service tool: 307-584 2-6 Spring Compressor, 307-589 Overdrive Clutch and Balance Piston Service Kit.
Use common equipment: hydraulic press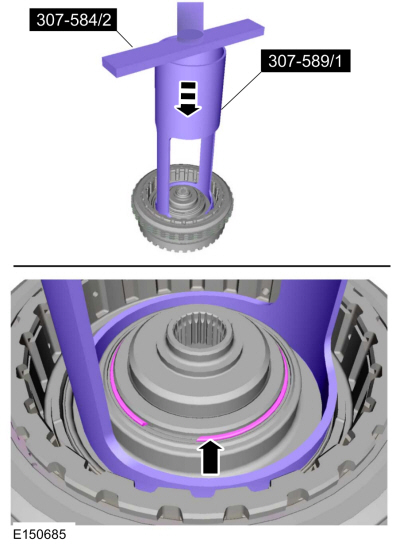
- Install thrust bearing No. 2.
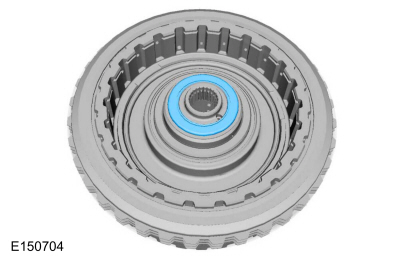
- Install the overdrive (4, 5, 6) clutch hub.
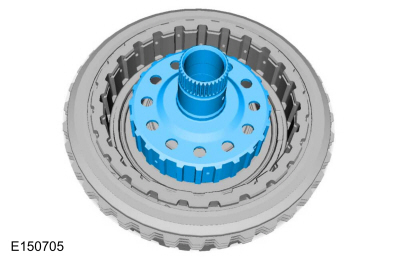
- Soak the overdrive (4, 5, 6) clutch pack in transmission fluid.
Material: Motorcraft® MERCON® LV Automatic Transmission Fluid / XT-10-QLVC (WSS-M2C938-A) (MERCON® LV)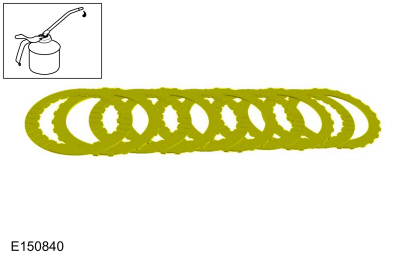
- Install the overdrive (4, 5, 6) clutch friction pack.
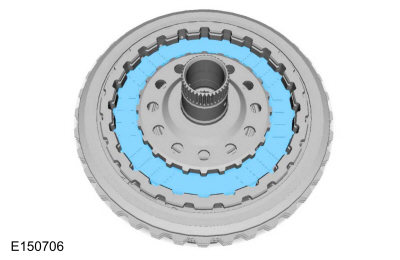
- Install the overdrive (4, 5, 6) clutch pressure plate.
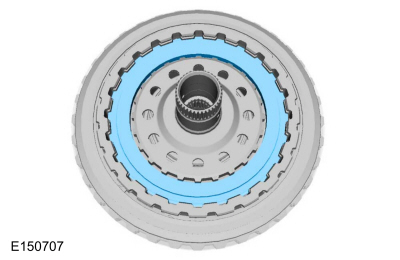
- Install the overdrive (4, 5, 6) clutch snap ring.
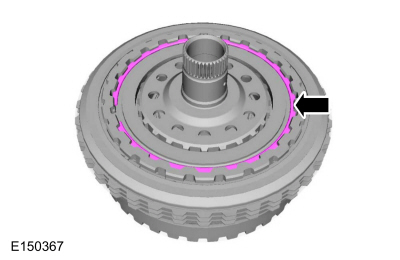
- Install the input shaft.
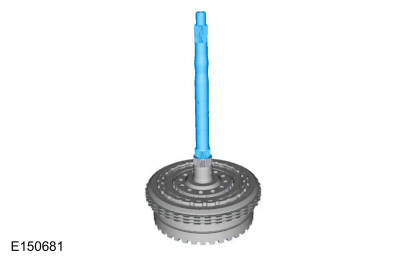
- Hold the input shaft in place and install the snap ring.
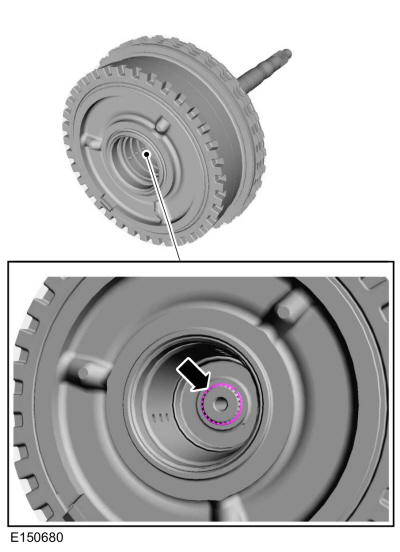
- Install the overdrive/direct clutch assembly in the transmission case. Install the special tool or dial indicator and place the plunger on the overdrive (4, 5, 6) clutch pressure plate.
Use special service tool: 100-002 (INSTRUMENT-4201-C) Dial Indicator Holding Fixture.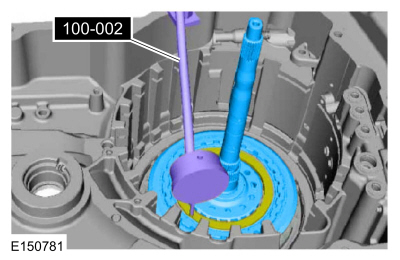
- Apply 483 kPa (70 psi) air pressure to the overdrive (4, 5, 6) clutch piston port while recording the clutch pack clearance on the dial indicator. Clearance must be between 0.950 mm (0.037 in) and 1.778 mm (0.07 in). If clearance is outside the range, check the overdrive (4, 5, 6) clutch friction pack for correct installation. If the overdrive (4, 5, 6) clutch friction pack is installed correctly, install a new overdrive (4, 5, 6) clutch friction pack.
Use special service tool: 100-002 (INSTRUMENT-4201-C) Dial Indicator Holding Fixture.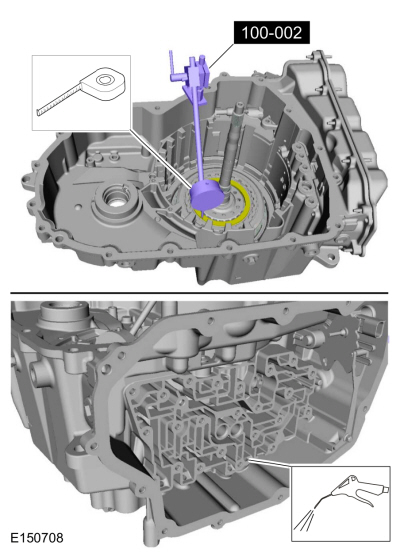
- Place the piston on one of the upper direct (3, 5, R) clutch disc lugs. Apply 483 kPa (70 psi) of air pressure to the direct (3, 5, R) clutch piston port while reading the clutch pack clearance on the dial indicator. Clearance must be between 1.71 mm (0.067 inch) and 3.61 mm (0.142 inch). If the clearance is outside the range, check the direct (3, 5, R) clutch pack for correct installation. If the direct (3, 5, R) clutch pack is installed correctly, install a new direct (3, 5, R) clutch pack.
Use the special service tool: 100-002 (TOOL-4201-C) Dial Indicator Holding Fixture.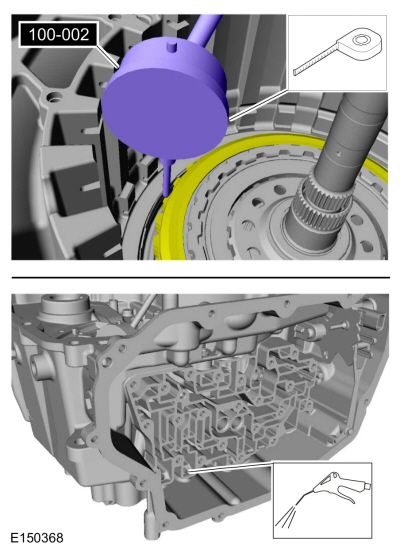
- Remove the special tool, overdrive/direct clutch assembly and No. 1 overdrive/direct clutch thrust bearing assembly.
Use the special service tool: 100-002 (TOOL-4201-C) Dial Indicator Holding Fixture.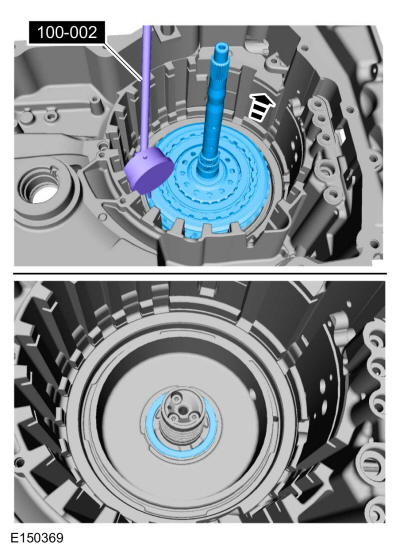
- Assemble the special tools. Install a new left axle shaft seal onto the special tool.
Use the special service tools: 205-153 (T80T-4000-W) Handle, 307-626 Installer, Differential Seal.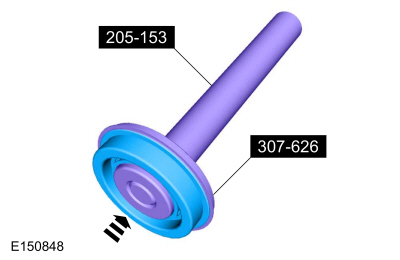
- Using the special tools, install a new left axle shaft seal into the transmission case.
Use the special service tools: 205-153 (T80T-4000-W) Handle, 307-626 Installer, Differential Seal.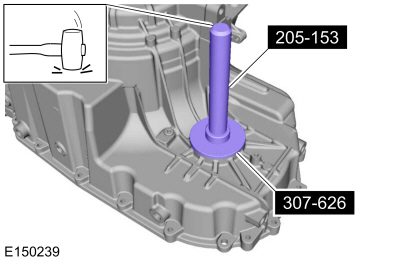
- Install a new manual shaft seal onto the special tool.
Use the special service tool: 307-581 Manual Shaft Seal Installer.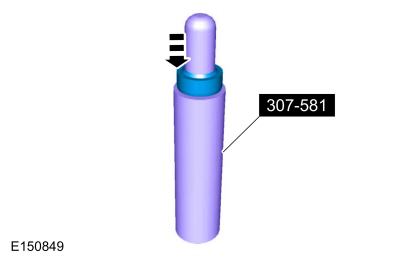
- Using the special tool, install a new manual shaft seal into the transmission case.
Use the special service tool: 307-581 Manual Shaft Seal Installer.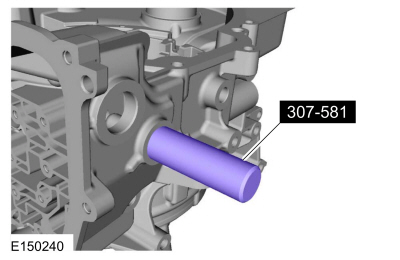
- Install the special tool.
Use the special service tool: 307-632 Protector, 2-6 Piston Seal.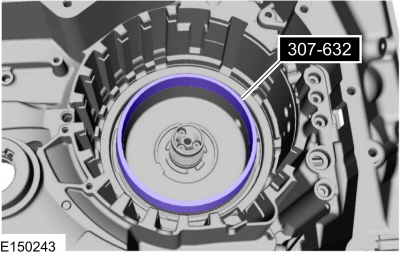
- Lubricate the seals on the intermediate (2, 6) clutch piston with transmission fluid.
Material: Motorcraft® MERCON® LV Automatic Transmission Fluid / XT-10-QLVC (WSS-M2C938-A) (MERCON® LV)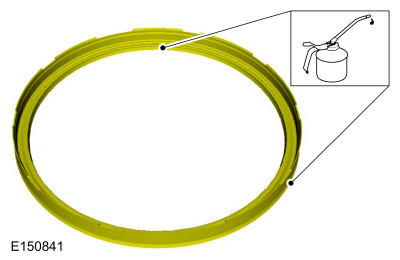
NOTICE: Make sure the exhaust port is aligned with the correct position marked during disassembly, or transmission damage may occur.
Install the intermediate (2, 6) clutch piston onto the seal protector with the exhaust port aligned with the upper part of the transmission case.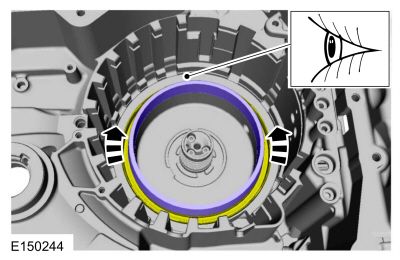
Position the intermediate (2, 6) clutch return spring on the piston to align the piston before inserting it into the bore. The return spring tabs must engage the piston recesses, and the 2 outer tabs must be at the far clockwise position in the open space at the bottom of the transmission case. The exhaust hole in the piston must be aligned between the inner double tabs of the return spring.- Inner double tabs
- exhaust port
- Outer tabs
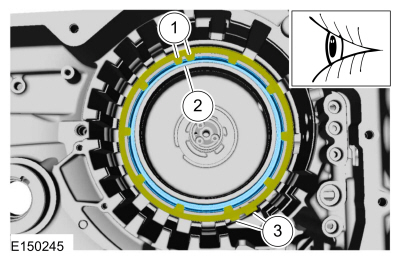
- Remove the intermediate (2, 6) clutch piston return spring.
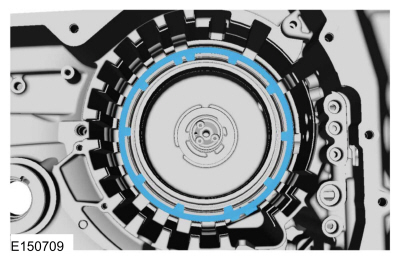
- Install the special tool onto the intermediate (2, 6) clutch piston. Insert the intermediate (2, 6) clutch piston into the clutch bore by hand.
Use the special service tool: 307-584 2-6 Spring Compressor.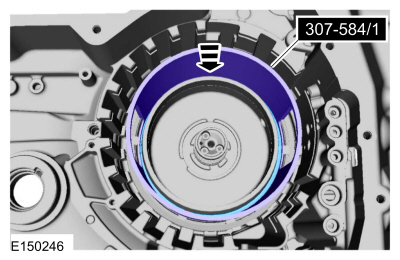
NOTICE: Make sure the return spring is installed correctly with the forward clutch exhaust hole aligned between the inner double tabs and the outer tab at the far clockwise position of the slot on the bottom of the case, or transmission damage may occur.
Install the intermediate (2, 6) clutch return spring. The return spring tabs must engage the piston recesses, and the 2 outer tabs must be at the far clockwise position of the slots at the bottom of the case. The exhaust hole in the piston must be aligned between the inner double tabs of the return spring.- Inner double tabs
- exhaust port
- Outer tabs
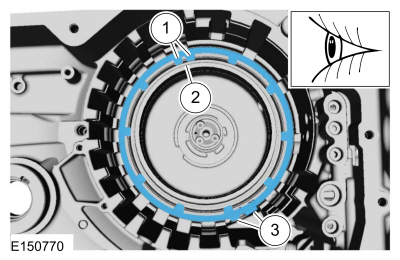
NOTICE: Make sure the snap ring gap faces the front of the transmission case, or transmission damage may occur. The front of the transmission is where the low/reverse and the front (1, 2, 3, 4) clutch hydraulic ports are located.
Install the snap ring in place. Align the snap ring gap with the front of the transmission case.- Snap ring
- Snap ring gap
- Low/reverse and front (1, 2, 3, 4) clutch hydraulic ports (located at the front of the transmission case)
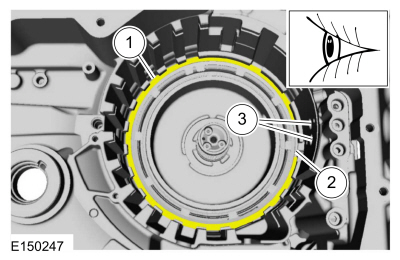
- Install the special tool onto the transmission case to center the intermediate (2, 6) clutch return spring.
Use the special service tool: 307-633 2-6 Piston Return Spring Assembly.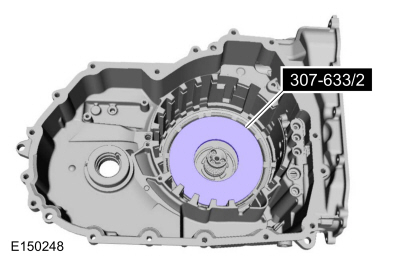
- Install the special tool onto the snap ring.
Use the special service tool: 307-633 2-6 Piston Return Spring Assembly.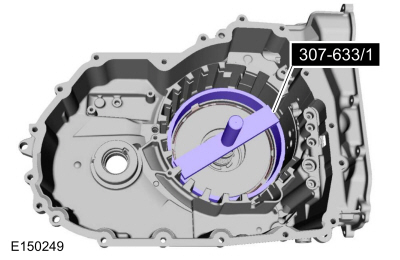
- Install the special tool onto the transmission case.
Use the special service tool: 307-574 Forward Clutch Spring Compressor.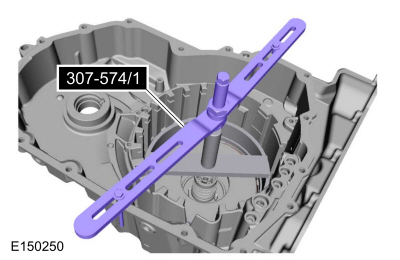
NOTICE: Make sure the return spring is centered, otherwise it may bind on the snap ring groove and damage the transmission case.
Using the special tools, install the intermediate (2, 6) clutch snap ring into the groove.
Use the special service tools: 307-574 Forward Clutch Spring Compressor, 307-633 2-6 Piston Return Spring Assembly.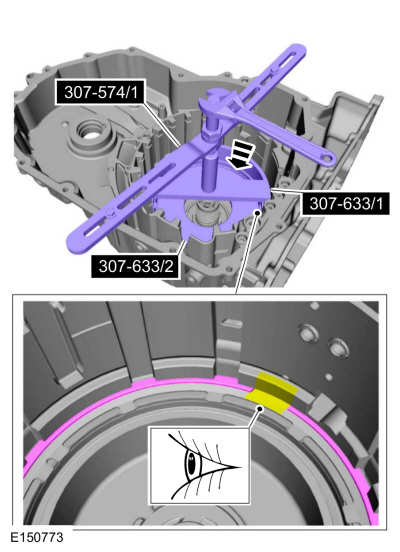
- Install the intermediate (2, 6) clutch backing plate. Press the plate into place.
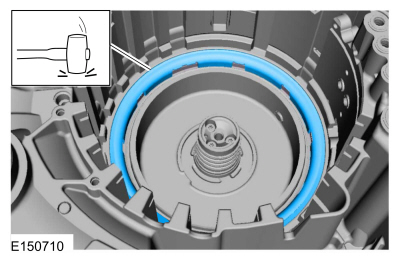
NOTICE: Make sure to install the No. 1 thrust bearing with the flat side facing up, or transmission damage may occur.
Install the No. 1 thrust bearing with the flat side facing up.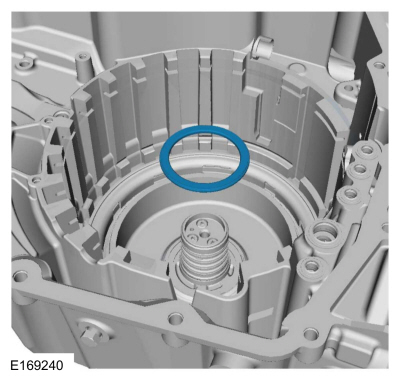
- Install the overdrive/direct clutch assembly.
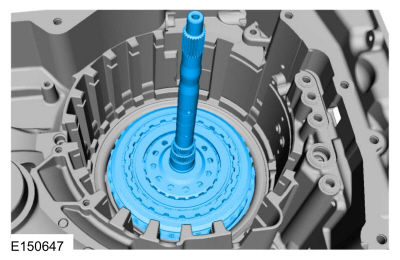
NOTICE: Make sure to install the No. 3 thrust bearing with the flat side facing down, or transmission damage may occur.
Install the No. 3 thrust bearing with the flat side facing down.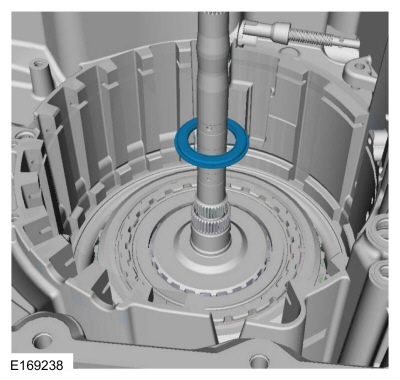
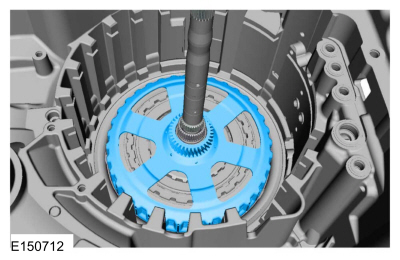
- Install the direct/intermediate clutch hub and rear sun gear assembly.
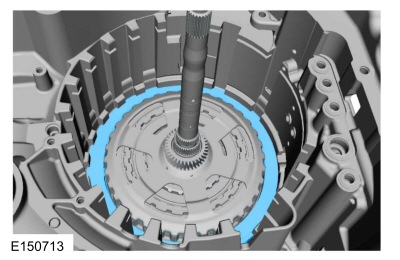
- Install the intermediate (2, 6) wave spring assembly.
- Soak the intermediate clutch (2, 6) assembly in transmission fluid.
Material: Motorcraft® MERCON® LV Automatic Transmission Fluid / XT-10-QLVC (WSS-M2C938-A) (MERCON® LV).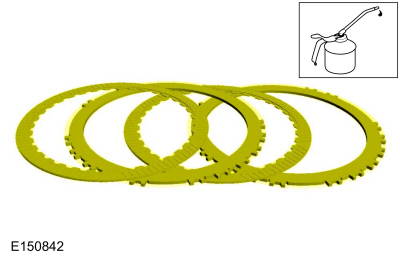
Install the intermediate (2, 6) clutch assembly, temporarily reversing the top friction and steel clutch plates for pack measurement.- Steel plate
- Friction plate
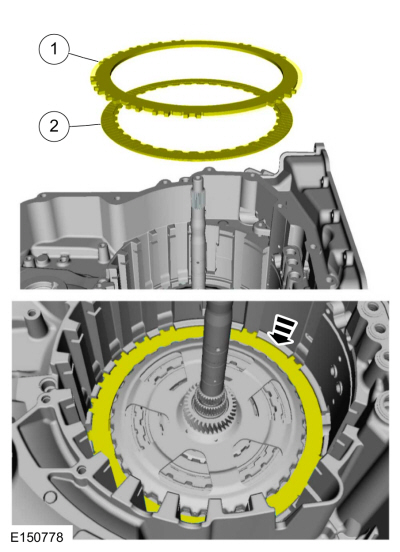
- Install the special tool on the transmission case.
Use special service tool: 307-300 Calibration Plate, Selective Shims.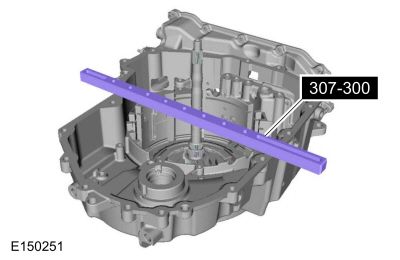
- Using a depth micrometer, measure and record as Measurement A the distance from the special tool to the top of the intermediate (2, 6) clutch pack at 3 different points, and average the 3 distances.
Use special service tool: 307-300 Calibration Plate, Selective Shims.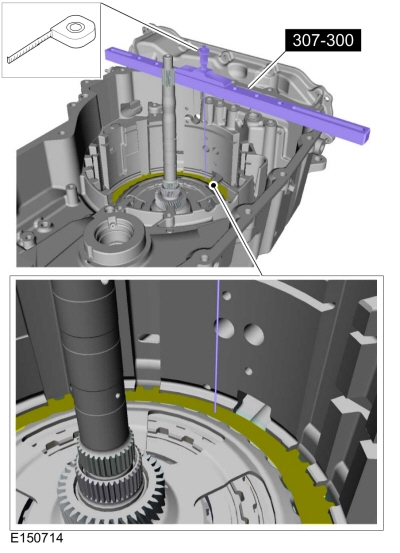
- Using a depth micrometer, measure and record as Measurement B the distance from the top of the special tool to the transmission case step above the intermediate (2, 6) clutch.
Use special service tool: 307-300 Calibration Plate, Selective Shims.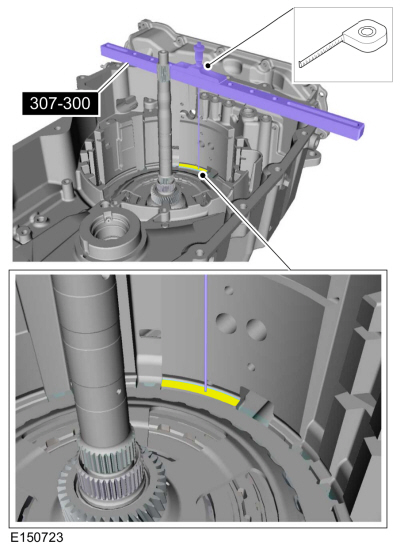
- Subtract Measurement B from Measurement A. The clearance must be between 0.240 mm (0.009 in) and 2.60 mm (0.102 in). If the clearance is out of range, check the intermediate (2, 6) clutch pack for correct installation. If the intermediate (2, 6) clutch pack is installed correctly, install a new clutch pack.
Description Reading Measurement A Measurement B Subtract Measurement B from Measurement A and check that it is within the range of 0.240 mm (0.009 in) and 2.60 mm (0.102 in) - Remove the top intermediate (2, 6) friction and steel clutch plates.
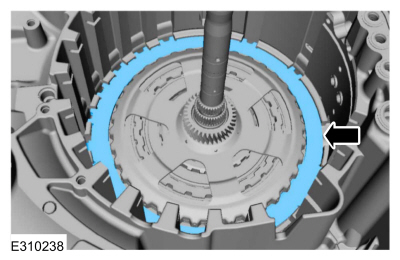
Correctly reinstall the top intermediate (2, 6) friction and steel clutch plates into the transmission case.- Friction plate
- Steel plate
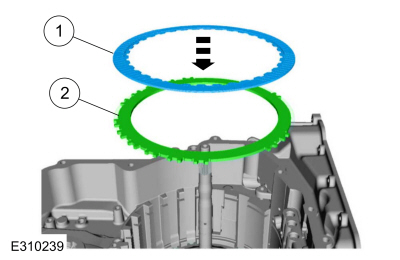
- Install the one-way clutch (OWC) assembly.
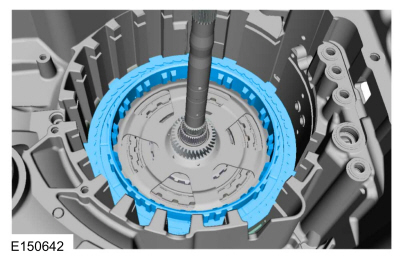
- Install the rear planetary carrier/center sun gear assembly.
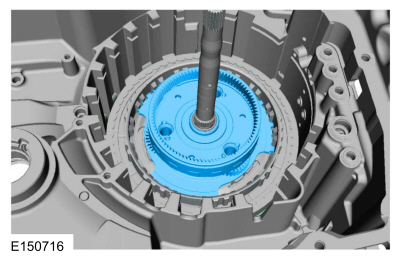
- Position the low/reverse pressure plate so the center support legs pass through the pressure plate and rest on the one-way clutch (OWC), then install the low/reverse pressure plate.
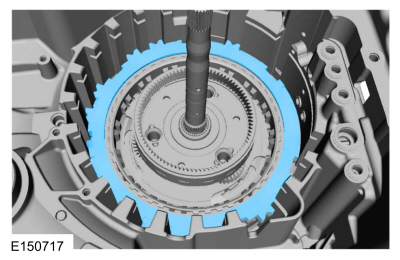
- Soak the low/reverse clutch pack in transmission fluid.
Material: Motorcraft® MERCON® LV Automatic Transmission Fluid / XT-10-QLVC (WSS-M2C938-A) (MERCON® LV).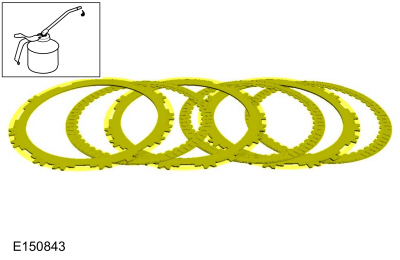
Align the low/reverse clutch friction plates with the pressure plate and install into the transmission case, temporarily reversing the wave spring and top steel plate.- Steel plate.
- Wave spring.
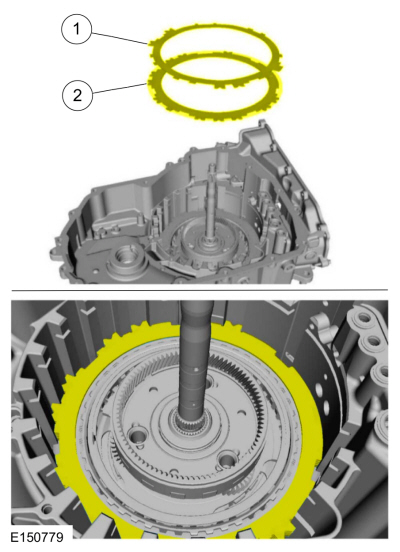
- Install the special tool on the center support side with the long support legs.
Use special service tool: 307-300 Calibration Plate, Selective Shims.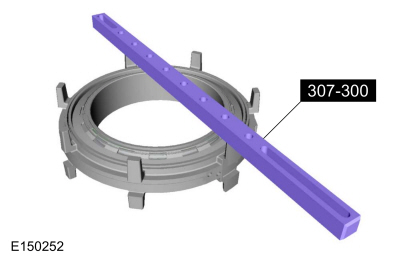
- Using a depth micrometer, measure and record as Measurement A the distance from the top of the special tool to the contact surface of the low/reverse clutch piston.
Use special service tool: 307-300 Calibration Plate, Selective Shims.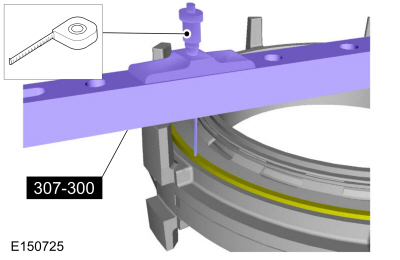
- Using a depth micrometer, measure and record as Measurement B the distance from the top of the special tool to the surface of the center support leg.
Use special service tool: 307-300 Calibration Plate, Selective Shims.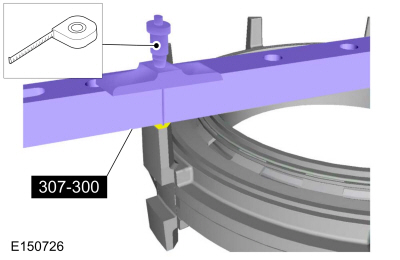
- Subtract Measurement B from Measurement A and record as Measurement C.
Description Reading Measurement A Measurement B Subtract Measurement B from Measurement A and record as Measurement C - Install the special tool on the transmission case.
Use special service tool: 307-300 Calibration Plate, Selective Shims.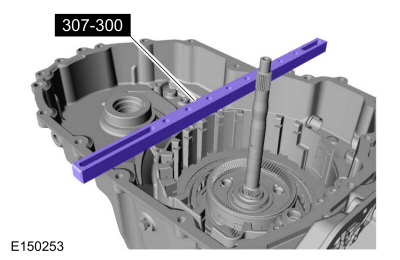
- Using a depth micrometer, measure and record as Measurement D the distance from the special tool to the top of the one-way clutch (OWC).
Use special service tool: 307-300 Calibration Plate, Selective Shims.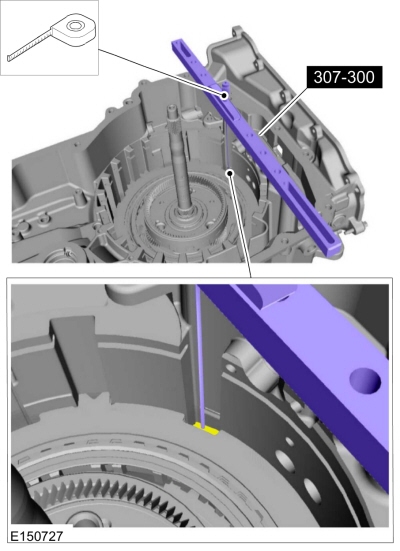
- Using a depth micrometer, measure and record as Measurement E the distance from the top of the special tool to the top of the low/reverse clutch at 3 different points, and average the 3 distances.
Use special service tool: 307-300 Calibration Plate, Selective Shims.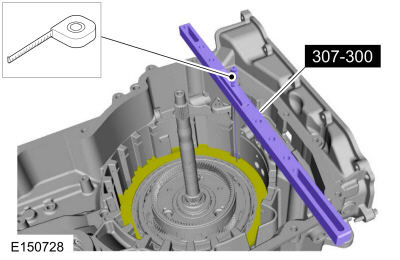
- Subtract Measurement E from Measurement D and record as Measurement F.
Description Reading Measurement D Measurement E Subtract Measurement E from Measurement D and record as Measurement F - Subtract Measurement F from Measurement C to obtain the low/reverse clutch clearance. The clearance must be between 0.406 mm (0.015 in) and 2.000 mm (0.078 in). If the clearance is out of range, check the low/reverse clutch pack for correct installation. If the low/reverse clutch pack is installed correctly, install a new clutch pack.
Description Reading Measurement C Measurement F Subtract Measurement F from Measurement C and check that it is within the range of 0.406 mm (0.015 in) and 2.000 mm (0.078 in)
Remove the top steel plate of the low/reverse clutch and the wave spring, and correctly reinstall the plates into the transmission case.- Wave spring
- Steel plate
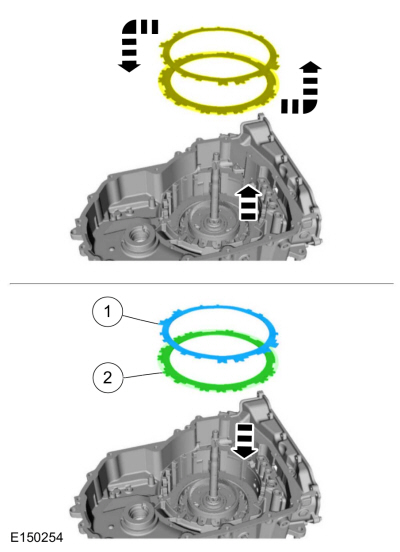
Install the center support with the long legs facing down and the feed holes aligned with the feed holes in the transmission case.- Long center support legs facing down
- Feed holes facing the front of the transmission case.
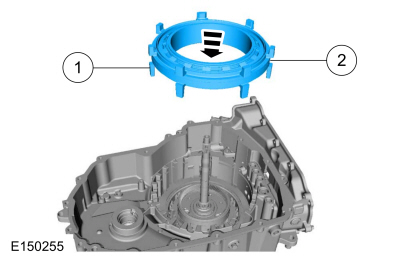
- Install thrust bearing No. 5.
- Install thrust bearing No. 6.
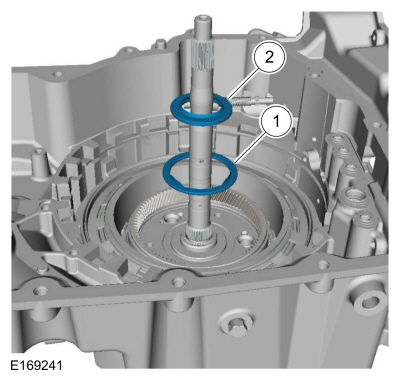
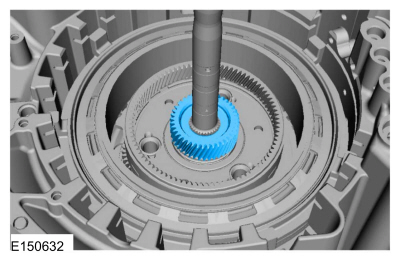
- Install the center planetary sun gear.
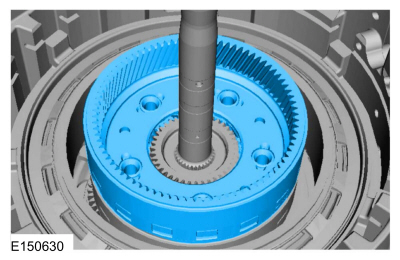
- Install the center planetary carrier/front ring gear assembly.
- Install thrust bearing No. 7.
- Install thrust bearing No. 8.
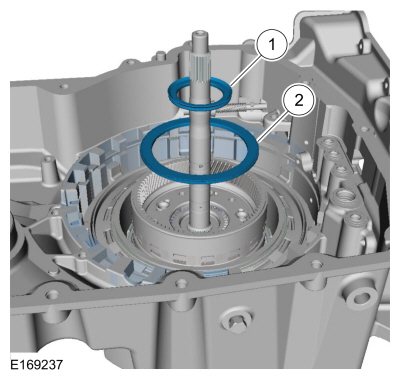
- Install the front planetary/rear ring gear assembly.
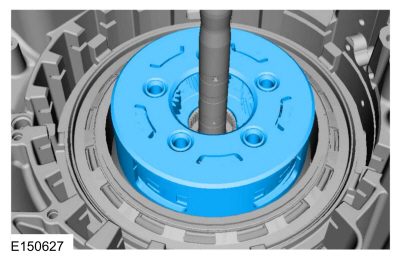
- Install the forward clutch wave spring (1, 2, 3, 4).
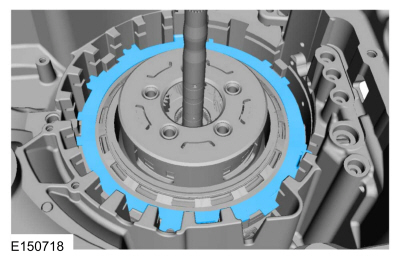
- Soak the forward clutch (1, 2, 3, 4) friction plate pack in transmission fluid.
Material: Motorcraft® MERCON® LV Automatic Transmission Fluid / XT-10-QLVC (WSS-M2C938-A) (MERCON® LV)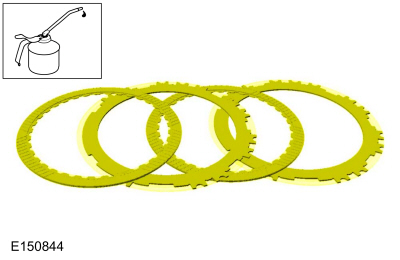
- Install the front (1, 2, 3, 4) clutch pack.
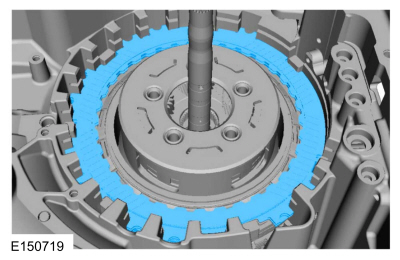
- Install the forward clutch (1, 2, 3, 4) pressure plate.
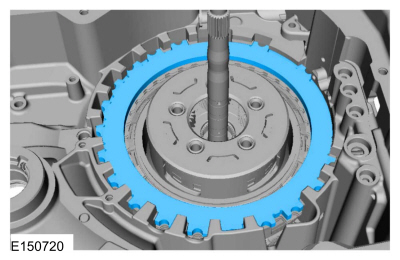
NOTICE: Make sure to install the beveled edge forward clutch (1, 2, 3, 4) snap ring flat side down, or the snap ring may loosen, causing transmission damage.
Install the beveled forward clutch (1, 2, 3, 4) snap ring with the flat side facing down and the gap facing the front of the transmission.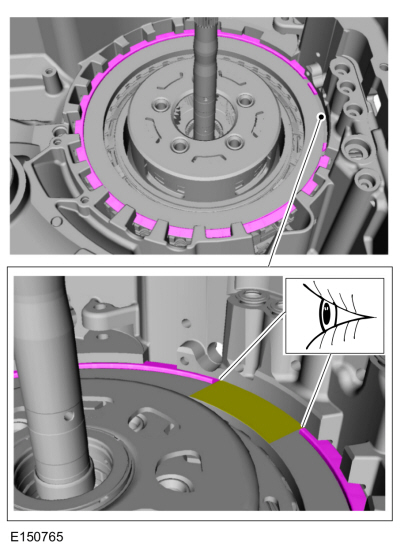
- Seat the snap ring in the snap ring groove.
Use common service equipment: Flat-blade screwdriver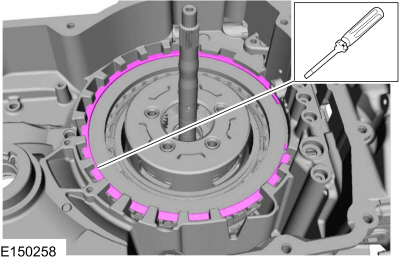
- Install the special service tool or dial indicator on the transmission case and set the front (1, 2, 3, 4) clutch piston friction plate.
Use special service tool: 100-002 (TOOL-4201-C) Dial indicator holding fixture.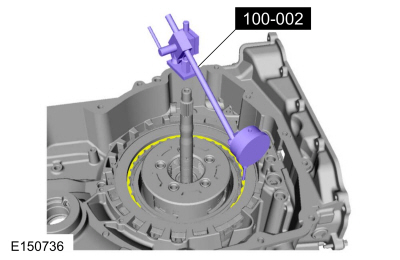
- Install new low/reverse and forward clutch (1, 2, 3, 4) seals connecting the main control to the transmission case.
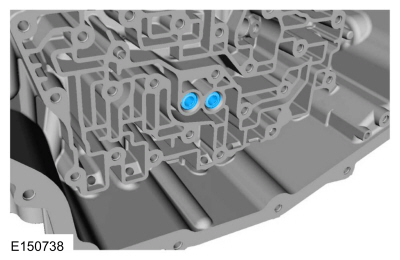
- Apply 483 kPa (70 psi) air pressure to the front (1, 2, 3, 4) clutch piston port while recording the clutch pack clearance on the dial indicator. The clearance must be between 0.076 mm (0.002 in) and 1.840 mm (0.072 in). If the clearance is outside the range, check the front clutch (1, 2, 3, 4) friction plate pack installation and the transmission for correct assembly. If the forward (1, 2, 3, 4) friction plate pack is installed correctly, install a new front (1, 2, 3, 4) clutch pack.
Use special service tool: 100-002 (TOOL-4201-C) Dial indicator holding fixture.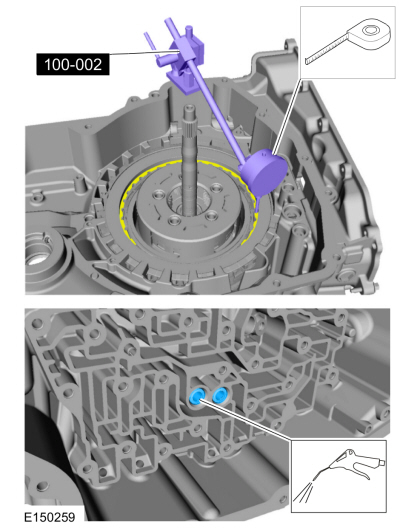
- Install the front planetary sun gear and carrier assembly.
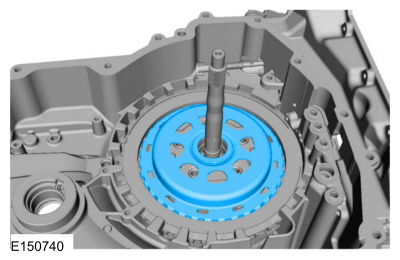
- Install the parking pawl.
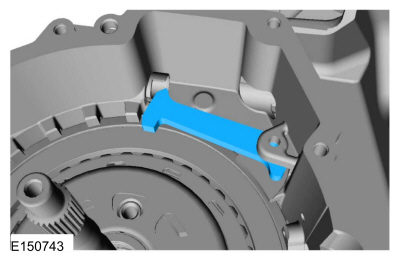
- Install the parking pawl pin and spring.
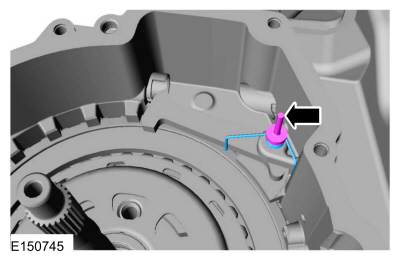
- Install the parking pawl actuator rod to the TR sensor. Set the parking pawl aside and place the parking pawl actuator rod and TR sensor in the transmission case.
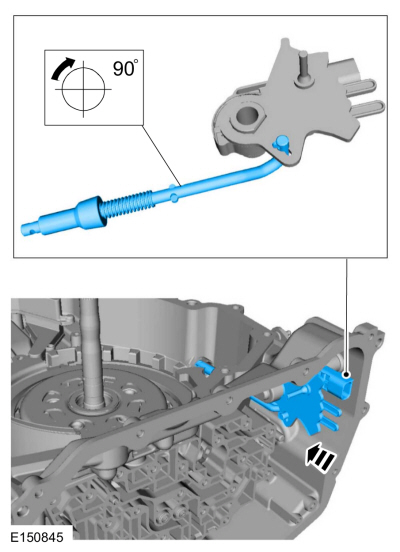
- Install the manual shaft and align the manual shaft pin holes.
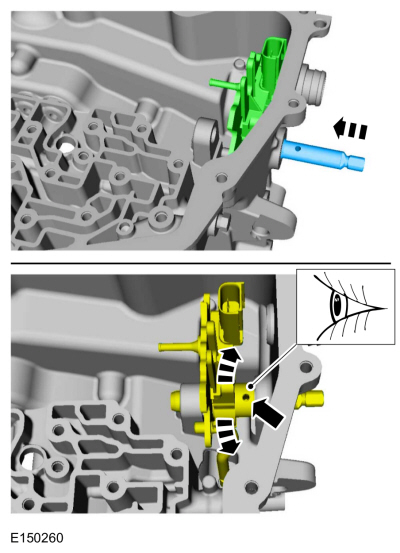
- Install the manual shaft pin.
Use common service equipment: Hammer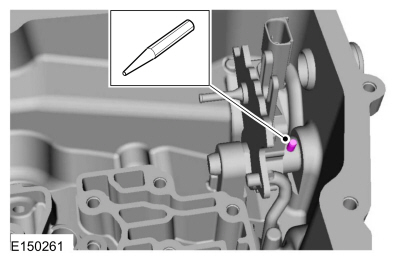
NOTICE: Make sure to hold the manual control lever while tightening the manual control lever nut, or damage to the manual control lever and parking components will occur.
Install the manual lever and manual lever nut.
Torque: 18 lb-ft (24 N·m)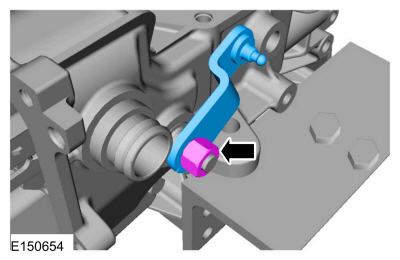
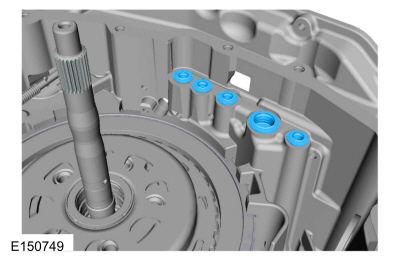
- Install 5 new clutch feed seals.
- Install the transmission fluid baffle in place and install the transmission fluid baffle bolts.
Torque: 106 lb-in (12 N·m)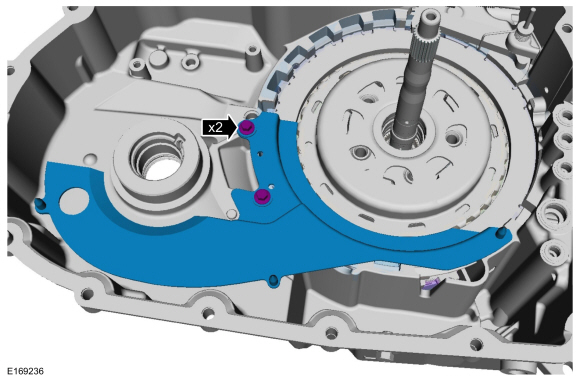
- Install the fluid reservoir in place and install the fluid reservoir bolts.
Torque: 106 lb-in (12 N·m)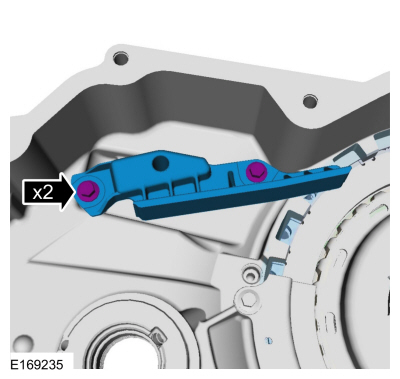
- Install thrust bearing No. 12.
- Install thrust bearing No. 10.
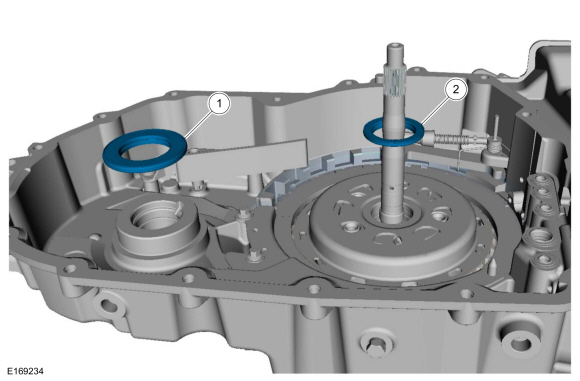
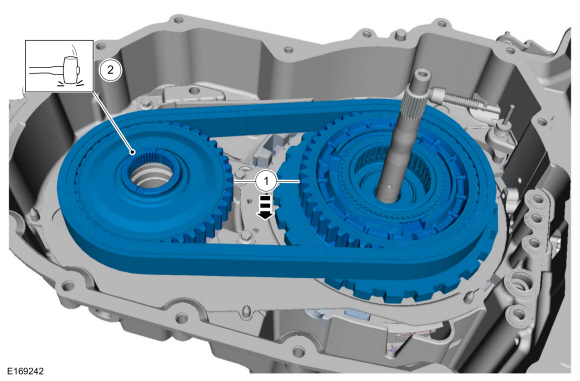
- Simultaneously install the drive/driven sprocket and chain assembly.
- Lightly tap the driven sprocket to make sure it is fully seated in the case.
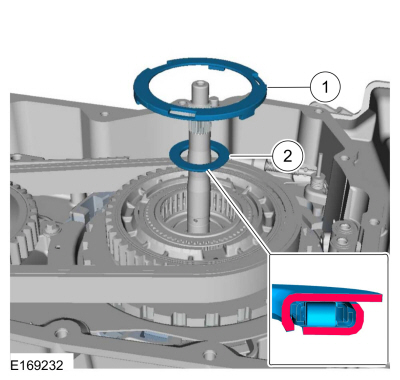
- Install thrust washer No. 13.
- Install thrust bearing No. 11.
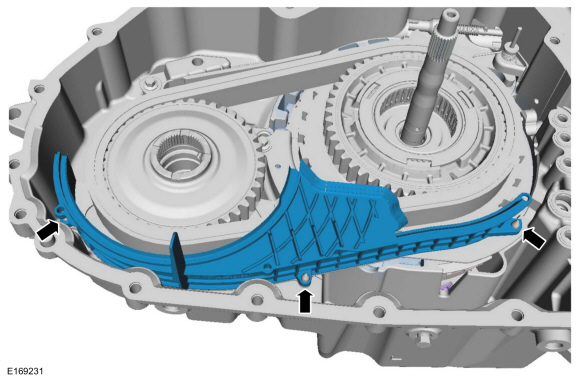
- Install the differential transmission fluid reflector.
- Install the differential sun gear.
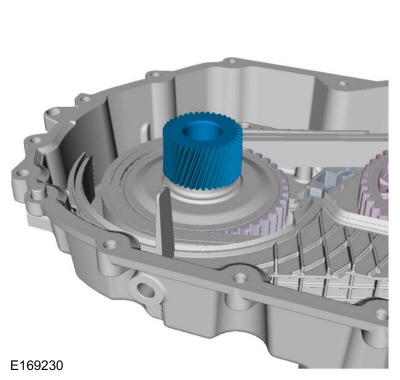
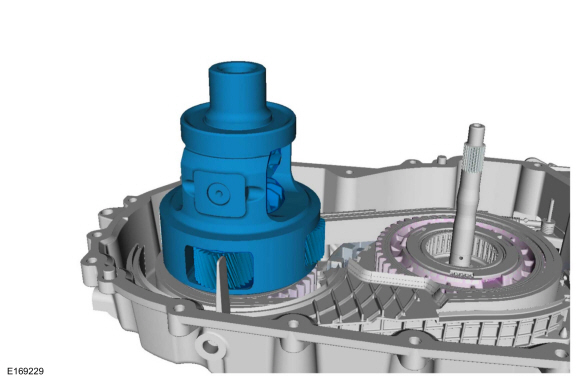
- Install the differential assembly.
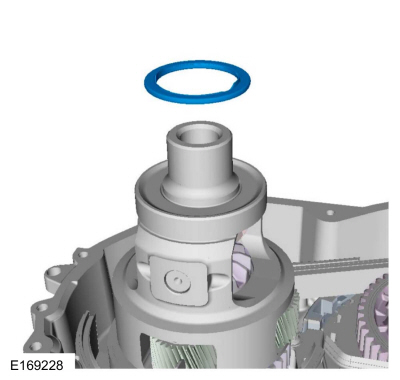
- Install thrust bearing No. 15.
- Install the special tool on the input shaft.
Use the special service tool: 307-635 Protector, Turbine Shaft Seal.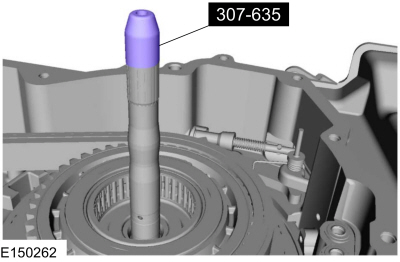
- Assemble the special tools and install the new right axle shaft seal onto them.
Use special service tools: 205-153 (T80T-4000-W) Handle, 307-718 Installer, axle shaft seal.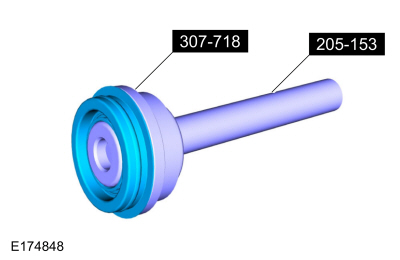
- Using the special tools, install the new right axle shaft seal.
Use special service tools: 205-153 (T80T-4000-W) Handle, 307-718 Installer, axle shaft seal.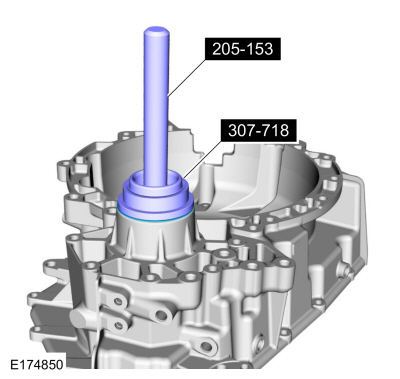
- Assemble the special tools and install the new right axle shaft seal onto them.
Use special service tools: 205-153 (T80T-4000-W) Handle, 307-718 Installer, axle shaft seal.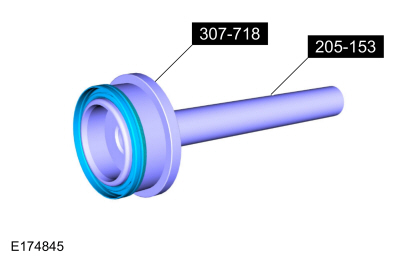
- Using the special tools, install the new right axle shaft seal.
Use special service tools: 205-153 (T80T-4000-W) Handle, 307-718 Installer, axle shaft seal.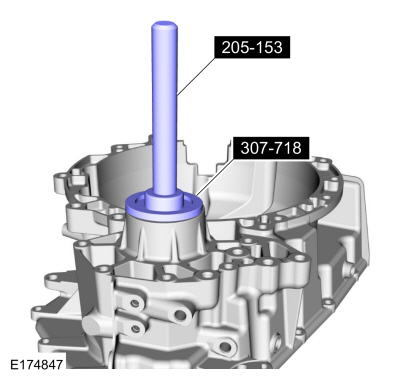
- Install the pump and filter assembly into the torque converter housing and install the torque converter housing bolts.
Torque: 26 lb-ft (35 N·m)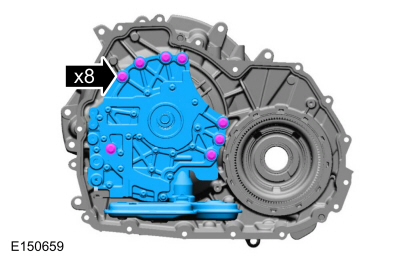
- Apply silicone to the transmission case sealing surface.
Material: Motorcraft® Ultra Silicone Gasket Maker / TA-29 (WSS-M4G323-A8)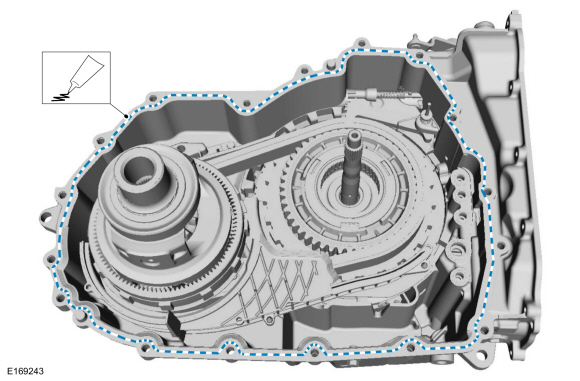
- Install the torque converter housing on the transmission case.
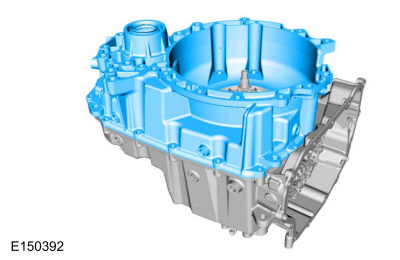
- Install the torque converter housing bolts and the torque converter housing stud.
Torque: 24 lb-ft (32 N·m)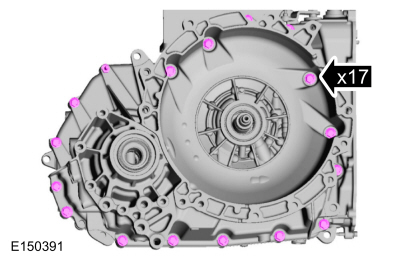
- Remove the special tool.
Remove the special service tool: 307-635 Protector, Turbine Shaft Seal.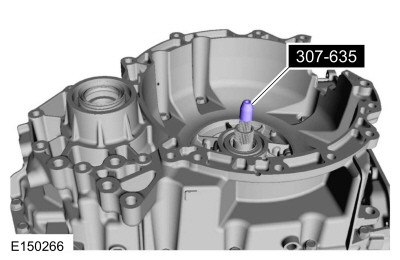
- Install the TSS sensor and TSS sensor bolt.
Torque: 89 lb-in (10 N·m)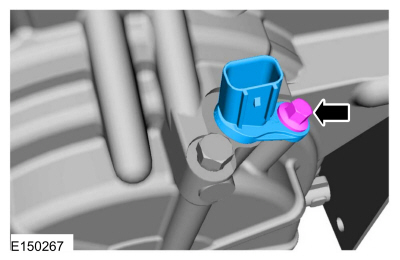
- Install the OSS sensor and OSS sensor bolt.
Torque: 89 lb-in (10 N·m)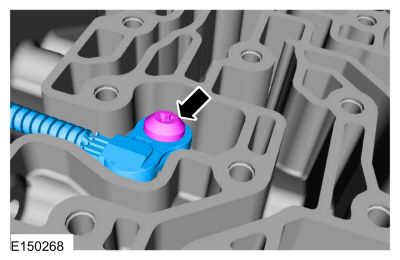
- Install a new separator plate between the main control and the transmission case and align it with the stud and guide pin.
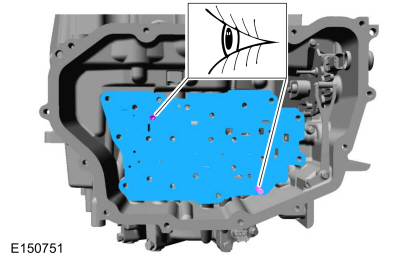
- Install the main control in place and align the manual valve with the TR sensor.
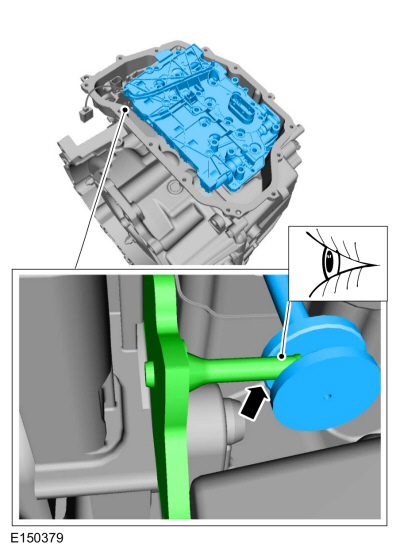
- Install the main control adjusting nut, hand-tightening it.
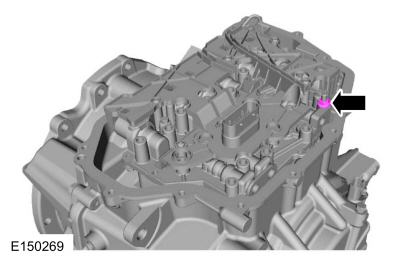
- Hand-tighten the short main lever-to-transmission case bolts.
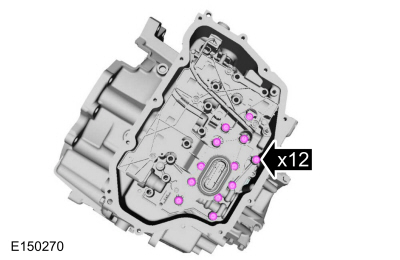
- Hand-tighten the long main lever-to-transmission case bolts.
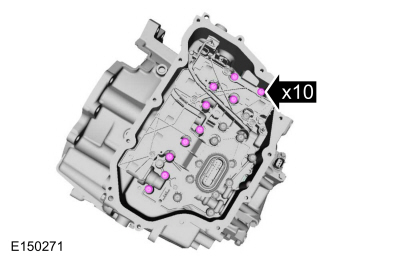
- Tighten the main lever bolts to the transmission case and the main lever nut in a crisscross pattern.
Torque: 89 lb-in (10 N·m)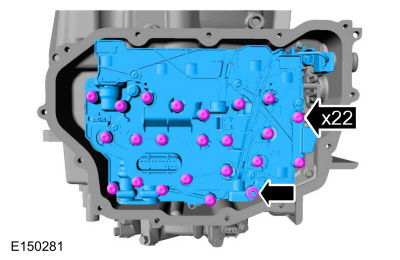
- Place the TR sensor retaining spring in position so the locating tab is in the locating hole, and install the TR sensor retaining spring bolt.
Torque: 115 lb-in (13 N·m)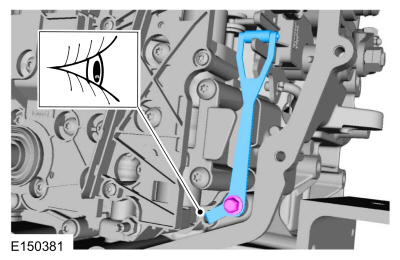
- Install the main control gasket between the main control and the cover.
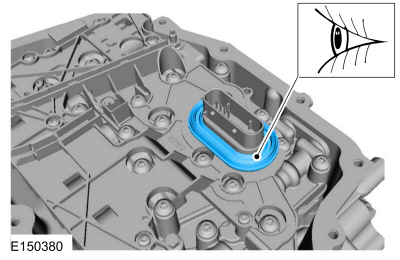
- Connect the TR sensor electrical connector.
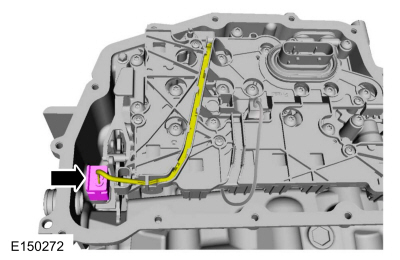
- Connect the OSS sensor electrical connector.
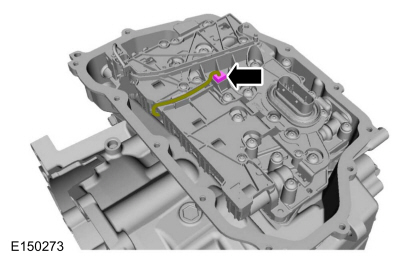
NOTICE: Do not use metal scrapers, wire brushes, power abrasive discs or other abrasive means to clean sealing surfaces. These tools leave scratches and gouges that create leak paths.
Make sure the mating surfaces are clean and free of foreign material.
Refer to: Cleaning and Preparing RTV Sealing Surfaces (303-00 Engine System - General Information, General Procedures).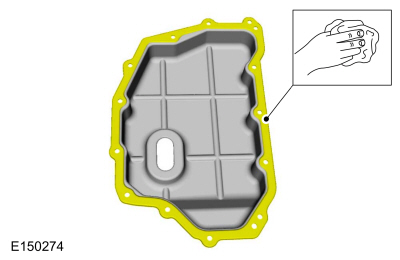
- Apply silicone to the sealing surface of the main control to transmission case.
Material: Motorcraft® Ultra Silicone Sealant / TA-29 (WSS-M4G323-A8)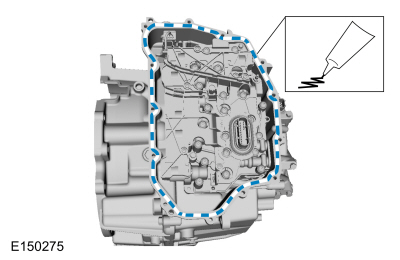
- Install the main control cover, and the main control cover bolts and studs.
Torque: 106 lb-in (12 N·m)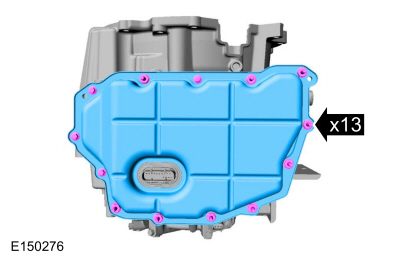
Auto Start-Stop
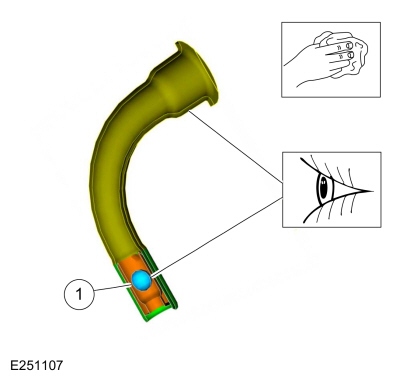
Clean and inspect the auxiliary transmission fluid pump feed tube and check ball.- Check Ball (part of the auxiliary transmission fluid pump feed tube)
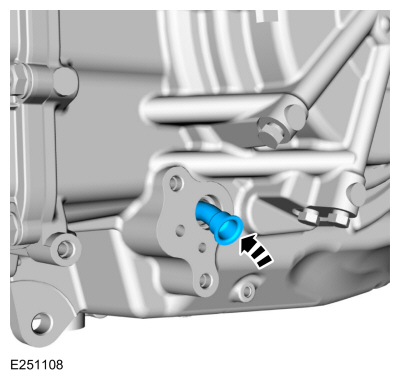
- Install the auxiliary transmission fluid pump feed tube assembly.
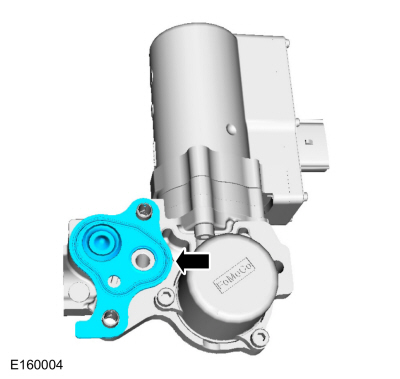
- Install the auxiliary transmission fluid pump gasket.
- Install the auxiliary transmission fluid pump and new bolts.
Torque: 115 lb-in (13 N·m)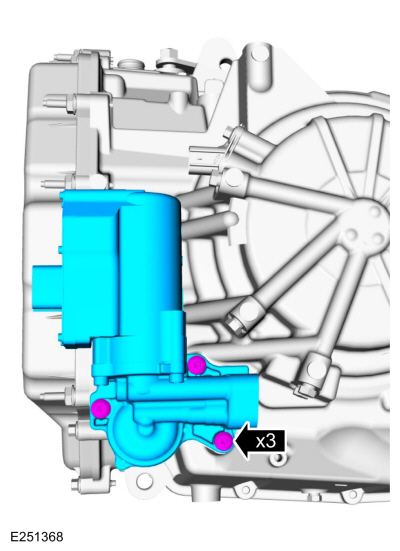
All vehicles
NOTICE: The torque converter is heavy. Take care not to drop it, as this may cause damage.
Using the special tools, install the torque converter.
Use special service tools: 307-091 Handle, torque converter.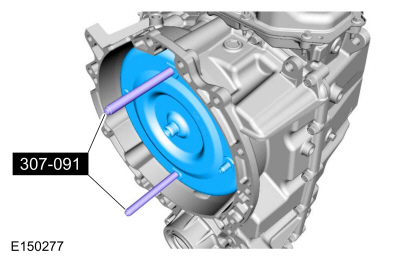
- Install the special tool.
Use special service tool: 307-566 Retainer, torque converter.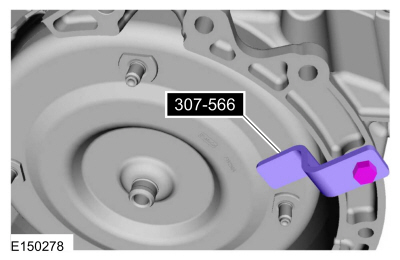
- Remove the transmission from the bench-mounted holder.
Use special service tools: 307-003 (T57L-500-B) Holding fixture, transmission. , 307-625 Fixture, bench mount.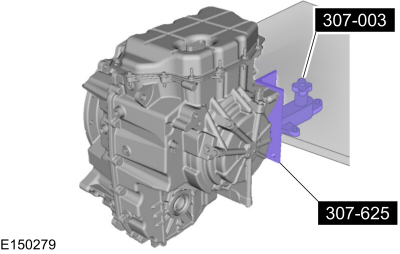
- Remove the special tool.
Use special service tool: 307-625 Fixture, bench mount.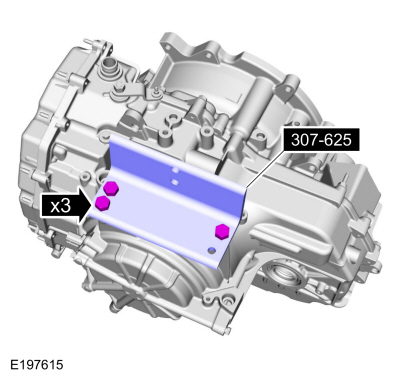
Test yourself
A quick Ford Fusion quiz: every answer comes with an explanation and a link to the manual page.